Hello, my people from the jewelry community, I greet you again. Today I come to show you the beautiful bracelet that I learned to make with Chinese thread. It is a bracelet of woven flowers, I used beads for the center of the flower but since they are very small they are not so noticeable, that is why my recommendation for you if you decide to make this bracelet is that you choose a bead like number eight more or less. I'm not going to go into that much detail since it's a more or less long step by step and I hope you read it to the end. So without anything else to say I leave you with the post.
Hola, mi gente de la comunidad de jewelry, les saludo nuevamente. El día de hoy vengo a mostrarle la hermosura de pulsera que aprendí a hacer con hilo chino. Es una pulsera de flores tejidas, usé mostacillas para el centro de la flor pero como son muy pequeñas no son tan notorias, por eso es que mi recomendación para ustedes si se animan a hacer esta pulsera es que escojan una mostacilla como número ocho más o menos. No me voy a extender tanto ya que es un paso a paso más o menos largo y espero que lo lean hasta el final. Así que sin nada más que decir los dejo con el post.

Materials:
- Yellow Chinese thread, two pieces of 85 cm each and one of 20 cm.
- Green Chinese thread, one piece of 90 cm and another of 50 cm.
- 12 brown beads.
- 2 golden pellets.
- Scissors.
- Meter.
- Lighter.
Materiales:
- Hilo chino color amarillo, dos piezas de 85 cm cada uno y una de 20 cm.
- Hilo chino color verde, una pieza de 90 cm y otra de 50cm.
- 12 Mostacillas marrones.
- 2 Balines dorados.
- Tijeras.
- Metro.
- Encendedor.
Step by Step:
Paso a paso:


1.- We are going to start working with the 50 cm piece of green thread. We are going to tie a small knot at one of the ends.
1.- Vamos a comenzar trabajando con la pieza de hilo de 50 cm de color verde. Vamos a hacer un pequeño nudo por uno de los extremos.

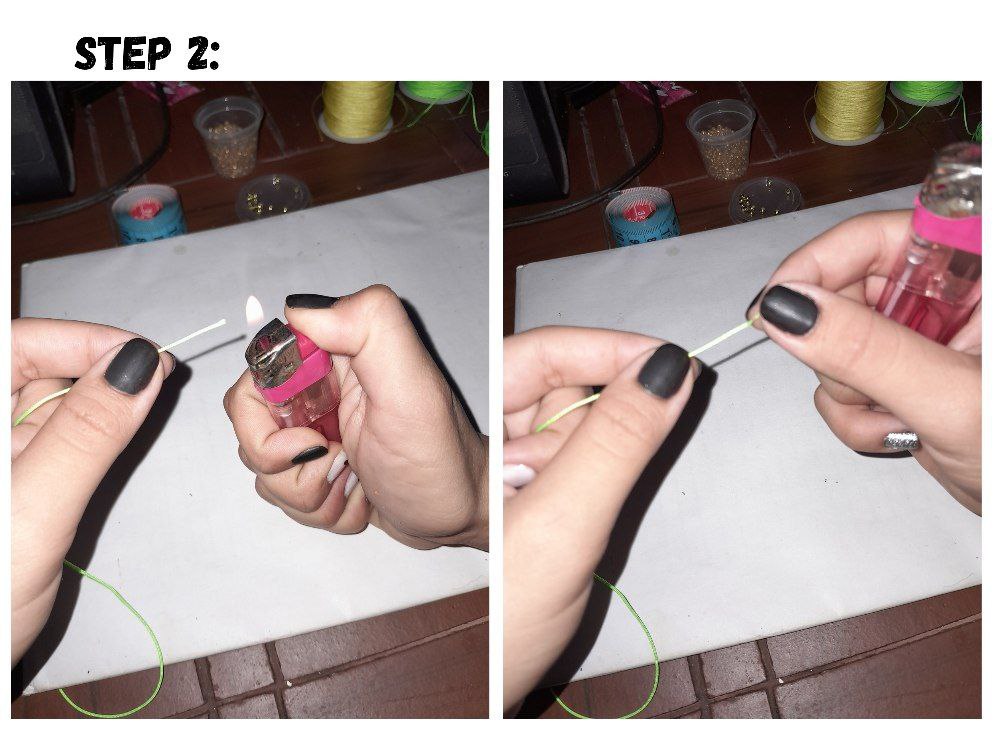
2.- At the other end we are going to outline the point with the help of the lighter because we are going to introduce beads that will be the center of the flowers and this will make our work easier.
2.- Por el otro extremo vamos a perfilar la puntica con ayuda del encendedor porque vamos a introducir mostacillas que serán el centro de las flores y esto nos va a facilitar el trabajo.

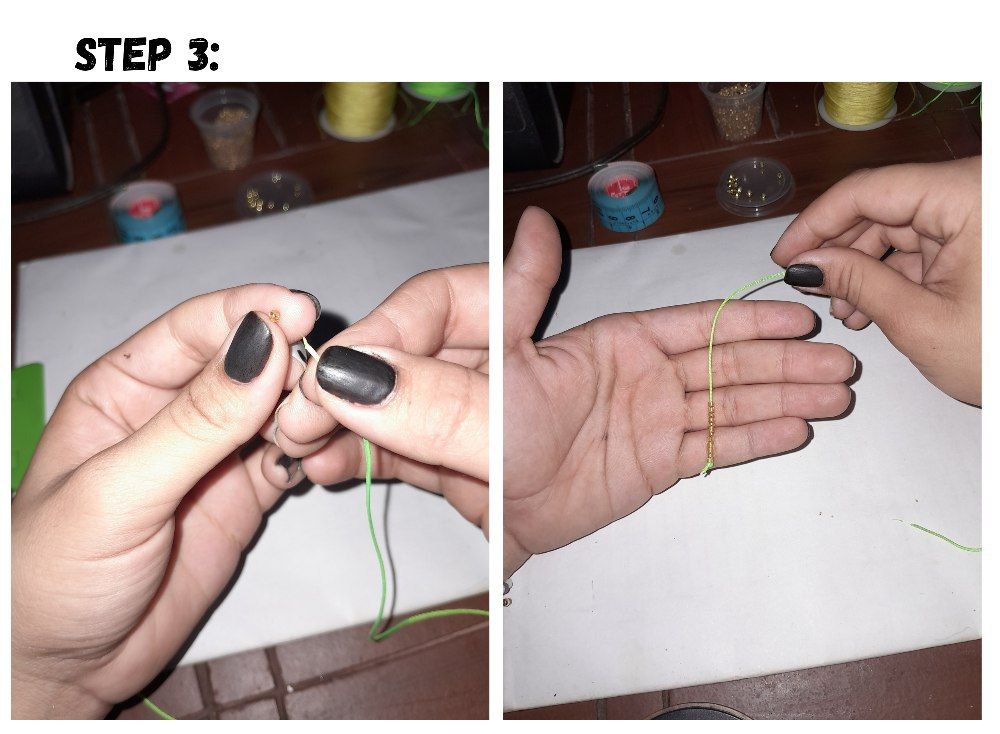
3.- We are going to introduce 12 beads in total, which will be the number of flowers that our bracelet will have.
3.- Vamos a introducir 12 mostacillas en total que va ser la cantidad de flores que va a tener nuestra pulsera.


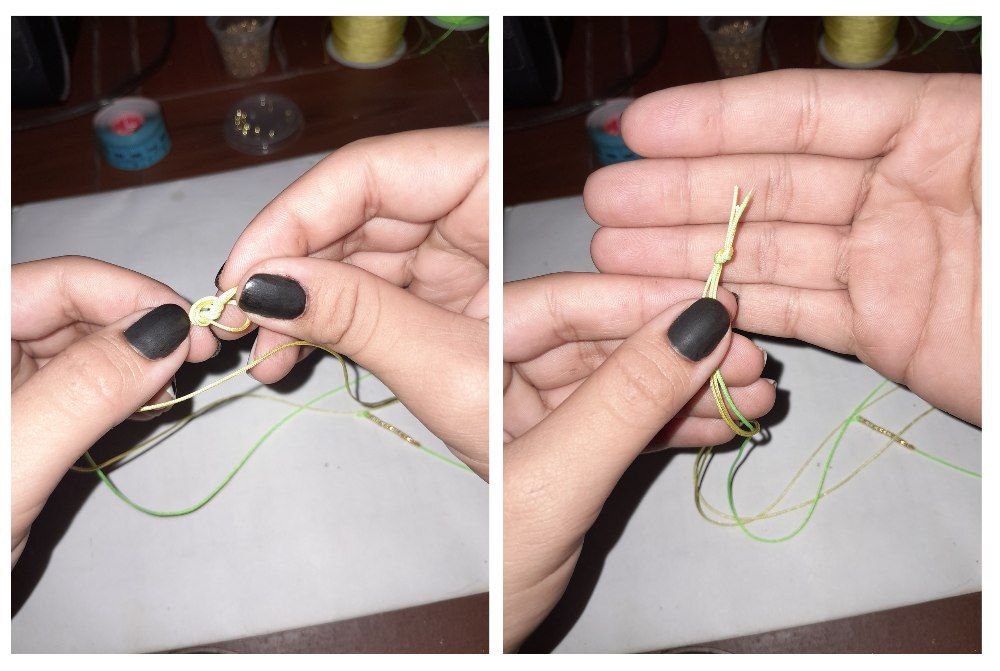
4.- Now we are going to take the other two 85cm pieces of the yellow color. We will take one of the ends of both threads and join it with the end of the green thread through which we inserted the beads. We will tie a small knot with these three threads, leaving the green in the center of the yellow threads, so that they always remain in that position and will not move.
4.- Ahora vamos a tomar las otras dos piezas de 85cm del color amarillo. Tomaremos uno de los extremos de ambos hilos y lo junto con el extremo del hilo verde por donde metimos las mostacillas. Haremos un pequeño nudo con estos tres hilos dejando el verde en el centro de los hilos amarillos, con el fin de que permanezcan siempre en esa posición y no se nos vaya a mover.

5.- I am going to measure 10cm from the point of the knot, which will be the length of the cord to make the sliding knot, from here I will begin to weave the bracelet and I will fix the threads on my work table, in my case I used a board with some hooks but it could be fixed with adhesive tape.
5.- Voy a medir desde el punto del nudo 10cm que será el largo del cordón para hacer el nudo corredizo, ya a partir de acá comenzaré a tejer la pulsera y voy a fijar los hilos en mi mesa de trabajo, en mi caso utilicé una tabla con unos ganchos pero se podría fijar con cinta adhesiva.


6.- We are going to take the 90 cm piece of green thread and we are going to pass it under the three pieces of thread that we have just placed and here we are going to begin to weave four flat knots making sure that the two ends are same length so that when weaving the bracelet there will be no thread missing on either side.
6.- Vamos a tomar la pieza de hilo de 90 cm del color verde y vamos a pasarla por debajo de las tres piezas de hilo que acabamos de poner y aquí vamos a comenzar a tejer cuatro nudos planos asegurándonos de que los dos extremos estén del mismo largo para que a la hora de tejer la pulsera no vaya a quedar faltando hilo en ninguno de los dos lados.


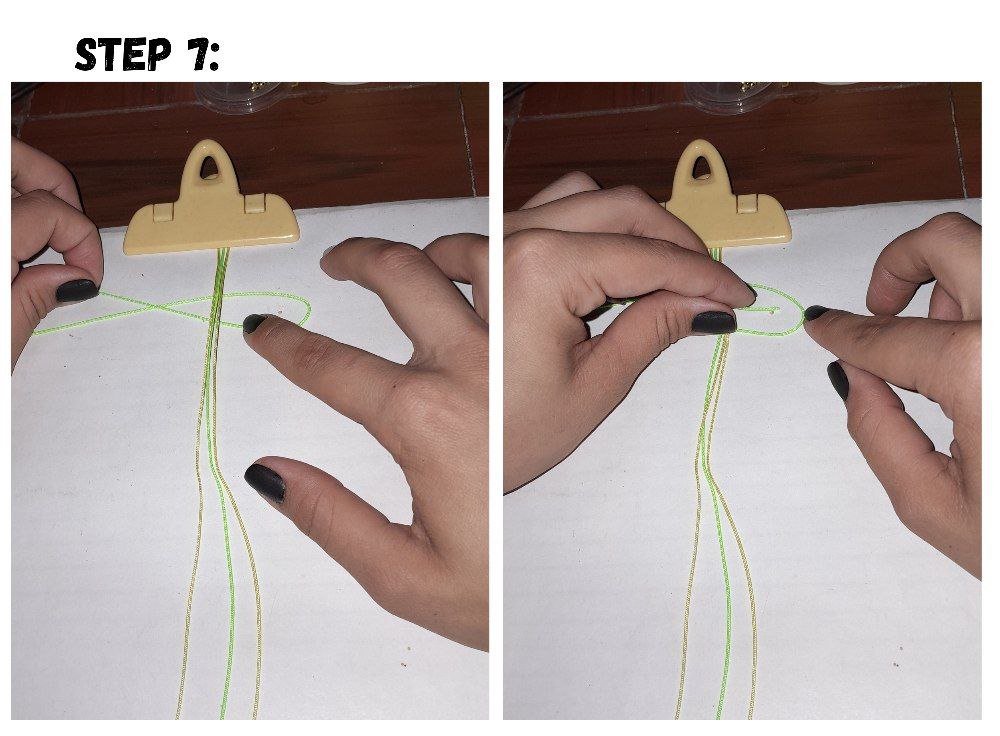
7.-For the flat knot I am going to form a "C" on the right side and on the other side an "X" taking the thread that is underneath to pass it over the center threads and through the middle of the "C" . I pull and I have the first knot ready. Now I will make the second flat knot on the left side doing the same procedure. I will do these two more times to form the four flat knots.
7.-Para el nudo plano voy a formar una "C" del lado derecho y del otro lado una "X" tomando el hilo que esta por debajo para pasarlo por encima de los hilos del centro y por en medio de la "C". Jalo y ya tengo el primer nudo listo. Ahora haré el segundo nudo plano del lado izquierdo haciendo el mismo procedimiento. Haré estos dos veces más para formar los cuatro nudos planos.

8.- The next thing I am going to do is pass the green thread on the left side over the threads in the center to the right side and the one on the right to the left side. Leaving the shape shown in the photo.
8.- Lo siguiente que voy a hacer será pasar el hilo color verde del lado izquierdo por encima de los hilos del centro al lado derecho y el que esta a la derecha al lado izquierdo. Dejando la forma que se muestra en la foto.

9.- Now we are going to take the strand of yellow thread on the left side and we are going to pass the end inside the little ear that has formed on the same left side and I will pass it under the two strands of green thread, we are going to do it Pull very carefully so that it doesn't come apart.
9.- Ahora vamos a tomar la hebra del hilo amarillo del lado izquierdo y vamos a pasar el extremo por dentro de la orejita que se nos ha formado del mismo lado izquierdo y pasare por debajo de las dos hebras de hilo verde, lo vamos a jalar con mucho cuidado para que no se nos vaya a desarmar.


10.- And we will do the same with the thread on the right side, we take the end and pass it through the little ear that formed and under the two green strands. Now we are going to begin to close it very carefully so that it does not fall apart, we support ourselves with our fingers and begin to pull until it is as warm as we can.
10.- Y haremos lo mismo con el hilo del lado derecho, tomamos el extremo y lo pasamos por la orejita que se nos formó y por debajo de las dos hebras verdes. Ahora lo vamos a comenzar a cerrar con mucho cuidado para que no se nos desbarate, nos apoyamos con los dedos y comenzamos a jalar hasta que nos quede lo mejor templadas que podamos.

11.-Now we are going to take the green thread and we are going to put it parallel to the central strand. We are going to remove the other two yellow strands so that it remains above those green ones.
11.-Ahora vamos a tomar el hilo verde y vamos a ponerlo paralelo a la hebra central. Vamos a sacar las otras dos hebras amarillas para que nos quede por encima de esos verdes.


12.- We are going to take the yellow thread on the left side and put it above the green thread on that same side, and we are going to take the end of the left yellow thread and pass it under the green thread and inside the ear of the yellow thread Let's put it as close as possible to the two yellow knots we have up here.
12.- Vamos a tomar la hebra amarilla del lado izquierdo y a ponerla por encima del hilo verde de ese mismo lado, y vamos a coger el extremo del hilo amarillo izquierdo y pasarlo por debajo del hilo verde y por dentro de la orejita del hilo amarillo.Vamos a ponerlo lo más pegado posible a los dos nudos que tenemos aquí arriba amarillo.


13.- Now again we are going to take the yellow cord but this time we are going to pass it under the green thread and we take it out to form the ear, and now we pass that end inside the ear but above the green cord.
13.- Ahora nuevamente vamos a coger el cordón amarillo pero esta vez vamos a pasarlo por debajo del hilo verde y lo sacamos formamos la orejita, y ahora ese extremo lo pasamos por dentro de la orejita pero por encima del cordón verde.


14.-There we have two knots, now again we are going to pass the yellow thread over the green one and now we are going to take it out under the green one and outside the ear. And again we take the yellow cord, we pass it under the green one and we take it out over the green one in this case and inside the ear and we now have the knots that correspond to the left side.
14.-Ahí llevamos dos nudos, ahora nuevamente el hilo amarillo lo vamos a pasar por encima del verde y ahora lo vamos a sacar por debajo del verde y por afuera de la orejita. Y nuevamente tomamos el cordón amarillo lo pasamos por debajo del verde y lo sacamos por encima en este caso del verde y por dentro de la orejita y ya tenemos los nudos que corresponden al lado izquierdo.


15.- Now we are going to work with the right side. We are going to take the yellow cord again, we pass it over the green cord forming an ear and we pass the other end under the green cord and outside the ear. We take the yellow cord, we pass it under the green cord, we form the ear, and now we bring the yellow cord above the green cord and inside the ear.
15.- Ahora vamos a trabajar con el lado derecho. Vamos a tomar nuevamente el cordón amarillo, lo pasamos por encima del cordón verde formando una orejita y pasamos el otro extremo por debajo del cordón verde y por fuera de la orejita. Tomamos el cordón amarillo, lo pasamos por debajo del cordón verde, formamos la orejita, y ahora llevamos el cordón amarillo por encima del cordón verde y por dentro de la orejita.


16.- The same thing again, the yellow cord passes over the green one forming a little ear and we take the other end under the green cord and outside the little ear. And the last knot then we take the yellow cord, we pass it under the green cord, we form the ear, and we take the other end of the yellow cord and pass it over the green cord and inside the ear.
16.- Nuevamente lo mismo, el cordón amarillo pasa por encima del verde formando una orejita y sacamos el otro extremo por debajo del cordón verde y por fuera de la orejita. Y el último nudo entonces tomamos el cordón amarillo, lo pasamos por debajo del cordón verde, formamos la orejita, y tomamos el otro extremo del cordón amarillo y lo pasamos por encima del cordón verde y por dentro de la orejita.

17.- And here we have all the sides of the flower, now what we are going to do is close it. But before that we are going to take one of the beads that we have placed from the central cord and raise one of the beads and put it in the middle of the flower.
17.- Y ya aquí tenemos todos los lados de la flor, ahora lo que vamos a hacer es cerrarla. Pero antes de eso vamos a tomar del cordón central una de las mostacillas que hemos puesto y subimos una de las mostacillas y la vamos a poner en el medio de la flor.

18.- Now we are going to take the two green cords and put them on top and we are going to put the yellow ones below the green ones so that they are facing outside and the two yellow ones are facing inside.
18.- Ahora vamos a tomar los dos cordones verdes y los ponemos por encima y los amarillos los vamos a poner por debajo de los verdes haciendo que nos queden hacia fuera y los dos amarillos hacía adentro.


19.- Once they are in that position, we take the green cord on the left side and pass it to the right side and we pass the one on the right side to the left, forming two little ears. We take one of the sides of the yellow thread, in this case the left, and we are going to pass the other end inside the ear and under the two green cords, and we are going to close it. Now we take the one on the right side, put it inside the ear and pass it under the two green cords. We begin to close carefully so that it does not come apart and the knots remain well tied. We will close little by little. And this is how we have the first flower ready.
19.- Una vez estén en esa posición, tomamos el cordón verde del lado izquierdo y lo pasamos al lado derecho y el del lado derecho lo pasamos a la izquierda formándonos dos orejitas. Tomamos uno de los lados del hilo amarillo, en este caso el izquierdo, y vamos a pasar el otro extremo por dentro de la orejita y por debajo de los dos cordones verde, y vamos a ir cerrando. Ahora tomamos el del lado derecho lo ponemos dentro de la orejita y lo pasamos por debajo de los dos cordones verdes. comenzamos a cerrar con cuidado para que no se nos vaya a desbaratar y nos quede bien hecho los nudos vamos a ir cerrando poco a poco. Y así es como tenemos lista la primera flor.


20.- Now what we are going to do is knit two flat knots with the green cord, tying the three cords in the center.
20.- Ahora lo que vamos a hacer es tejer dos nudos planos con el cordón verde amarrando los tres cordones del centro.


21.- Here we are going to start weaving the second flower, repeating the entire previous process.
21.- Aquí vamos a comenzar a tejer la segunda flor, repitiendo todo el proceso anterior.


22.- We are going to do the same procedure until we run out of beads, that is, until we have 12 flowers ready.
22.- Vamos a hacer el mismo procedimiento hasta que se nos terminen las mostacillas, es decir, hasta que tengamos listas 12 flores.


23.- We finish the weaving with four more flat knots.
23.- Finalizamos el tejido con otros cuatro nudos planos.


24.- We are going to cut the strands of the green thread and we are going to finish off by burning the ends. We cut leaving a point and hide other strands that we do not want to burn, and we burn.
24.- Vamos a cortar las hebras del hilo verde y vamos a rematar quemando las puntas. Cortamos dejando una puntica y escondemos otras hebras que no queremos quemar, y quemamos.


25.- We are going to take the green thread from the center and cut the other two yellow ones and burn them in the same way as the previous one. Before cutting the threads at the other end, we are going to cut the knot we made at the beginning.
25.- Vamos a tomar el hilo verde del centro y cortamos los otros dos amarillos y de la misma manera que la anterior quemamos. Antes de cortar los hilos del otro extremo vamos a cortar el nudo que hicimos al inicio.


26.- We take the two ends of the bracelet and we are going to even them out with the scissors. I insert a bead into each of the ends to give the ends a better finish and I tie a knot so they don't escape. And we cut the excess threads.
26.- Tomamos los dos extremos de la pulsera y lo vamos a igualar con la tijera. Introduzco una mostacilla en cada uno de los extremos para darle un mejor acabado a las puntas y le hago un nudo para que no se escapen. Y cortamos los hilos excedentes.


27.- We take the ends of the bracelet and join them together and with the 20cm thread we are going to close the bracelet with a slip knot with a flat knot.
27.- Tomamos los extremos de la pulsera y los juntamos y con el hilo de 20cm vamos a cerrar la pulsera con un nudo corredizo de nudo plano.


28.- Just like we did before, we are going to cut the excess threads and burn them. And now we have finished this bracelet.
28.- Igual que hicimos antes vamos a cortar los hilos excedentes y los quemamos. Y ya finalizamos esta pulsera.

All photos were taken from my Samsung A14 phone, and edited in Canva.
Me encantó el resultado. A pesar de que no destaca mucho la mostacilla de la flor yo la veo muy linda. El paso a paso muy bien explicado. Gracias por compartir tu creación ☑️🙋🏾♀️🫂😃👍🏾😊
The recipe is good, I hope it is delicious and I can make it one day.
Te quedó muy linda y llamativa amiga, excelente trabajo.
Wow hermoso trabajo
.me encanta este color!
Quedó muy linda!
Nos encantó el proceso y el resultado de esta hermosa pulsera en macramé, tienes razón, las mostacillas más grandes deben verse un poco más, siempre trabajamos con lo que tenemos a mano y esto te ha quedado genial, un proceso fantástico y pulcro, continúa creando se te da muy bien 👍 😉
Recuerda hacer comunidad, comentar y siempre responder, es importante para que sigas creciendo.
Yo lo amé. Ya con los colores me tienes ganada. Jajaja. Es un diseño fresco y juvenil. Aunque también lo podemos usar sin distinción de edades ya que las flores son un clásico en cuanto a accesorios para damas.
Saludos