feliz y bendecido día tengan todos ustedes mis queridos y apreciados amigos creativos, el día de hoy a pesar de que tristemente ya terminó el concurso propuesto por esta hermosa comunidad en la que nos invitaron a realizar un bello accesorio que nos identificara con nuestro bello país quise De igual manera compartirles estos hermosos zarcillos que elaboré con el tricolor de la bandera de mi amada Venezuela. Son unos zarcillos súper sencillos pero la verdad que este tricolor le da una belleza increíble.
Have a happy and blessed day to all of you my dear and appreciated creative friends, today despite the fact that sadly the contest proposed by this beautiful community has already ended in which they invited us to make a beautiful accessory that would identify us with our beautiful country, I wanted Likewise, I would like to share with you these beautiful earrings that I made with the tricolor of the flag of my beloved Venezuela. They are super simple tendrils but the truth is that this tricolor gives it incredible beauty.
I invite you to accompany me in this step by step so that together we can create this beautiful design which is ideal to show off with great pride and emotion that beautiful tricolor that we carry in our hearts.
- alambre de bisutería calibre 20.
- alambre de bisutería calibre 26.
- cristales Amarillos.
- Cristales azul.
- cristales Rojo
- Piedras perladas
- Pinza de bisutería.
- 20 gauge jewelry wire.
- 26 gauge jewelry wire.
- Yellow crystals.
- Blue crystals.
- Red crystals
- Pearly stones
- Jewelry clamp.

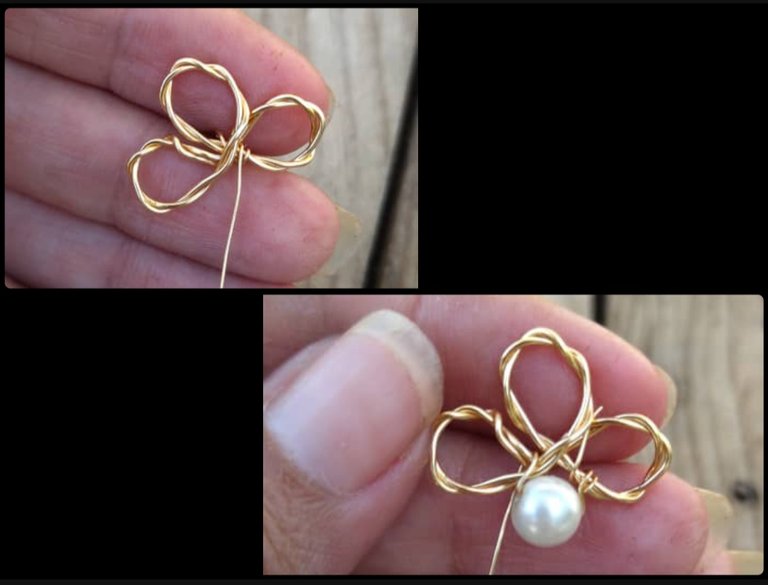
⭐ Paso 1: para iniciar la elaboración de este hermoso diseño lo primero que debemos hacer es tomar el alambre de bisutería calibre 20 y cortaremos un pedazo de 15 cm aproximadamente el cual doblaremos en dos y comenzaremos a unir ambas hebras enrollando mutuamente tal cual pueden observar en las siguientes imágenes. Ensayaremos las dos hebras de alambre De punta a punta y luego con ayuda de la pinza de bisutería iniciaremos a realizar la base que será una pequeña flor de trébol es decir con la pinza elaboraremos tres pequeñas pétalos moldeando que queden en forma de media luna como pueden observarla En las siguientes imágenes y si nos queda un acceso de alambre lo golpearemos hacia la parte de atrás y podemos cortarlo ahora o dejarlo para el último momento.
⭐ Step 1: to start making this beautiful design, the first thing we must do is take the 20-gauge jewelry wire and we will cut a piece of approximately 15 cm which we will fold in two and begin to join both strands by winding each other like this. which you can see in the following images. We will test the two strands of wire from end to end and then with the help of the jewelry tweezers we will begin to make the base, which will be a small clover flower, that is, with the tweezers we will make three small petals, molding them to be in the shape of a half-moon as they can. Observe it in the following images and if we have a wire access left we will hit it towards the back and we can cut it now or leave it for the last moment.

⭐ Paso 2: para continuar como ya tenemos la base principal que es nuestro trébol ahora tomaremos un pedazo largo aproximadamente 30 cm de alambre de bisutería calibre 26 y lo uniremos a la parte central de nuestro trébol y por este alambre introduciremos la piedra perlada la cual colocaremos exactamente en la parte central baja de nuestro trébol enrollando el alambre pasándolo de un extremo al otro.
⭐ Step 2: to continue as we already have the main base which is our clover, now we will take a long piece of approximately 30 cm of 26 gauge jewelry wire and we will attach it to the central part of our clover and through this wire we will insert the stone pearl which we will place exactly in the lower central part of our clover, winding the wire passing it from one end to the other.

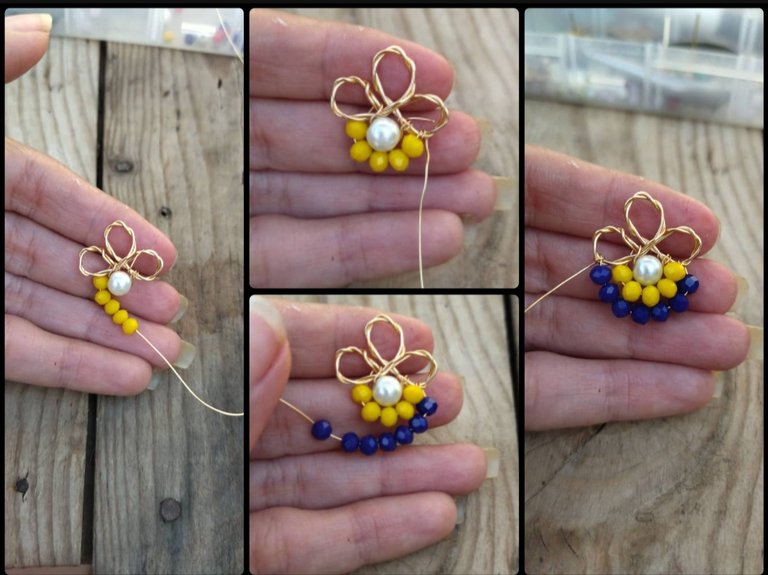
⭐ Paso 3: ahora por el mismo alambre de bisutería calibre 26 introduciremos los cristales amarillos utilicé cuatro cristales amarillos los cuales moldee la parte de abajo de la piedra perlada en forma de medio círculo llevando el alambre y empollándolo en el otro extremo de nuestra base Es decir llevándolo de un pétalo al otro como pueden observar en las imágenes a continuación. De esta misma manera introduciremos los cristales color azul pero en mayor cantidad ya que a mordear por debajo de los cristales amarillos necesitaremos mayor cantidad de cristales en mi caso utilicé siete cristales azules para llevar la tira de un extremo al otro. para terminar nuestro tricolor nos faltan los cristales rojo los cuales introduciremos a continuación 13 cristales rojos para que nos quede en forma semicircular de un extremo al otro y así cortaremos el exceso de alambre calibre 26 pues ya tenemos nuestro diseño tricolor elaborado.
⭐ Step 3: now using the same 26 gauge jewelry wire we will introduce the yellow crystals. I used four yellow crystals which I molded the bottom part of the pearl stone in the shape of a half circle, taking the wire and nesting it at the other end of our base That is, taking it from one petal to the other as you can see in the images below. In this same way we will introduce the blue crystals but in greater quantity since to bite below the yellow crystals we will need a greater amount of crystals. In my case I used seven blue crystals to take the strip from one end to the other.
To finish our tricolor we are missing the red crystals which we will then introduce 13 red crystals so that it remains in a semicircular shape from one end to the other and thus we will cut the excess 26 gauge wire since we already have our tricolor design made.


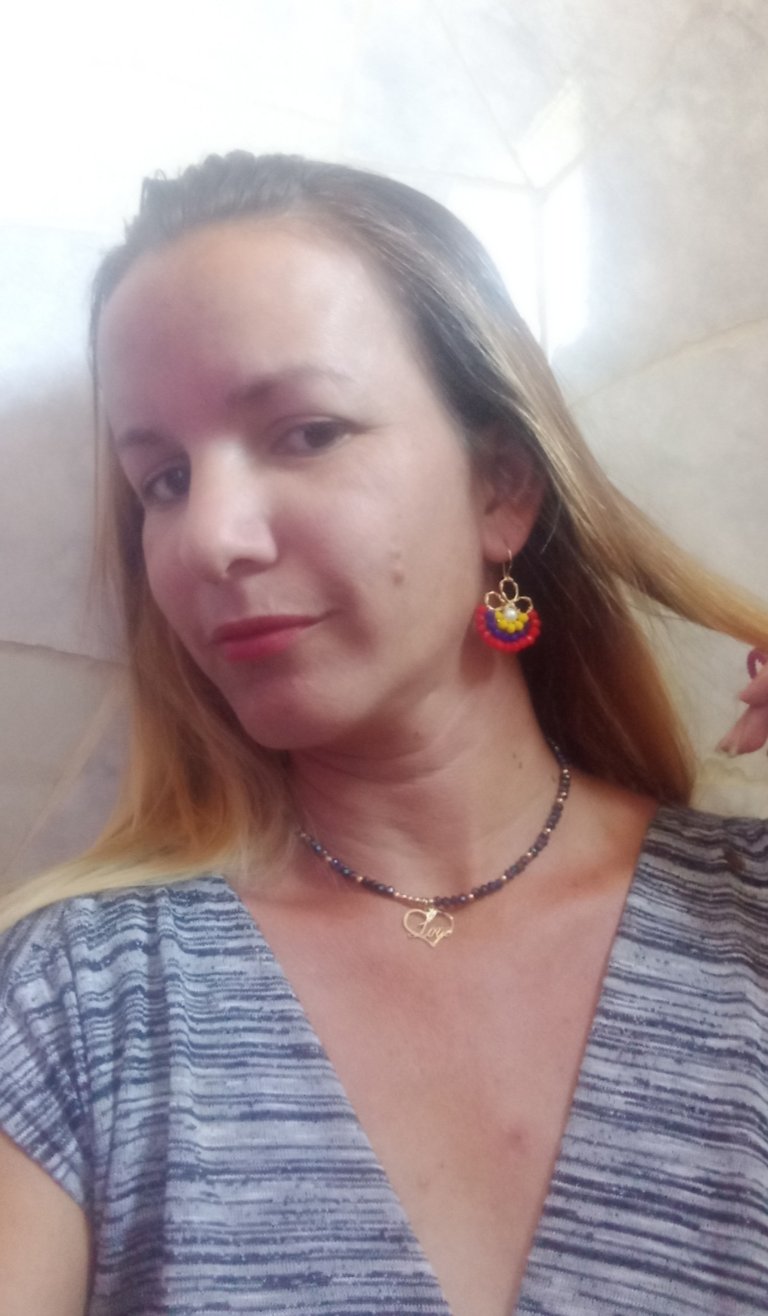
⭐ Step 4: to finish we will make a simple hook where we will give our beautiful elaboration. For this we will take a piece of 20 gauge jewelry wire and we will shape it with the help of the tweezers and our fingers giving it the shape of a ground and we will hook this to the central and highest petal of our beautiful clover and thus we will complete our first accessory and we only have to repeat the procedure to make the pair.


Todas las Fotos son de mi autoría y fueron tomadas con mi Celular Redmi 9.How can you see, despite being a very simple design, the union of our tricolor gives it an elegance and incredible beauty that will make us stand out anywhere we want to show it off. My dear and appreciated friends I hope that this simple design is to the total liking of all of you and that this small tutorial can be useful and beneficial.
I say goodbye for this opportunity, grateful for your visit and I will be very eager to receive comments and suggestions. Greetings and blessings.
All Photos are my authorship and were taken with my Redmi 9 Cellphone
Posted Using InLeo Alpha
Que preciosos te quedaron esos zarcillos. Buen trabajo 🙏
Gracias, me alegra mucho que te haya gustado 😊
WOW! It is so beautiful, stylish, and attractive. Love its design. It looks amazing. Well done!
Thank you very much, I am very pleased with your comment 😊.
Quedaron preciosos amiga me gusta el diseño del alambre entorchado, y nuestra hermosa bandera 🇻🇪 muy lindo trabajo.
Gracias amiga, quise compartir igual del tema del mes a pesar de que se me pasó la fecha.
Hola.
Wow estan increibles, realmente te inspiraste. Es una linda forma de representar a Venezuela. Mucha suerte en el concurso. Saludos.
Gracias amigo,e alegra que te haya gustado 😊
Muy bonito , me ha encantado amiga
Gracias amiga,me alegra mucho que te haya gustado.
Quedaron bellísimo esos aretes, se ven elegantes, felicitaciones.
Gracias amiga.
Gusooo..! Que hermosos amiga. 🤗🤗🤗
Gracias amiga 😊
😍 quedaron super hermosos.... Sin duda alguna los colores de nuestro tricolor nacional son tan hermosos que hacen la combinación perfecta en cualquier accesorio 🥰🇻🇪💖
Así es amiga, nuestro tricolor le da ese toque hermoso y especial.
It looks so beautiful and nice, I love the color combination, good work.
Wow, the earrings are so beautiful, I love the style and the colors combination.
This is so creative, thanks for sharing
You are so creative in doing this earrings,thanks for sharing with us
So beautiful 😍❤️