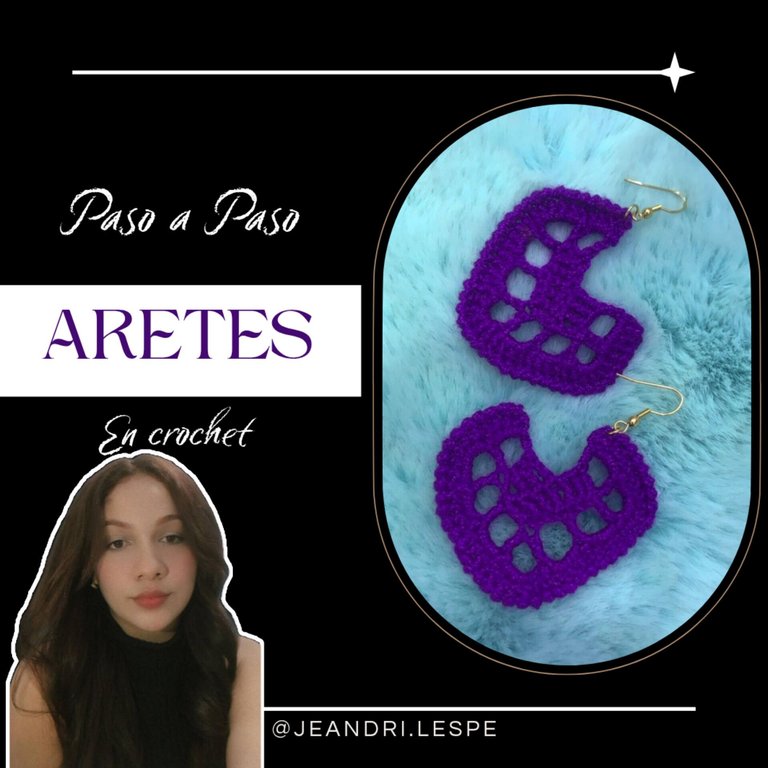
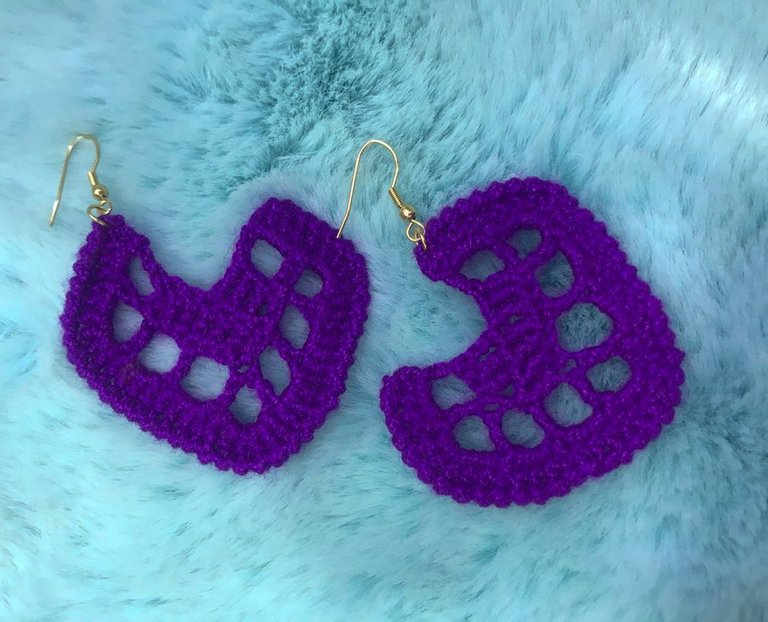
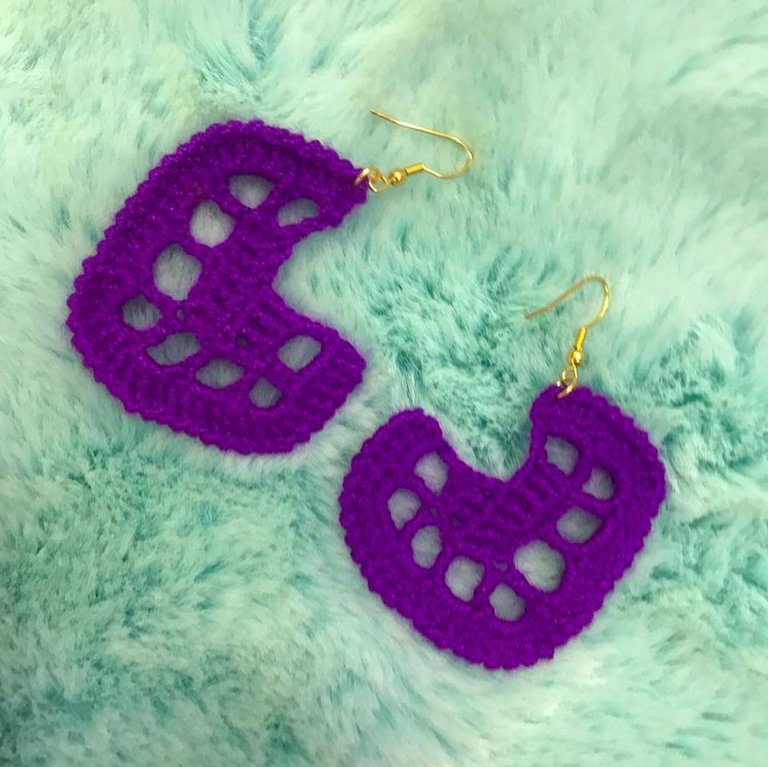
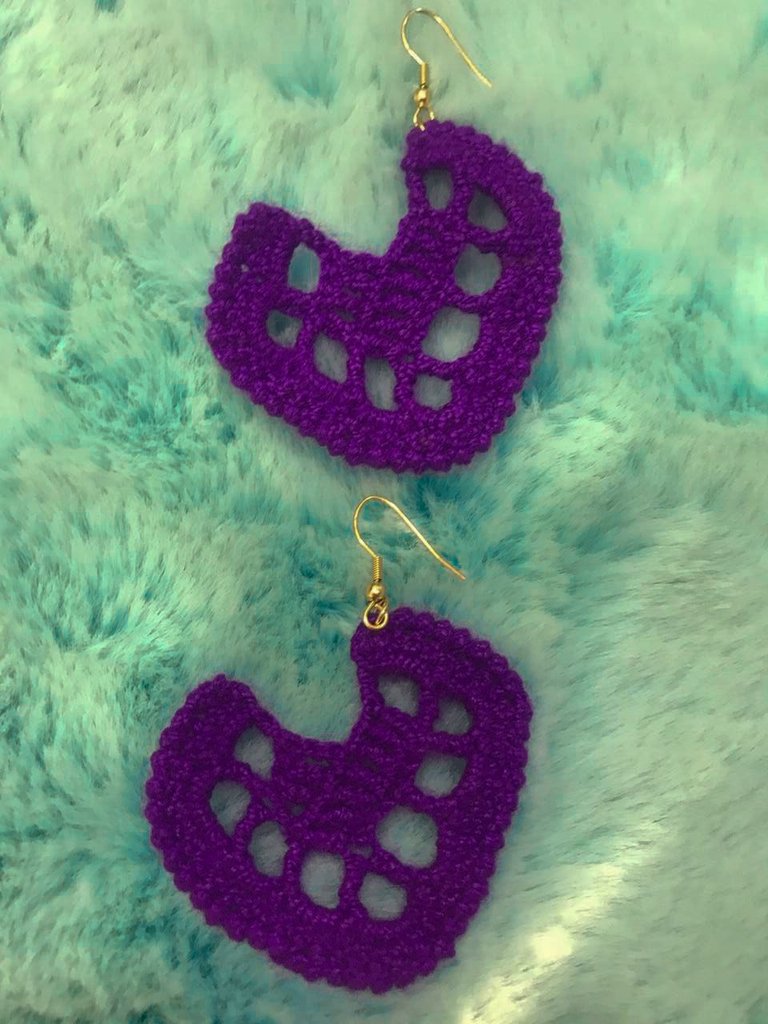
Hola mi gente linda, nuevamente estoy por acá con un nuevo diseño que realice el día de hoy y por supuesto tenía que compartirlo con ustedes 💓✨
El diseños de hoy fue el verdadero "confía en el proceso" ya que, al principio de la elaboración, no le veía muy buena forma, sin embargo a medida que fui avanzando en la elaboración iba viendo como agarraba cada vez más sentido, espero puedan comprender mi explicación en cuanto a la elaboración y que les encante el resultado final 💕 ¡Vamos con los materiales y el paso a paso!
Hello my lovely people, I'm here again with a new design that I made today and of course I had to share it with you 💓✨
Today's design was the real "trust the process" because, at the beginning of the elaboration, I didn't see it in very good shape, however as I progressed in the elaboration I saw how it made more and more sense, I hope you can understand my explanation regarding the elaboration and that you love the final result 💕 Let's go with the materials and the step by step!
Materiales / Materials 💕✨
Hilo coral / Coral thread ✨
Aguja (número 3) / Needle (number 3) ✨
Anzuelos / Hooks ✨
Argollas / Rings ✨
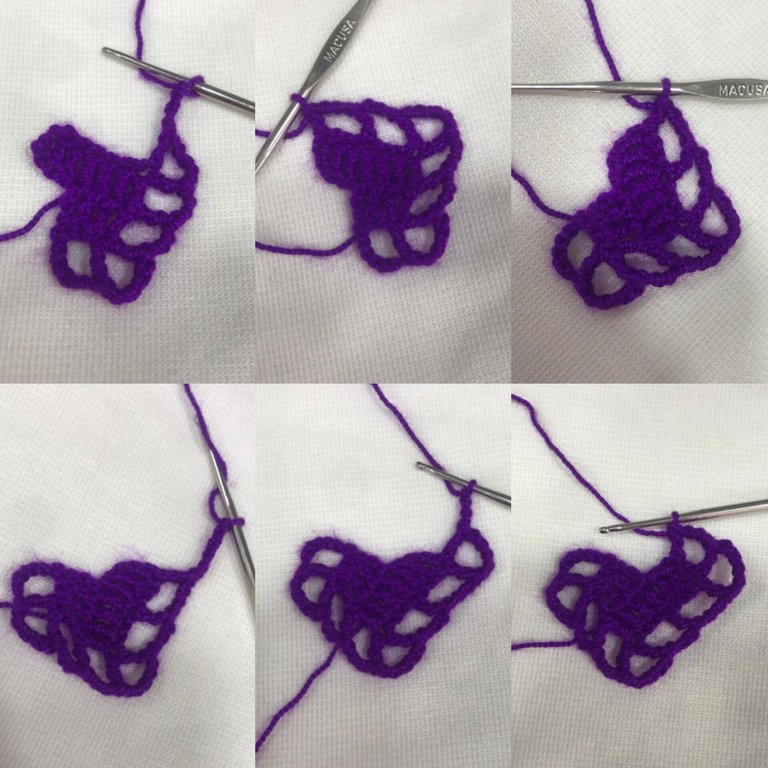
Paso 1️⃣ / Step 1️⃣
Lo primero que haremos será un nudo deslizado y continuamos levantando 6 cadenas, de forma consecutiva a las 6 cadenas, levantaremos 4 cadenas más, enlazamos 2 veces y luego nos ubicamos en la sexta cadena y hacemos un punto alto doble, luego en la cadena siguiente haremos nuevamente un punto alto doble y así sucesivamente en cada una de las cadenas, al final tendremos un total de 7 puntos altos dobles, contando las primeras 4 cadenas como un punto.
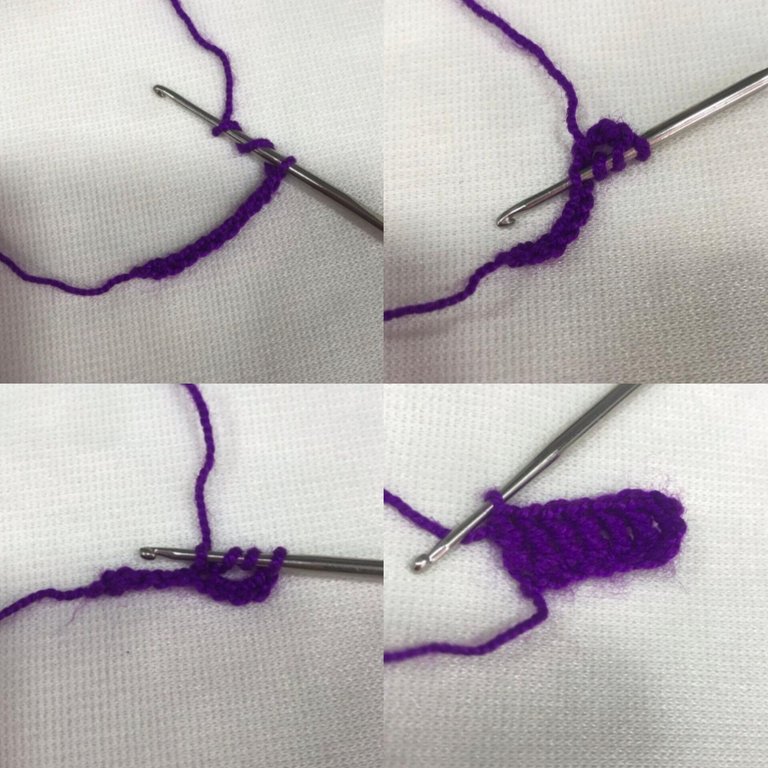
The first thing we will do is a slip knot and continue lifting 6 chains, consecutively to the 6 chains, we will lift 4 more chains, we will link 2 times and then we will place ourselves in the sixth chain and we will make a double crochet, then in the next chain we will make a double crochet again and so on in each of the chains, in the end we will have a total of 7 double crochets, counting the first 4 chains as one point.
Paso 2️⃣ / Step 2️⃣
Le damos vuelta al tejido y vamos a subir 3 cadenas, enlazamos dos veces y en encima de los siguientes 3 puntos altos dobles de la vuelta anterior, haremos 3 puntos altos dobles y con las 3 cadenas que subimos al comienzo de esta vuelta, serían 4 puntos, volvemos a girar el tejido y subimos 6 cadenas, enlazamos dos veces y haremos un punto alto doble en la tercera cadenas que se ubica en el extremo, levantamos 5 cadenas y en ese mismo orificio hacemos otro punto alto doble.
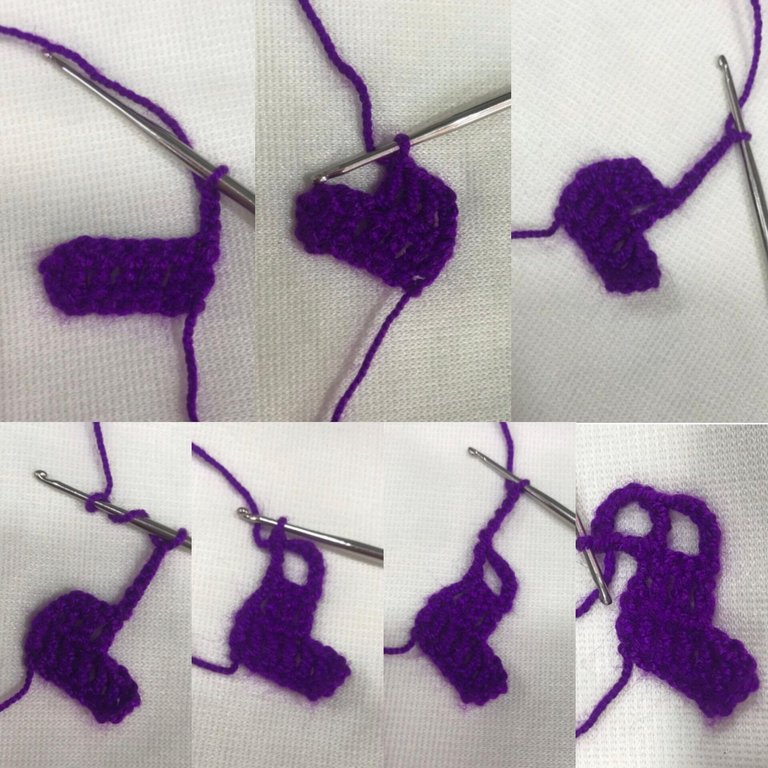
We turn the fabric over and we are going to go up 3 chains, we link twice and on top of the next 3 double crochets from the previous round, we will make 3 double crochets and with the 3 chains that we went up at the beginning of this round, it would be 4 stitches, we turn the fabric over again and go up 6 chains, we link twice and we will make a double crochet in the third chain that is located at the end, we pick up 5 chains and in that same hole we make another double crochet.
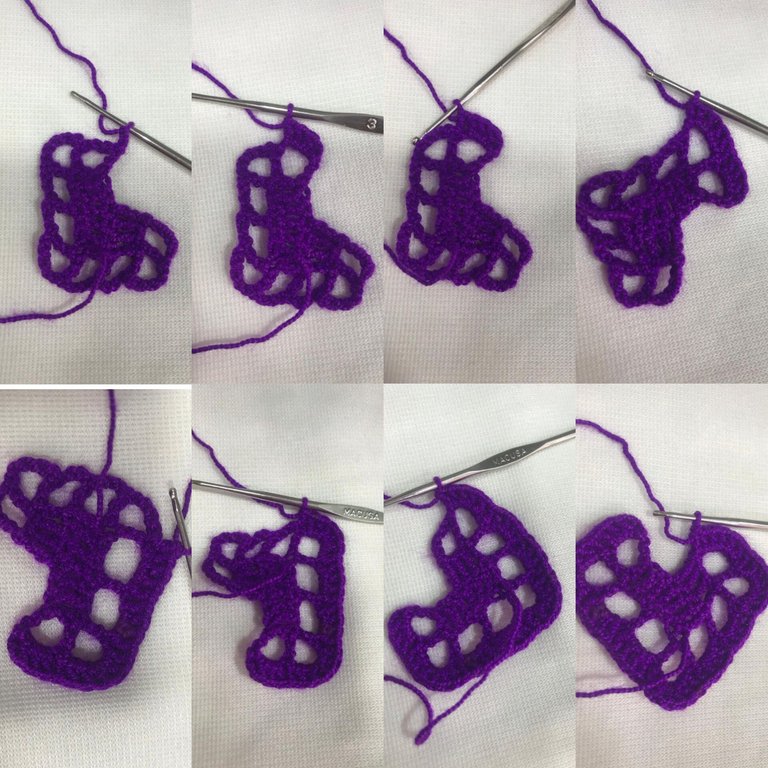
Paso 3️⃣ / Step 3️⃣
Vamos a subir 3 cadenas, enlazamos y hacemos un punto alto doble en el espacio siguiente de 3 cadenas, hacemos nuevamente 3 cadenas, enlazamos y cerramos con un punto alto doble justo en la primera cadena de nuestro tejido, levantamos 5 cadenas y cerramos nuevamente con un punto alto doble en el mismo orificio, tal cual se aprecia en la fotografía.
We are going to go up 3 chains, we link and we make a double crochet in the next space of 3 chains, we make 3 chains again, we link and close with a double crochet right in the first chain of our fabric, we pick up 5 chains and we close again with a double crochet in the same hole, as you can see in the photograph.
Paso 4️⃣ / Step 4️⃣
Volvemos a repetir nuevamente la misma secuencia, levantamos 3 cadenas y nos vamos a ubicar en el tercer punto de la vuelta anterior y hacemos un punto alto doble, levantamos 3 cadenas y justo en las cadenas del extremo, haremos el punto alto doble que sigue, levantamos ahora 5 cadenas y en el mismo orificio, hacemos el punto alto doble, cerramos con las ultimas 3 cadenas y hacemos un punto alto doble justo en el extremo del tejido.
We repeat the same sequence again, we lift 3 chains and we are going to place ourselves in the third point of the previous round and we make a double high stitch, we lift 3 chains and right in the chains at the end, we will make the double high stitch that follows, we now lift 5 chains and in the same hole, we make the double high stitch, we close with the last 3 chains and we make a double high stitch right at the end of the fabric.
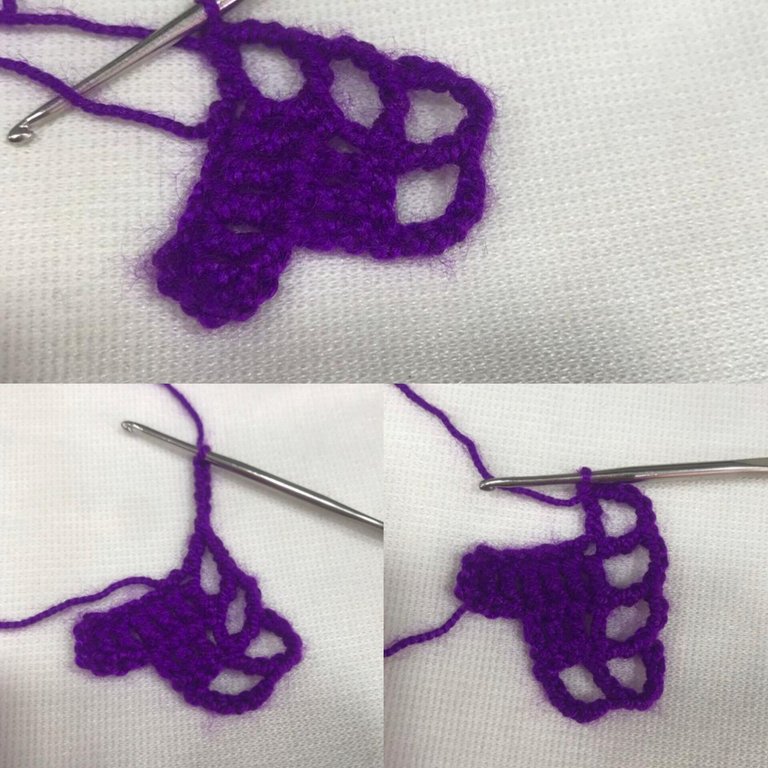
Paso 5️⃣ / Step 5️⃣
Le damos vuelta al tejido y levantamos 2 cadenas y haremos puntos altos en base a la cantidad de cadenas que tenga cada espacio, es decir, en el primer espacio haremos 3 puntos altos y cerramos con un punto alto en el punto que divide cada espacio, luego hacemos 5 puntos altos, más el punto alto que va en la división de cada espacio y así sucesivamente en cada uno de ellos, nos quedará como se aprecia en la foto, cuando llegamos a la última casilla, luego de hacer los 3 puntos altos correspondientes, hacemos un ultimo punto alto en la tercera cadena del extremo.
We turn the fabric over and lift 2 chains and we will make high stitches based on the number of chains that each space has, that is, in the first space we will make 3 high stitches and close with a high stitch in the point that divides each space, then we make 5 high stitches, plus the high stitch that goes in the division of each space and so on in each one of them, it will be as seen in the photo, when we get to the last box, after making the 3 corresponding high stitches, we make a last high stitch in the third chain at the end.
Paso 6️⃣ / Step 6️⃣
Para el último paso, haremos un punto que se llama "punto cangrejo" vamos a subir una cadena y nos ubicamos en el segundo punto alto, hacia atrás, jalamos el hilo y procedemos tomar hilo nuevamente y a pasar las dos hebras juntas, haremos el mismo procedimiento con cada punto alto de la vuelta anterior hasta llegar al final del tejido, luego para terminar, haremos un punto bajo en las 3 cadenas, subimos una cadena, sacamos suficiente hilo y cortamos, escondemos las dos hebras sobrantes y listo, ya solo nos queda poner las argollas y los anzuelos, y es así como nos queda listo nuestro arete.
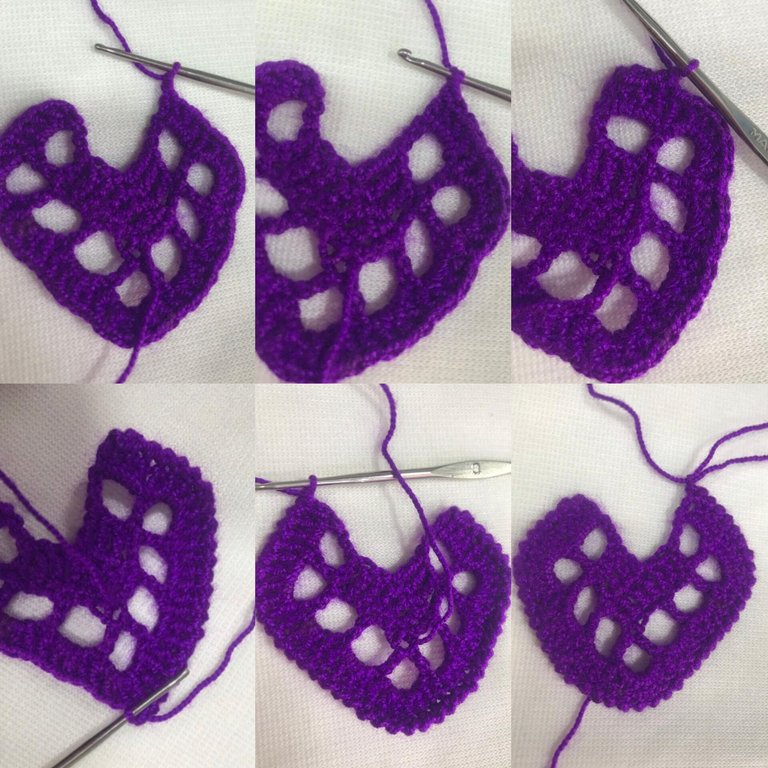
For the last step, we will make a stitch called "crab stitch" we will go up a chain and we will place ourselves in the second high point, backwards, we pull the thread and proceed to take thread again and pass the two strands together, we will do the same procedure with each high point of the previous round until we reach the end of the weave, then to finish, we will make a low point in the 3 chains, we go up a chain, we take out enough thread and cut, we hide the two leftover strands and that's it, we just have to put the rings and the hooks, and that's how our earring is ready.
Se que la elaboración puede ser un poco confusa, pero la verdad es que, a medida que vas avanzando, vas entendiendo un poco más cada paso, hasta que ya terminas tú arete y ves que todo quedó perfecto, espero les haya gustado tanto como a mí, les mando un abrazo y muchísimas Gracias por su apoyo ✨
I know that the elaboration can be a little confusing, but the truth is that, as you go along, you understand each step a little more, until you finish your earring and you see that everything was perfect, I hope you liked it as much as I did, I send you a hug and thank you very much for your support ✨
Claro que me encanta el resultado final. Has hecho unos aretes magníficos. Tiene una forma parecida a un corazón, pero distinto a lo que habitualmente vemos en crochet, quizás por eso no te sentías tan confiado. Que bueno que no desististe y continuaste porque el resultado es precioso.
Saludos.
So elegant and unique.
Thanks for sharing with us.
These earrings are very unique and pretty. You made it very well.