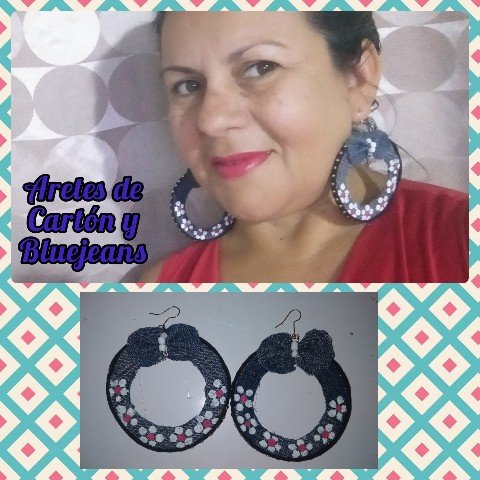
Hello to all who make life in this great community full of artists, @jewlry, full of countless beautiful ideas made accessories that make young and old look great regardless of gender or race, a great family of inspiring people par excellence , it is a great pleasure, starting the weekend to be here, sharing once again, a very simple tutorial, of How to make beautiful Earrings using cardboard and blue Jeans fabric, super comfortable and very low cost earrings without stopping mention how simple it is to make, a quick step-by-step and that's it. They are ideal to make us look very striking at parties, walks or meetings, I hope you enjoy it, it is dedicated to my beautiful people from @jewelry, recycling lover ♻️, for you without further ado I tell you./
Hola a todos los que hacen vida en esta gran comunidad llena de artistas,@jewlry, llena que un sin número de ideas hermosas hechas accesorios que hacen lucir a grandes y chicos sin importar sexo, ni raza, una gran familia de gente inspiradora por excelencia, es un gran placer, iniciando el fin de semana estar por acá, compartiendo una vez más, un muy sencillo tutorial, de Cómo hacer unos lindos Aretes usando cartón y tela de blue Jeans, aretes súper cómodos y de muy bajo costo sin dejar de mencionar lo sencillo de su elaboración, un rápido paso a paso y listo. Son ideales para hacernos lucir muy llamativas en fiestas, paseos o reuniones, espero lo disfrutes, va dedicado a mi gente hermosa de @jewelry, amante de el reciclaje ♻️, para ustedes sin más les cuento.
Materials/Materiales.
. cardboard cutout
. Cutout of blue jeans fabric.
. Scissors
. White and pink cold paints
. leather with rivets
. Hot silicone.
. Two jewelry earrings
. Two earring hooks.
. needle and thread for sewing
. White beads.
. hizopo
. Round plastic cap for marking.
. Plastic cup n1. To mark.
. Marker.
. Scissors.
. Tweezers (flat and round tip for jewelry)./
. Recorte de Cartón
. Recorte de tela de blue jeans.
. Tijeras
. Pinturas al frío color blanca y rosada
. Cuerito con remaches
. Silicón caliente.
. Dos aritos de bisutería
. Dos anzuelos de aretes.
. Aguja e hilo para coser
. Mostacillas color blanca.
. Hizopo
. Tapa redonda plástica para marcar.
. Vaso plástico n1. Para marcar.
. Marcador.
. Tijeras.
. Pinzas (plana y punta redonda de bisutería)
Step/Paso
1.) Start by marking the circle of the plastic lid on the cardboard with the marker, and then inside this circle, centering well, I mark the circle of the upper edge of the plastic cup./
1.) Inicio marcando con el marcador, en el cartón el círculo de la tapa plástica y luego dentro de este círculo centrando bien, marco el círculo de el borde superior de el vaso plástico.
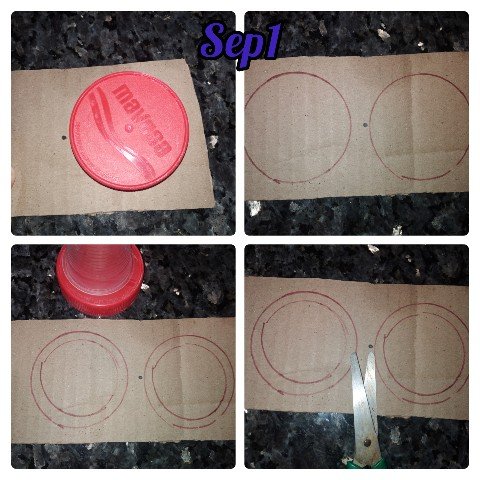
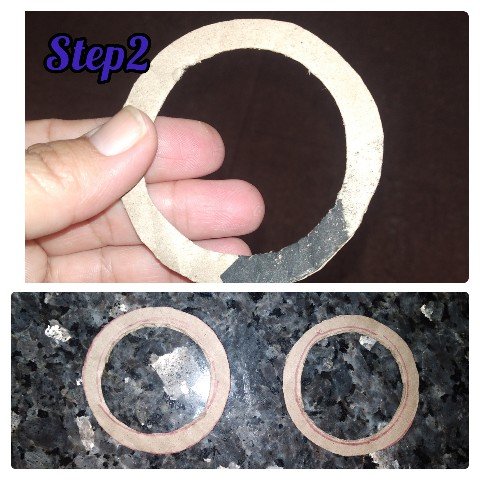
2.) Marked the circles, cut as straight as possible with the scissors and likewise I will cut the middle circle, leaving a central hole.
2.) Marcado los círculos, recortó lo más derecho posible con las tijeras y así mismo cortaré el círculo de el medio, quedando un orificio central.
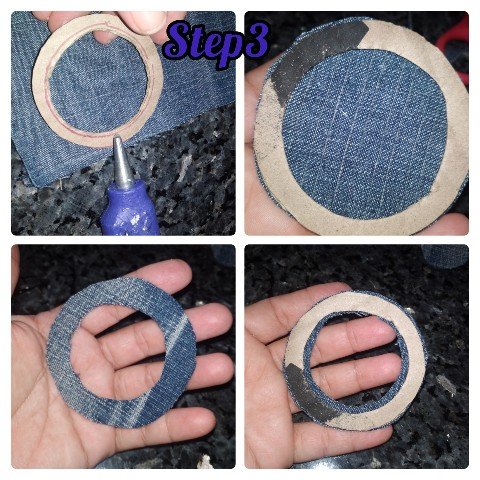
3.) Continuous, applying abundant glue on the cardboard and sticking it to the blue jeans fabric, cut it with scissors and after this I glue the other side which I cut in the same way, leaving the circles completely lined with the blue fabric jeans, I apply hot silicone again to the edges of both sides and perfectly glue the fabric to the cardboard.
3.) Continuo, aplicando abundante pegamento sobre el cartón y pego a la tela de blue jeans, recortó con las tijeras y luego de esto pego el otro lado el cual de la misma manera recortó, quedándome los círculos completamente forrados con la tela de blue jeans, aplico nuevamente silicón caliente por las orillas de ambos lados y pego perfectamente la tela a el cartón.
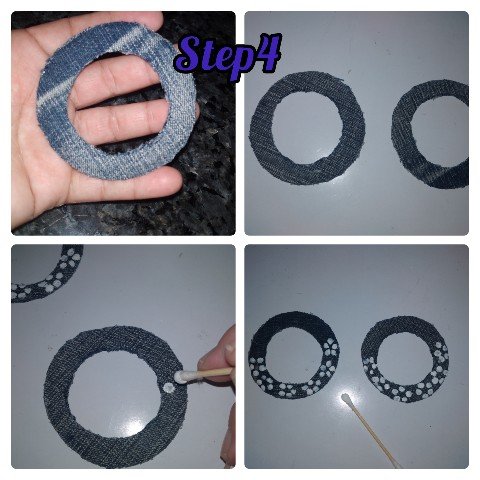
4.) Using the paints and the paintbrush, I paint in the middle of the circle, white flowers with five petals and in the center a point of fuchsia.
4.) Usando las pinturas y el hizopo, pinto en la mitad de el círculo, flores de cinco pétalos color blanca y en el centro un punto de color fucsia.
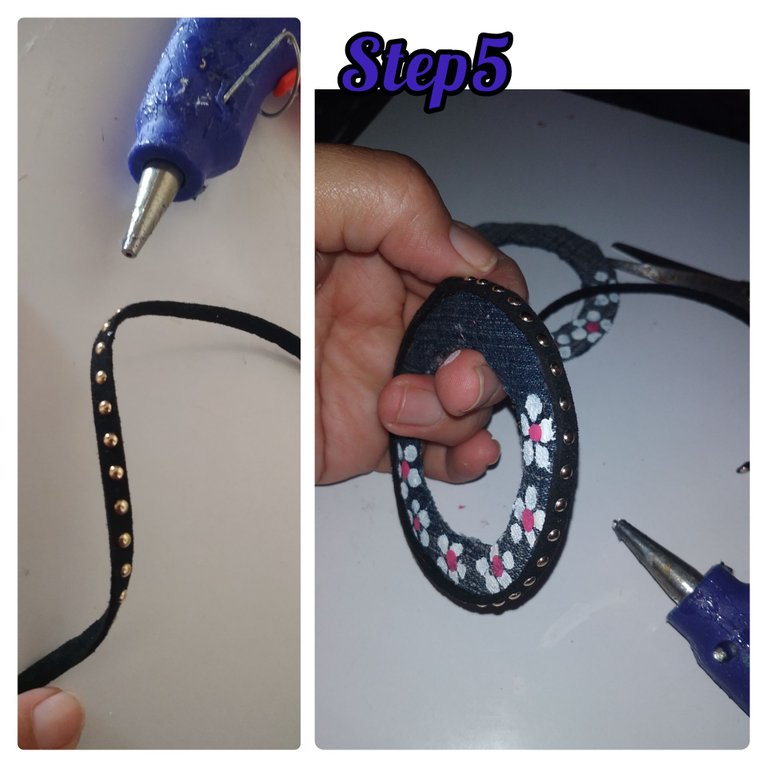
5.) Dry the flowers painted in the previous step, apply hot silicone to the edge of the circles and stick the leather with rivets. I must try to be well glued and straight around the circle.
5.) Secas las flores pintadas en paso anterior, aplico en el borde de los círculos silicón caliente e iré pegando el cuerito con remaches. Debo tratar de queden bien pegados y derechos en todo el círculo.
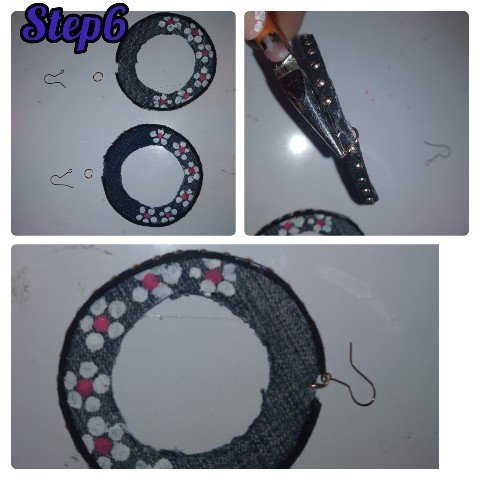
6.) With the help of the jewelry pliers, before drilling the upper part of what will be the earring, I put the earring and inside it the earring hook, I close with the tweezers, I take two circles, which I still had to cut in the second step and with a needle and thread I put together a nice and delicate bow I will also sew Beads in the center, finish off and cut the thread. I apply a thin silicone stitch on the earring and glue on the top or top, thus giving a touch of cuteness to our cute and elegant earring.
6.) Con ayuda de las pinzas de bisutería, antes perforó la parte superior de lo que ya será el arete, meto el arito y dentro de el el anzuelo para aretes, cierro con las pinzas, tomo dos círculos, que me quedaron de cortar en el segundo paso y con aguja e hilo armó un lindo y delicado lazo cosere además Mostacillas en el centro, remato y corto el hilo. Aplico un adelucada puntada de silicón sobre el arete y pego en la parte alta o superior, dando así un toque de ternura a nuestro lindo y elegante arete.
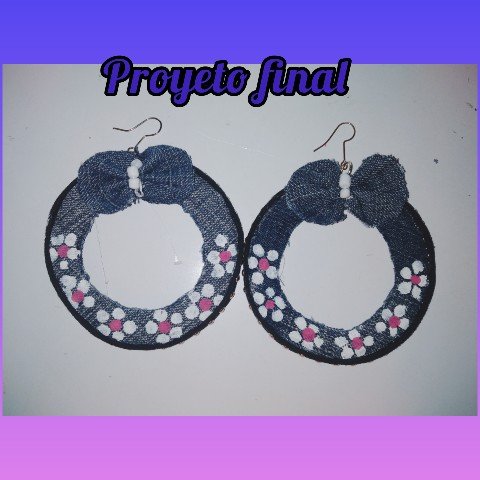
And this way I have left my crafts from recycled material ♻️, I recommend you make your own, just try it following my steps, you could ideally have the size of your preference./
Y de esta manera me ha quedado mis artes de material reciclado ♻️, te recomiendo hacer el suyo, usted solo inténtelo siguiendo mis paso, podrías ideal el tamaño de su preferencia.
. All photos are my property, taken with my smartphone.
. Use InShot, to show you step by step.
. Use google translate./
. Todas las fotos son de mí propiedad, tomadas con mí teléfono inteligente.
. Use InShot, para mostrarle el paso a paso.
. Use traductor Google.
I appreciate you visiting my blog, it was a great pleasure to show you my most recent project until tomorrow./
Agradezco hayas visitado mí blog, fue un gran placer mostrarles mí proyecto más reciente será hasta mañana.
Quedo lindo amiga
Gracias mi niña hermosa...que bueno te haya gustado..abrazos
Sin duda cada día te vas perfeccionando amiga @katiuskamata estas argollas están preciosas y nada mejor que verlo en reciclaje con todos estos materiales 👍😉