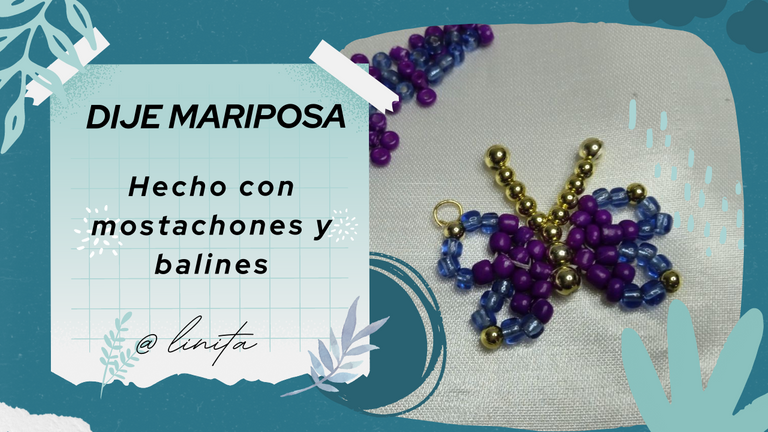
WELCOME TO MY BLOG
Hellooooo, hellooooo! I don't know why he has given me to make butterflies. Maybe because they mean transformation? Perhaps because I have noticed some metamorphosis in my brain and it has led me to do it? Don't know. What I do know is that I like them a lot. In my previous tutorials I have made various shapes and materials, but I still have a few left. I hope that when you have exhausted the forms, you will find a logical explanation for this fixation that I have for them.
Today I bring you a beautiful butterfly pendant, made with beads and balinas, to complement that necklace or chain that you have stored in your chest and you still do not wear it. Among all the butterflies, this is the one that has given me the most work and although I have followed a tutorial step by step, I think they did not do it properly, so in my attempts to finish it, I managed to make the pertinent modifications until I achieved this beautiful pendant. I hope you like it. Without further ado, let's get started.
BIENVENIDOS A MI BLOG
¡Holaaaa, holaaaaa! No sé por qué motivo me ha dado por hacer mariposas. Quizás porque signifiquen la transformación? Quizás porque he notado alguna metamorfosis en mi cerebro y me ha llevado a realizarlas? No lo sé. Lo que si sé es que me gustan mucho. Ya en mis tutoriales anteriores he hecho de varias formas y materiales, pero me faltan aún unos cuantos. Espero que cuando ya haya agotado las formas, le encuentre una explicación lógica a esta fijación que tengo por ellas.
Hoy les traigo, un hermoso dije de mariposa, hecho con mostachones y balinas, para complementar ese collar o cadena que tienes guardado en tu cofre y aún no lo usas. Entre todas las mariposas, esta es la que más trabajo me ha dado y aunque he seguido paso a paso un tutorial, creo que no lo hicieron adecuadamente, así que en mis intentos por terminarlo, logré hacer las modificaciones pertinentes hasta lograr este precioso dije. Espero te guste. Sin más, comencemos.
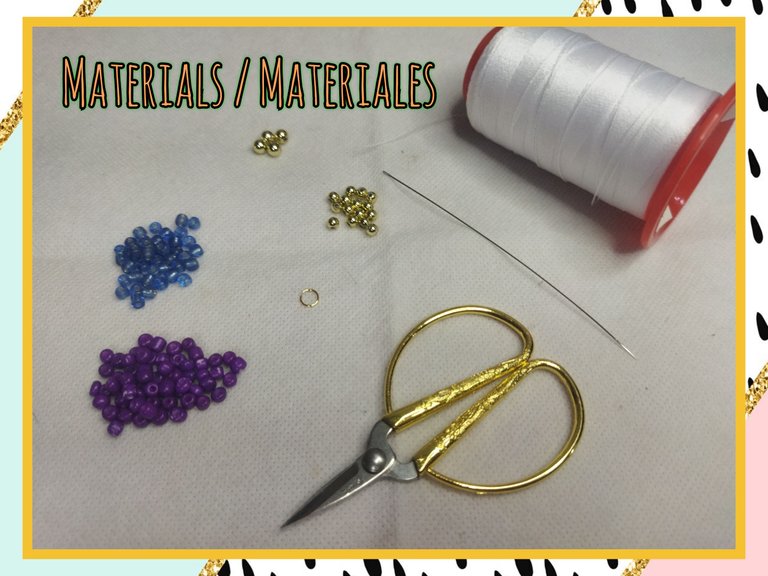
MATERIALS
- Purple and blue mustaches
- Pellets Nº5 and Nº3
- 5 mm wire ring
- White upholstery thread
- Scissors
- Lighter
MATERIALES
- Mostachones morados y azules
- Balines Nº5 y Nº3
- Aro de alambre de 5 mm
- Hilo de tapicería blanco
- Tijera
- Encendedor
STEP BY STEP // PASO A PASO
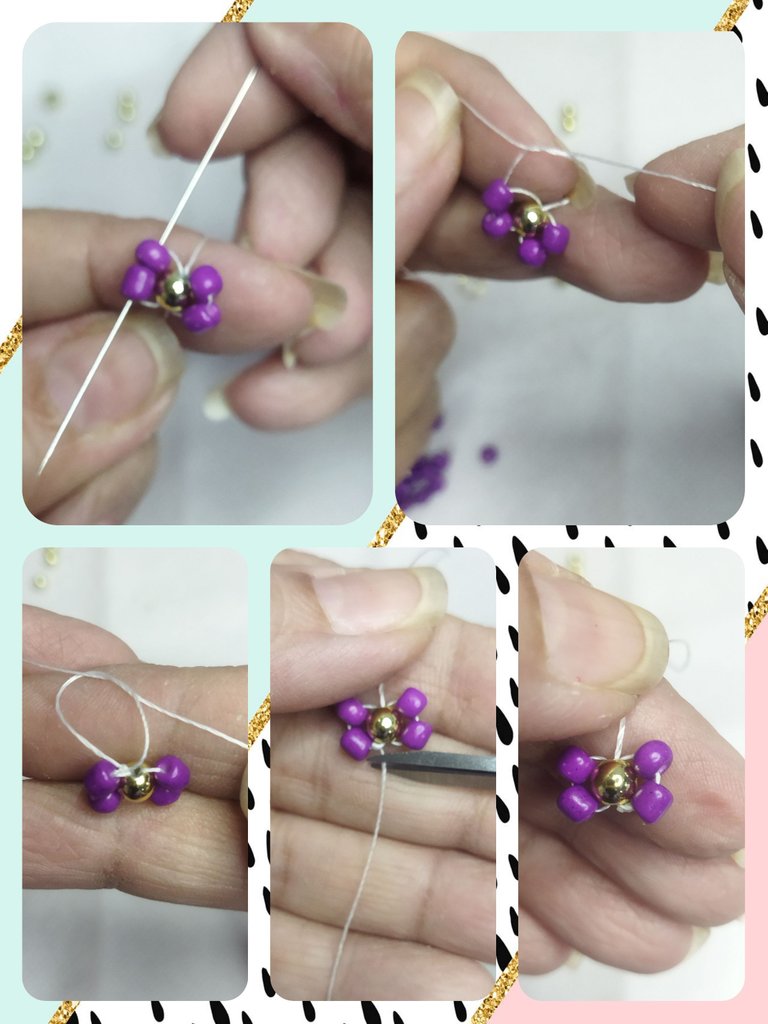
We begin by making the center from which the wings of the butterfly will depart.
We take 100 cm of upholstery thread and thread the beading needle and start working with a #5 pellet and two purple beads. You can combine the mastachones with the colors that you like the most.
We bring the thread to the end, leaving about 10 cm long and insert the needle through the center of the pellet. We adjust strongly.
Comenzamos realizando el centro de donde partirán las alas de la mariposa.
Tomamos 100 cm de hilo de tapicería y ensartamos la aguja para mostacillas y comenzamos trabajando con un balin #5 y dos mostachones morados. Puedes combinar los mostachones con los colores que más te gusten.
Llevamos al final el hilo dejando unos 10 cm de largo y metemos la aguja por centro del balín. Ajustamos fuerte.
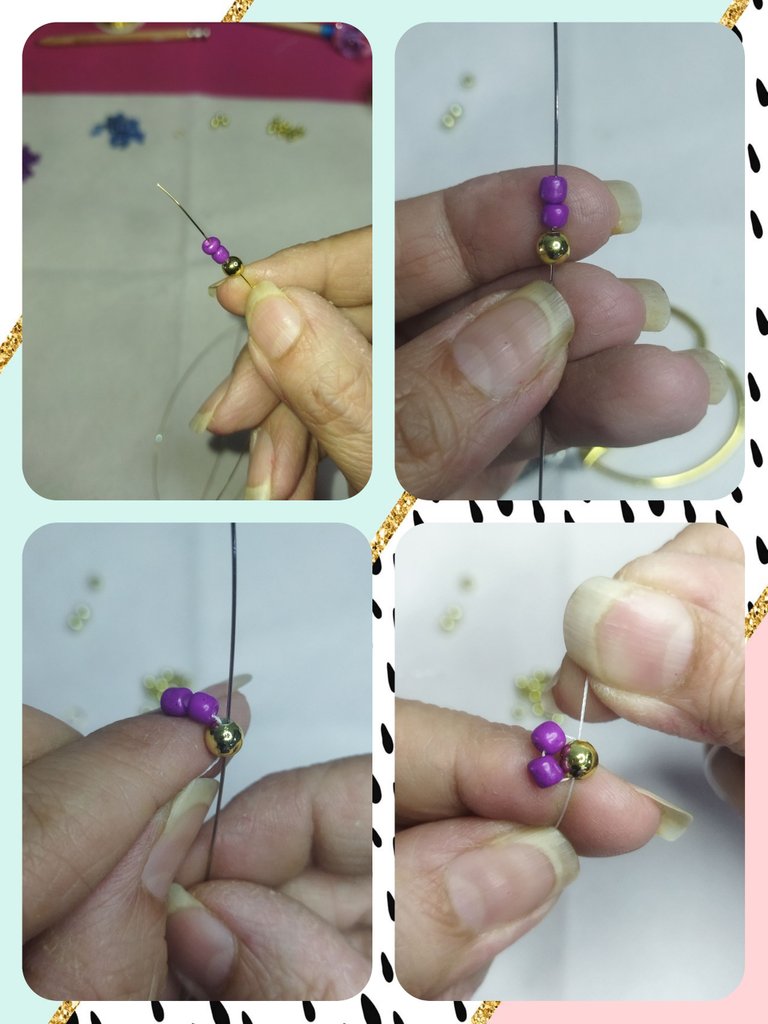
We take two purple mastachons again and introduce one more time through the pellet on the opposite side to where the thread comes out.
Tomamos dos mostachones morados nuevamente e introducimos una vez más por el balin del lado contrario a donde sale el hilo.
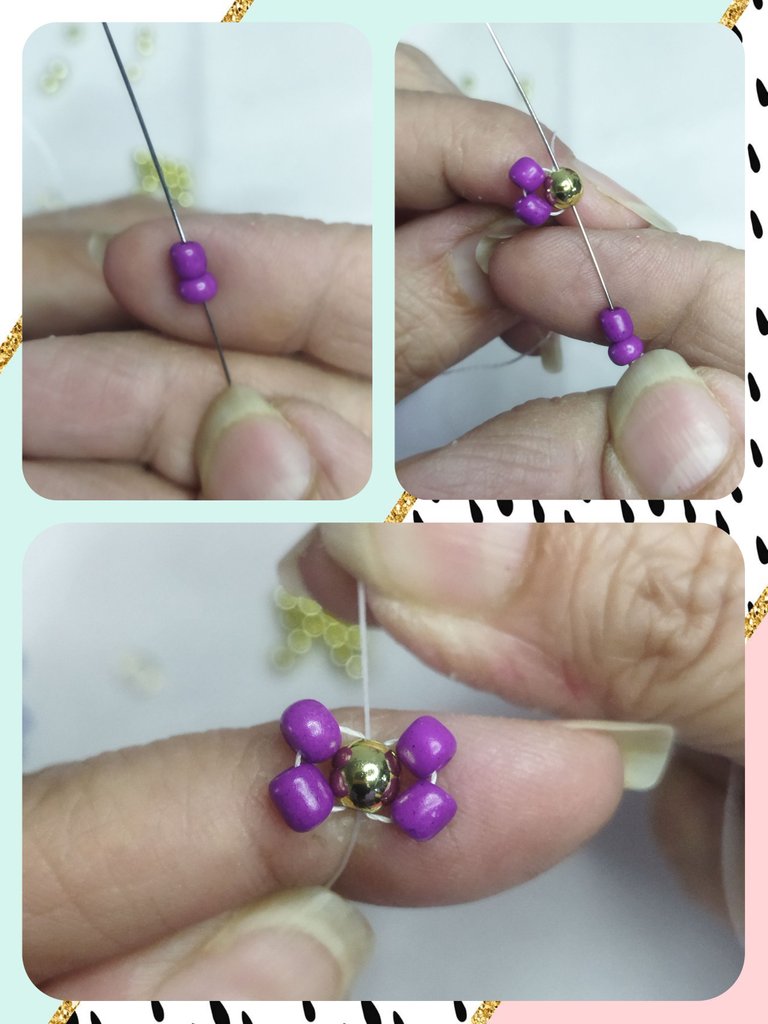
Now we pass the needle through either of the two mastachons in order to have both threads on the same side. Then we make a double knot and tie it very tight so that the mastachons are well attached to each side of the pellet. We cut the shortest thread and from here we will begin to work the wings.
Ahora pasamos la aguja por cualquiera de los dos mostachones con el fin de tener ambos hilos de mismo lado. Luego realizamos doble nudo y amarramos bien fuerte para que los mostachones queden bien pegados a cada lado del balín. Cortamos el hilo más corto y a partir de aquí comenzaremos a trabajar las alas.
We will begin to form the wings on the right side. We introduce the needle through one of the mastachons and take 3 purple mastachons and insert them through the same mastachon.
Empezaremos a formar las alas del lado derecho. introducimos la aguja por uno de los mostachones y tomamos 3 mostachones morados y los insertamos por el mismo mostachón.
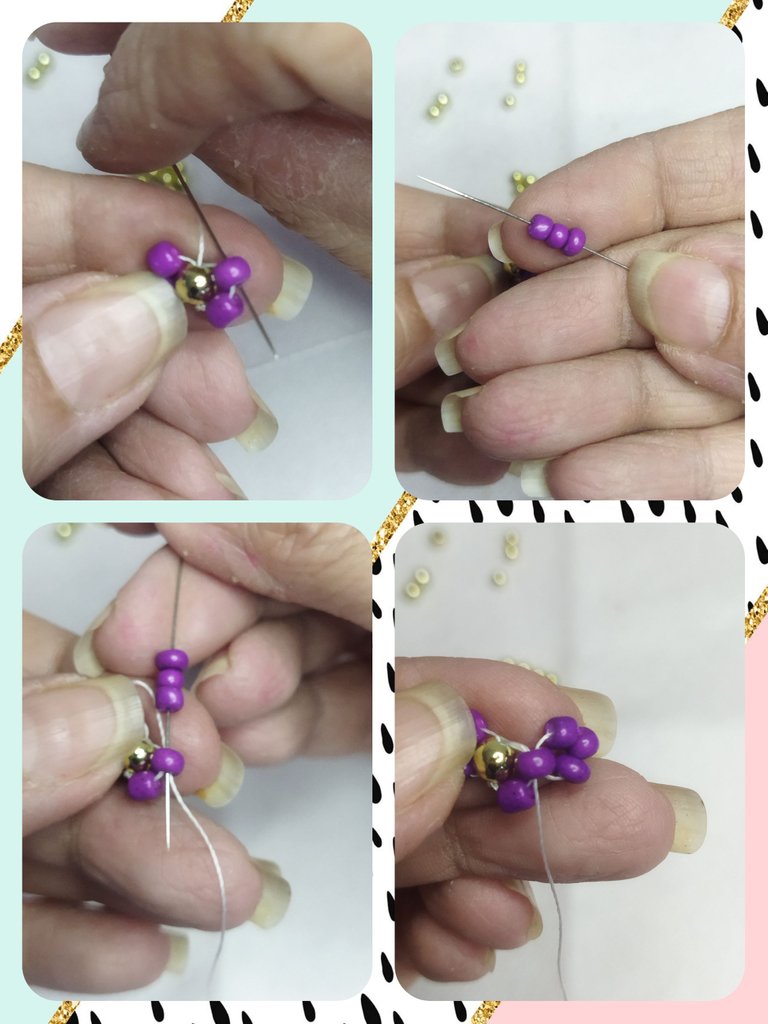
We pass the needle through the adjacent mostachon and take one mostachon and insert it into the next one.
Pasamos la aguja por el mostachón contiguo y tomamos un mostachón e insertamos en el siguiente.
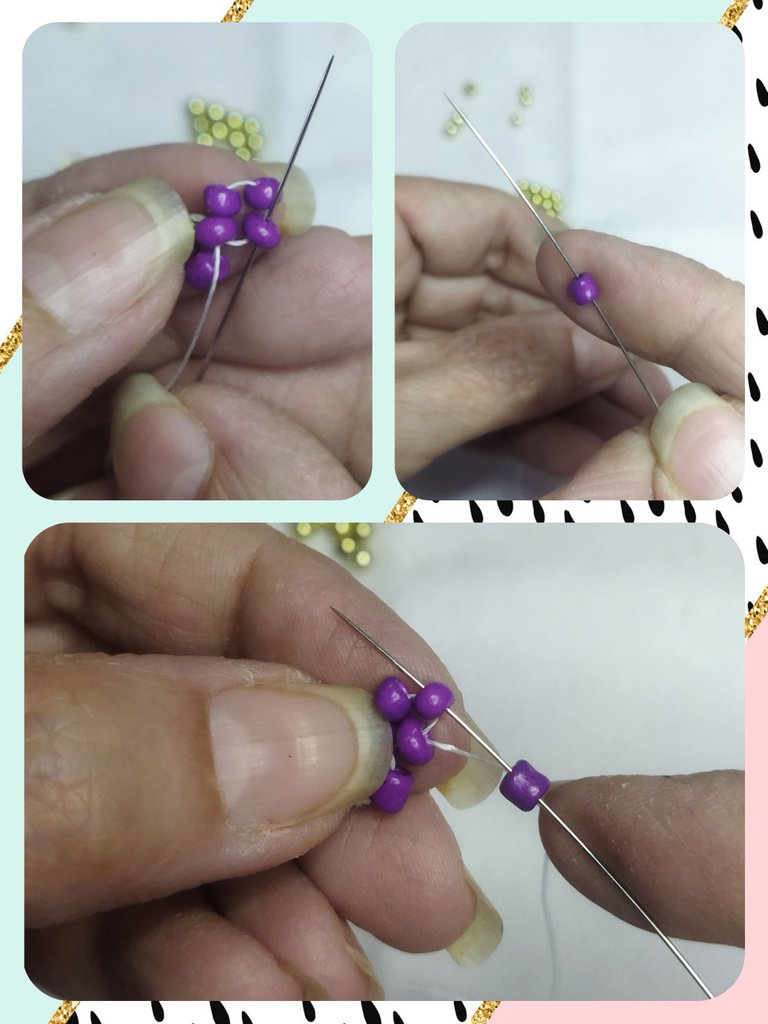
We take another mostachón and we also insert it in the next one. We now pass the needle through the two adjacent mustaches.
Tomamos otro mostachón más e igualmente lo insertamos en el siguiente. Pasamos ahora la aguja por los dos mostachones contiguos.
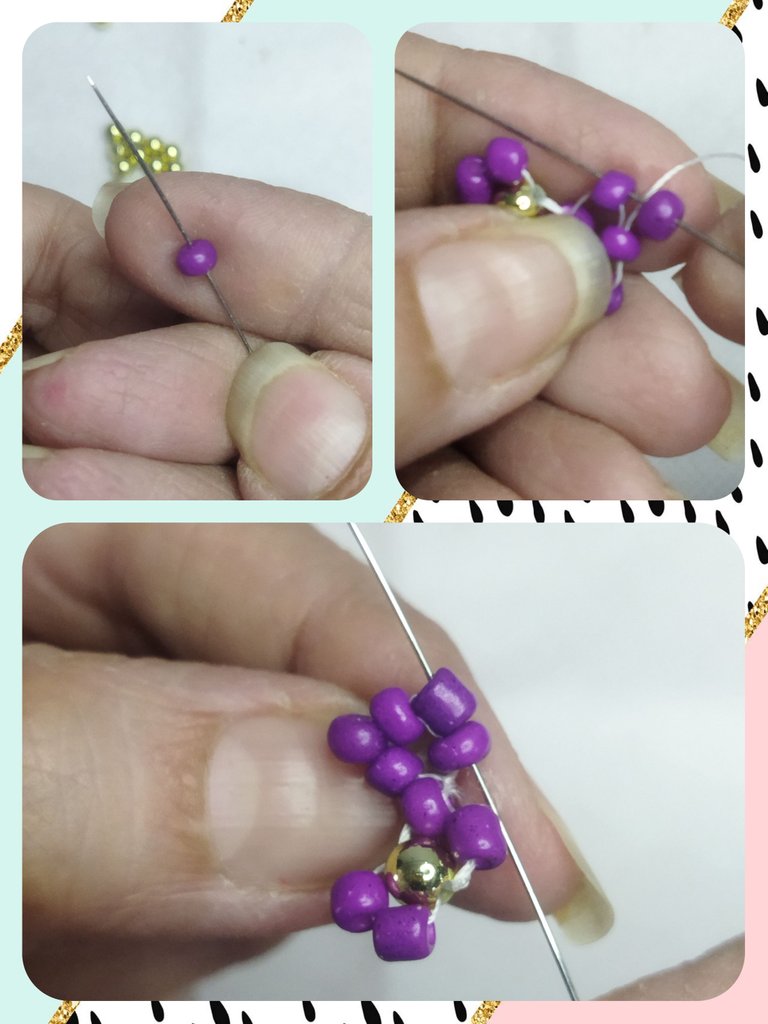
We take 1 purple mostachon, 3 blue, 1 3 mm pellet and 2 blue mostachon, we introduce it into the next mostachon, leaving one in between. Forming the first fin on the right side.
Tomamos 1 mostachón morado, 3 azules, 1 balín de 3 mm y 2 mostachones azules, lo introducimos en el mostachón siguiente, dejando uno de por medio. Formando la primera aleta del lado derecho.
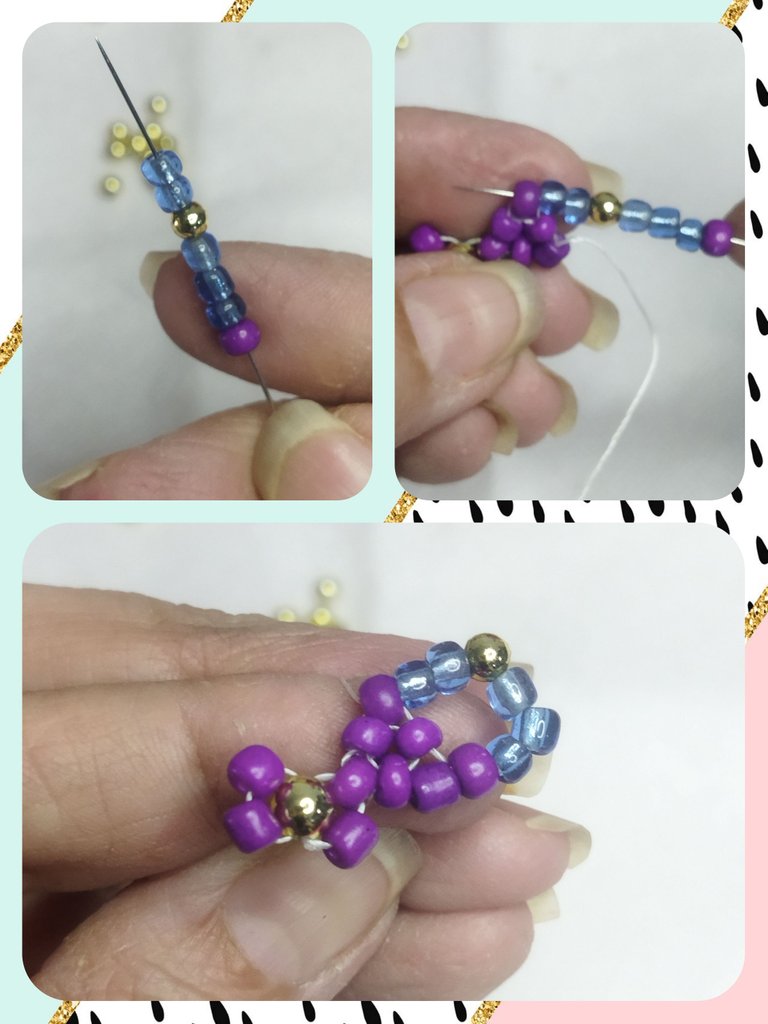
We always have to take into account, in order not to lose shape, where the thread is. This will be the guide for the route to follow.
We continue to introduce the needle between the two mastachons, skip one and introduce through the next two. We take a purple mustachon and introduce it through the same two previous ones.
Siempre tenemos que tomar en cuenta, para no perder la forma, dónde queda el hilo. Éste será la guía del trayecto a seguir.
Continuamos introduciendo la aguja entre los dos mostachones, saltamos uno e introducimos por los dos siguientes. Tomamos un mostachón morado e introducimos por los mismos dos anteriores.
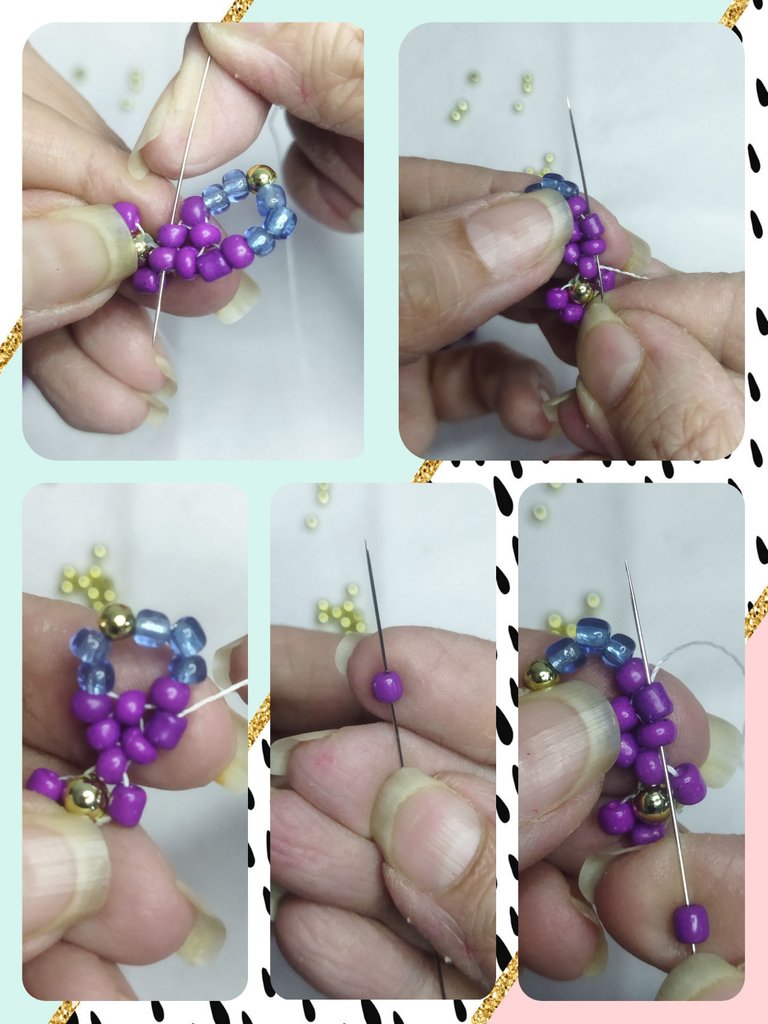
We will pass the needle through the mostachon that we have just inserted and through the lower one. We take two purple mustaches and introduce again through the previous two.
Pasaremos la aguja por el mostachón que acabamos de introducir y por el inferior. Tomamos dos mostachones morados e introducimos nuevamente por los dos anteriores.
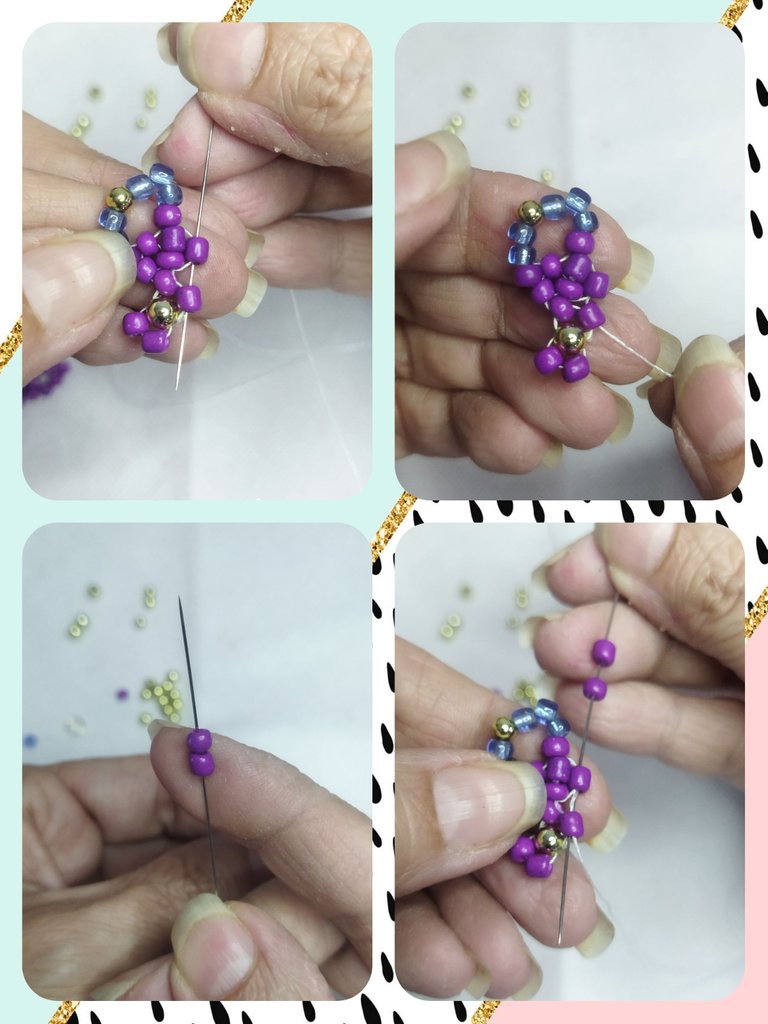
We pass the needle through the next mostachon, take one mostachon and insert it into the next one.
Pasamos la aguja por el mostachón siguiente, tomamos un mostachón y lo insertamos en el que sigue.
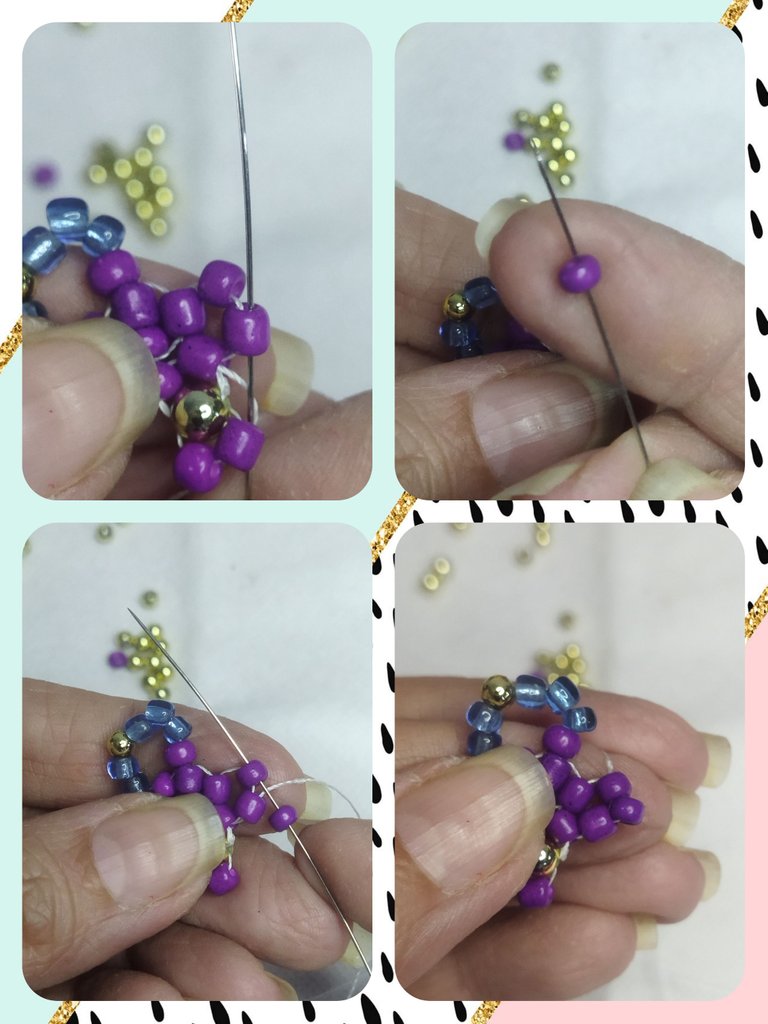
Now we take a blue mustachon and introduce it through the left purple mustachon, then we pass it through the next two leaving one in between.
Ahora tomamos un mostachón azul y lo introducimos por el mostachón morado izquierdo, luego lo pasamos por los dos siguientes dejando uno intermedio.
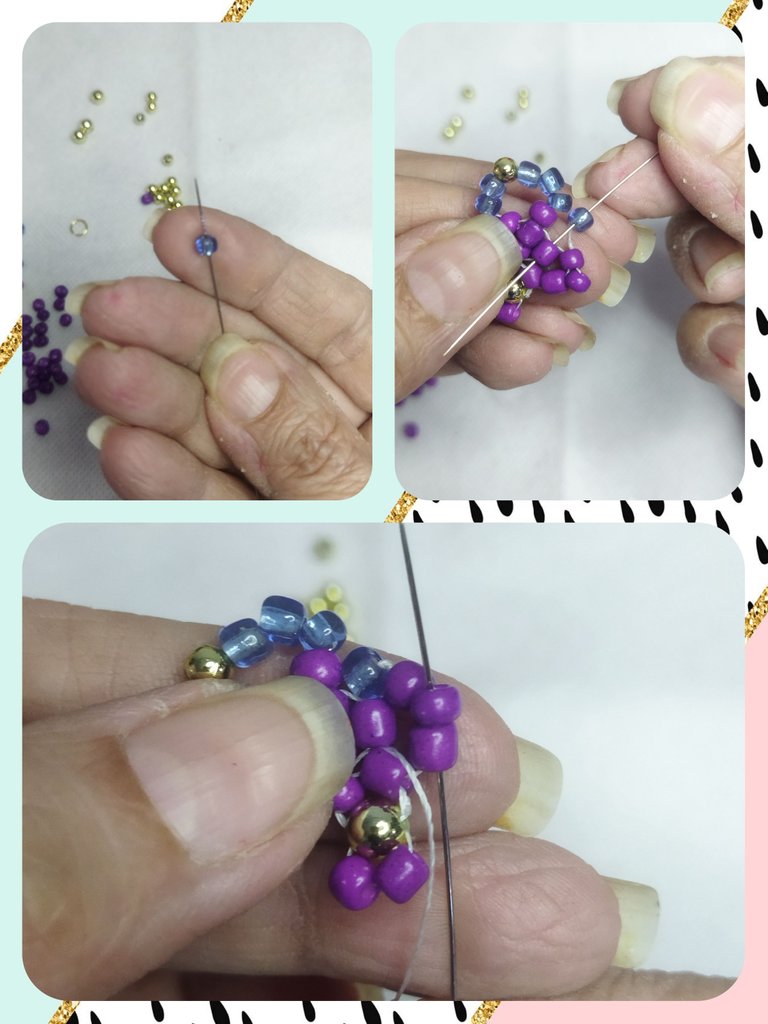
We form the other wing by taking 2 blue moustaches, 1 3mm pellet and 2 blue moustaches and insert through the blue mustachon that we already have in the fabric and through a purple one, the one that follows the blue one, thus forming the other wing.
Formamos la otra ala tomando 2 mostachones azules, 1 balín de 3mm y 2 mostachones azules e introducimos por el mostachón azul que ya tenemos en en tejido y por uno morado, el que le sigue al azul, formando así la otra ala.
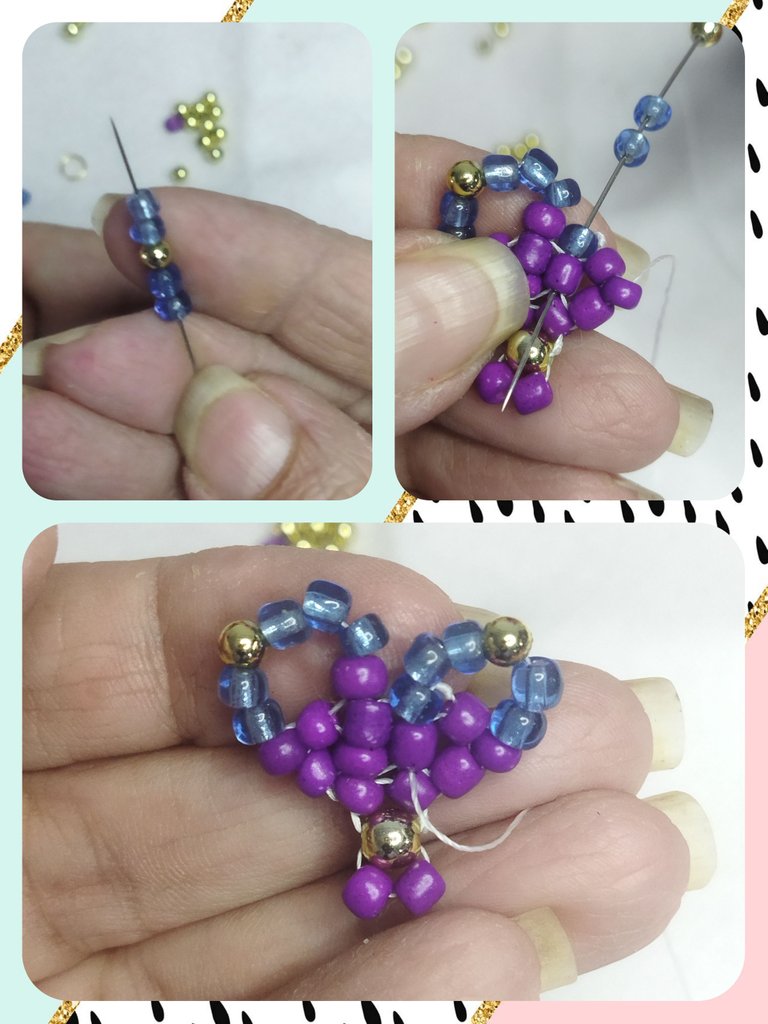
We pass the needle through the central ball and then through one of the purple mastachons on the left side to start the process of the wings again but this time on the other side.
We will begin to form the wings on the left side. We introduce the needle through one of the mastachons and take 3 purple mastachons and insert them through the same mastachon.
Pasamos la aguja por el balín central y luego por uno de los mostachones morados del lado izquierdo para comenzar nuevamente el proceso de las alas pero ahora del otro lado.
Empezaremos a formar las alas del lado izquierdo. Introducimos la aguja por uno de los mostachones y tomamos 3 mostachones morados y los insertamos por el mismo mostachón.
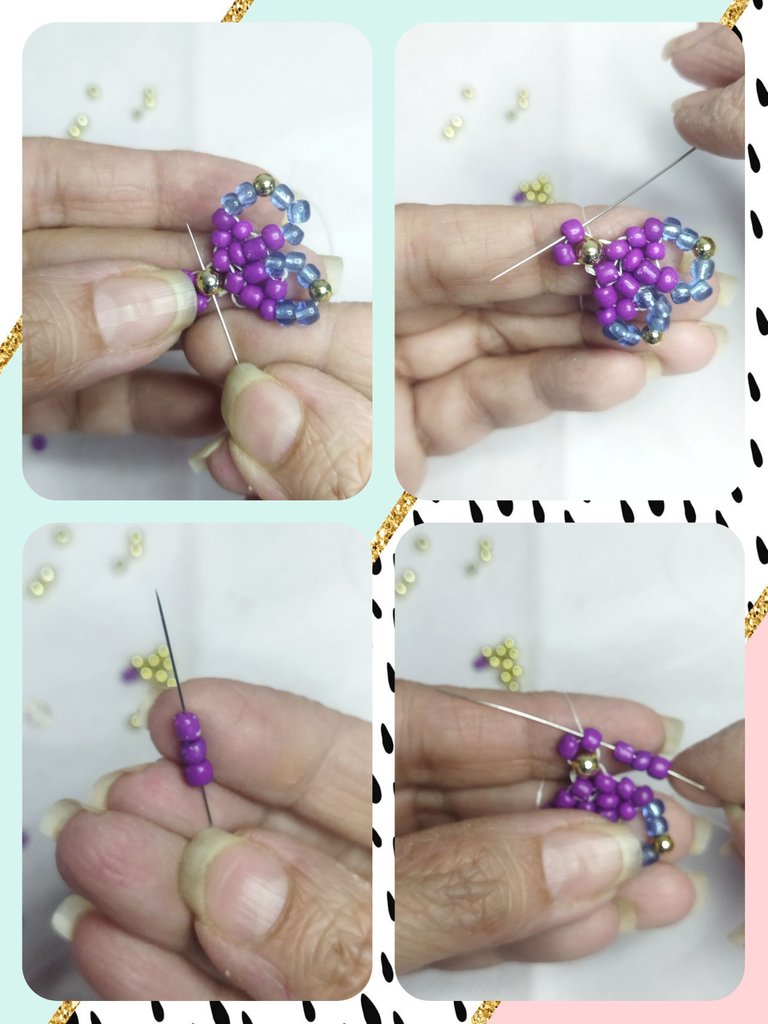
We pass the needle through the adjacent mostachon and take one mostachon and insert it into the next one.
Pasamos la aguja por el mostachón contiguo y tomamos un mostachón e insertamos en el siguiente.
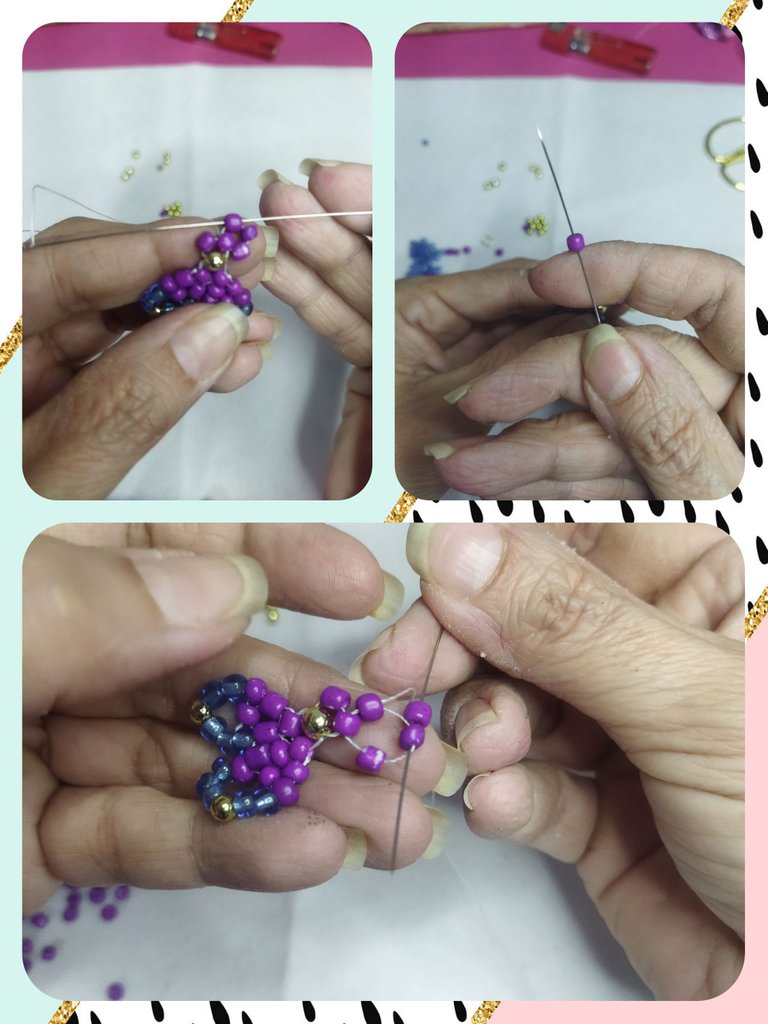
We take another mostachón and we also insert it in the next one. We now pass the needle through the two adjacent mustaches.
Tomamos otro mostachón más e igualmente lo insertamos en el siguiente. Pasamos ahora la aguja por los dos mostachones contiguos.
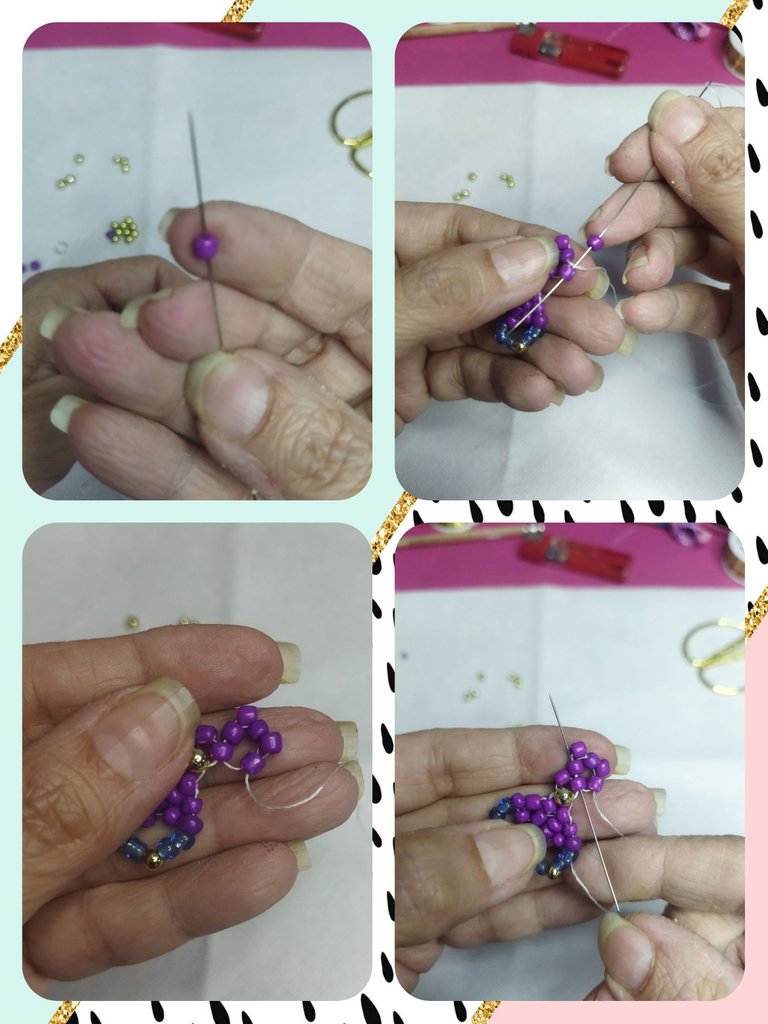
We take 1 purple mostachon, 3 blue, 1 3 mm pellet and 2 blue mostachon, we introduce it into the next mustachon, leaving one in between. Forming the first fin on the left side.
Tomamos 1 mostachón morado, 3 azules, 1 balín de 3 mm y 2 mostachones azules, lo introducimos en el mostachón siguiente, dejando uno de por medio. Formando la primera aleta del lado izquierdo.
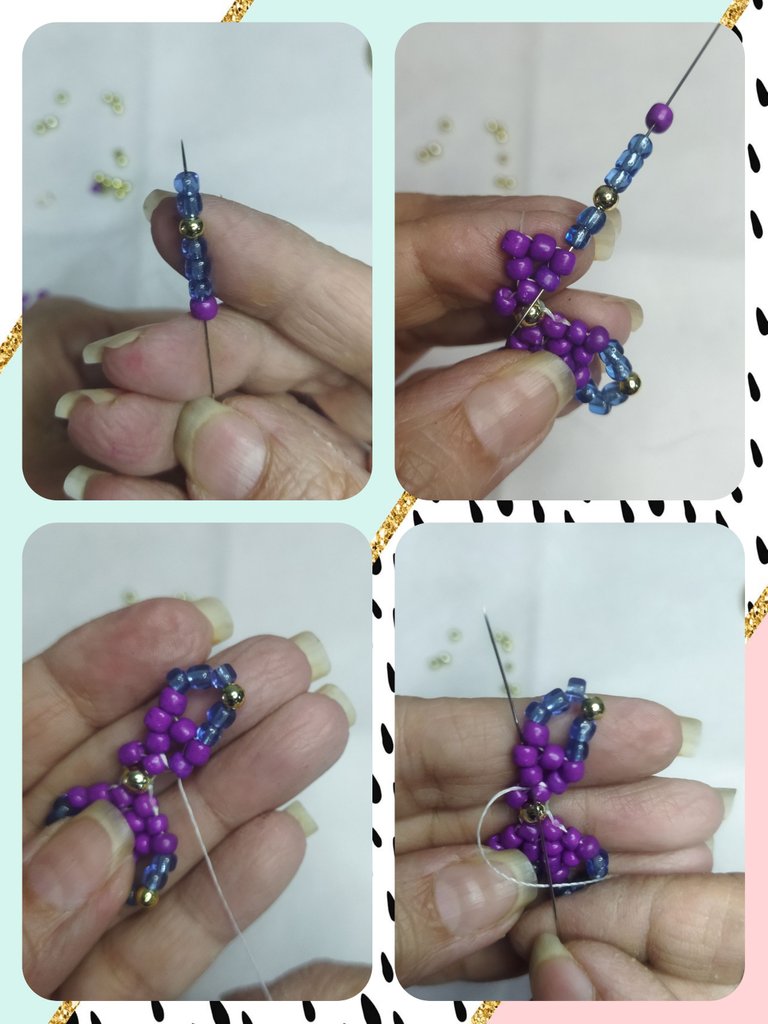
We continue to introduce the needle between the two mastachons, skip one and introduce through the next two. We take a purple mustachon and introduce it through the same two previous ones. Forming one of the wings on the left side.
Continuamos introduciendo la aguja entre los dos mostachones, saltamos uno e introducimos por los dos siguientes. Tomamos un mostachón morado e introducimos por los mismos dos anteriores. Formando una de las alas del lado izquierdo.
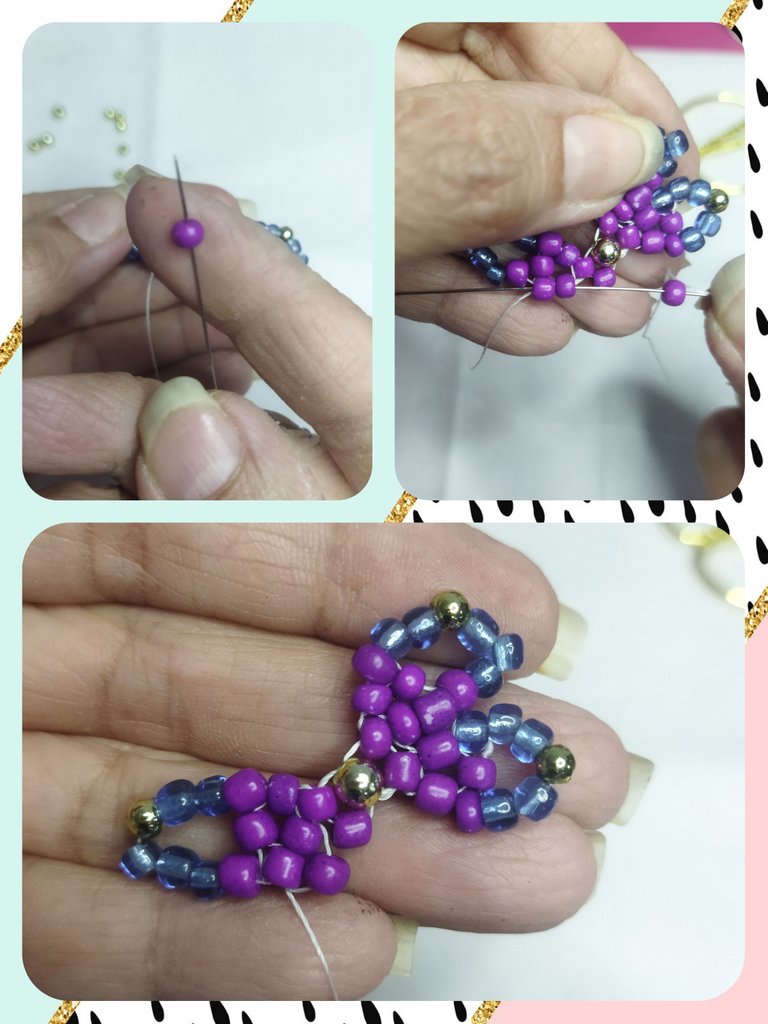
We will pass the needle through the mostachon that we have just inserted and through the lower one. We take two purple mustaches and introduce again through the previous two.
Pasaremos la aguja por el mostachón que acabamos de introducir y por el inferior. Tomamos dos mostachones morados e introducimos nuevamente por los dos anteriores.
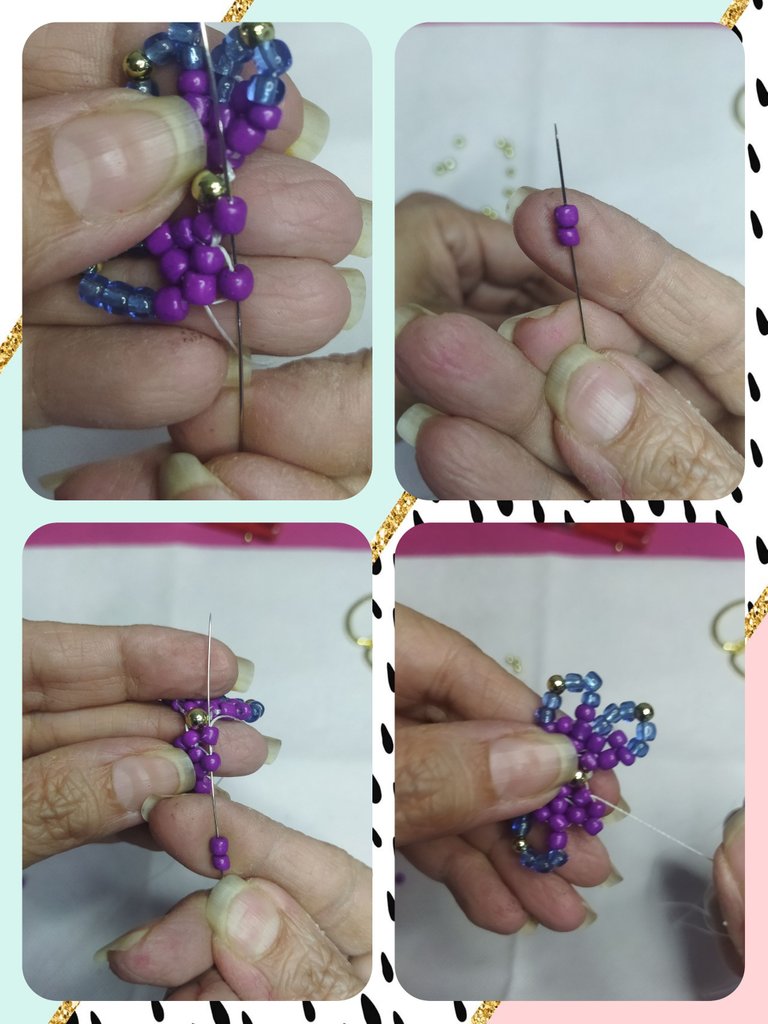
We pass the needle through the next mostachon, take one mostachon and insert it into the next one.
Pasamos la aguja por el mostachón siguiente, tomamos un mostachón y lo insertamos en el que sigue.
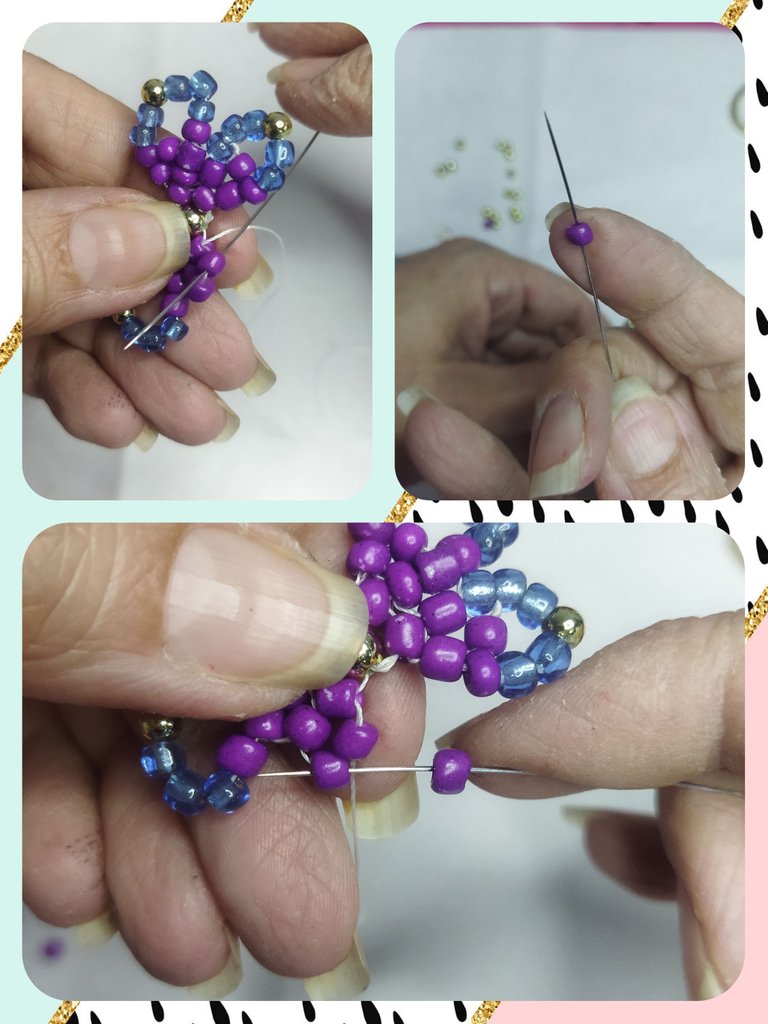
Now we take a blue mustachon and introduce it through the left purple mustachon, then we pass it through the next two leaving one in between.
Ahora tomamos un mostachón azul y lo introducimos por el mostachón morado izquierdo, luego lo pasamos por los dos siguientes dejando uno intermedio.
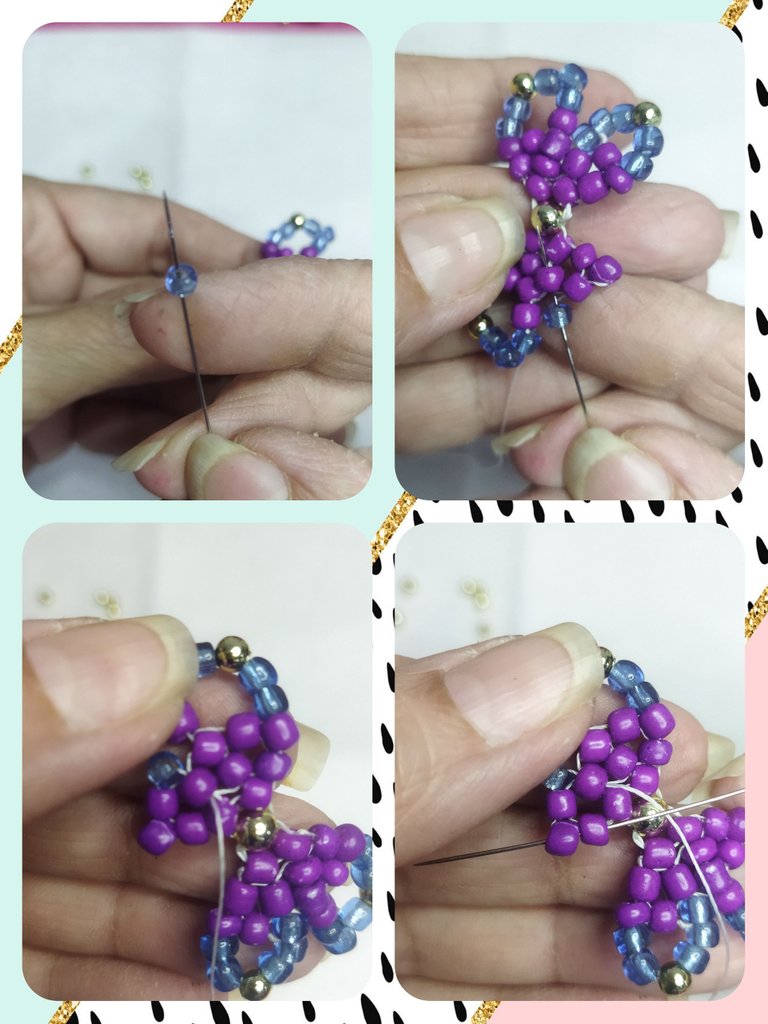
We form the other wing by taking 2 blue moustaches, 1 3mm pellet and 2 blue moustaches and introduce through the blue moustachon that we already have in the fabric and through a purple one, the one that follows the blue one, thus forming the other wing to finish the body of the butterfly
Formamos la otra ala tomando 2 mostachones azules, 1 balín de 3mm y 2 mostachones azules e introducimos por el mostachón azul que ya tenemos en en tejido y por uno morado, el que le sigue al azul, formando así la otra ala para terminar el cuerpo de la mariposa.
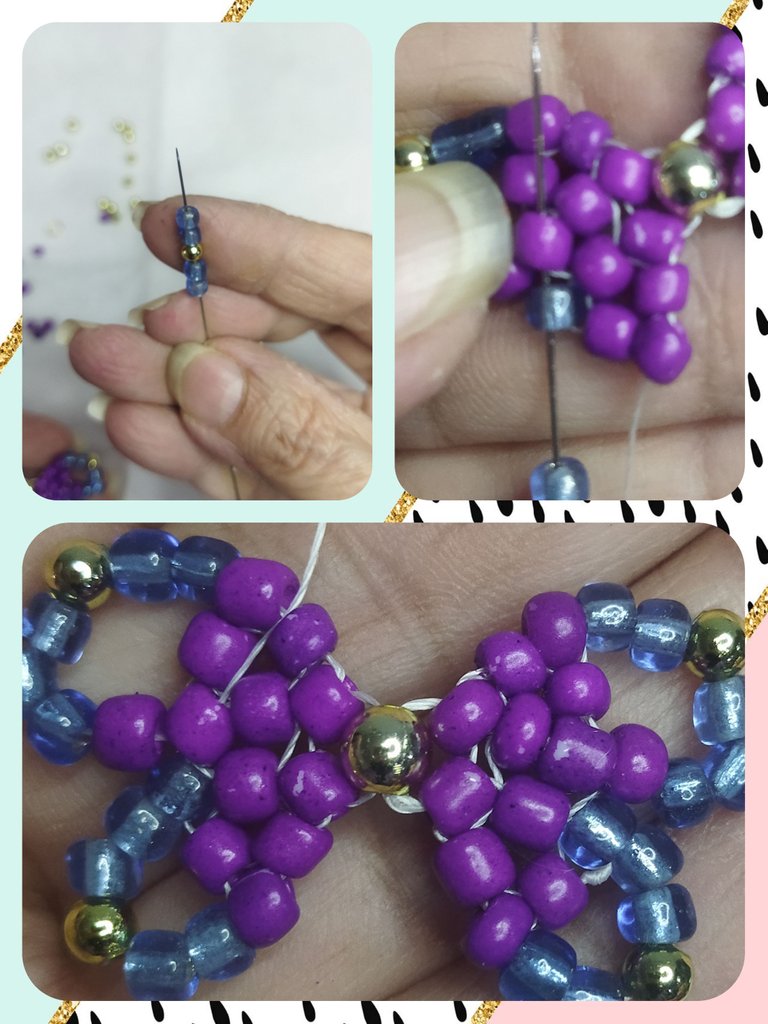
We pass the needle through the adjoining purple mustachon and then through the central pellet, to begin to form the antennae.
Pasamos la aguja por el mostachón morado contigua y luego por el balín central, para comenzar a formar las antenas.
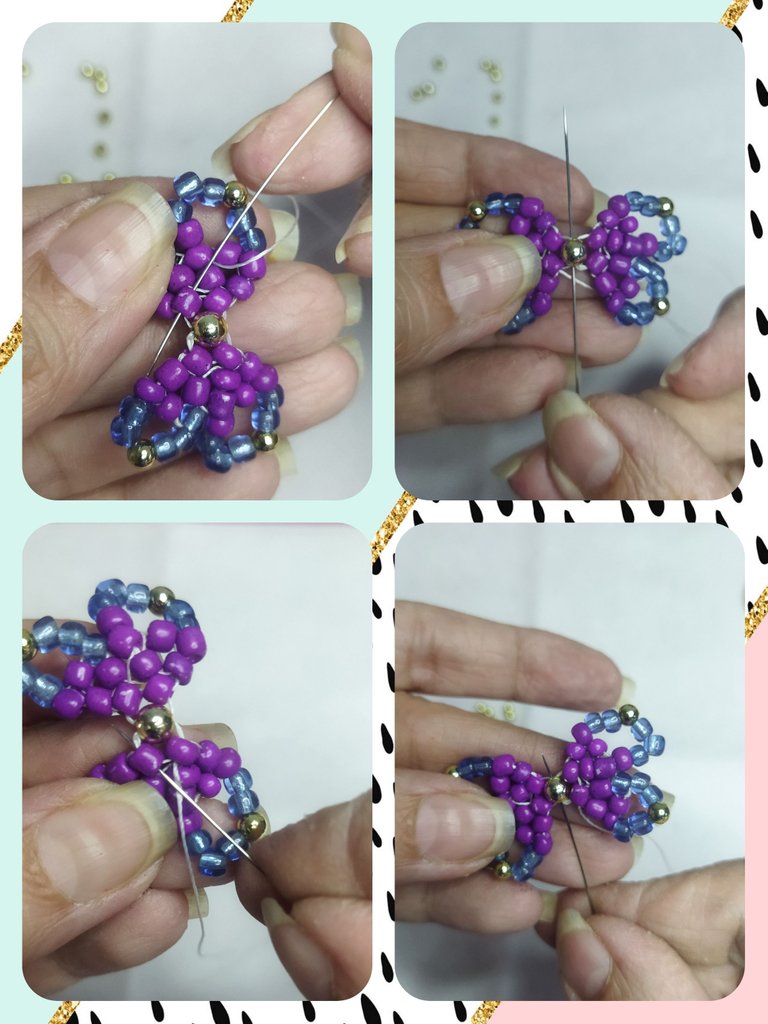
For the first antenna we will take 5 pellets of 3 mm and 1 of 5 mm, we take until joining with the central pellet. Then we pass the needle through the center of the 3 mm pellets and through the central pellet, leaving the 5 mm one on the outside.
Para la primera antena tomaremos 5 balines de 3 mm y 1 de 5 mm, llevamos hasta unir con el balín central. Luego pasamos la aguja por el centro de los balines de 3 mm y por el balín central, dejando por fuera el de 5 mm.
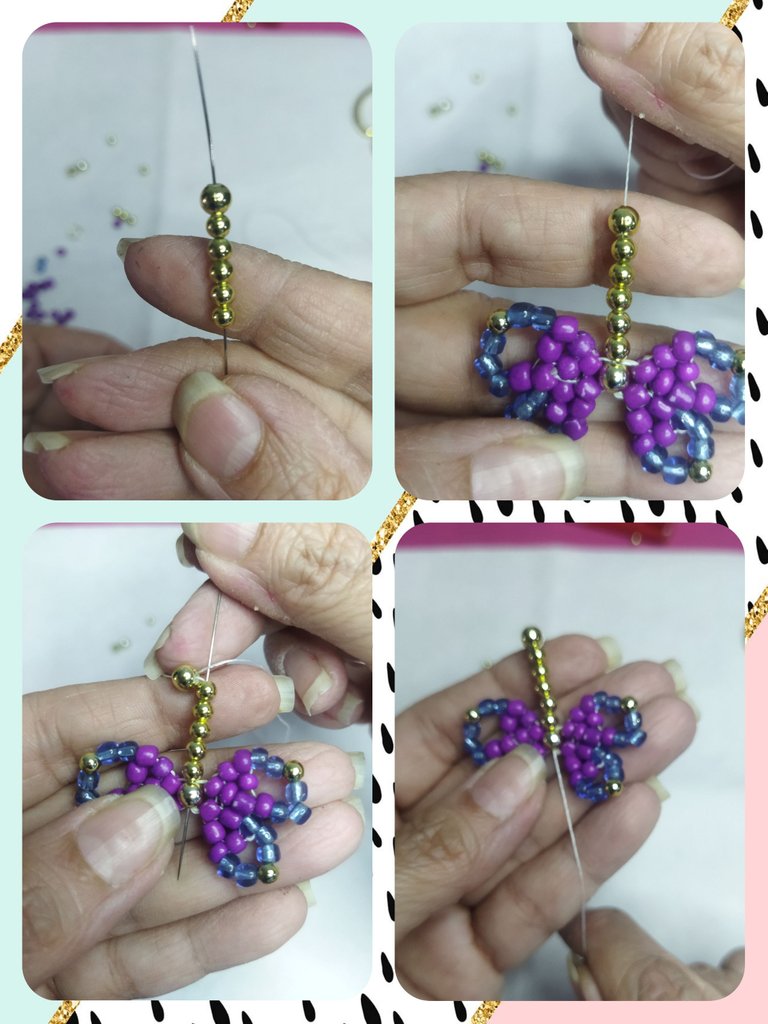
We take another 5mm pellet and pass again through the central pellet and one of the 3mm pellets of the antenna that we already formed.
Tomamos otro balín de 5 mm y pasamos nuevamente por el balín central y uno de los balines de 3mm de la antena que ya formamos.
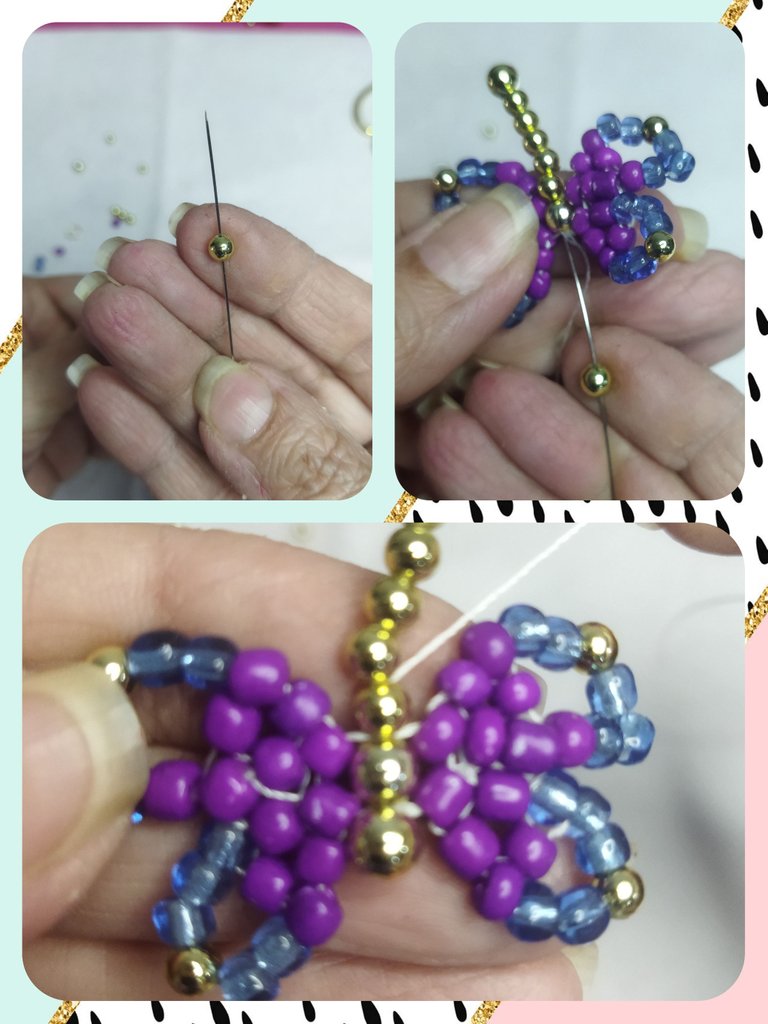
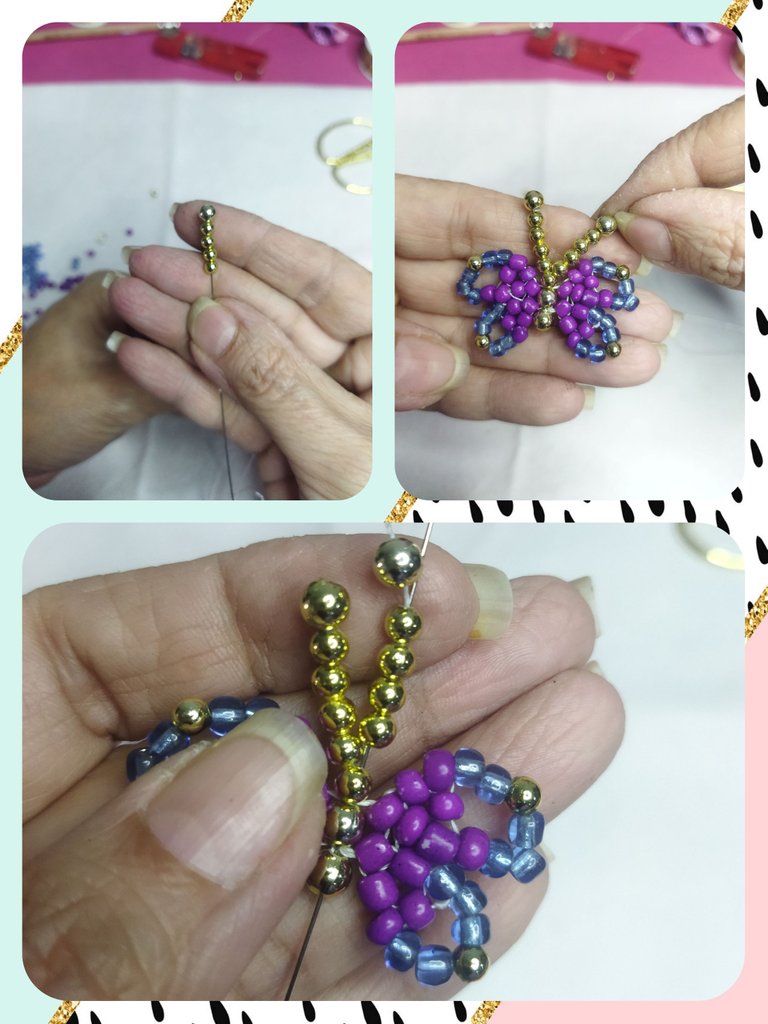
We take 4 balis of 3mm and 1 of 5mm to form the other antenna. We take it until it hits the other antenna and we introduce the needle through the pellets, omitting the 5 mm one, and we remove until the end of the 5 mm pellets.
Tomamos 4 balis de 3mm y 1 de 5mm para formar la otra antena. Llevamos hasta pegar a la otra antena e introducimos la aguja por los balines omitiendo el de 5 mm y sacamos hasta el final de los balines de 5 mm.
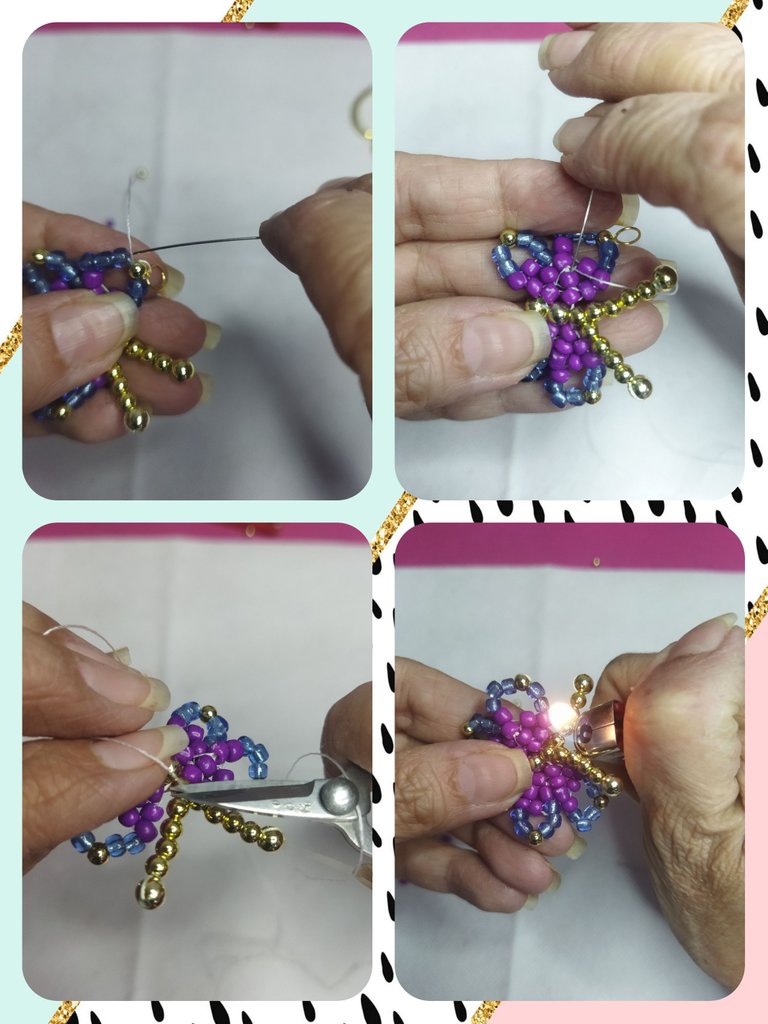
We already have the butterfly formed. To place the ring, we will pass the needle inside the mastachons until we reach the 3 mm pellet on the left wing. Once there, we place the ring and introduce it again through the pellet, tighten it tightly and return through the mastachons.
Ya tenemos formada la mariposa. Para colocar el aro, pasaremos la aguja por dentro de los mostachones hasta llegar al balín de 3 mm del ala izquierdo. Una vez allí, Colocamos el aro e introducimos nuevamente por el balín, ajustamos fuerte y regresamos por los mostachones.
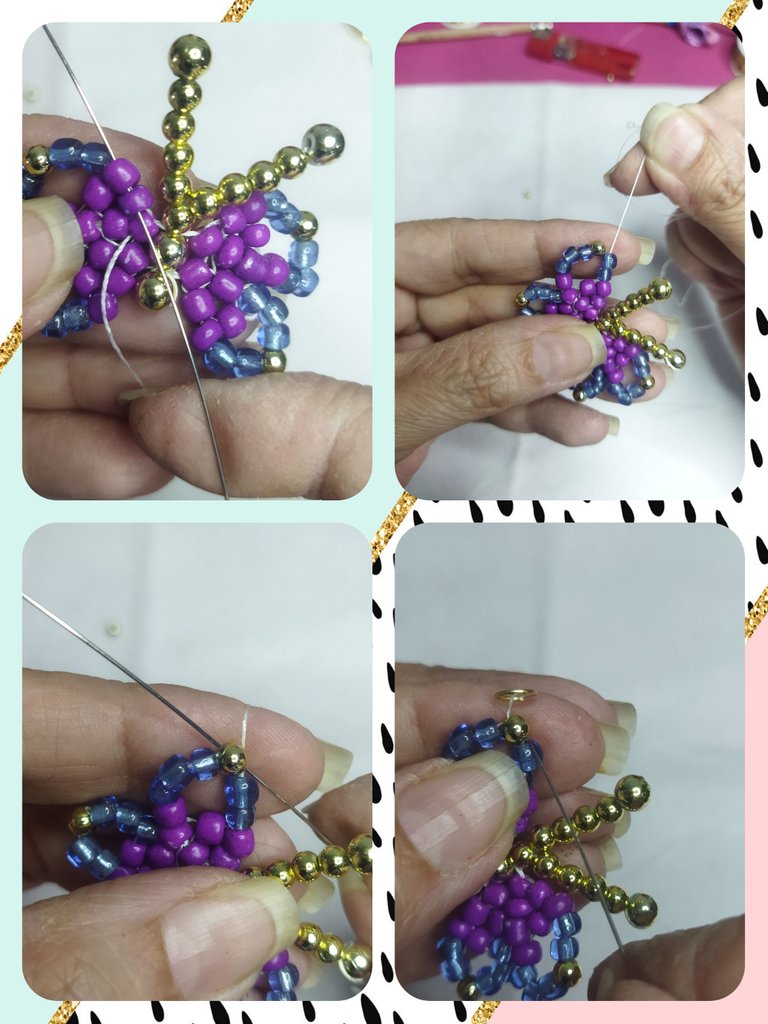
I must remind you that in each turn we make with each mustachon, we must tighten the thread hard so that the piece is firm. Once we have secured the thread between the mostachones, we cut and seal with the lighter.
Debo recordarles que en cada vuelta que hacemos con cada mostachón, debemos ajustar duro el hilo para que la pieza quede firme. Una vez que hemos asegurado el hilo entre los mostachones, cortamos y sellamos con el encendedor.
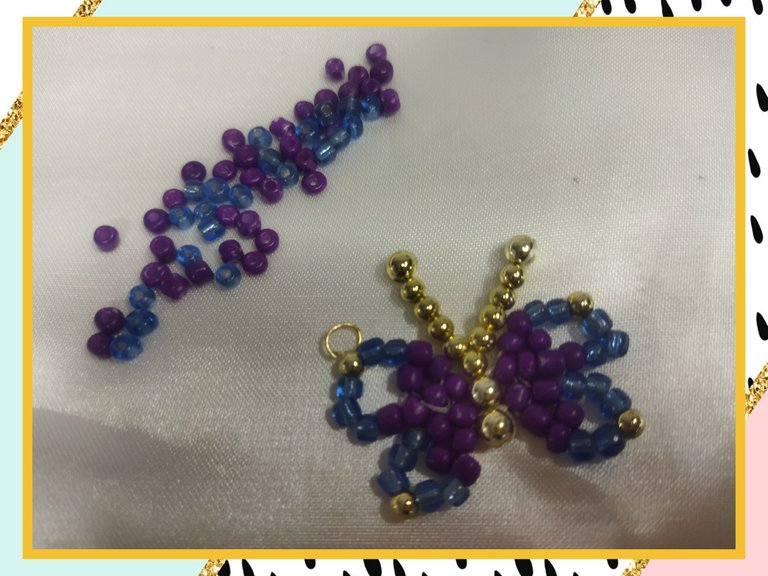
A piece that at first glance we believe is very simple but that requires a little concentration and patience. When I tell you that you should adjust the thread with each turn, it is because on more than one occasion I had to destroy what I had made because it was getting loose. But after so much I was able to achieve it. So here I leave them. I hope you like this cute Butterfly pendant. See you next time.
Una pieza que a simple vista creemos que es bien sencilla pero que requiere un poco de concentración y paciencia. Cuando les digo que deben ir ajustando el hilo en cada vuelta es porque en más de una ocasión tuve que destruir lo que llevaba hecho debido a que estaba quedando flojo. Pero después de tanto pude lograrlo. Así que aquí se los dejo. Espero les guste este lindo dije Mariposa. Nos vemos en la próxima.
Es muy hermosa, ¡me encanta!♥💟👍
Holaaa, gracias 😁
Oye, pero valió todo tu empeño en lograr la forma de la mariposa, se ve muy linda. 🙋✍️😂📸🥳🧐
Wow, what a lovely pendant! The butterfly theme is so gorgeous.
@tipu curate 4
Upvoted 👌 (Mana: 0/55) Liquid rewards.
Hermosa la mariposa. Gracias por mostrarnos el progreso de elaboración 🤗