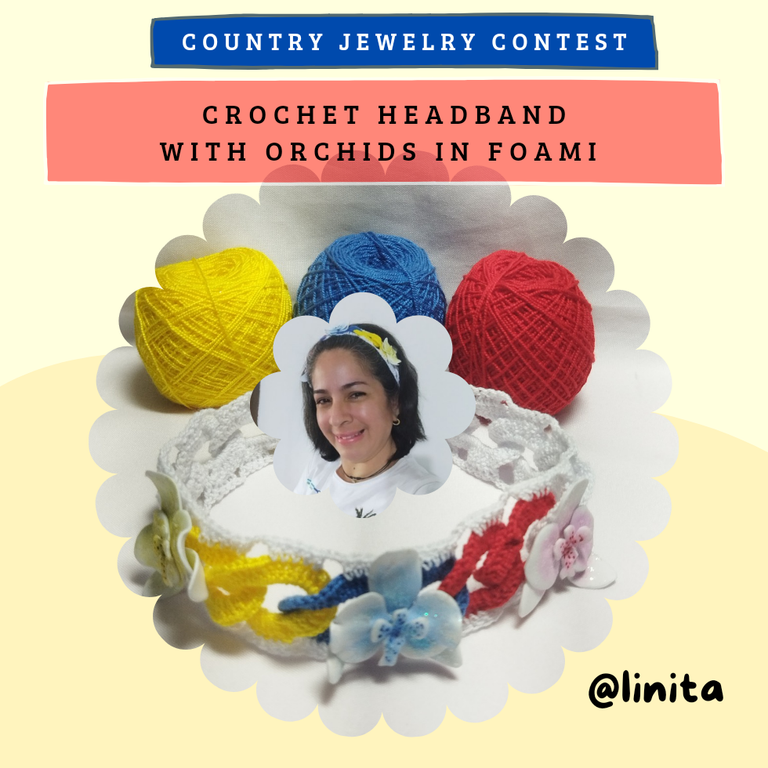
WELCOME TO MY BLOG
Hellooooo, hellooooo! Greetings creators of #Jewelry. Venezuela, my country, land of hard-working, supportive people full of love to give. Since we are born and begin to have a sense of belonging, we are taught to love, care for, respect and protect our territory. At school we are taught our national symbols (the flag, the coat of arms and our national anthem) and the natural national symbols (the araguaney, our national tree; the turpial, our national bird; and the orchid, the national flower).
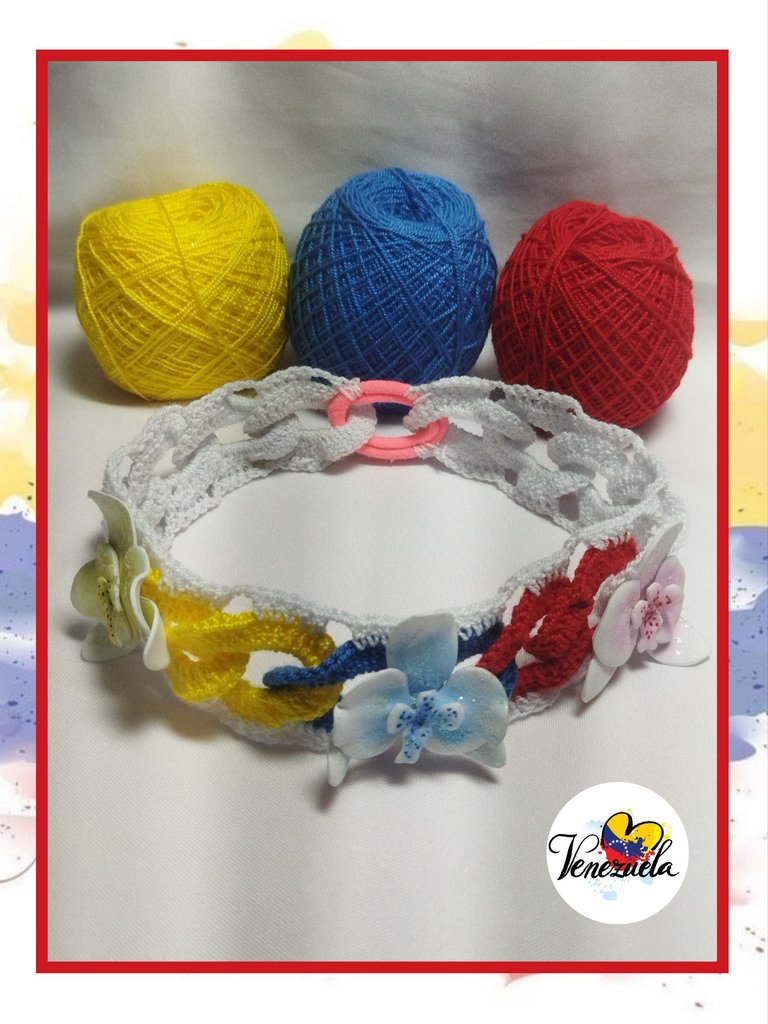
This contest is about creating an accessory alluding to our country of origin. For my participation I created a crocheted quilt including two of our national symbols, the tricolor of our flag, yellow, blue and red and for the decoration I made 3 orchids, making a soft shade on each of them, highlighting the tricolor. I hope you like it.
BIENVENIDOS A MI BLOG
¡Holaaaa, holaaaaa! Saludos creadores de #Jewelry. Venezuela, mi país, tierra de gente trabajadora, solidaria y llena de amor para dar. Desde que nacemos y comenzamos a tener sentido de pertenencia, nos enseñan a amar cuidar, respetar y proteger nuestro territorio. En la escuela nos enesñan nuestros símbolos patrios (la bandera, el escudo y nuestro himno nacional) y los símbolos patrios naturales (el araguaney, nuestro árbol nacional; el turpial, nuestra ave nacional; y la orquídea, la flor nacional).
Este concurso trata de crear un accesorio alusivo a nuestro país de origen. Para mi participación creé un contillo tejido a crochet incluyendo dos de nuestros símbolos patrios, el tricolor de nuestra bandera, amarillo azul y rojo y para la decoración realicé 3 orquídeas, realizando en cada una de ellas un matizado suave, resaltando el tricolor. Espero les guste.
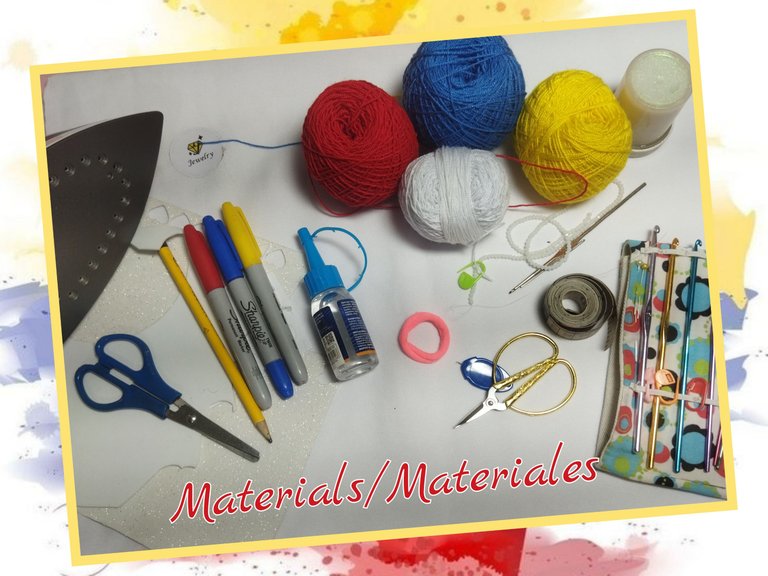
MATERIALS
- Acrylic crochet threads (white, yellow, blue and red)
- 1.6 mm crochet hook
- Yarn needle
- White foam
- Elastic band or ponytail
- Acrylic markers
- Graphite pencil
- Scissors
- Iron
- Liquid silicone
- Alcohol and swab
- Frosted gel
- Paintbrush
- Measuring tape
- 5 cm orchid mold
MATERIALES
- Hilos de crochet acrílico (blanco, amarillo, azul y rojo)
- Aguja de crochet 1,6 mm
- Aguja lanera
- Foami blanco
- Banda elástica o colita
- Marcadores acrílicos
- Lápiz de grafito
- Tijeras
- Plancha
- Silicón líquido
- Alcohol e hisopo
- Gel escarchado
- Pincel
- Cinta métrica
- Molde de orquídea de 5 cm
STEP BY STEP // PASO A PASO
ORCHIDS
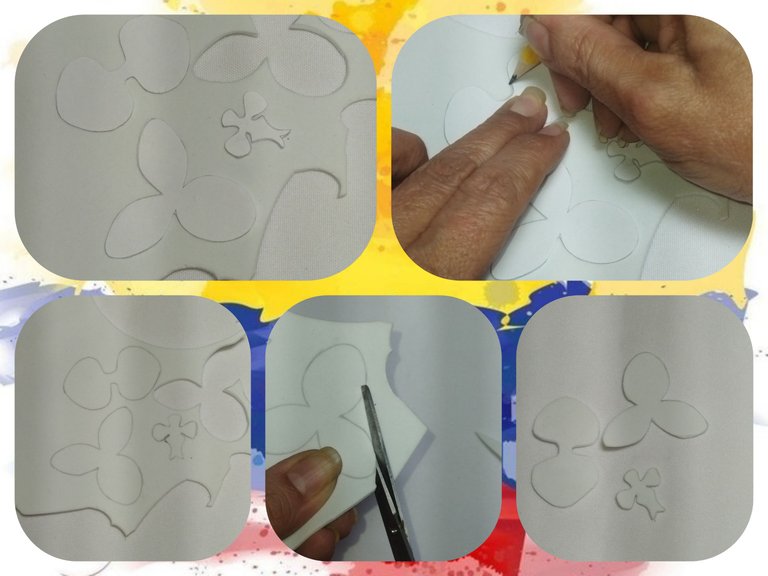
We begin by making the orchids that will be our pieces to decorate the headband. We use the mold according to the desired size, in this case I will be using a 5 cm one.
We place the pieces on the back of the foam and trace with the pencil. Then we cut them out.
ORQUÍDEAS
Comenzamos realizando las orquídeas que serán nuestras piezas para adornar el cintillo. Utilizamos e molde acorde al tamaño deseado, en este caso estaré utilizando uno de 5 cm.
Colocamos las piezas al reverso en el foami y trazamos con el lápiz. Luego recortamos.
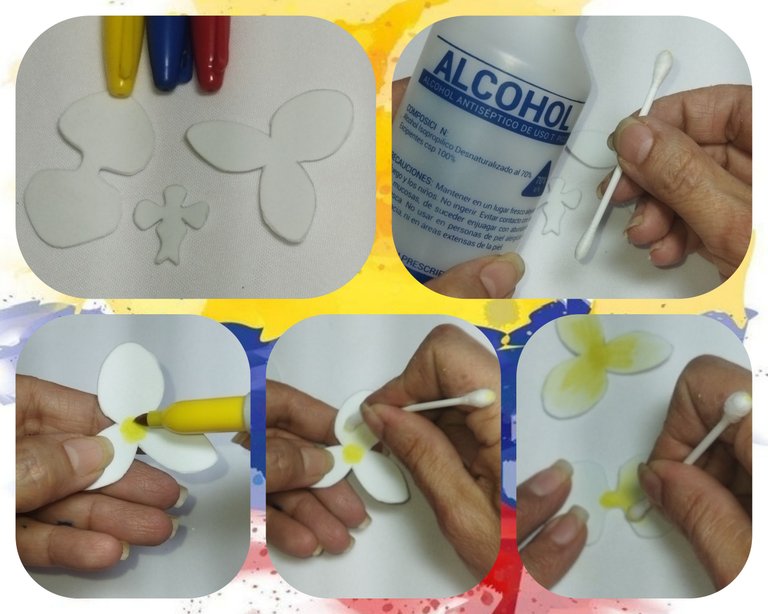
Now we are going to shade each of the parts using the acrylic markers, the cotton swab and the alcohol. If you use water-based markers, you only have to moisten the brush with water to blend.
We take the marker corresponding to the color we want and stain the center of the piece. From there, we begin to blend from the inside out in straight lines until we cover the petals of the flower.
Ahora vamos a matizar cada una de las partes utilizando los marcadores acrílicos, el hisopo y el alchohol. Si usas marcadores a base de agua, sólo debes humedecer el pincel con agua para realizar el difuminado.
Tomamos el marcador correspondiente al color que queremos y manchamos el centro de la pieza. A partir de allí, comenzamos a difuminar de adentro hacia afuera en líneas rectas hasta cubrir los pétalos de la flor.
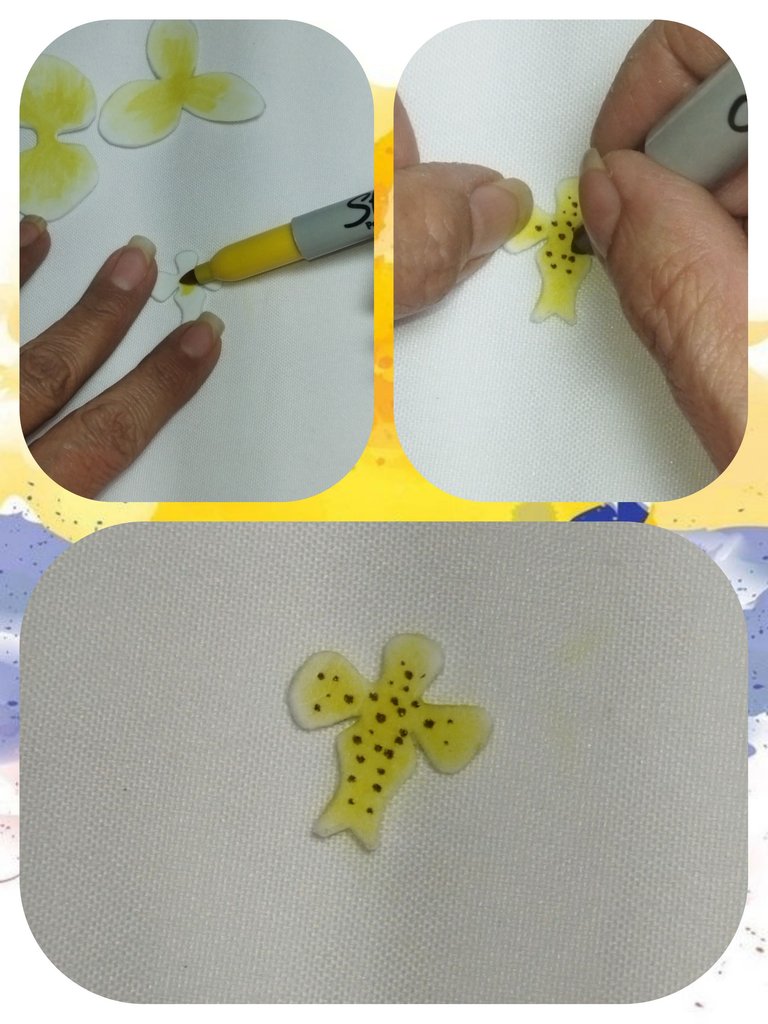
We apply the same technique to the two remaining pieces and on the smallest one we will make small stitches.
Aplicamos la misma técnica en las dos piezas restantes y en la más pequeña vamos a realizar pequeños puntos.
Now we are going to shape it with the iron at a high temperature. We are going to use a thin object to make the center of the first piece. We place it on the iron until it is hot, we remove it and immediately place it along the object, it can be a toothpick or the crochet hook itself. We apply pressure for a moment, until we obtain the desired shape.
Ahora vamos a darle forma con la plancha a temperatura alta. Camos a utilizar un objeto delgado para realizar el centro de la primera pieza. Colocamos en la plancha hasta que esté caliente, retiramos e inmediatamente colocamos a lo largo del objeto, puede ser un palillo o la misma aguja de crochet. Hacemos presión un instante, hasta obtener la forma deseada.
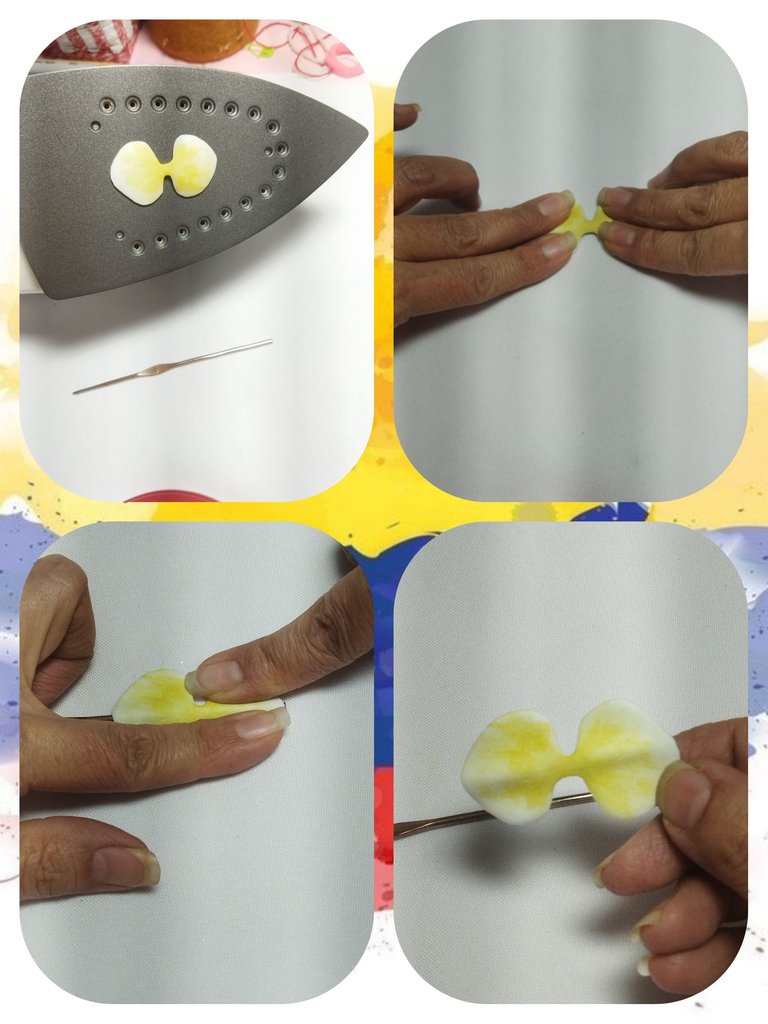
We place the second piece and once it is hot, with the tip of our index finger and thumb, we stretch it slightly and fold it upwards.
Colocamos la segunda pieza y una vez caliente con la yema de los dedos índice y pulgar estiramos ligeramente y doblamos hacia arriba.
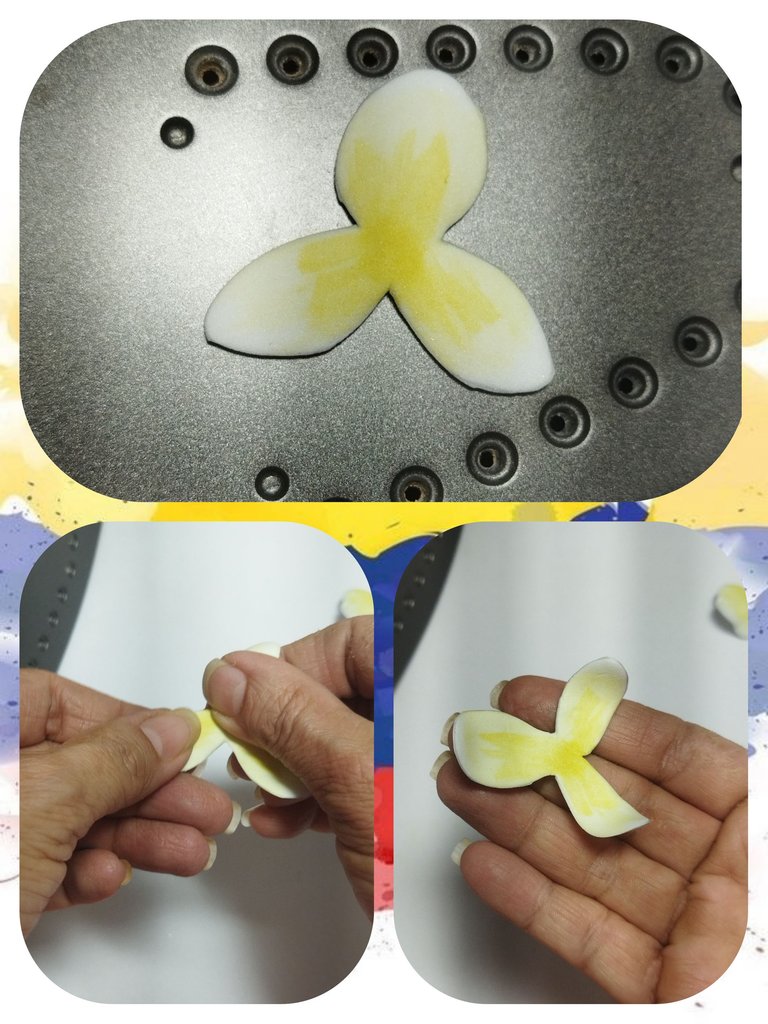
We place the third piece, heat it and with the tip of a brush we press the center until it sinks, so that the petals stand out.
Colocamos la tercera pieza, calentamos y con la punta de un pincel presionamos el centro hasta hundirlo, de manera que los pétalos sobresalgan.
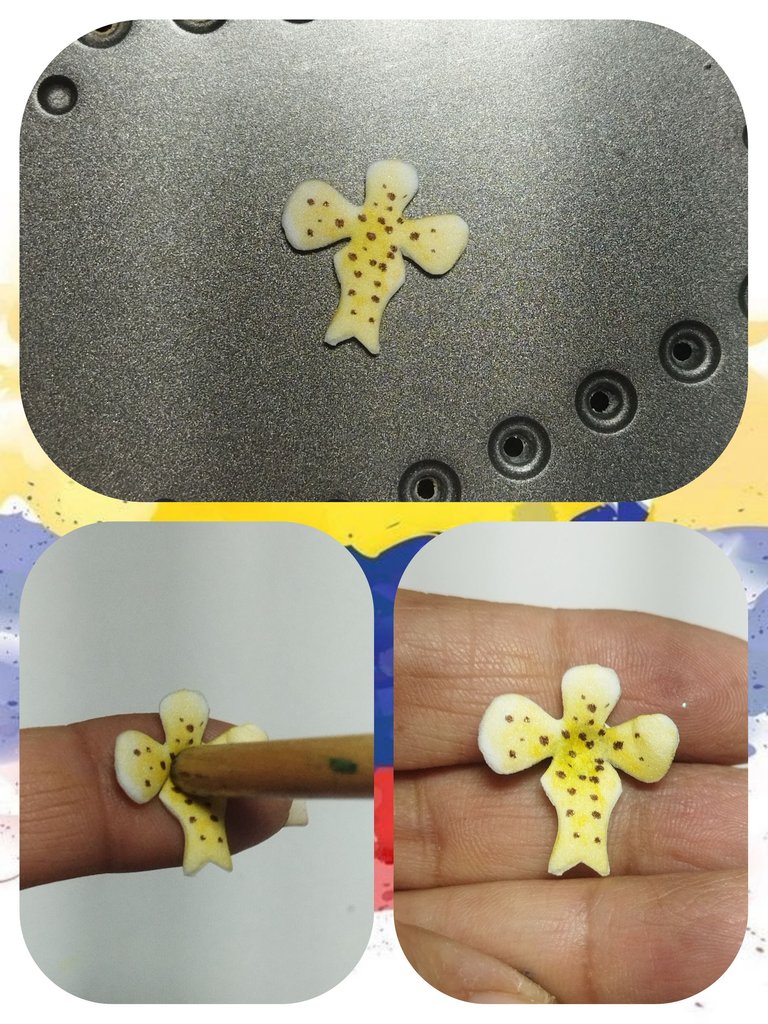
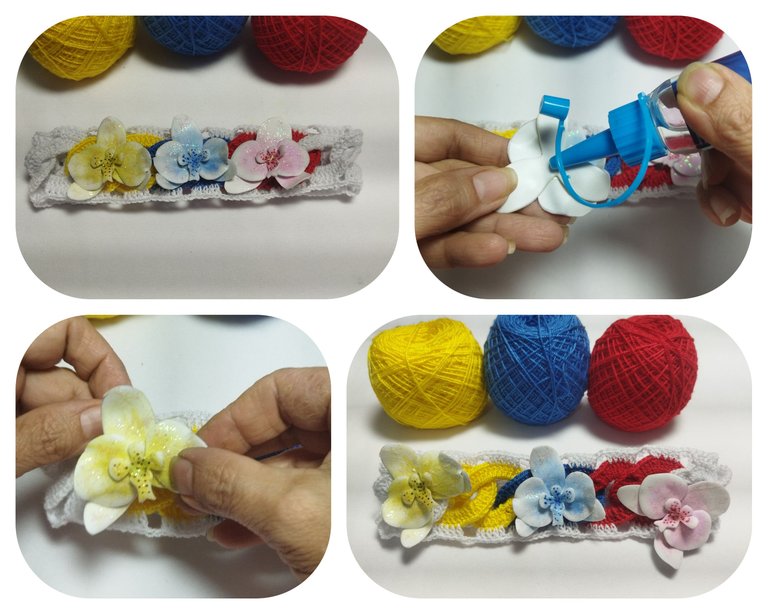
We glue the 3 pieces together with silicone. Starting with the one with 3 petals as a base, we then place the second one and finally the smallest one, and with this we form our orchids.
Pegamos las 3 piezas con silicón. Comenzando con la que tiene 3 pétalos como base, luego colocamos la segunda y por último la más pequeña, y con ésta formamos nuestras orquídeas.
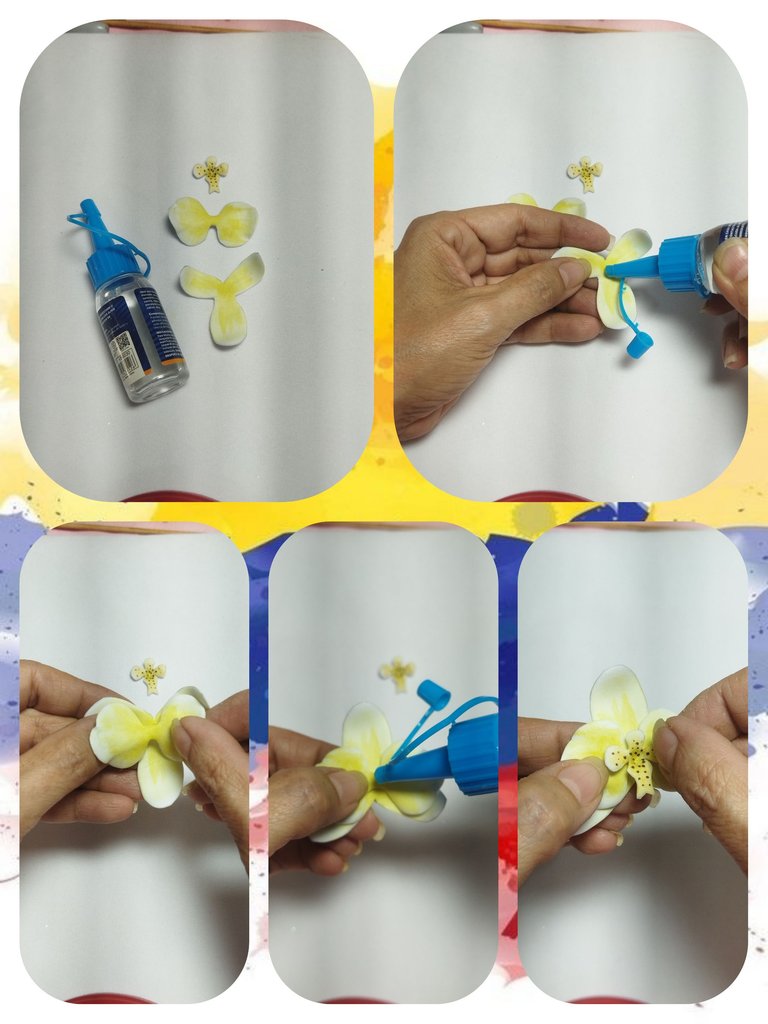
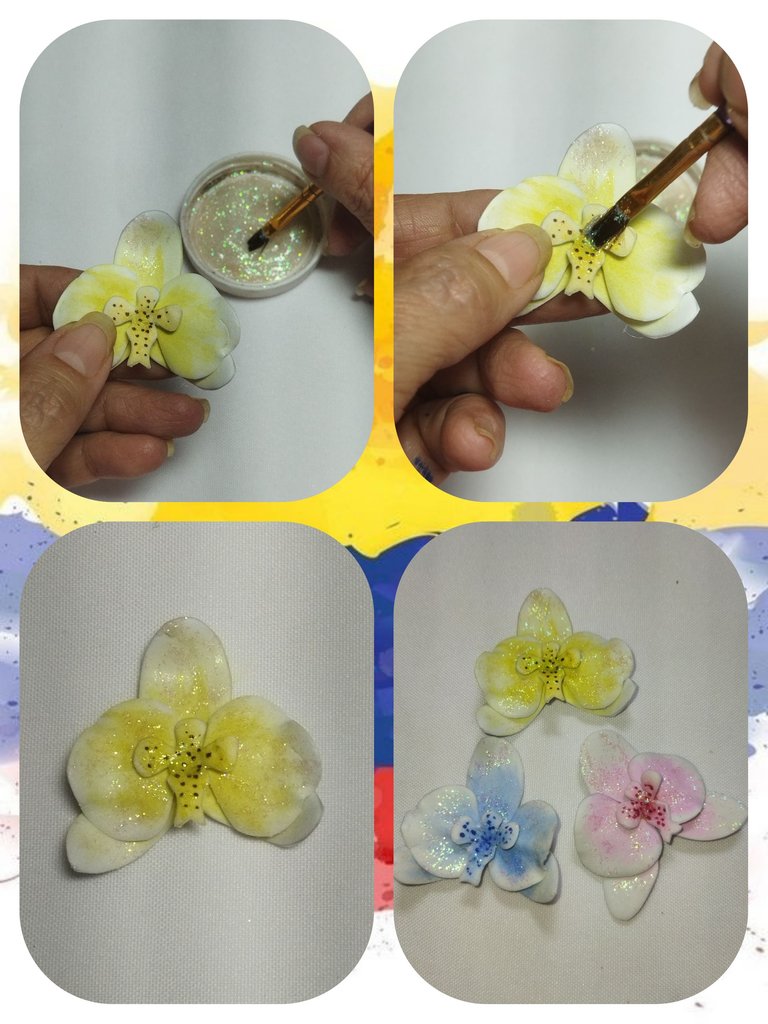
Once the pieces are glued, we varnish them with iridescent frosted gel. We make the other two orchids using the markers of the other colors and we will obtain 3 orchids (yellow, blue and red).
Una vez pegadas las piezas, barnizamos con gel escarchado tornasol. Realizamos las otras dos orquídeas utilizando los marcadaores de los otros colores y obtendremos 3 orquídeas (amarilla, azul y roja)
HEADBAND
The headband is made by forming woven rings in white, yellow, blue and red, linked together.
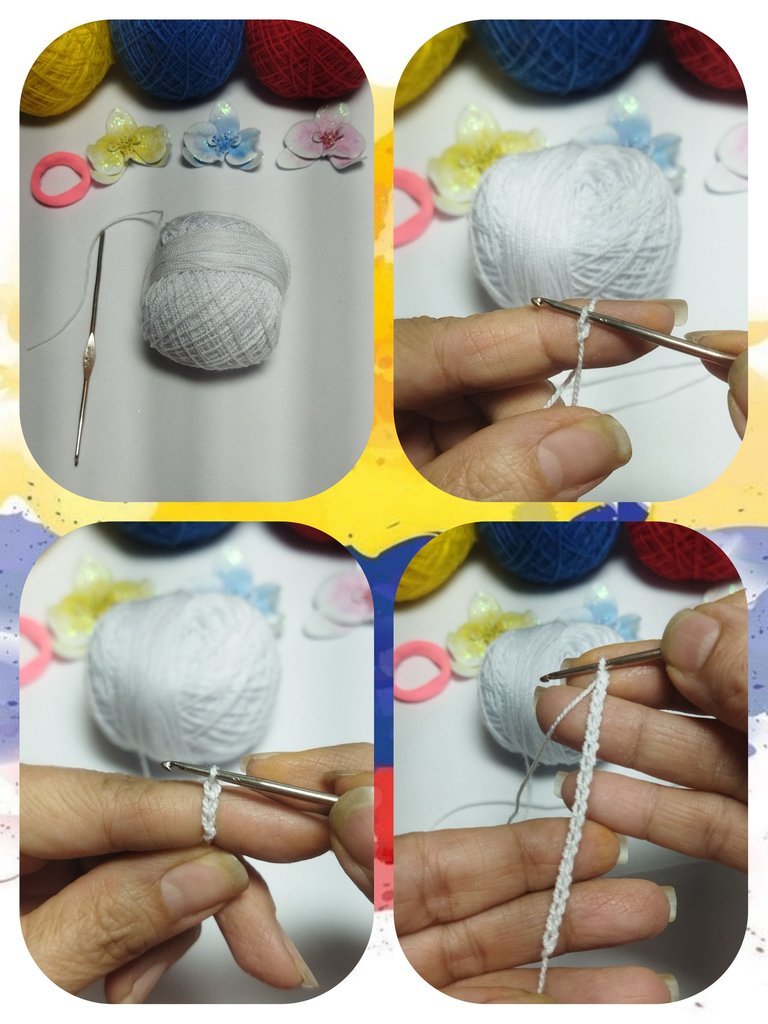
- For the headband we will start with the white thread, making a chain of 20 stitches.
- We take the ponytail and pass the chain through the middle and close with a slip stitch in the first stitch of the chain.
CINTILLO
La realización del cintillo consiste en formar anillos tejidos en colores blanco, amarillo, azul y rojo, enlazados entre si.
- Para el cintillo vamos a comenzar con el hilo blanco, realizando una cadena de 20 puntos.
- Tomamos la colita y pasamos la cadena por el medio y cerramos con un punto deslizado en el primer punto de la cadena.
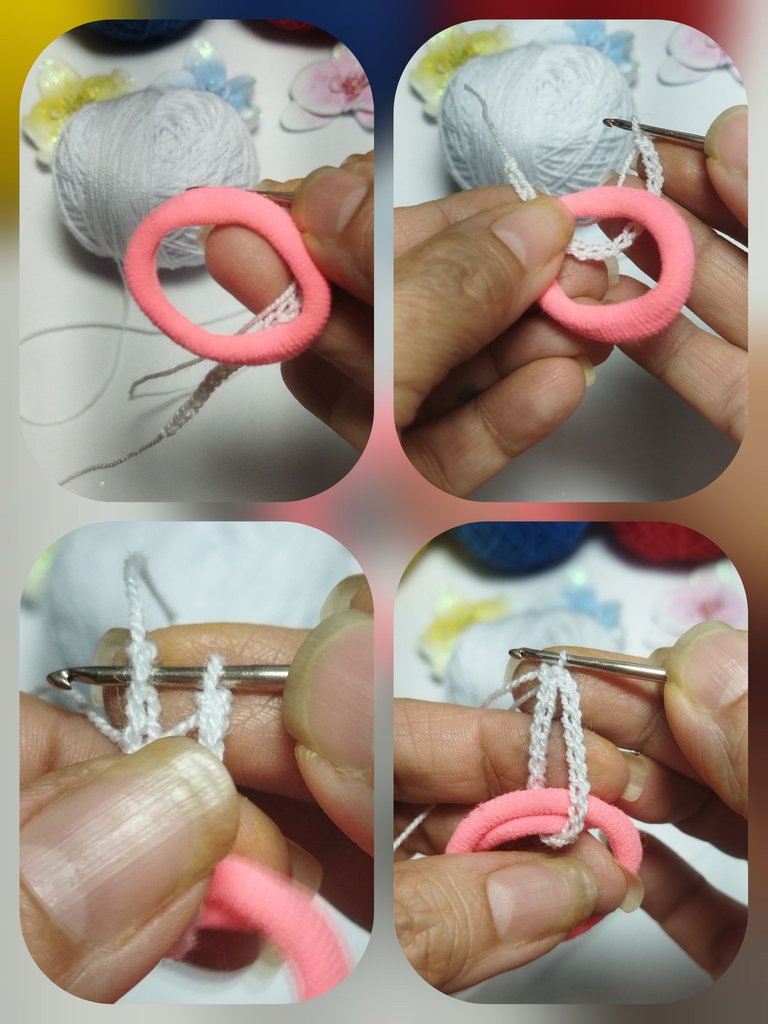
- We pick up 3 chains and weave 40 double crochet stitches inside the ring formed with the chains.
- To make the closure, we cut the thread leaving a long tail, we pass it through the wool needle and insert the needle through the first stitch of the row to make the magic closure. Then we go through the back part, we make a stitch, we hide the remaining thread and we cut the rest.
- Levantamos 3 cadenas y tejemos 40 puntos altos por dentro del aro formado con las cadenas.
- Para realizar el cierre cortamos el hilo dejando una hebra larga, pasamos por la aguja lanera e introducimos la aguja por el primer punto de la vuelta para realizar el cierre mágico. Luego pasamos por la parte trasera realizamos un punto, escondemos el hilo restante y cortamos el resto.
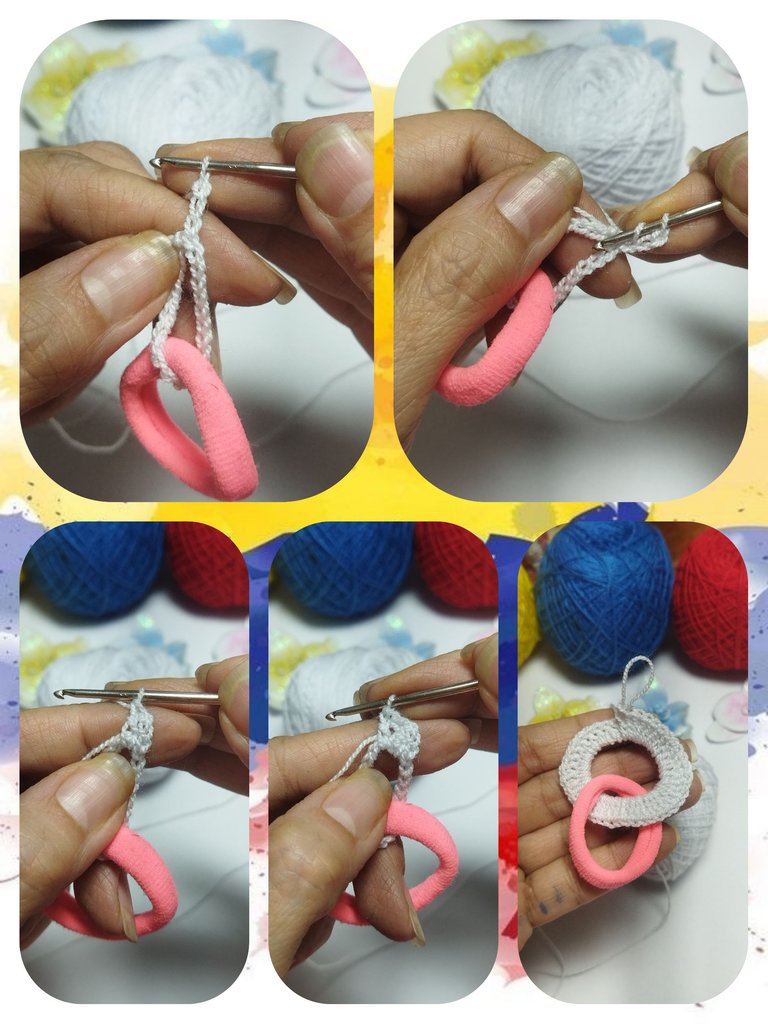
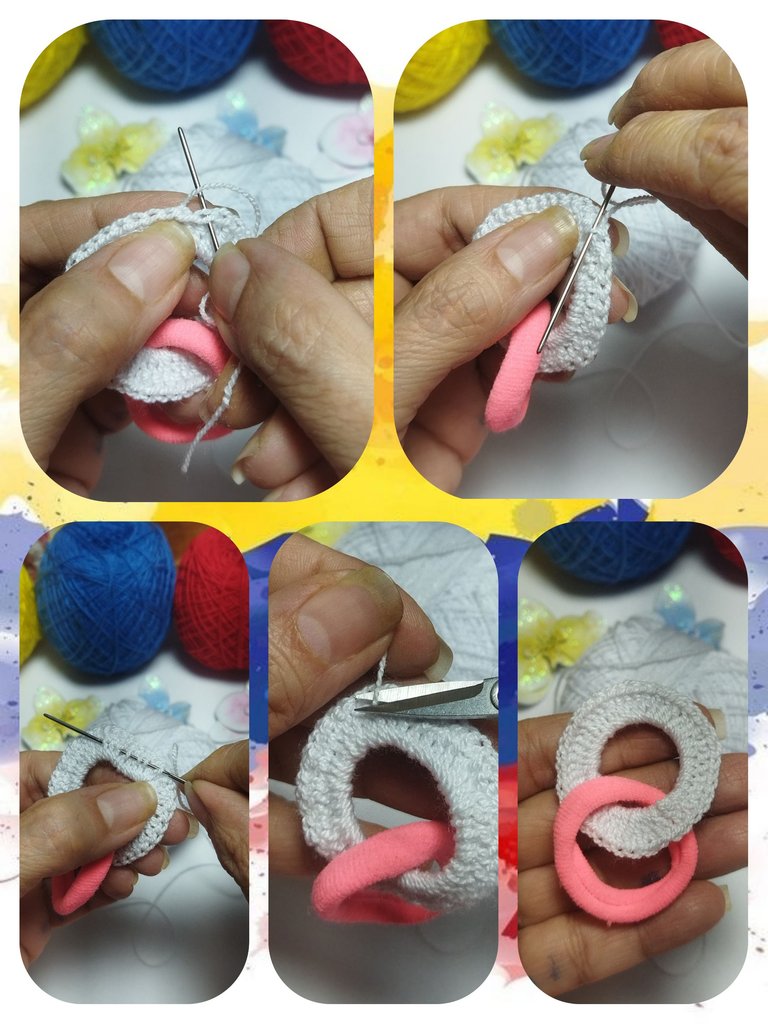
We form 4 more white rings in the same way as the previous one, we form the chain and pass through the previous ring, then we knit 40 double crochets and close with the magic clasp.
Formamos 4 anillos más blancos de la misma forma que el anterior, formamos la cadena y pasamos por el anillo anterior, luego tejemos 40 puntos altos y cerramos con el cierre mágico.
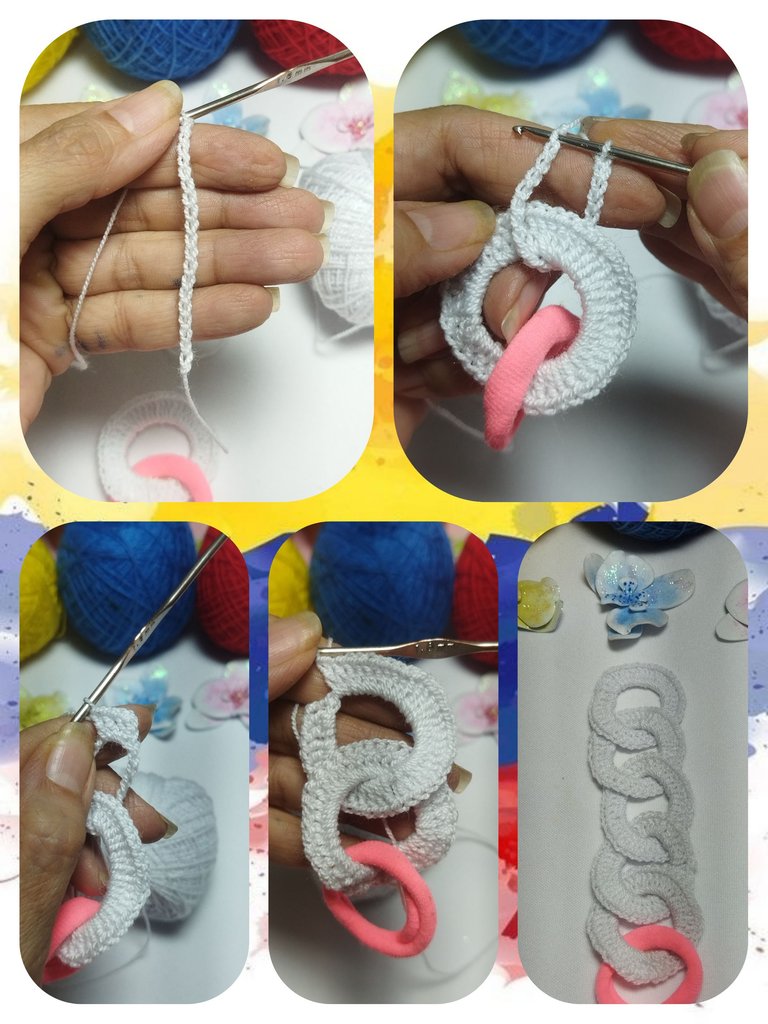
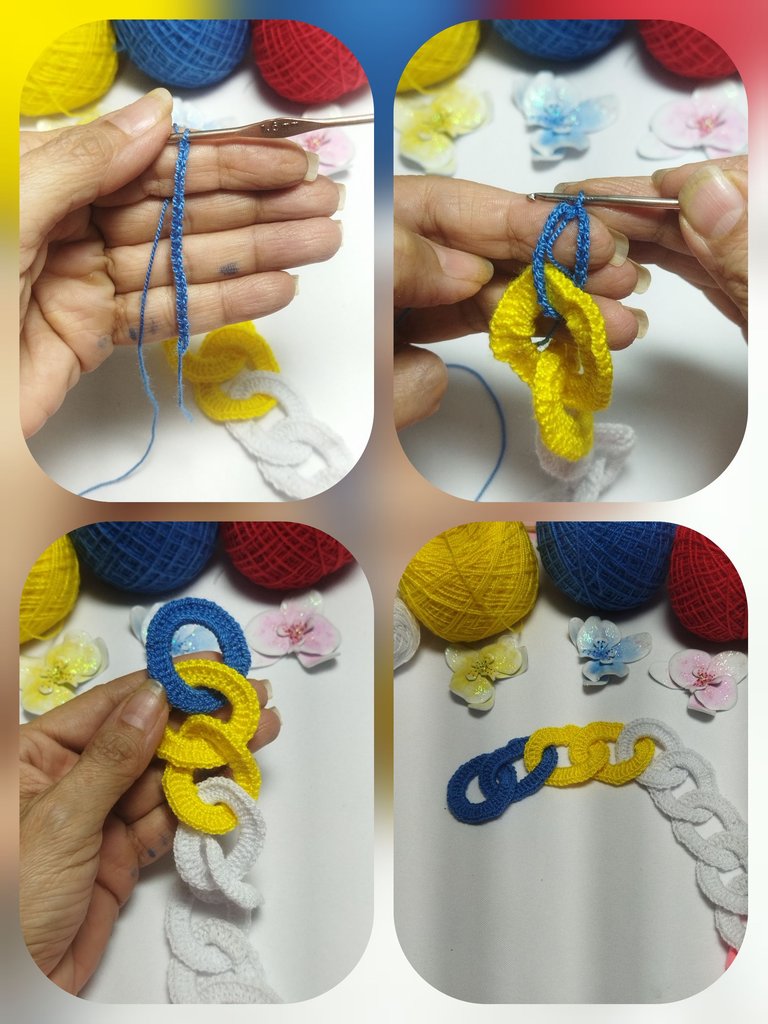
At this point we are going to change to the yellow thread and form two rings, following the sequence we have been doing. We link the chain through the last white ring, close with a slip stitch, form 3 chains and 40 double crochets, then close with the magic clasp and form the other yellow ring.
En este punto vamos a cambiar al hilo amarillo y vamos a formar dos anillos, siguiendo la secuencia que venimos haciendo. Enlazamos la cadena por el último anillo blanco, cerramos con un punto deslizado, formamos 3 cadenas y 40 puntos altos, luego cerramos con el cierre mágico y formamos el otro anillo amarillo.
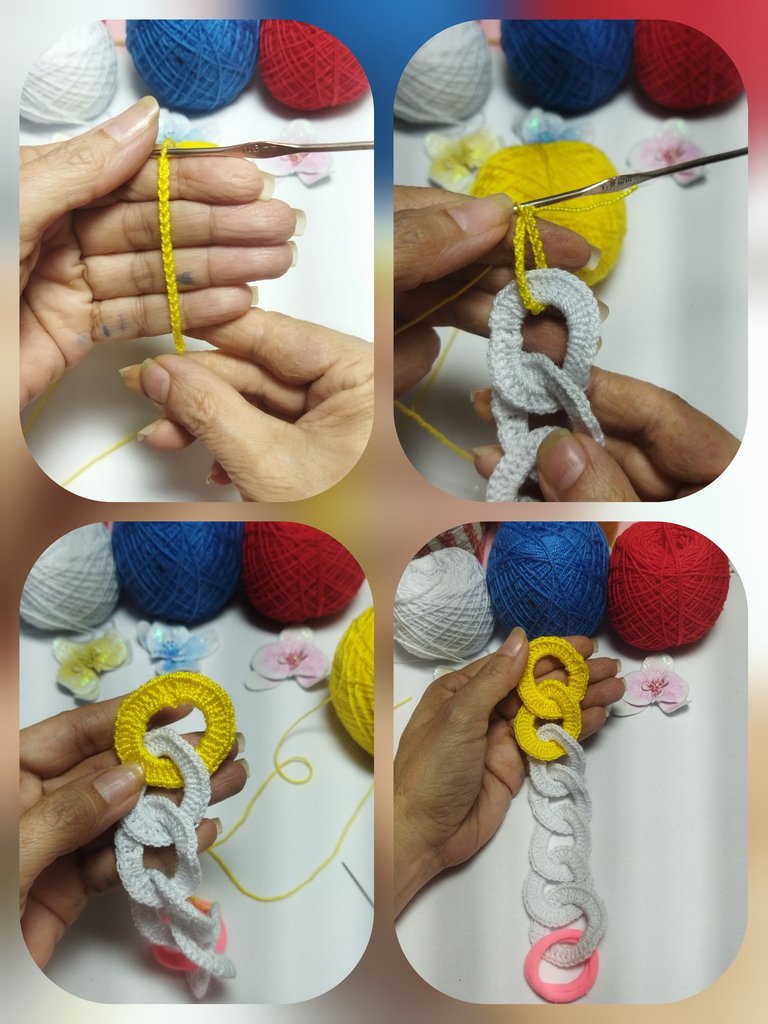
We repeat the previous step with the blue thread. We form two blue rings.
Repetimos el paso anterior con el hilo azul. Formamos dos anillos azules.
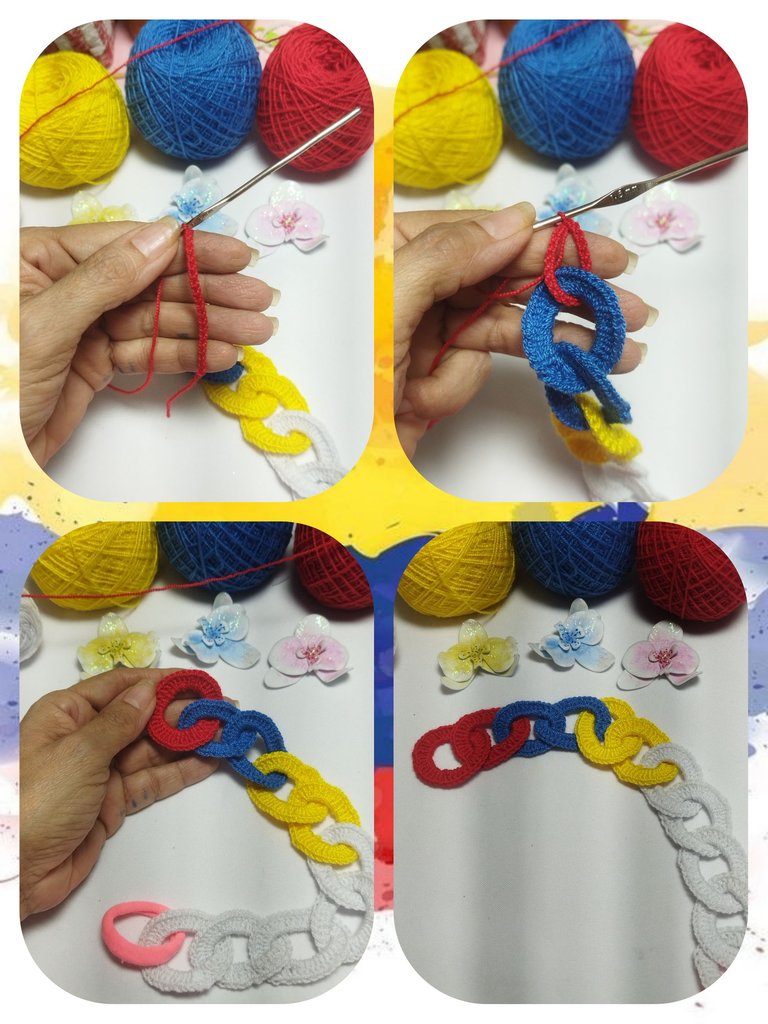
And then it corresponds to the rings in red, also following the previous sequence.
Y luego corresponde a los anillos en color rojo, siguiendo igualmente la secuencia anterior.
To finish the headband, we make, just like at the beginning, 5 white rings linked together. To close the headband with the 5th white ring, we will take the 4th white ring and the tail and pass the chain of 20 stitches through both, then we continue knitting the last ring normally.
Para finalizar el cintillo, realizamos, igual que al comienzo, 5 anillos blancos enlzados uno con otro. Para cerrar el cintillo con el 5 anillo blanco, tomaremos el 4 anillo blanco y la cola y pasamos la cadena de 20 puntos por ambos, luego continuamos tejiendo normalmente el último anillo.
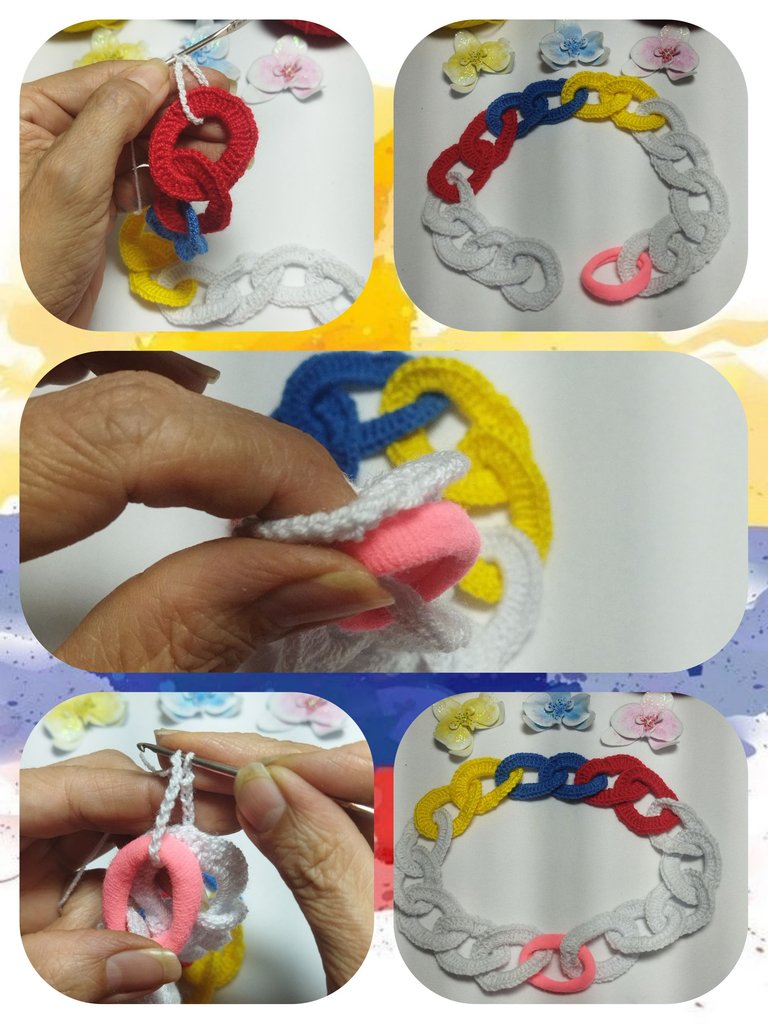
In this round we will make the outline of the headband. To do this we will pass the needle through the tail and make two single crochets and a chain.
En esta vuelta realizaremos el contorno del cintillo. Para ello vamos a traspasar la aguja por la cola y realizaremos dos puntos bajos y una cadena.
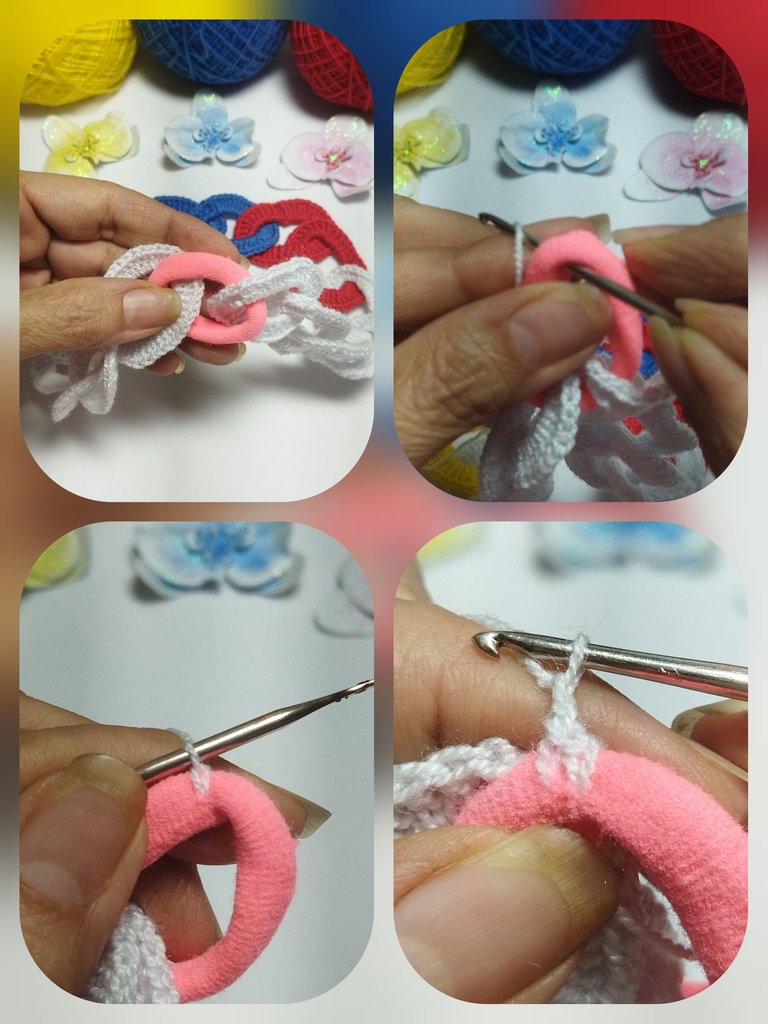
We place 1 stitch of the first ring attached to the tail and we raise 3 chains. Then we make 1 double crochet in each of the next 5 stitches.
Ubicamos 1 punto del primer anillo pegado a la cola y levantamos 3 cadenas. Luego formamos 1 punto alto en cada uno de los siguiente 5 puntos.
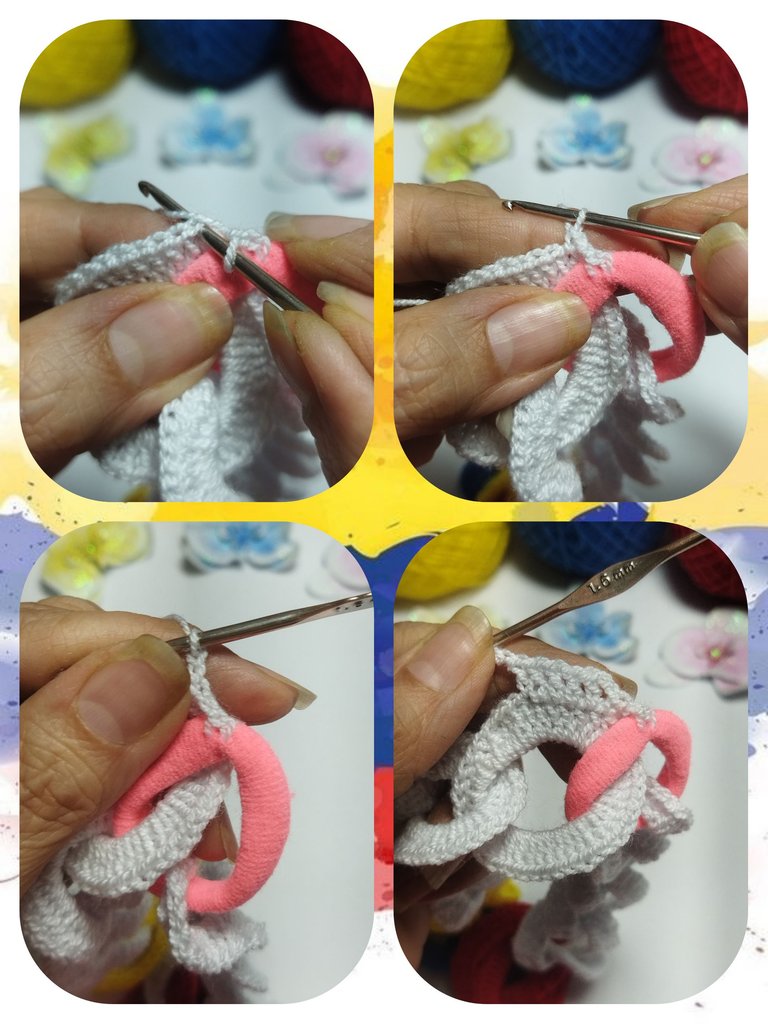
We knit 2 chains, count 3 stitches of the ring, take the next ring and right at the junction of both rings, we knit 5 more double crochets.
We separate by 2 chains again, count 3 stitches of the ring and take the next ring and make 5 more double crochets. And so on until we reach the tail.
Tejemos 2 cadenas, contamos 3 puntos del anillo, tomamos el anillo siguiente y justo en la unión de ambos anillos, tejemos 5 puntos altos mas.
Separamos por 2 cadenas nuevamente, contamos 3 puntos del anillo y tomamos el siguiente anillo y formamos 5 puntos altos más. Y así sucesicamente hasta llegar a la cola.
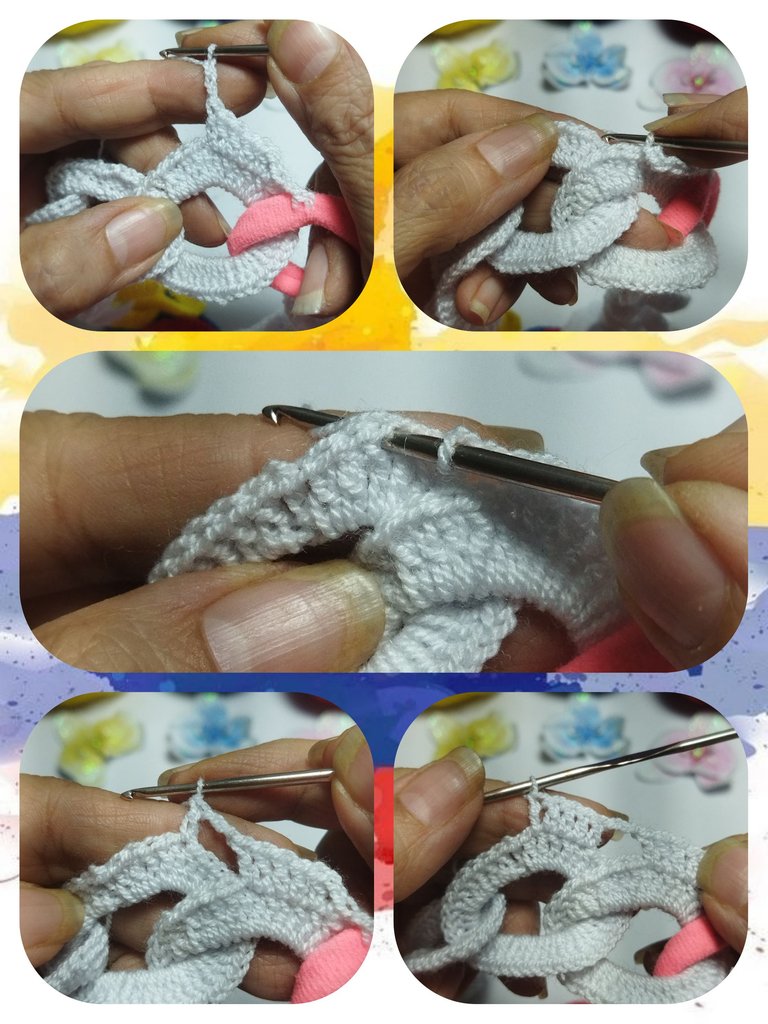
To close the row, knit 2 stitches, count 3 stitches in the same ring and make a half-single stitch, then insert the needle into the tail and make 2 single crochet stitches. Finish with a slip stitch and cut the thread.
Para cerrar la vuelta tejemos 2 puntos, contamos 3 puntos en el mismo anillo y realizamos un punto medio bajo, luego insertamos la aguja en la cola y formamos 2 puntos bajo. Terminamos con un punto deslizado y cortamos el hilo.
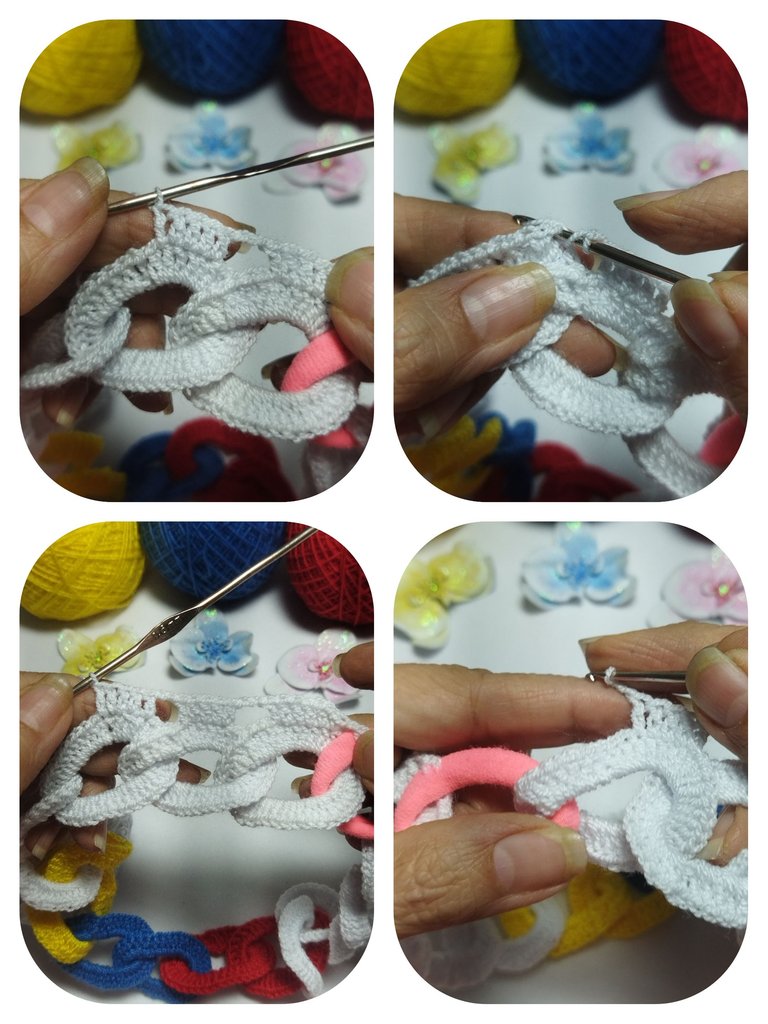
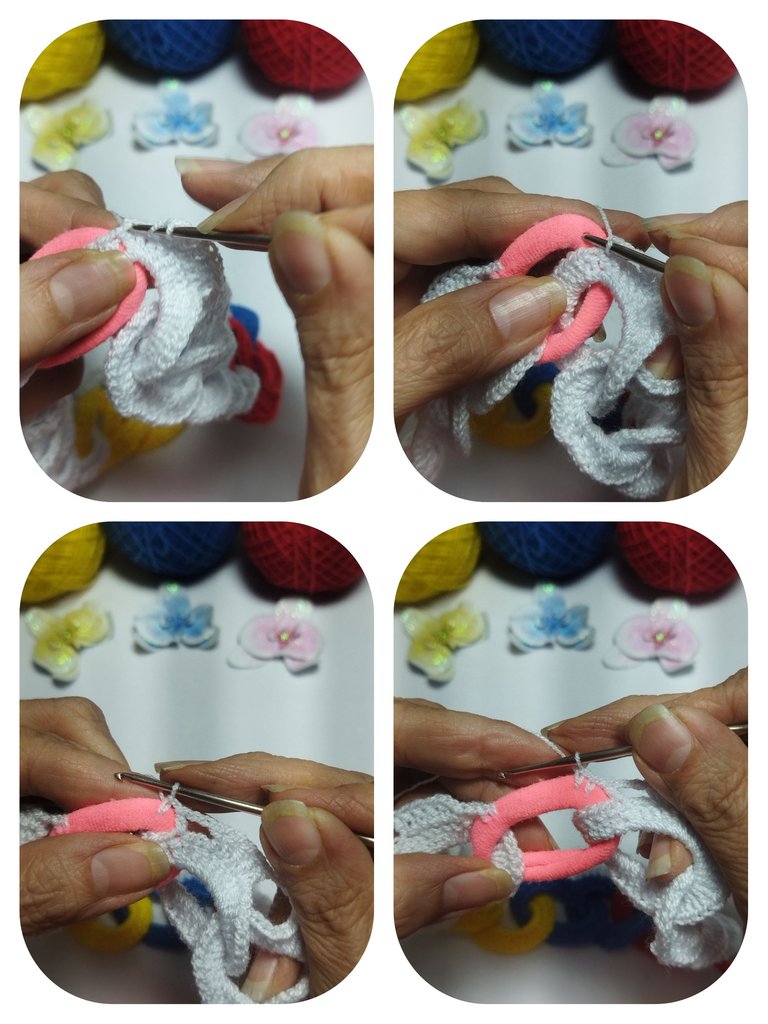
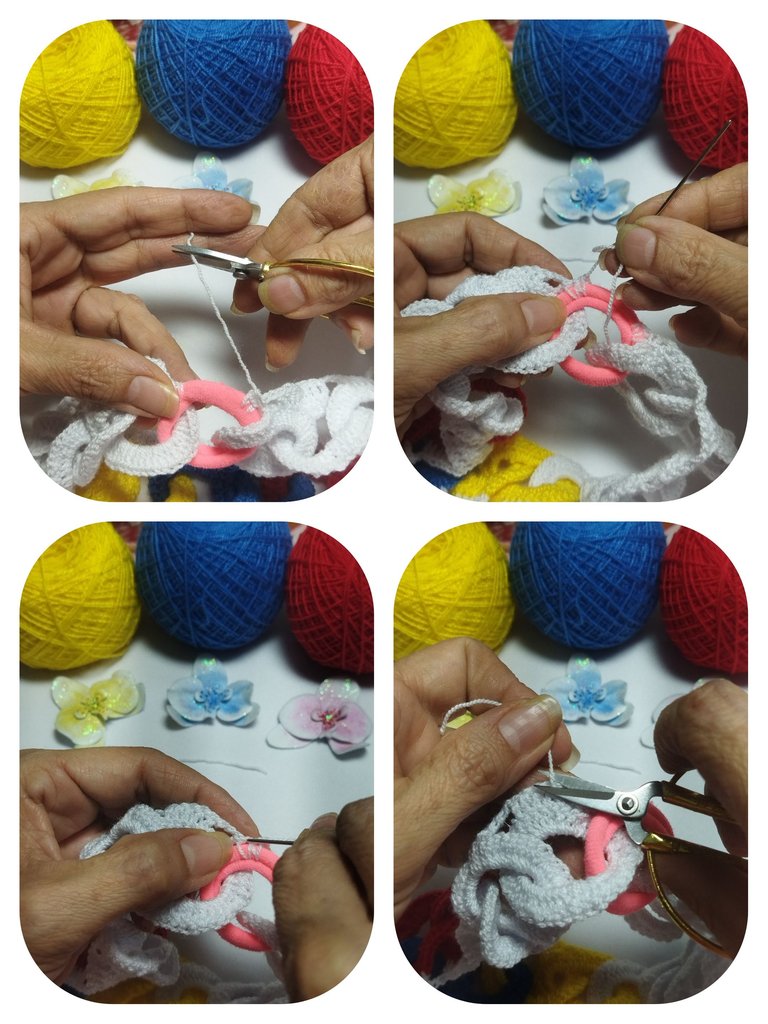
Now we turn the headband and repeat the weaving on the other side in the same way.
Ahora giramos el cintillo y repetimos el tejido del otro lado de la misma forma.
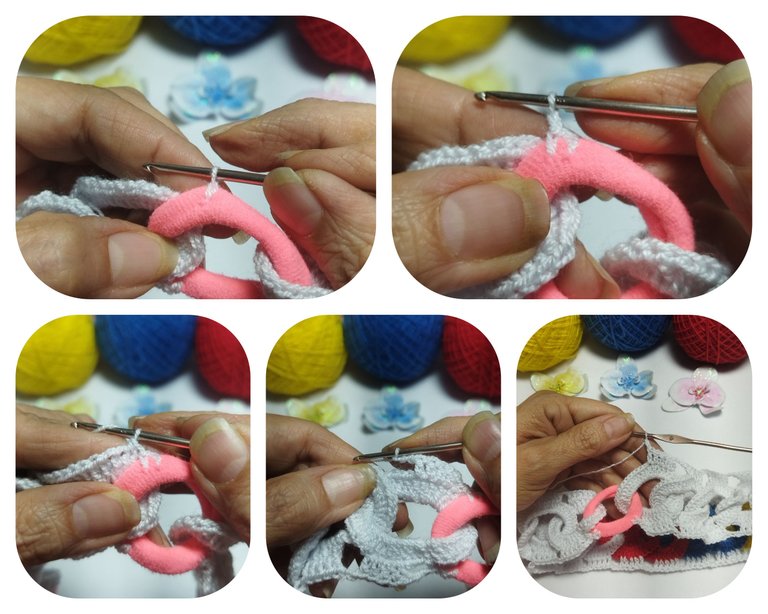
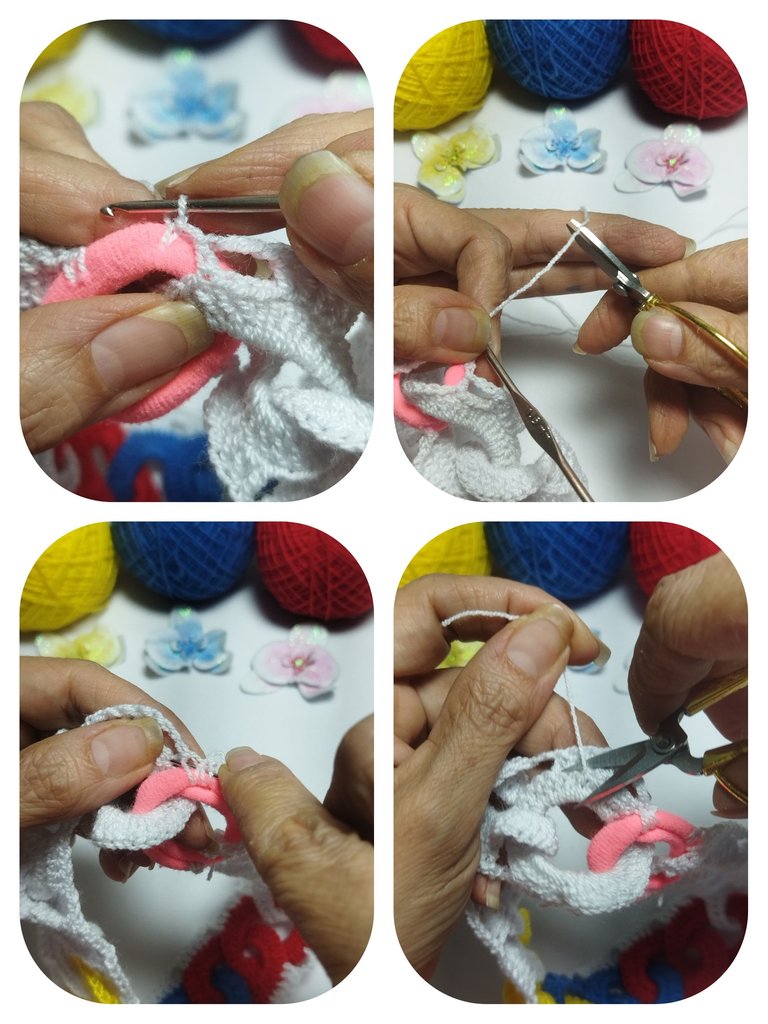
And now we have our headband formed with the tricolor representing our flag.
Y ya tenemos nuestro cintillo formado con el tricolor en representación de nuestra bandera.
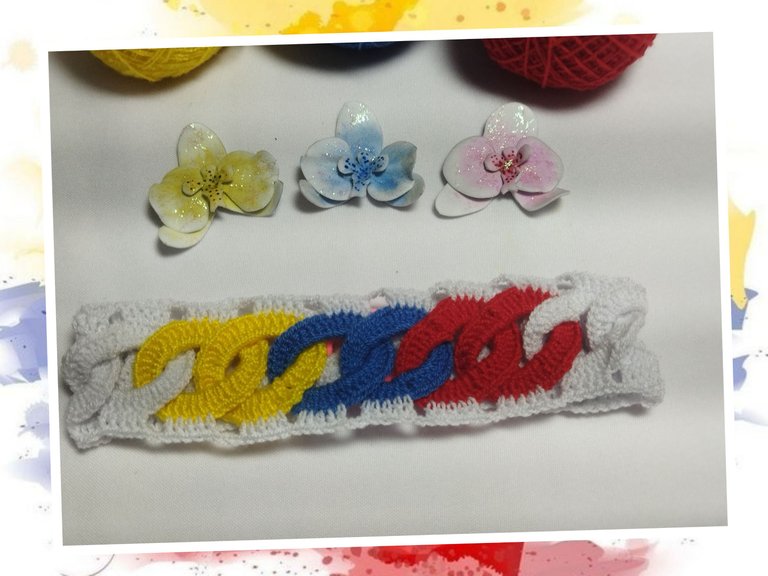
Now it's time to place the orchids. Using silicone glue, place a dot on the orchid and stick it to the headband. Each orchid corresponds to each color of the headband.
Ahora corresponde colocar las orquídeas. Con la pega de sílicón colocamos un punto sobre la orquídea y pegamos en el cintillo. Cada orquídea correspondiente a cada color del cintillo.
PROJECT COMPLETED
And this is the final result. An accessory that represents us as good Venezuelans. Our tricolor and our national flower. I take this opportunity to invite @agathalara, @aarolita and @vicmito74 to participate in this motivating contest. See you next time.
PROYECTO FINALIZADO
Y este es el resultado final. Un accesorio que nos representa como buenos venezolanos. Nuestro tricolor y nuesta flor nacional. Aprovecho la ocasión para invitar a @agathalara, @aarolita y a @vicmito74 a participar en este motivador concurso. Nos vemos en la próxima.
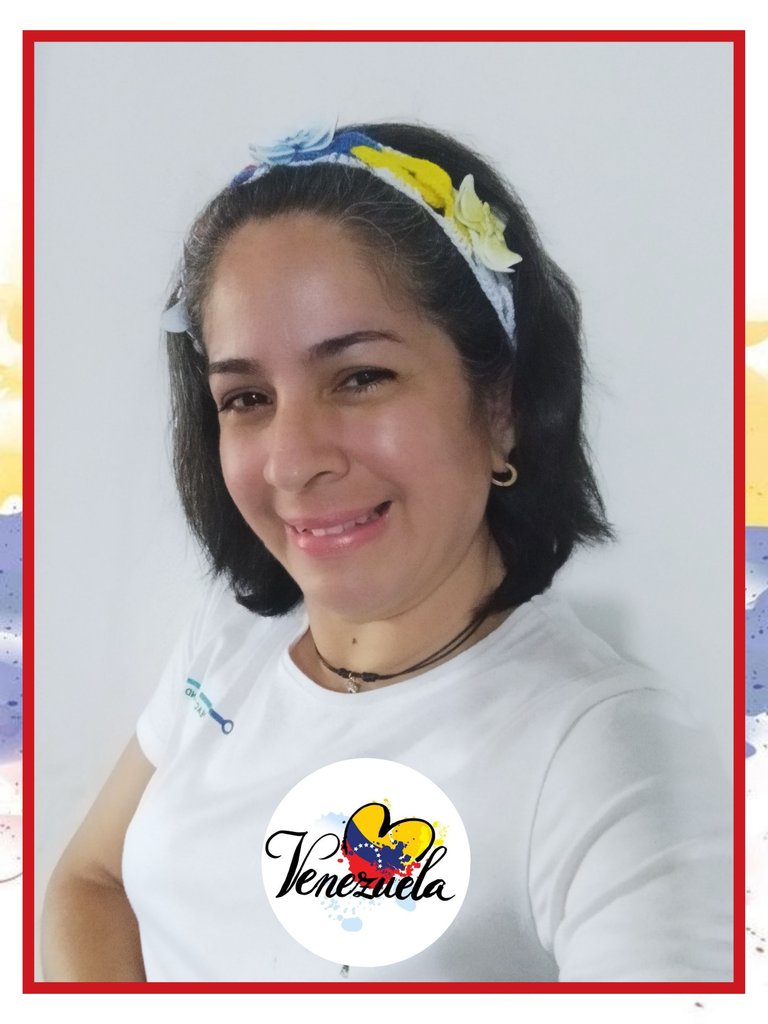
Muy hermoso, y lo luces muy bien, @linita éxitos infinitos.
Quedó muy bonito sobre todo que representa nuestro país 🙏💯💫
¿Qué te puedo decir?
¡Está precioso! Los colores de nuestra bandera hecho arte. Me encantó 😍
Muchas 🍀 suerte en este reto.
Nice headband
Muy lindo, muy acertado el uso de la orquídea. El tricolor lo llevamos en el corazón ❤️. Saludos 😍👍
Una hermosa representación de tu país, sin duda lo realizaste excelente lograste representar dos símbolos de Venezuela, que gran creatividad nos muestras el día de hoy y un accesorio hermoso. Mucho éxito en el concurso 😉
Wow quedó muy hermoso el diseño y la combinación de técnicas. Saludos ☺️
It looks so beautiful and stylish. Love its design. Great job! Keep it up!