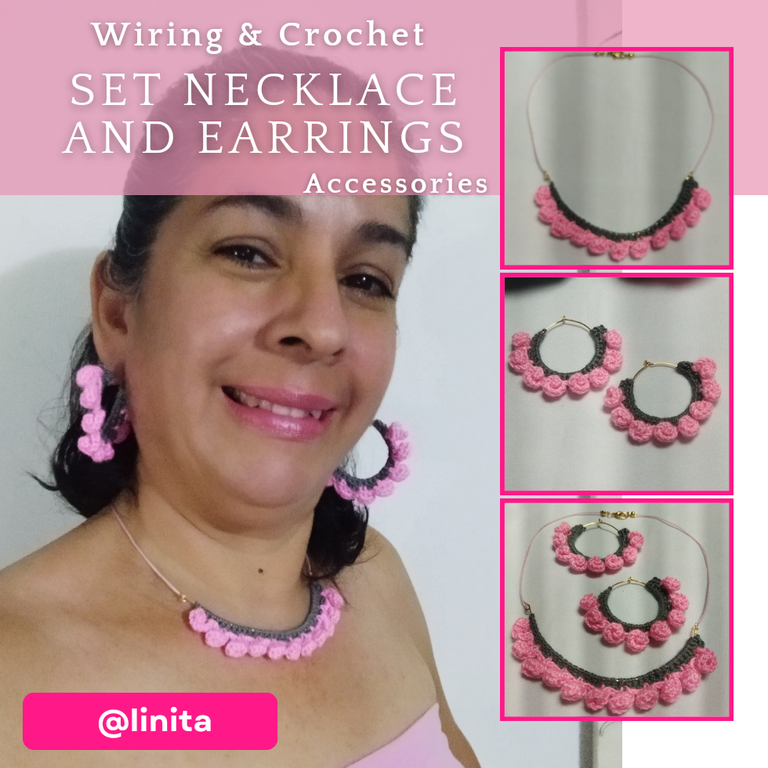
WELCOME TO MY BLOG
Hellooooo, hellooooo! Greetings #Jewelry creators. When I make accessories I try to combine them with the clothes I have in my closet and that have somehow been forgotten. Many times I try to make changes in the clothes or focus attention on the accessories, so they would go unnoticed.
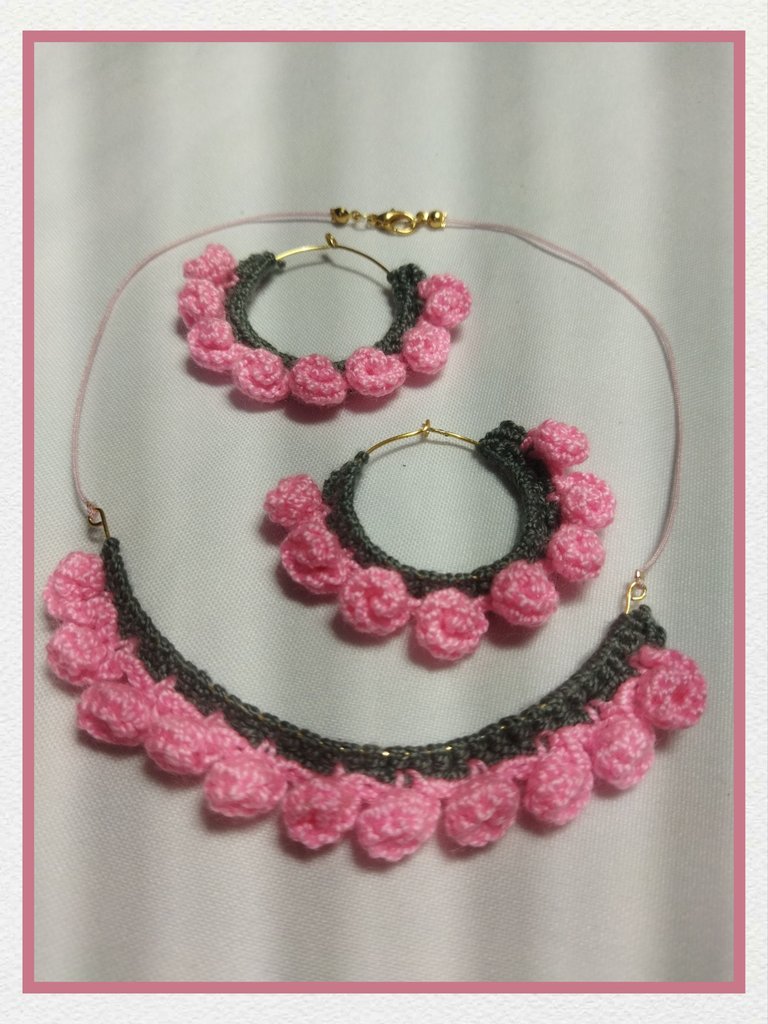
For some time I have wanted to make an accessory combining two of my favorite techniques, wirework and crochet. In order to create a delicate accessory that is also striking and elegant, I used gold field wire and acrylic crochet thread in soft tones creating small roses in series to form a special necklace and earring set to highlight that dusted outfit. I hope you like it.
BIENVENIDOS A MI BLOG
¡Holaaaa, holaaaaa! Saludos creadores de #Jewelry. Cuando elaboro accesorios trato de combinarlos con las prendas de vestir que tengo en mi closet y que de alguna forma han pasado al olvido. Muchas veces intento acer cambios en las prendas o enfocar la atención en los accesorios, así pasaría desapercibida.
Desde hace un tiempo he querido elaborar un accesorio combinando dos de mis técnicas preferidas, alambrismo y tejido a crochet. Para poder crear un accesorio delicado y a la vez llamativo y elegante, utilicé alambre de gold field dorado e hilo de crochet acrilico en tonos suaves creando pequeñas rosas en serie para formar un juego de collar y aretes especiales para resaltar ese oufit desemplovado. Espero les guste.
MATERIALS
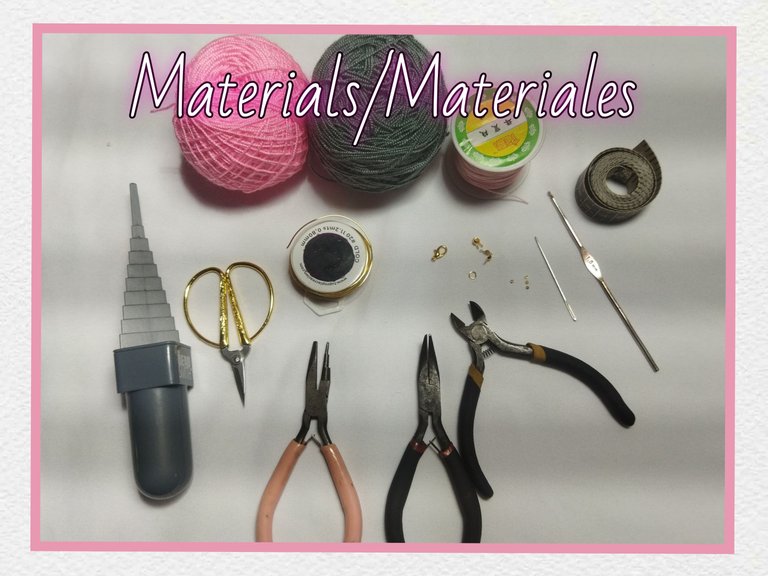
- Acrylic crochet threads (pink and grey)
- 1.6 mm crochet hook
- Yarn needle
- Gold field wire #20
- Pink Chinese thread
- Round mandrel
- 3 mm rings
- Parrot beak safety pin
- Jewelry staples
- Knot stoppers
- Scissors
- Lighter
- Jewelry pliers
- Measuring tape
MATERIALES
- Hilos de crochet acrílico (rosado y gris)
- Aguja de crochet 1,6 mm
- Aguja lanera
- Alambre gold field #20
- Hilo chino rosado
- Mandril redondo
- Aros de 3 mm
- Seguro pico de loro
- Grapas de bisutería
- Tapanudos
- Tijera
- Encendedor
- Pinzas de bisutería
- Cinta métrica
STEP BY STEP // PASO A PASO
EARRINGS
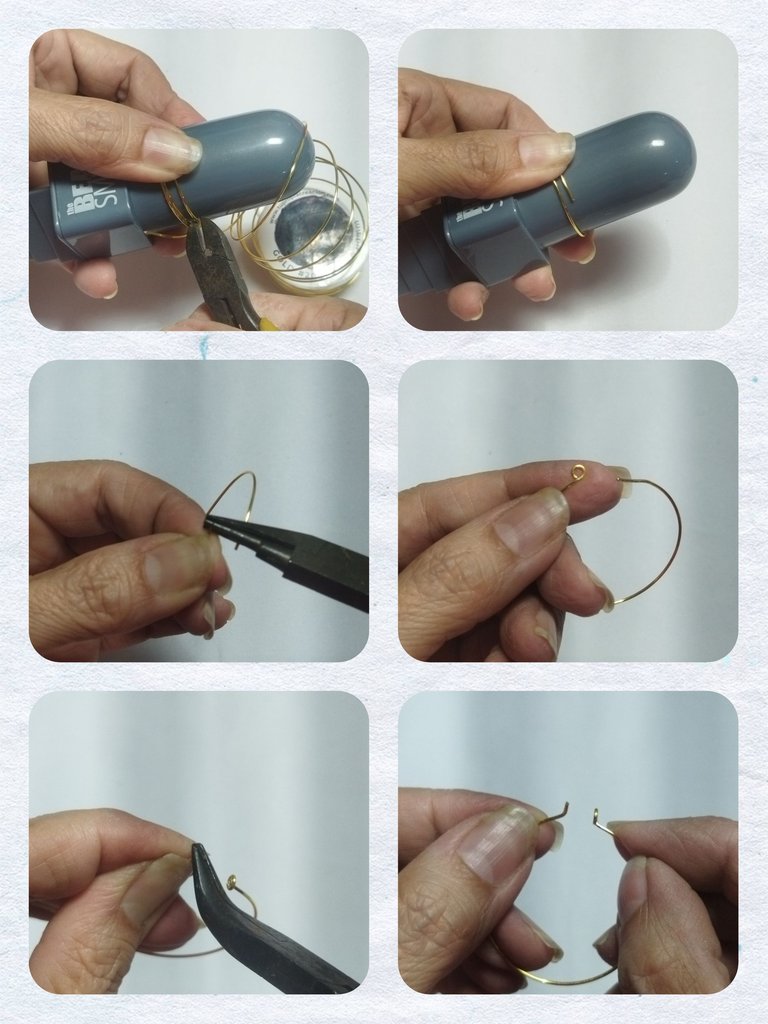
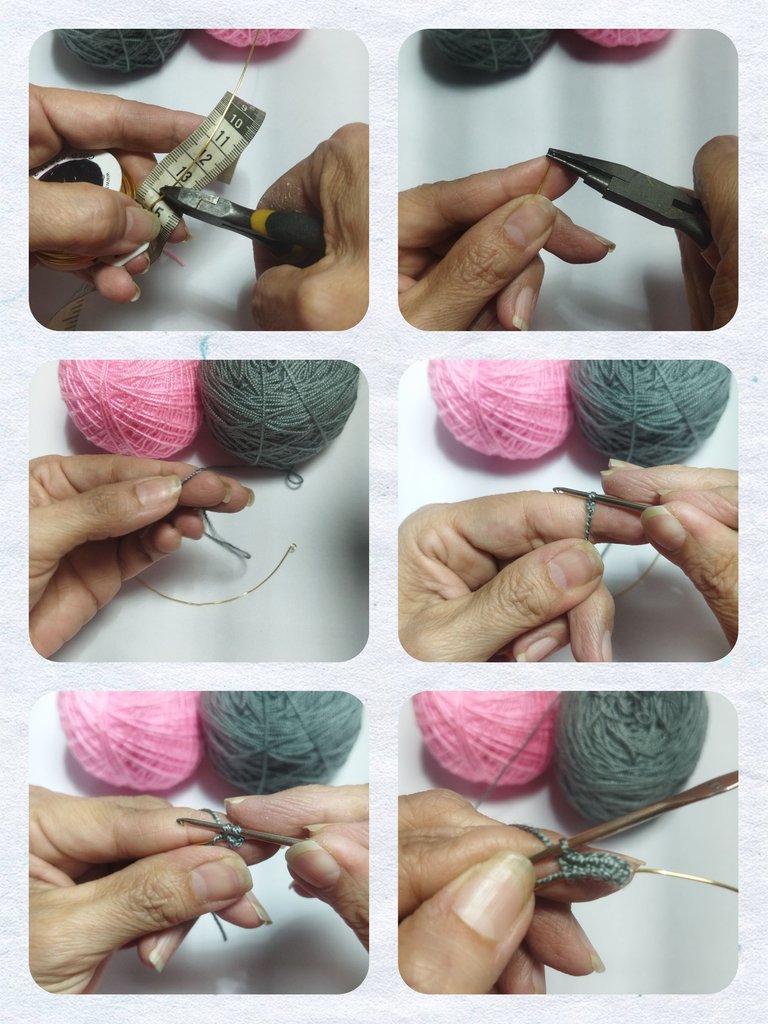
We begin this tutorial by making the rings for our earrings.
We take the round mandrel and make three turns with the wire, applying pressure until it tightens. We cut the wire and take out two rings of 3.5 cm in diameter.
With the conical pliers we make a small ring at one end and with the flat pliers we make a 90º bend to close the earring.
ARETES
Comenzamos este tutorial elaborando las argollas para nuestros aretes.
Tomamos el mandril redondo y realizamos tres giros con el alambre haciendo presión hasta ajustar. Cortamos el alambre y sacamos dos argollas de 3,5 cm de diámetro.
Con la pinza cónica realizamos un aro pequeño en uno de los extremos y con la pinza plana realizamos un doblez de 90º para cerrar el arete.
LAP 1
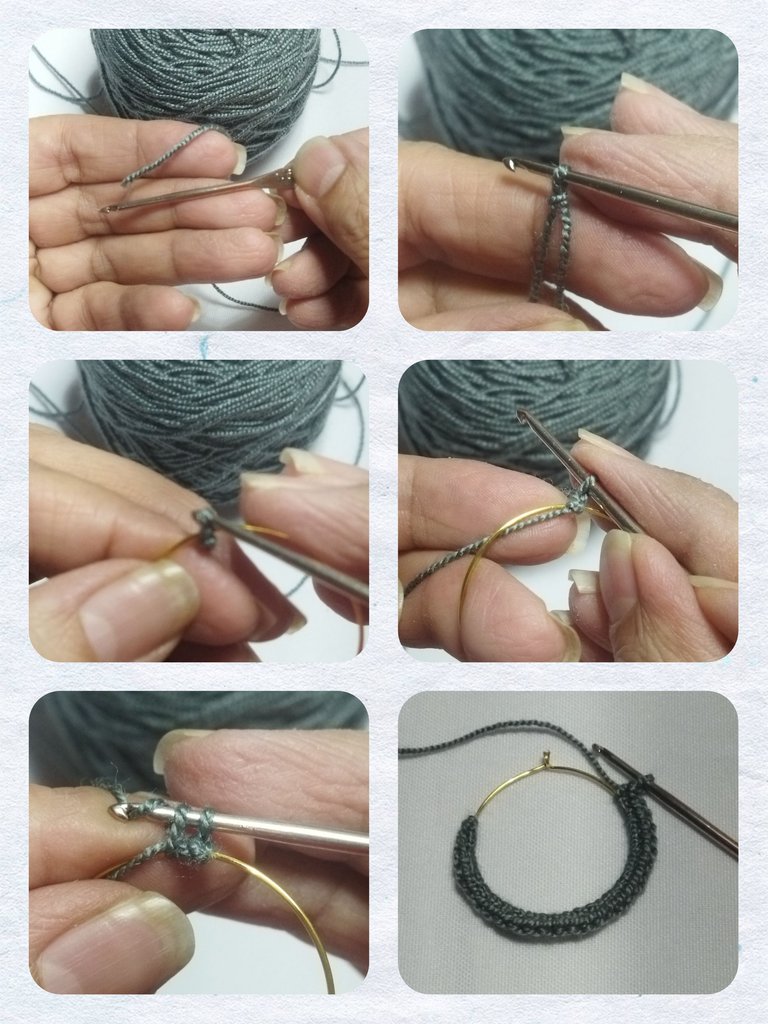
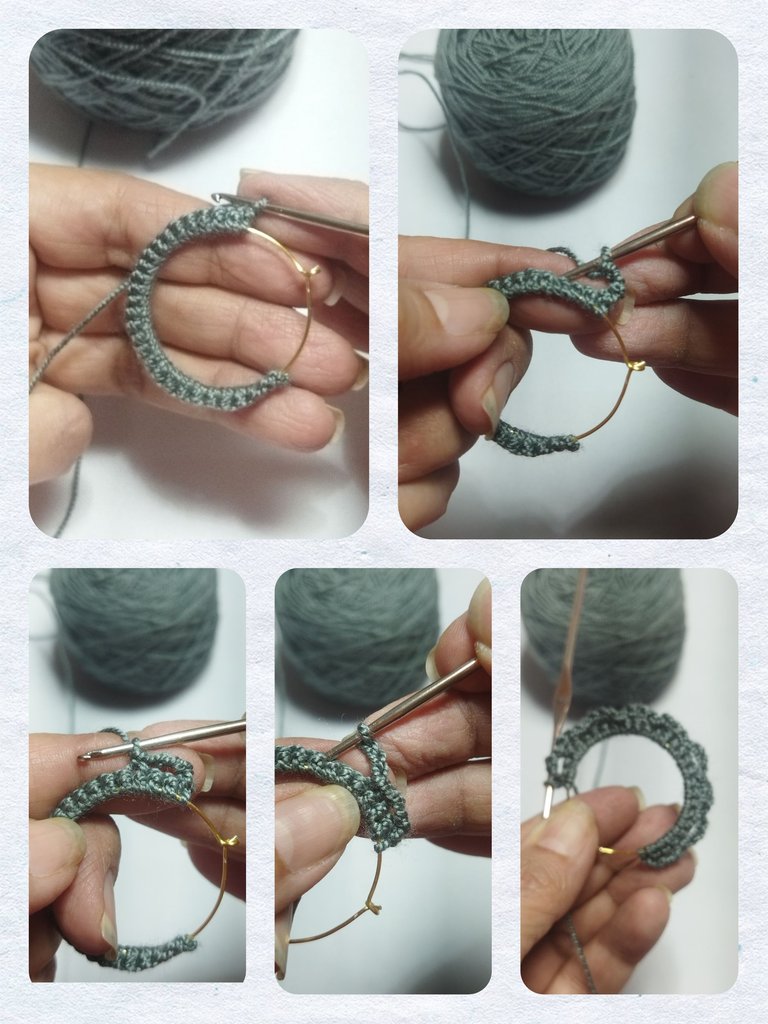
Now with the base for the earrings ready, we begin to make our crochet design.
We take the grey thread and make a slip knot and take it to the hoop and we will make a slip stitch to adjust the thread.
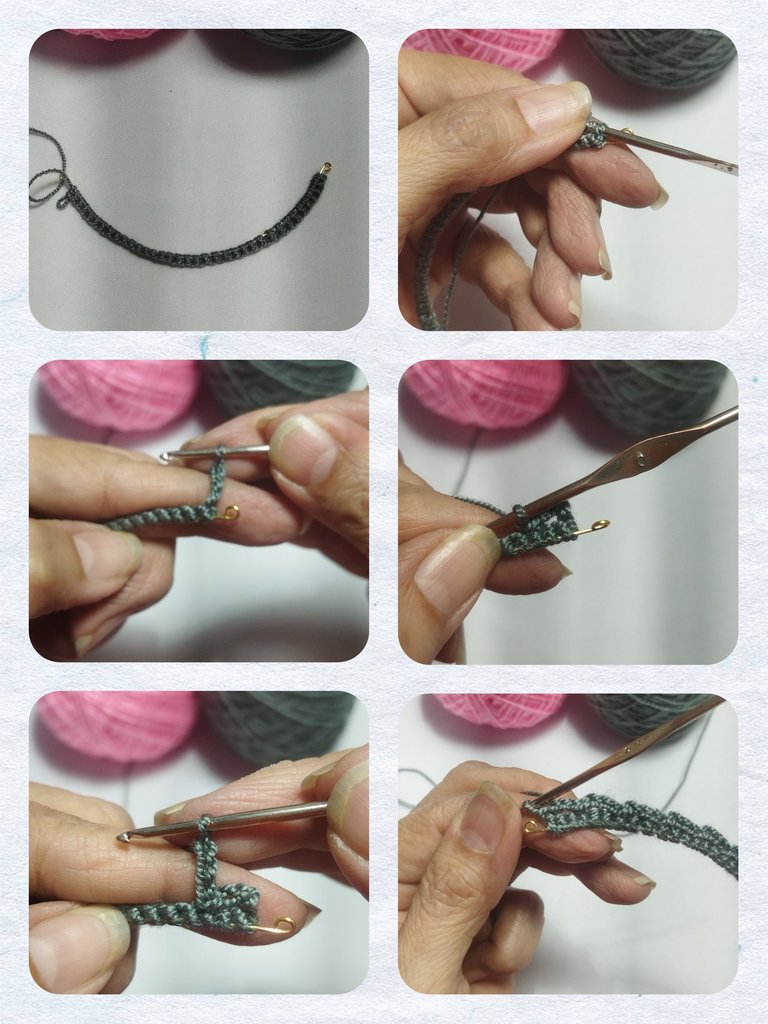
Then we make 27 low stitches that will be the base for our weaving.
VUELTA 1
Ahora con la base para los aretes lista comenzamos a elaborar nuestro diseño a crochet.
Tomamos el hilo gris y ealizamos un nudo corredizo y lo llevamos al aro y realizaremos un punto deslizado para ajustar el hilo.
Luego elaboramos 27 puntos bajos que serán la base para nuestro tejido.
LAP 2
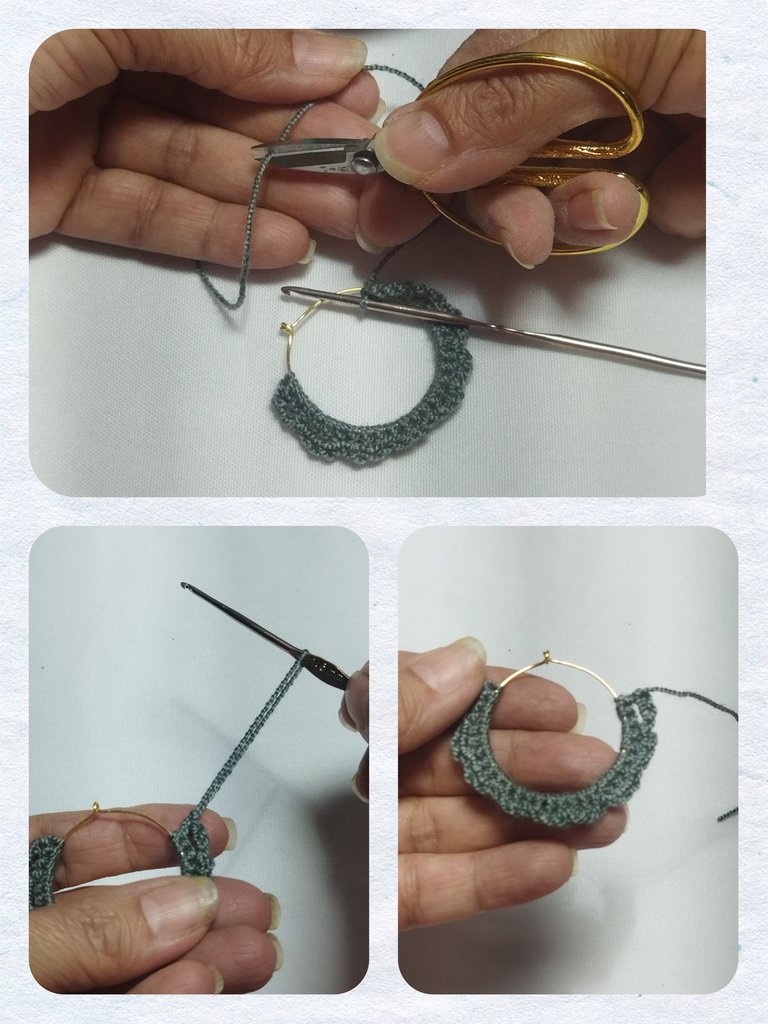
Now we will turn the knitted ring and we will go back making 3 chains and inserting into the 3rd stitch of the previous row with a slip stitch. We repeat until stitch 27 obtaining 9 divisions or arches.
We close with a slip stitch, cut the thread and adjust.
VUELTA 2
Ahora vamos a girar el aro tejido y nos regresaremos realizando 3 cadenas e insertando en el 3 punto de la vuelta anterior con un punto deslizado. Repetimos hasta el punto 27 obteniendo 9 divisiones o arcos.
Cerramos con un punto deslizado, cortamos el hilo y ajustamos.
LAP 3
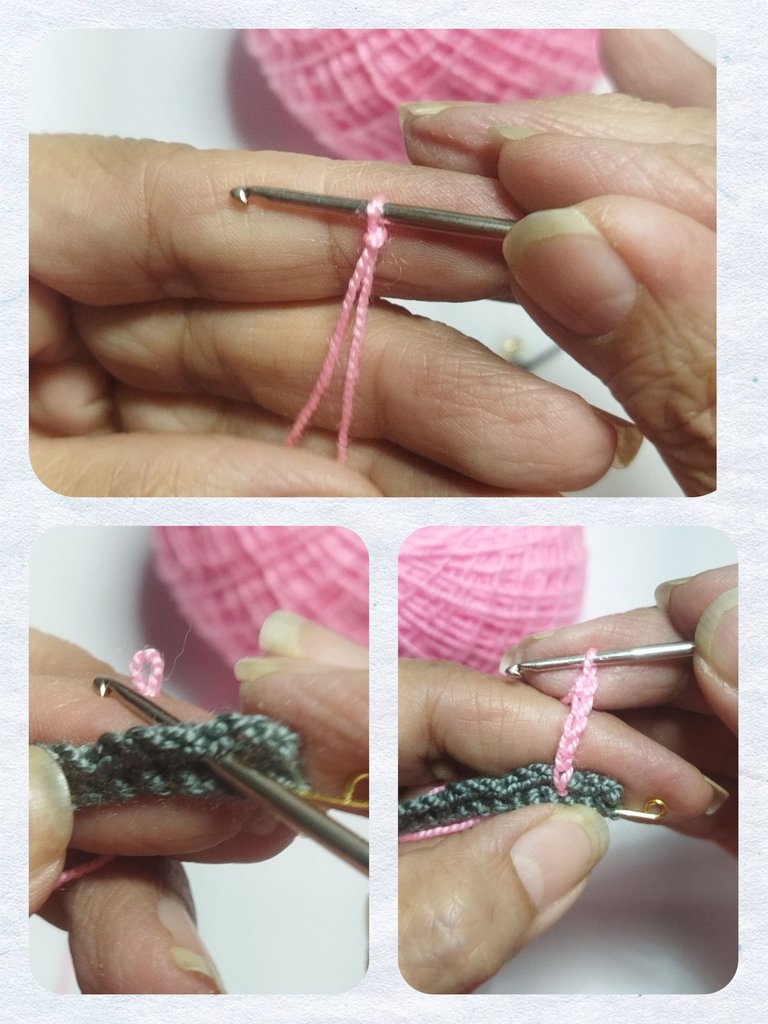
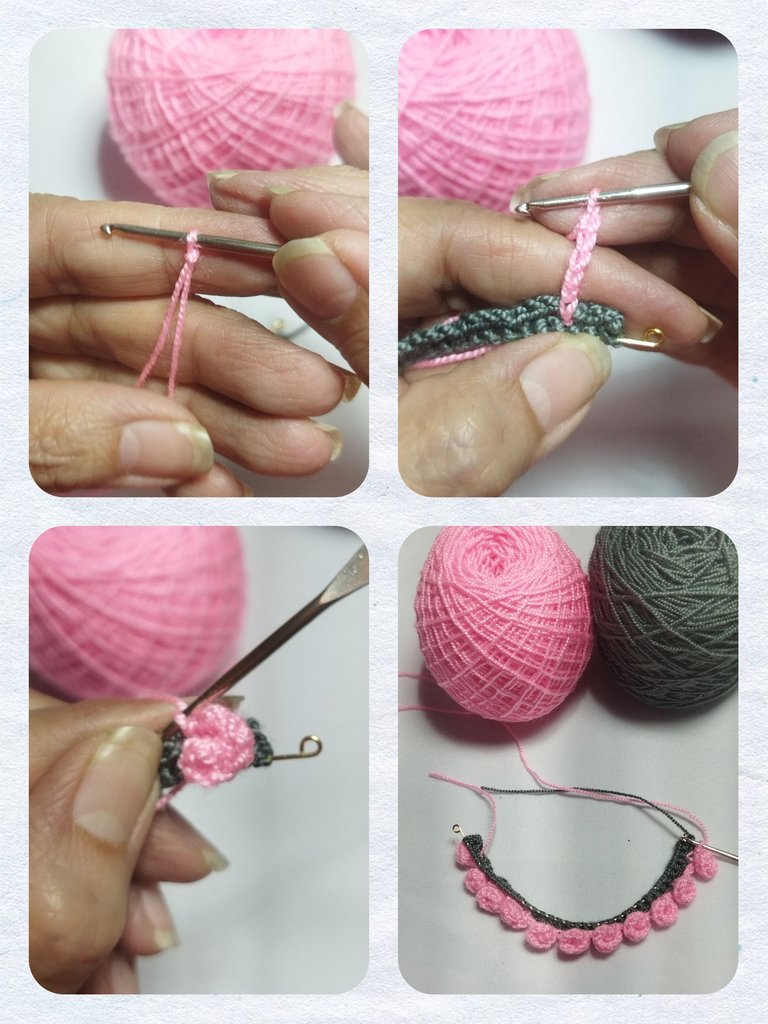
In this round we are going to use the pink thread.
- We start with a slip knot, we insert the needle through the first slip stitch that we made in the previous round, we take the slip knot and we go up 5 chains.
VUELTA 3
En esta vuelta vamos a utilizar el hilo rosado.
- Comenzamos con un nudo corredizo, introducimos la aguja por el primer punto deslizado que realizamos en la vuelta anterior, tomamos el nudo corredizo y subimos 5 cadenas.
Now we are going to crochet 3 half double crochets in the third stitch of the chain. We repeat 3 half double crochets in the fourth chain and also in the fifth and last chain to form the base of the rose.
Ahora vamos a tejer 3 medio punto alto en el tercer punto de la cadena. Repetimos 3 medio punto alto en la cuarta cadena e igualmente el la quinta y última cadena para formar la base de a rosa.
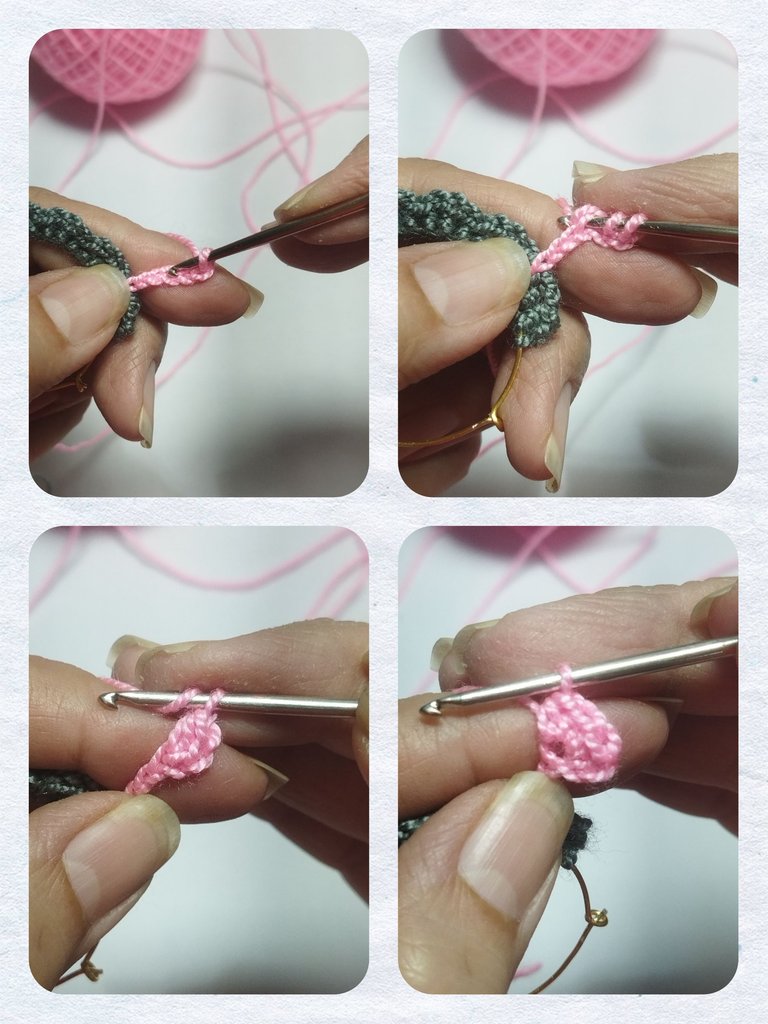
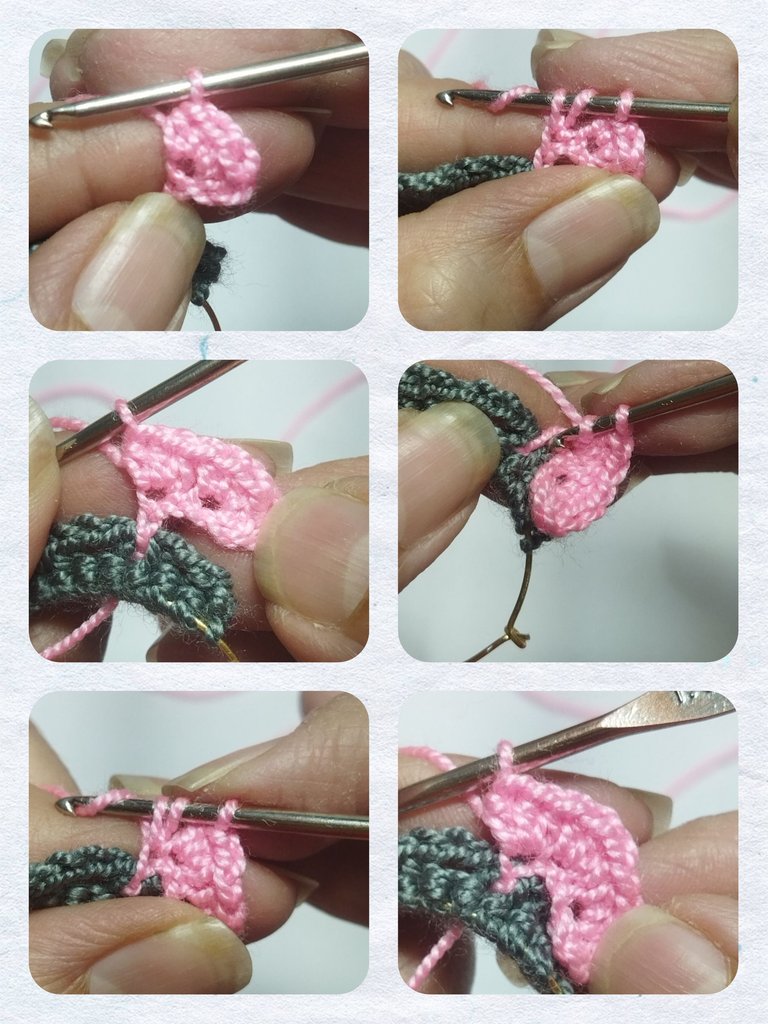
We roll to form the flower and close with a slip stitch at the same point where we started.
Enrollamos para formar la flor y cerramos con un punto deslizado en el mismo punto donde iniciamos.
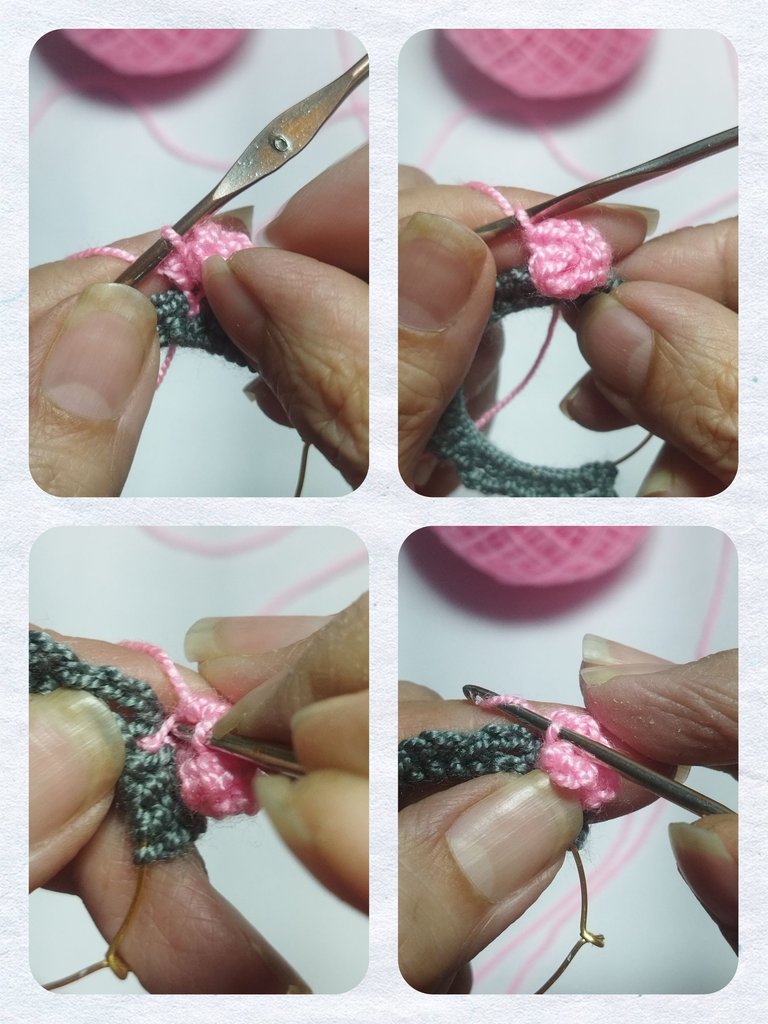
We pick up 3 chains and insert them into the next slip stitch of the previous row and make a slip stitch. We pick up 5 more chains and repeat the series to make the rose and so on until we have made 7 roses at the base of the earring. We close with a slip stitch.
Alzamos 3 cadenas e insertamos en el siguiente punto deslizado de la vuelta anterior y realizamos un punto deslizado. Levantamos 5 cadenas más y repetimos la serie para elaborar la rosa y así sucesivamente hasta formar 7 rosas en la base de arete. Cerramos con un punto deslizado.
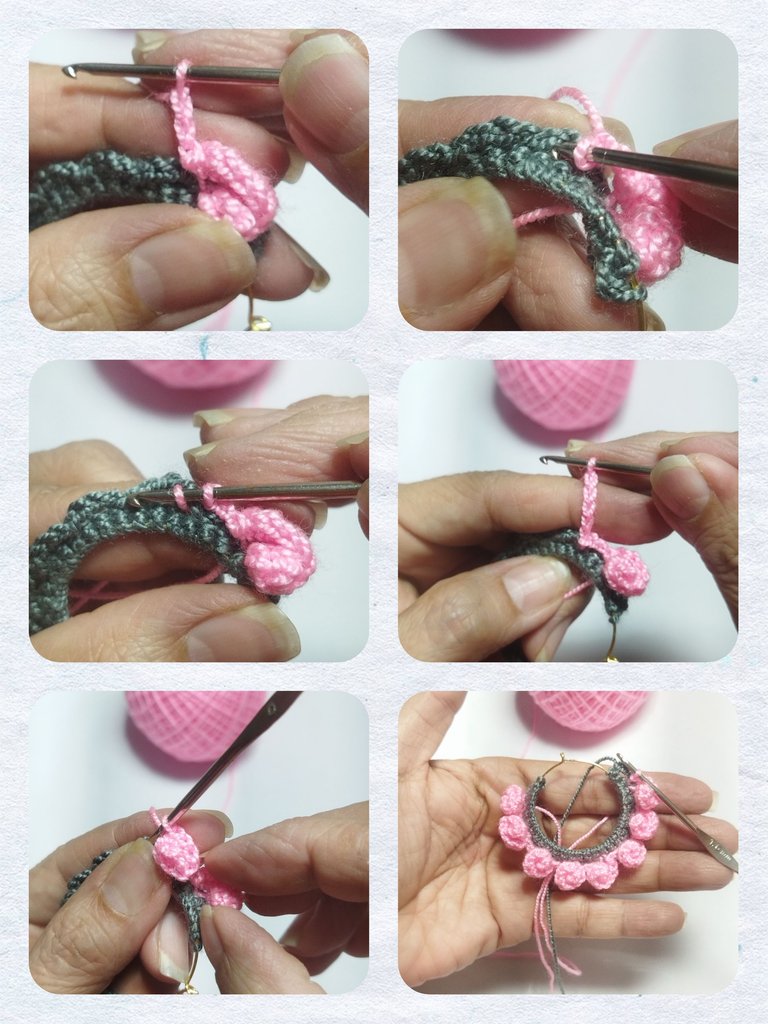
We cut the thread and with the wool needle we proceed to hide the excess threads between the fabric and remove the excess with the scissors.
Cortamos el hilo y con la aguja lanera procedemos a esconder los hilos sobrantes entre el tejido y retiramos el exceso con la tijera.
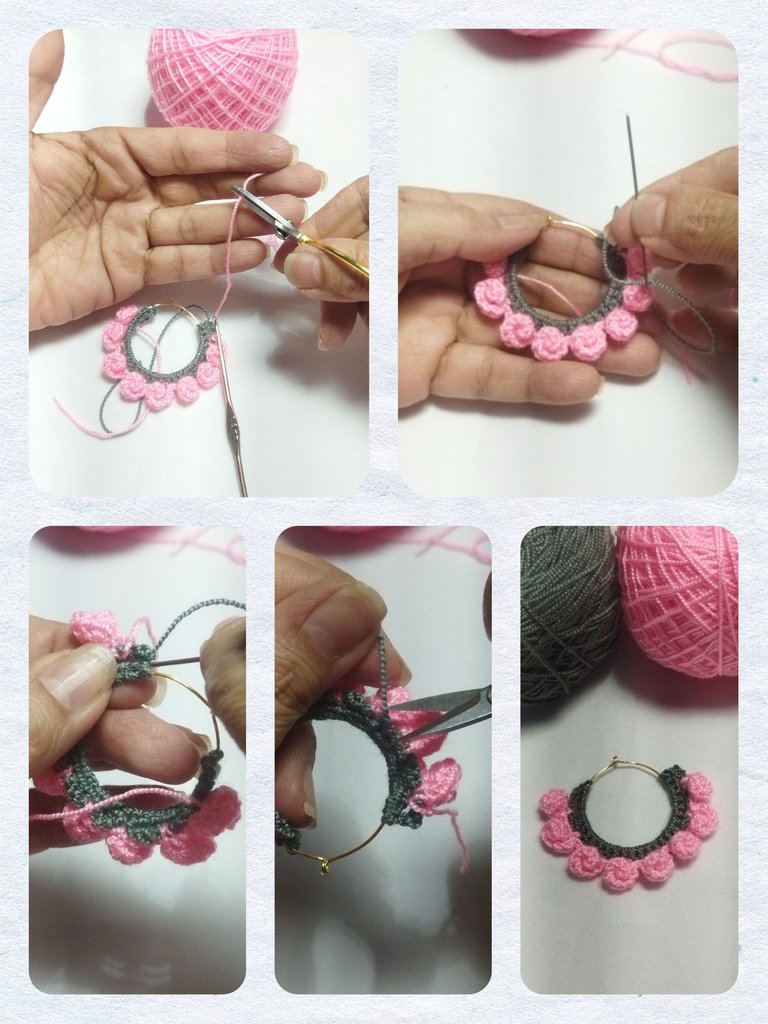
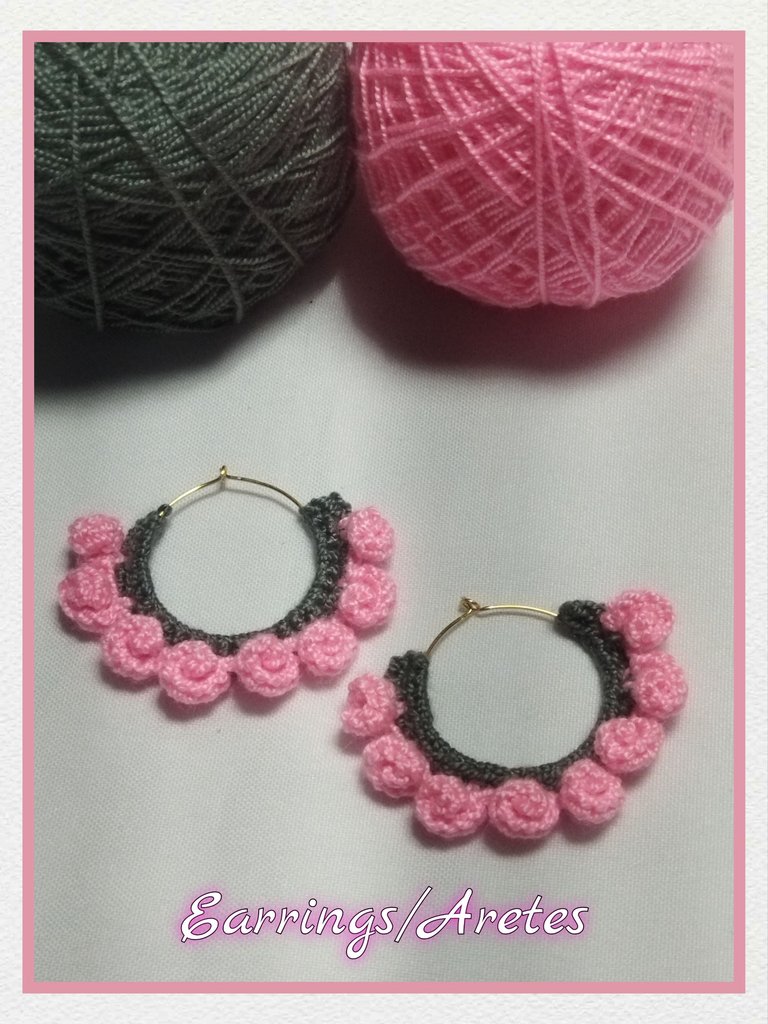
We made the second earring in the same way and this is the result.
Realizamos el segundo arete de la misma manera y este es esl resultado.
NECKLACE
For the necklace we are going to use 14 cm of #20 wire to make the base of the weave.
- At each end of the wire we will make two 2 mm rings.
LAP 1
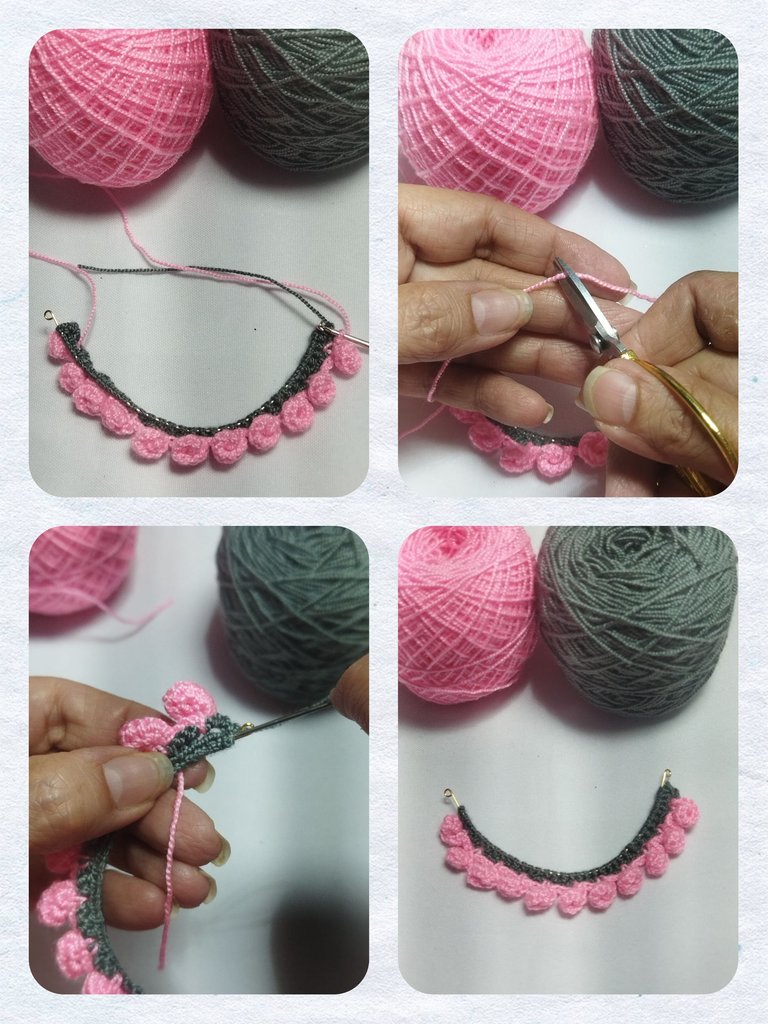
- With the grey thread we make a slip knot and just like we did with the earrings, we are going to weave 39 single crochet stitches in the wire.
COLLAR
Para el collar vamos a utilizar 14 cm de alambre #20 para realizar la base del tejido.
- En cada uno de los extremos del alambre haremos dos aros de 2 mm.
VUELTA 1
- Con el hilo gris realizamos un nudo corredizo y al igual que hicimos en los aretes, vamos a tejer 39 puntos bajos en el alambre.
LAP 2
We turn the fabric and make arches of 3 chains that we will insert between every 3 stitches of the previous row to form 13 arches.
We close the row with a slip stitch and cut the thread.
VUELTA 2
Giramos el tejido y realizamos arcos de 3 cadenas que vamos a insertar intercalando entre cada 3 puntos de la vuelta anterior para formar 13 arcos.
Cerramos la vuelta con un punto deslizado y cortamos el hilo.
LAP 2
We will repeat the step by step of round 3 of the earrings, but in this round we will make 11 flowers.
To finish, we close with a slip stitch, cut the thread and use the wool needle to hide the excess.
VUELTA 3
Repetiremos el paso a paso de la vuelta 3 de los aretes, pero en esta vuelta realizaremos 11 flores.
Al finalizar, cerramos con un punto deslizado, cortamos el hilo y con la aguja lanera escndemos los sobrantes.
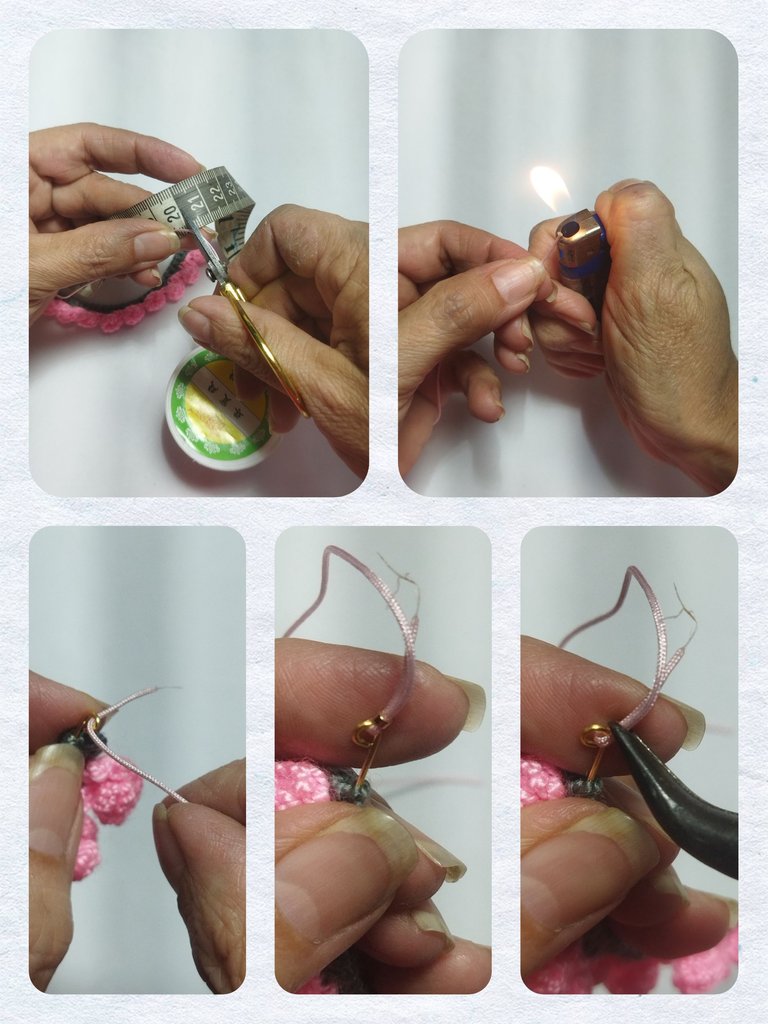
Now we will use pink Chinese thread to complete the choker-style necklace.
- We cut two 20 cm strands of Chinese thread. We form the needle point, insert it through each of the ends of the woven base, join and fasten with a jewellery staple. We tighten the staple with the pliers very tightly so that the threads do not come out.
Ahora utilizaremos hilo chino rosado para completar el collar, tipo gargantilla.
- Cortamos dos hebras de 20 cm de hilo chino. Formamos la punta aguja, introducimos por cada uno de los extremos de la base tejida, unimos y ajustamos con una grapa de bisutería. Apretamos la grapa con la pinza bien fuerte para que no se salgan los hilos.
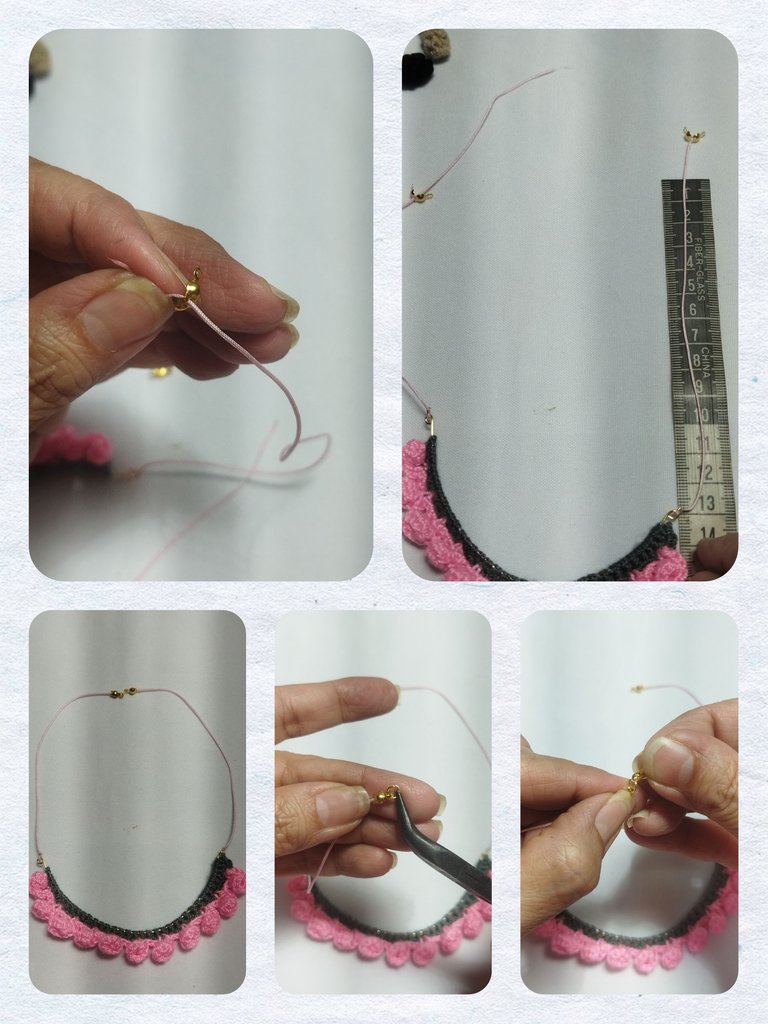
We place the end caps and with the measuring tape we measure 13 cms on each side to reach approximately 40 cm, which is the measurement for a choker-type necklace.
We make a knot at each end, cut the excess thread and close the end caps.
Next we place the 3 mm rings on each end cap and the parrot beak safety pin.
Colocamos los tapanudos y con la cinta métrica medimos 13 cms de cada lado para alcanzar 40 cm aproximadamente, que es la medida para un collar tipo gargantilla.
Realizamos un nudo en cada extremos, cortamos el exceso de hilo y cerramos los tapanudos.
Seguidamente colocamos los aros de 3 mm en cada tapanudos y el seguro pico de loro.
And now we have the necklace ready to match the earrings.
Y ya tenemos listo el collar a juego con los aretes.
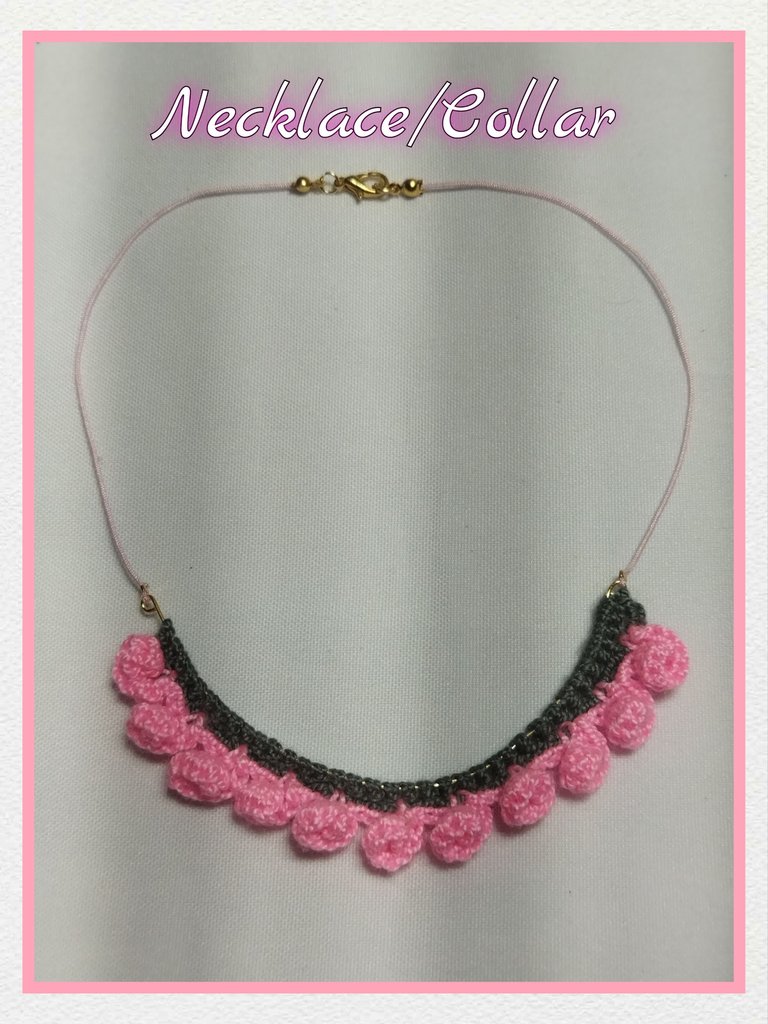
A perfect combination, delicate and elegant, made with my two favorite techniques, wire work and crochet. I hope you like it. See you next time.
Una combinación perfecta, delicada y elegante, realizada con mis dos técnicas favoritas, alambrismo y crochet. Espero les guste. Nos vemos en la próxima.

Es un hermoso set, gracias por compartir con nosotros 🤗😉
!DIY
Muchas gracias, me alegro que te haya gustado.
Un trabajo espectacular 100% creativo me encanta como has he ho este tejido, las argollas son fantástica, los colores combinan a la perfección ✨️ y el collar luce delicado y hermoso, gran trabajo 🤗
You can query your personal balance by
@marile21 just sent you a DIY token as a little appreciation for your post dear @linita! Feel free to multiply it by sending someone else !DIY in a comment :) You can do that x times a day depending on your balance so:!DIYSTATSY se te ve hermoso 🤩
Los colores me encantan. Usé un uniforme con esas combinaciones, se ve genial.
Bonito trabajo 🙋🏽♀️ te felicito.
Me alegro que te guste, está a la orden por si te toca de nuevo ese uniforme, jejejeje.
Que lindo te ha quedado amiga y lo luces genial
Congratulations @linita! You have completed the following achievement on the Hive blockchain And have been rewarded with New badge(s)
Your next target is to reach 1500 comments.
You can view your badges on your board and compare yourself to others in the Ranking
If you no longer want to receive notifications, reply to this comment with the word
STOPIt is so beautiful, elegant, and stylish. Love its design and color. Well done! Keep it up!
Muy creativo me encantó el diseño. Saludos.