Hola amigos de la comunidad de Jewelry, en este nuevo post quiero mostrar un tutorial de un anillo rosado de perlas con swarovskis, yo lo hice de este color porque eran las perlas que tenía disponibles y también porque este color me gusta mucho. El proceso de realizarlo es un poquito laborioso pero con paciencia puede hacerse en unas horas.. 😃
Hello friends of the Jewelry community, in this new post I want to show a tutorial of a pink pearl ring with swarovskis, I did it in this color because they were the pearls I had available and also because I like this color a lot. The process of making it is a little bit laborious but with patience it can be done in a few hours..... 😃
Materiales | Materials
- 4 Perlas de 4mm
- 1 Perla de 6mm
- 14 Swarovski de 3mm
- Hilo Nylon 0.25
- Mostacillas rosadas
- 4 Beads of 4mm
- 1 6mm pearl
- 14 Swarovski of 3mm
- Pink beads
- Nylon thread 0.25
Procedimiento | Procedure
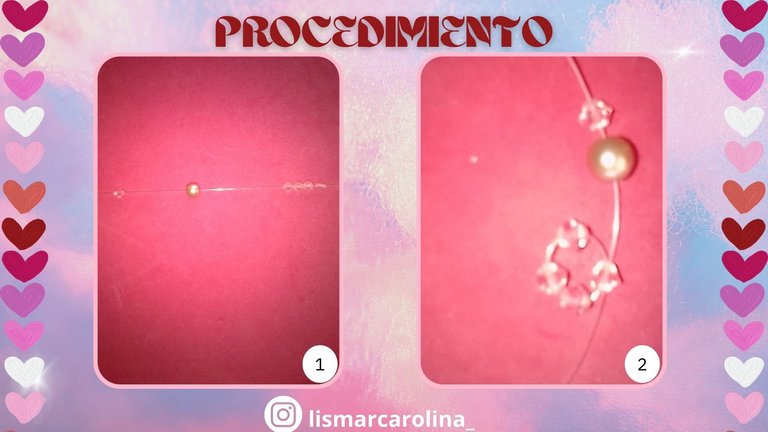
Paso 1 | Step 1
Primero ingresamos un swarovski, una perla pequeña (4mm), 4 swarovskis luego de los 4 swarovskis, formamos una pequeña crucecita devolviendonos por la primera piedrita. Como podemos ver en la imagen 2.
First we enter a swarovski, a small pearl (4mm), 4 swarovskis, then from the 4 swarovskis, we form a small cross, going back through the first pebble. As we can see in the image 2.
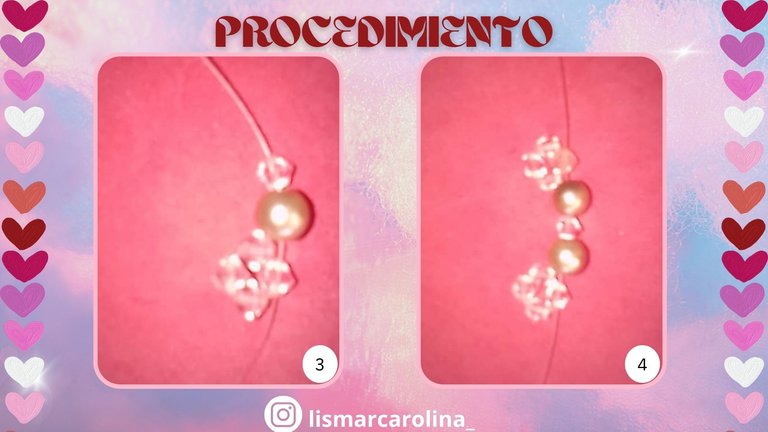
Paso 2 | Step 2
Luego del otro lado del nylon ( ambos lados deben medir lo mismo), se agrega otra perla del mismo tamaño (4mm) y 4 piedritas de swarovski y se vuelve a hacer lo mismo, nos devolvemos por el primer swarovski y queda como en la imagen 4.
Then on the other side of the nylon (both sides should measure the same), add another pearl of the same size (4mm) and 4 swarovski stones and do the same thing again, we go back through the first swarovski and it looks like in image 4.
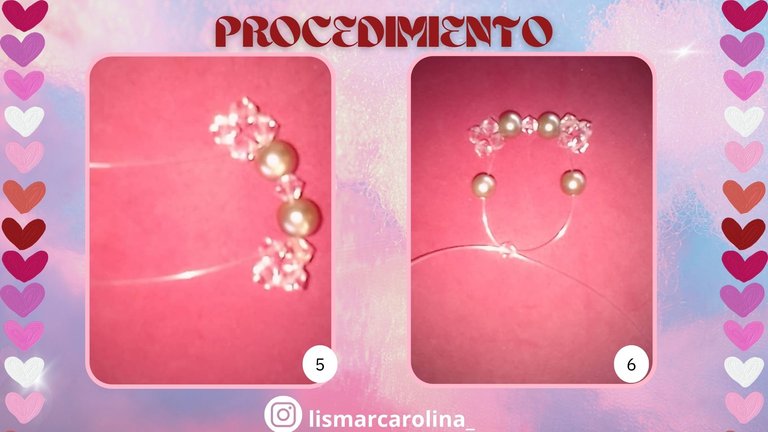
Paso 3 | Step 3
Luego le damos la vuelta al hilo nylon para que quede pasando por las piedras de swarovski que estan hacia adentro como se ve en la imagen 5. Luego se coloca una perla por cada lado de cada nylon del mismo tamaño que las otras perlas (4mm). Y luego se ingresa una piedra de swrovski y cruzamos ambos hilos. Como se ve en la imagen 6.
Then, we enter a swarovski and a bead, we go back through the bead we added after the swarovski and add a bead. We do this on both threads. Then we pass another bead and cross the two strands (4mm). And then a swrovski stone is entered and we cross both threads. As shown in image 6.
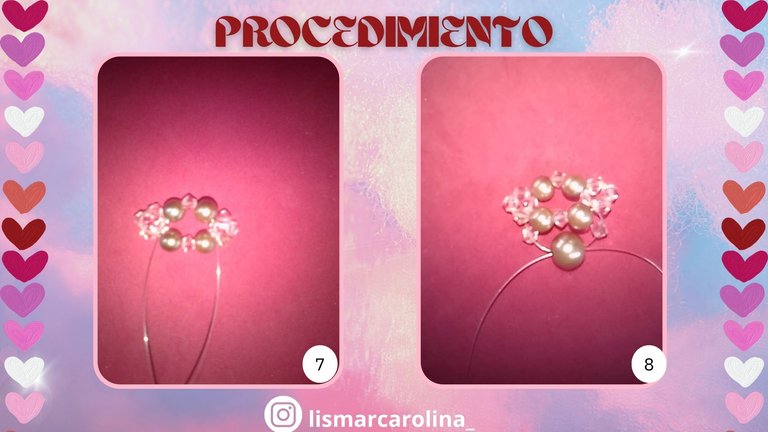
Paso 4 | Step 4
Luego, pasamos los hilos del extremo de las perlas que acabamos de pasar en la imagen 6 a pasar los hilos por las otras perlas que quedaon atrás. Y quedaria como se ve en la imagen 7. Luego pasamos un swarovski por cada hilo y pasamos una perla mas grande de 6 mm y cruzamos los hilos. Como se ve en la imagen 8.
Then we pass the threads from the end of the beads that we just passed in image 6 to pass the threads through the other beads that are left behind. Then we pass a swarovski through each thread and pass a larger bead of 6 mm and cross the threads. As shown in image 8.
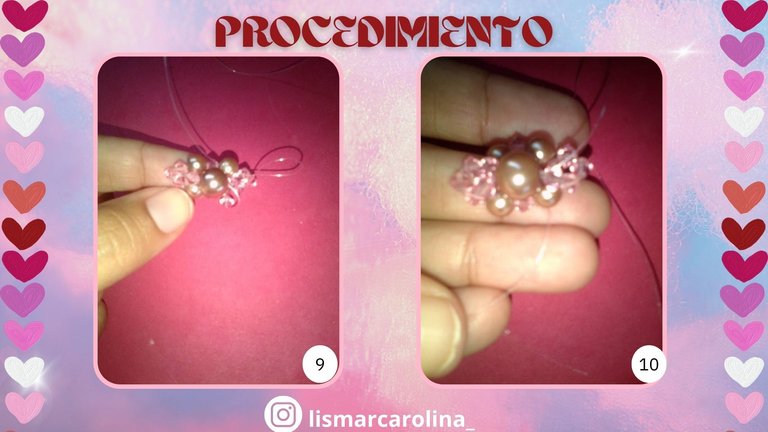
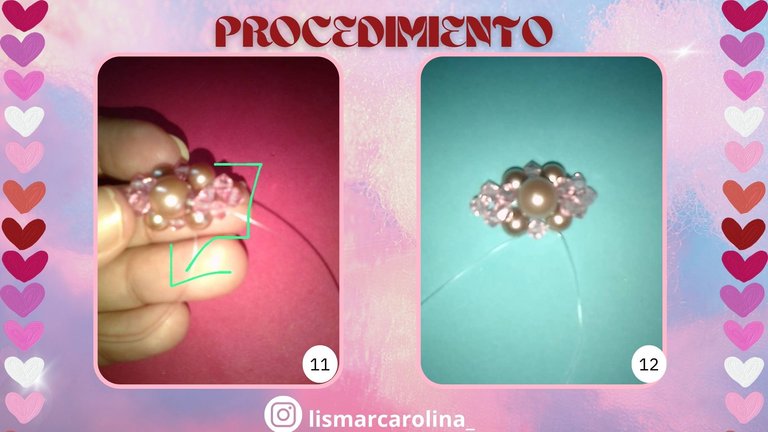
Paso 5 | Step 5
Luego, ingresamos un swarovski rosado por cada nylon y empezamos a pasar el hilo por dentro de todos los swarovskis por donde se formó la pequeña crucecita, hasta que salga por la perla de abajo. Si se complica mucho tambien puede pasar el hilo por las esquinas escondido debajo de la cruz y que salga por la perla como se ve en la imagen 20. Esto mismo se hace con el otro hilo del otro lado. Finalmente podemos ver que ambos hilos se terminan cruzando en la piedrita de swarovski como vemos en la imagen 12.
Then, thread a pink swarovski through each nylon and start passing the thread through all the swarovskis where the little cross was formed, until it comes out through the bottom bead. If it gets too complicated you can also pass the thread through the corners hidden under the cross and it will come out through the bead as shown in the picture 20. Finally we can see that both threads end up crossing in the swarovski stone as we can see in image 12.
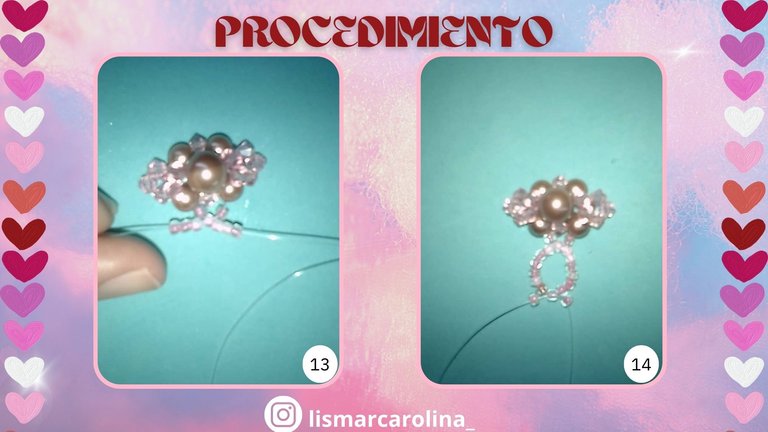
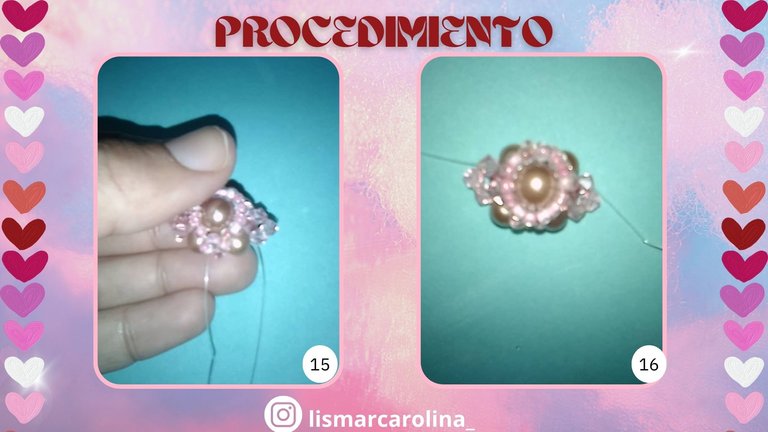
Paso 6 | Step 6
Luego lo colocamos una mostacilla por cada nylon , agregamos una mostacilla y cruzamos ambos nylon, luego agregamos 6 mostacillas de cada lado y colocamos otra y cruzamos los hilos por esta ultima y volvemos a colocar una mostacilla en cad nylon. Como se ve en la imagen 14.
Then we place a bead on each nylon, add a bead and cross both nylons, then add 6 beads on each side and place another bead and cross the threads through this last one and place a bead on each nylon again. As shown in picture 14.
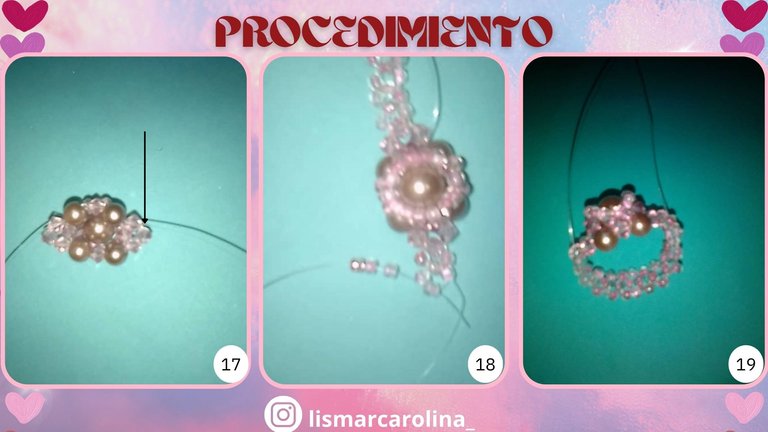
Paso 7 | Step 7
Ahora, en este paso colocamos toda la mostacilla encima de la perla grande de 6mm y pasamos los hilos por el swarovski de arriba de la perla de 6m , justamente es el swarovki opuesto del que salen las mostacillas, una vez que los hilos los saquemos por ese swarovski vamos a ir pasando el hilo hasta llegar a cada swarovski que se encuentra en el lateral , el que esta señalado por la flecha en la imagen 17, el hiilo saldrá por alli, lo mismo hacemos con el otro hilo que esta en el otro lado.
Now, in this step we place all the beads on top of the big 6mm bead and we pass the threads through the swarovski on top of the 6m bead, just the opposite swarovski from where the beads come out, once the threads are pulled through this swarovski we are going to pass the thread until we get to each swarovski that is on the side, the one that is marked by the arrow in the image 17, the thread will come out through there, the same we do with the other thread that is on the other side.
Paso 8 | Step 8
Finalmente para armar el mango del anillo que hacemos es que agregamos 3 mostacillas rosadas y las pasamos por la esquina del swarovski, jalamos un poco y luego agregamos tres mostacillas mas y las pasamos por la mostacilla del centro, luego pasamos el hilo por una mostacilla de un lado y volvemos a agregar tres mostacillas mas y volvemos a pasarla por la mostacilla de al lado y repetimos este proceso con el otro hilo nylon que está del otro lado, cuando lleguemos al centro del mango hacemos unos pequeños nudos a cada hilo por separado y sequimos pasando el hilo por mas mostacillas solo para esconder el hilo y que el nudo no se deshaga facilmente y alli cortamos cada hilo.
Finally to assemble the shank of the ring we add 3 pink beads and pass them through the corner of the swarovski, pull a little and then add three more beads and pass them through the bead in the center, then we pass the thread through a bead on one side and add again three more beads and pass it again through the bead on the other side and repeat this process with the other nylon thread on the other side, when we get to the center of the handle we make a few small knots to each thread separately and we dry passing the thread through more beads just to hide the thread and that the knot does not unravel easily and there we cut each thread.

Resultado | Result
Este es el resultado,es un anillo un poco elaborado , me costó un poco pero gustó mucho la verdad, porque es muy bonito este color y porque tiene muchos detalles, espero se animen a hacerlo!.
This is the result, is a ring a little elaborate, it cost me a little but I really liked it, because it is very nice this color and because it has many details, I hope you are encouraged to do it!
Gracias por leer !!!
Thanks for reading!!!
Créditos | Credits
Utilicé Canva para editar imágenes y personalicé un poco una plantilla de Canva.
I used Canva to edit images and customize a Canva template a bit.
Utilicé deepl.com para la traducción
I used deepl.com to traduction.
Todas las imagenes del paso a paso son mías, tomadas con mi telefono Yezz Liv1.
All the step by step images are mine, taken with my Yezz Liv1 phone.
 |
 |
 |
Hola, se ve muy lindo el anillo, resalta muy bien por la combinación de colores. Saludos.
!PIZZA
$PIZZA slices delivered:
(3/5) @darwinjj tipped @lismarcarolina2
hola querida amiga muy linda tu creación saludos..
disculpa el atrevimiento pero como le haces para hacer las imágenes con el gif y subirlas.. tengo tiempo tratando de hacerlos y subirlos pero no he podido.. espero y puedas compartir conmigo la manera
Hola!, en canva en la opcion de compartir seleccionas la imagen o imagenes y le das descargar como gif
ya lo he hecho pero no lo he logrado.. bueno seguiré intentando.. otra pregunta al momento de subirlo en la edición como lo haces
Como asi a que te refieres?
Listo @lismarcarolina2 creo que ya lo he logrado..! Solo era que en algunos tutoriales usaban postimage..!!
Ok que bien
Esta me parece una creación que le encantaría a mi sobrina, la veo femenina y juvenil.
Congratulations @lismarcarolina2! You have completed the following achievement on the Hive blockchain And have been rewarded with New badge(s)
Your next target is to reach 600 comments.
You can view your badges on your board and compare yourself to others in the Ranking
If you no longer want to receive notifications, reply to this comment with the word
STOPCheck out our last posts: