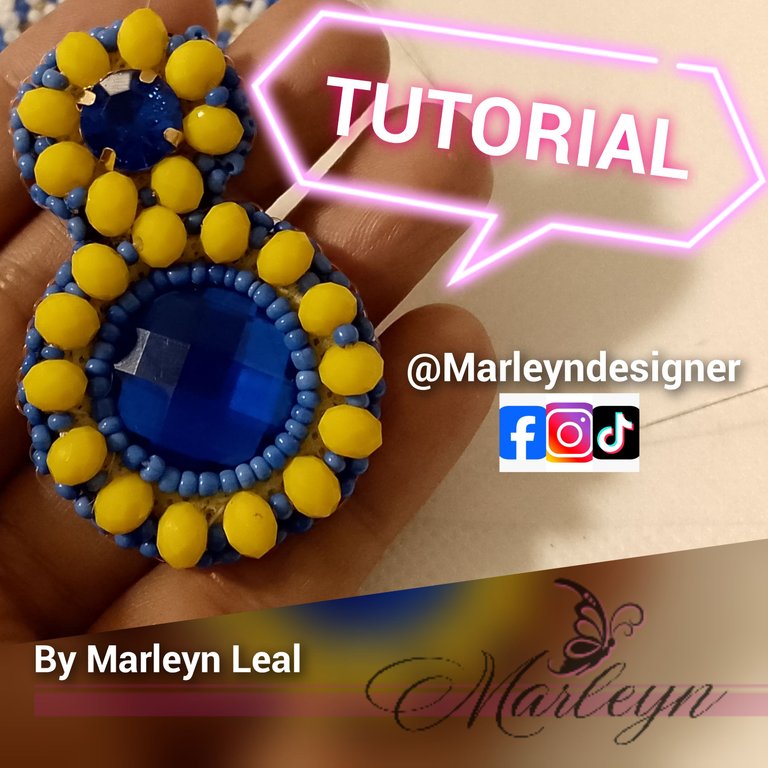
Feliz y Bendecido nuevo día, En este tutorial, aprenderemos a confeccionar unos elegantes zarcillos de tamaño mediano utilizando pequeñas mostacillas y cristal de Murano en tonos azul y amarillo. Estos colores son vibrantes y le darán un toque super especial, así como único a tus outfit diarios. Los explicare paso a paso a través de imágenes explicadas detalladamente, de esta manera con estos pasos, tendrás unos zarcillos únicos y personalizados que podrás lucir o regalar. ¡Disfruta del proceso creativo!
Happy and Blessed new day, In this tutorial, we will learn how to make elegant medium-sized earrings using small beads and Murano glass in blue and yellow tones. These colors are vibrant and will give a super special and unique touch to your daily outfits. I will explain them step by step through images explained in detail, this way with these steps, you will have unique and personalized earrings that you can wear or give as a gift. Enjoy the creative process!
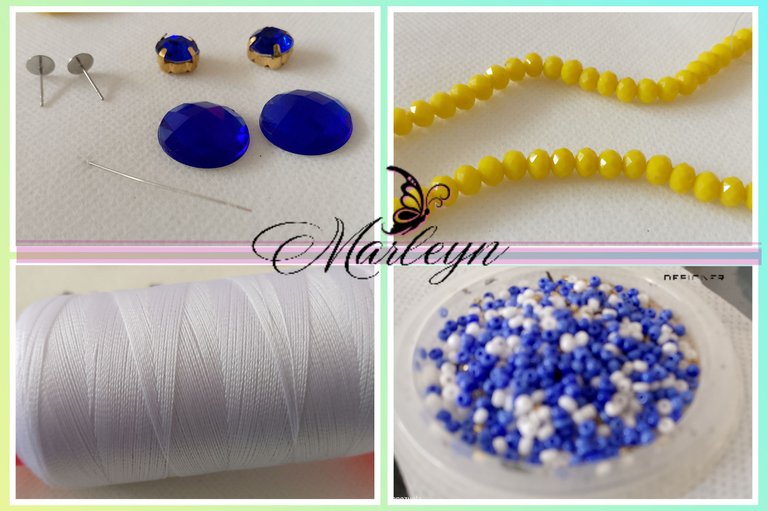
Antes de comenzar, asegúrate de tener todos los materiales listos:
Mostacillas en tono azul, Cristales de Murano en tono amarillo, Hilo de nylon transparente, hilo nylon especial para talabarteria, Aguja para Mostacillas, Tijeras, Tela POP o tela fina para la base, Cuero o Tela gruesa para la parte de atrás, Pines de Zarcillos o Bases para Zarcillos, Piedras engastadas de 0.5 Milímetros, Aplique plano redondo de 1.2 centímetros de diámetro, Yo utilice hilo blanco porque no tenia tono azul, pero lo mas recomendable es utilizar el tono de las piedras que estamos bordando.
Before you begin, make sure you have all the materials ready:
Beads in blue tone, Murano Crystals in yellow tone, Transparent nylon thread, special nylon thread for saddlery, Needle for Beads, Scissors, POP fabric or thin fabric for the base, Leather or thick fabric for the back, Pins Tendrils or Bases for Tendrils, Stones set at 0.5 Millimeters, Flat round appliqué of 1.2 centimeters in diameter, I used white thread because it did not have a blue tone, but it is best to use the tone of the stones that we are embroidering.
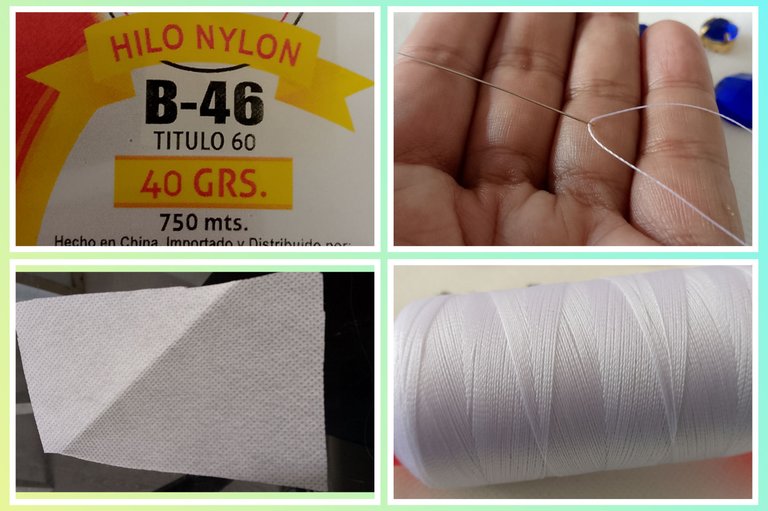
Este es el hilo que utilizo para las piezas bordadas y los trabajos en miyuki, es realmente resistente, no se enreda fácilmente que es uno de sus mayores beneficios ya que para un bordado mas unánime siempre es recomendable utilizar la misma linea de hilo. Si estas en Venezuela, este hilo puedes conseguirlo en las Mercerías del Castillo, debes estar al pendiente que sea titulo 60 para que pueda entrar en la aguja y pasen de manera optima las mostacillas.
This is the thread that I use for embroidered pieces and Miyuki work, it is really resistant, it does not tangle easily, which is one of its greatest benefits since for a more unanimous embroidery it is always advisable to use the same line of thread. If you are in Venezuela, you can get this thread at the Mercerías del Castillo, you must be aware that it is title 60 so that it can enter the needle and pass through the beads optimally.
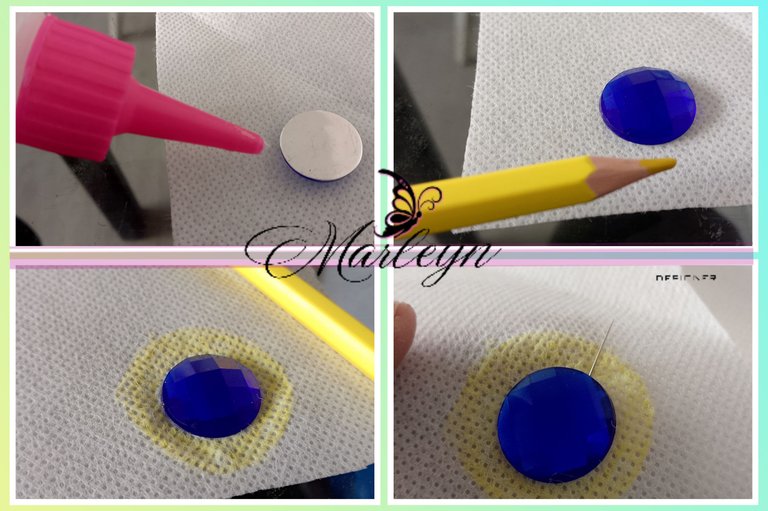
Empecemos, Vamos a cortar un trozo de tela POP, si no sabes cual es pues es muy facil, es la tela que utilizan en las batas de cirujanos, yo recomiendo utilizar de base igual a las piezas que estamos creando en este caso seria tela azul, y una parte redonda de amarillo, como no tenia esos tonos de tela, utilice tela blanca y pinte el alrededor en amarillo lo importante es solucionar y aun así quedaran genial, Ahora coloca una gota de silicon o pega E6000 en el aplique plano y pegarlo a la tela, luego pintamos el alrededor con el color amarillo.
Let's start, We are going to cut a piece of POP fabric, if you don't know what it is, it is very easy, it is the fabric they use in surgeons' gowns, I recommend using the same base as the pieces we are creating, in this case it would be blue fabric , and a round part of yellow, since I did not have those shades of fabric, I used white fabric and painted the surroundings in yellow, the important thing is to solve it and they will still look great. Now place a drop of silicone or glue E6000 on the flat applique and glue it to the fabric, then we paint the surroundings with yellow.
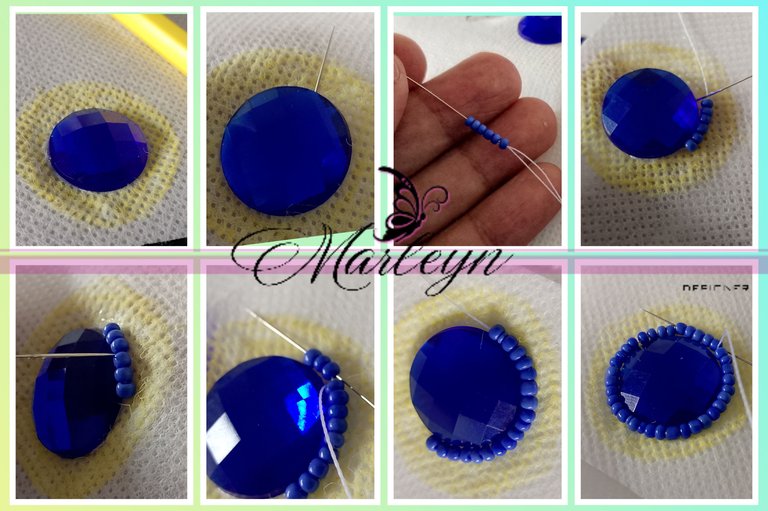
Ensarta la aguja con el Hilo, pasa la aguja de abajo hacia arriba, justo por la orilla de la piedra, ahora ensarta 6 mostacillas, vas a regresar la aguja ahora de arriba hacia abajo donde termina la ultima mostacilla, como vez en la cuarta foto de izquierda a derecha, ahora introduce la aguja de abajo hacia arriba, saliendo por la tercera mostacilla, y pasando la aguja por las 3 mostacillas siguientes, sigue el mismo proceso hasta culminar toda la vuelta de mostacillas, recuerda de 6 en 6 pasando de regreso por la tercera. Al terminar dale la vuelta a todas las mostacillas para que queden redonditas.
Thread the needle with the Thread, pass the needle from bottom to top, right along the edge of the stone, now thread 6 beads, you are going to return the needle now from top to bottom where the last bead ends, as you can see in the fourth photo from left to right, now insert the needle from bottom to top, exiting through the third bead, and passing the needle through the next 3 beads, follow the same process until completing the entire round of beads, remember 6 by 6 passing back for the third. When finished, turn all the beads so that they are round.
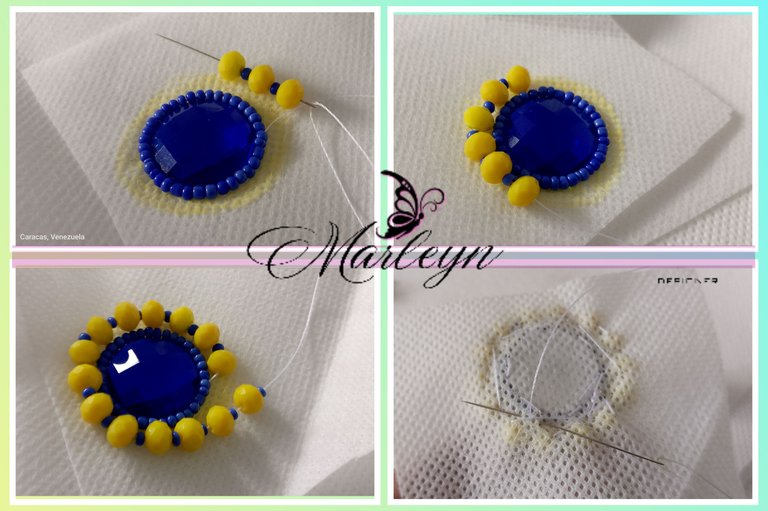
En esta etapa vamos a realizar el mismo proceso anterior solo que esta vez lo vamos a hacer con el cristal de murano numero 4, se colocara un murano, una mostacilla y asi sucesivamente, realizarlo de 3 en 3, te regresas por el segundo cristal y sales nuevamente al primer cristal para continuar hasta darle la vuelta completa, al terminar pasa la aguja con el hilo por todo el circulo nuevamente para que quede todo unido y mas redondito. Realiza un amarre en la parte de atras, esto puedes hacerlo cada vez que terminas una vuelta porque puede pasar que el hilo se reviente y de esta manera evitas que se dañe todo el proceso.
At this stage we are going to carry out the same process as before, only this time we are going to do it with murano glass number 4, place a murano glass, a bead and so on, do it 3 at a time, you return for the second glass and You go out again to the first crystal to continue until you turn it completely around, when you finish pass the needle with the thread through the entire circle again so that everything is united and more round. Make a tie at the back, you can do this every time you finish a round because the thread may burst and in this way you avoid damaging the entire process.
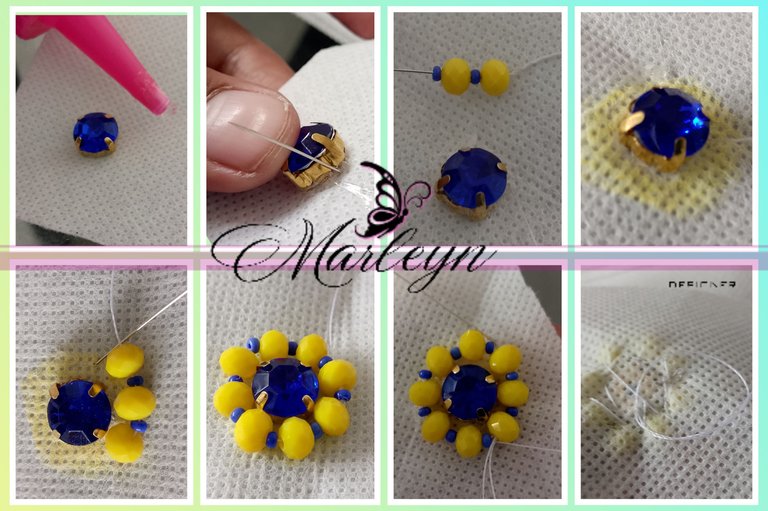
Realicemos la parte de arriba de nuestra pieza, esta se hace en una tela separada de la pieza anterior, como este aplique es engastado, solo le coloque un toque de silicon liquido o pega E6000 la que tengas, luego lo cocemos con cuidados ya que el engaste tienes pequeños agujeros donde la aguja pasa perfectamente, como este es mas pequeño y no me gusta que quede tan grande en la parte superior de la oreja, solo le agregue una linea de cristales de murano y mostacillas, se realiza con el mismo procedimiento anterior la única diferencia es que no lo vas a hacer de 3 en 3 cristales si no que lo harás de 2 en 2 para ir dando la curva paso a paso, al terminar recuerda hacer el nudo por la parte de atrás
Let's make the upper part of our piece, this is made of a fabric separate from the previous piece, as this appliqué is crimped, just add a touch of liquid silicone or glue E6000 whatever you have, then we cook it carefully since the setting you have small holes where the needle passes perfectly, as this one is smaller and I don't like that it is so big on the upper part of the ear, I just added a line of murano crystals and beads, it is done with the same previous procedure The only difference is that you are not going to do it 3 crystals at a time, but rather you will do it 2 at a time to take the curve step by step. When you finish, remember to tie the knot at the back.
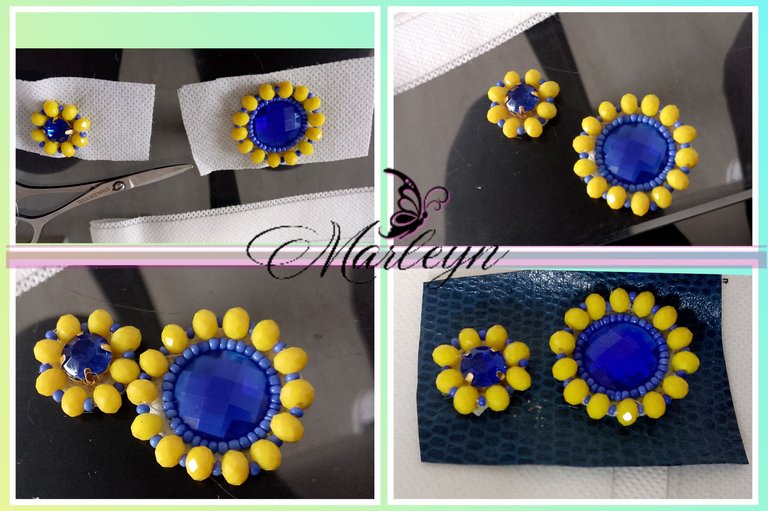
Corta las piezas con cuidado de no cortar los hilos para que no dañes todo lo que se a trabajado, es recomendable utilizar una tijera pequeña y muy afilada para que llegues mejor a todas las partes, mide el trozo de cuero donde lo vamos a pegar y cortarlo.
Cut the pieces being careful not to cut the threads so that you do not damage everything that has been worked, it is advisable to use a small and very sharp scissors so that you can reach all the parts better, measure the piece of leather where we are going to glue it and cut it.
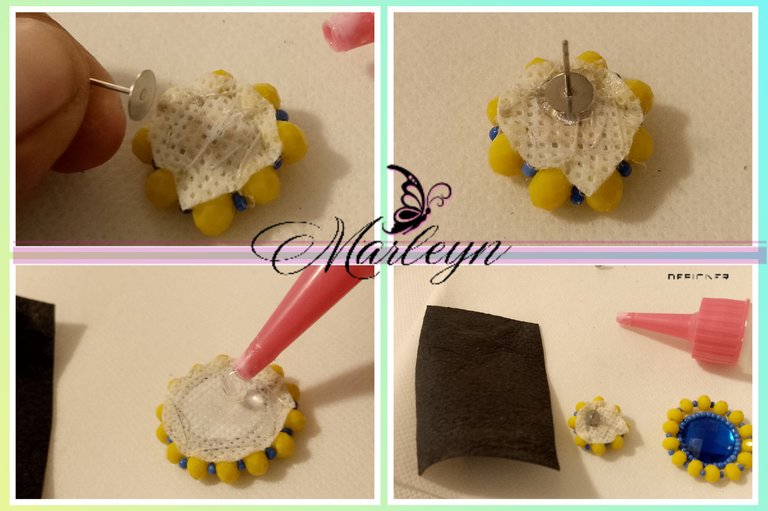
Antes de pegarlo en el cuero pegaremos la base de Zarcillo plana en la parte de atrás del zarcillo, es recomendable pegarlo con la pega E6000 que es de buena calidad y no se va a despegar la pieza con el uso del tiempo, déjalo secar varios minutos, mientras lo dejamos secar podemos ir colocando el pegamento en la parte de abajo de la pieza.
Before gluing it to the leather, we will glue the flat Tendril base to the back of the tendril. It is advisable to stick it with E6000 glue, which is of good quality and the piece will not come off over time. Let it dry for several minutes. , while we let it dry we can place the glue on the bottom of the piece.
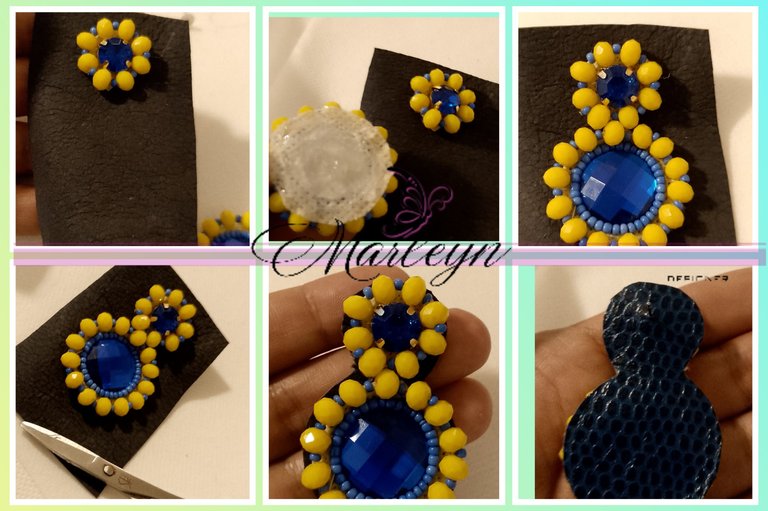
Ahora vamos a colocar pegamento en la parte de arriba de la pieza e insertarla en el cuero de manera que la base del zarcillo traspase el cuero, ahora pegaremos la parte de abajo buscando encajar los cristales para que parezcan unidos entre ellos, déjalo secar un rato. Ahora corta el cuero sobrante.
Now we are going to put glue on the top part of the piece and insert it into the leather so that the base of the tendril passes through the leather, now we will glue the bottom part trying to fit the crystals so that they appear joined together, let it dry for a while . Now cut off the excess leather.
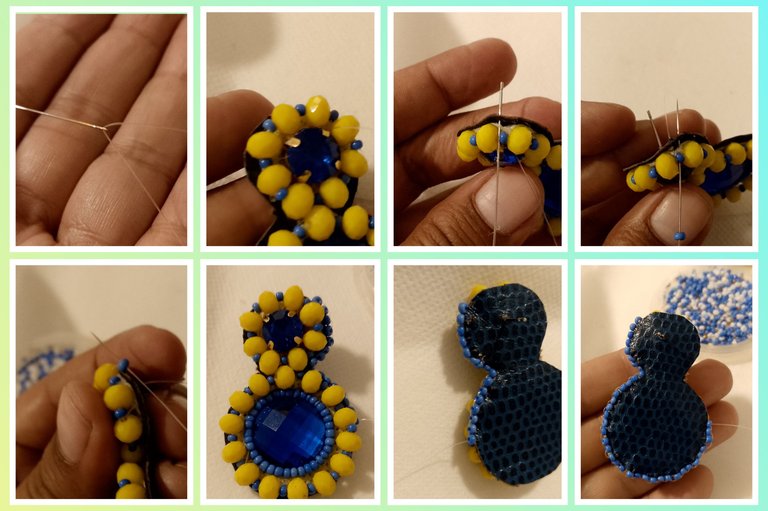
Esta es la parte final, es la parte en la que quizás tardes un poco mas pero es la parte mas satisfactoria, este es un proceso que si te gusta te va a mantener entretenida...Empezamos, Ensarta el nylon transparente en la aguja, Ahora levanta un poco el cuero, introduce la aguja por la tela POP de abajo hacia arriba, ahora pasa la aguja por el cuero, introduce una mostacilla, y vuelve a meter la aguja por el cuero pendiente de las imágenes lo harás desde la parte de adelante del zarcillo hacia atrás cada vez, esto es repetitivo, ahora sube la aguja por la mostacilla, y nuevamente introduce otra mostacilla y repite el proceso hasta completar todo el alrededor del zarcillo.
This is the final part, it is the part that may take a little longer but it is the most satisfying part, this is a process that if you like it will keep you entertained...Let's start, Thread the transparent nylon onto the needle, Now lift the leather a little, insert the needle through the POP fabric from bottom to top, now pass the needle through the leather, insert a small bead, and put the needle through the leather again, pending the images, you will do it from the back. forward of the tendril to the back each time, this is repetitive, now raise the needle through the bead, and again introduce another bead and repeat the process until completing all the way around the tendril.
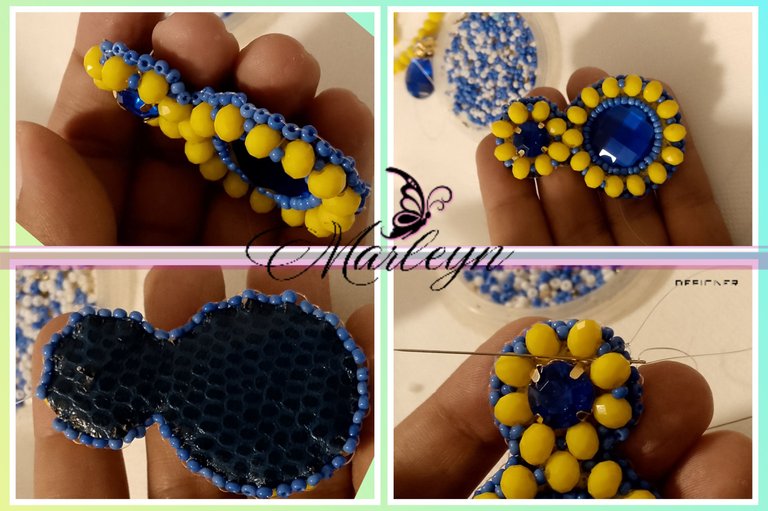
Para finalizar, realiza un amarre escondido, y luego pasa la aguja por los cristales para esconder el nudo ¡Y listo! Ahora tienes un par de zarcillos hechos a mano con mostacillas y cristales de Murano en tonos azul y amarillo. Disfruta de lucir tus nuevos accesorios o de regalarlos a alguien especial.
Consejos Adicionales
Juega con los colores: No temas experimentar con diferentes combinaciones de azul y amarillo.
Usa luz natural: Trabajar bajo buena iluminación te ayudará a ver mejor los detalles.
Prueba diferentes formas: Puedes crear patrones geométricos o formas más libres, según prefieras.
To finish, make a hidden tie, and then pass the needle through the crystals to hide the knot. And that's it! Now you have a pair of handmade earrings with beads and Murano crystals in blue and yellow tones. Enjoy showing off your new accessories or giving them to someone special.
Additional Tips
Play with colors: Don't be afraid to experiment with different combinations of blue and yellow.
Use natural light: Working under good lighting will help you see details better.
Try different shapes: You can create geometric patterns or freer shapes, depending on your preference.


IMAGENES CREADAS EN CANVA
IMAGES CREATED IN CANVA

Quedaron preciosos. Muchas gracias por compartir el procedimiento 😊🙏
Gracias, me alegra que gustaran @pinina
Me encanta te quedo hermoso..
Gracias, a mi me encanto hacerlos! Estamos a la Orden
Un resultado precioso, nos encanta ver el proceso tan minucioso que has realizado, hiciste un grandioso trabajo y la combinación del amarillo y azul es increíble 💛 💙
Gracias @hive-189504, siempre busco explicar de la manera mas facil y detallada posible para que todos puedan hacerlo.
Lindo tutorial.
Gracias @yanethstars, Me encanta saberlo, tarde horas en hacerlo.
These earrings are so beautiful and attractive. Love its design and color combination. It can be a great gift for loved ones. Nice work! Thanks!
So amazing 😍
Gracias @sommylove
Welcome 🤗
Wow this is really beautiful and unique
Thanks for sharing this with us
Thanks @praiselove I try to make it that way! that my pieces are different, original so that the people who buy from me feel unique, special and full of color and good vibes