Bienvenido 💕
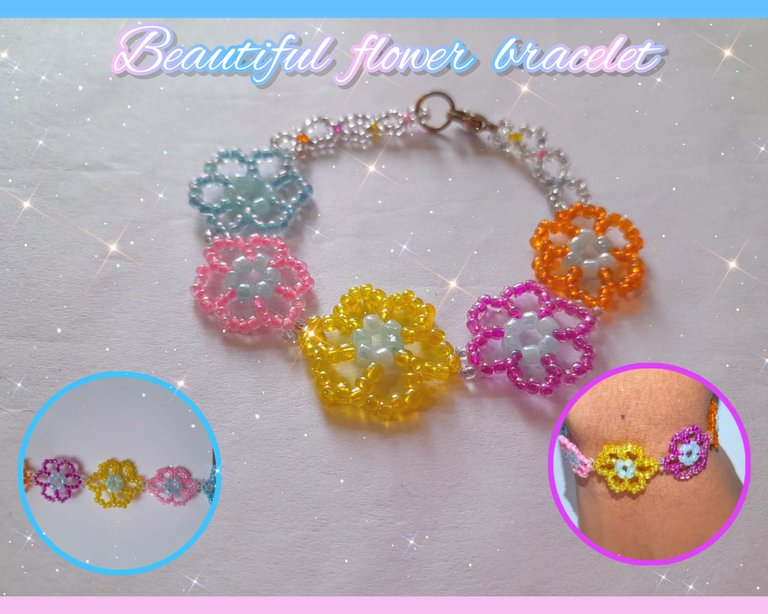
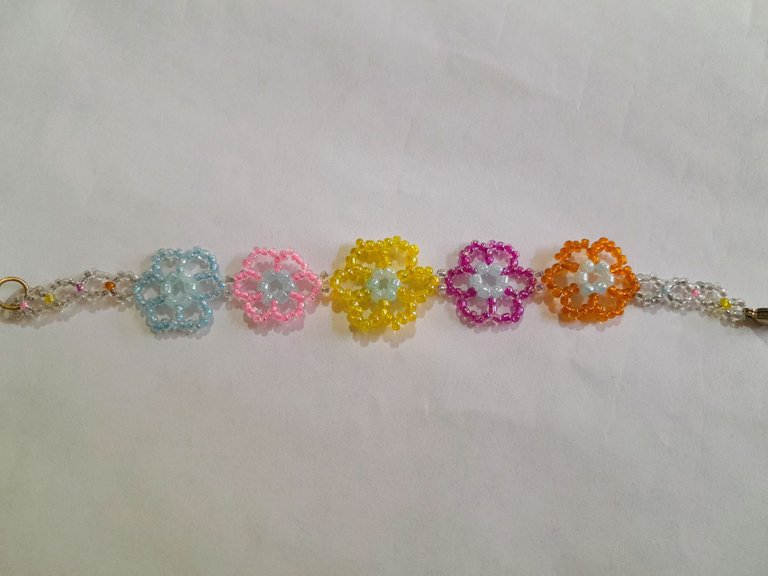
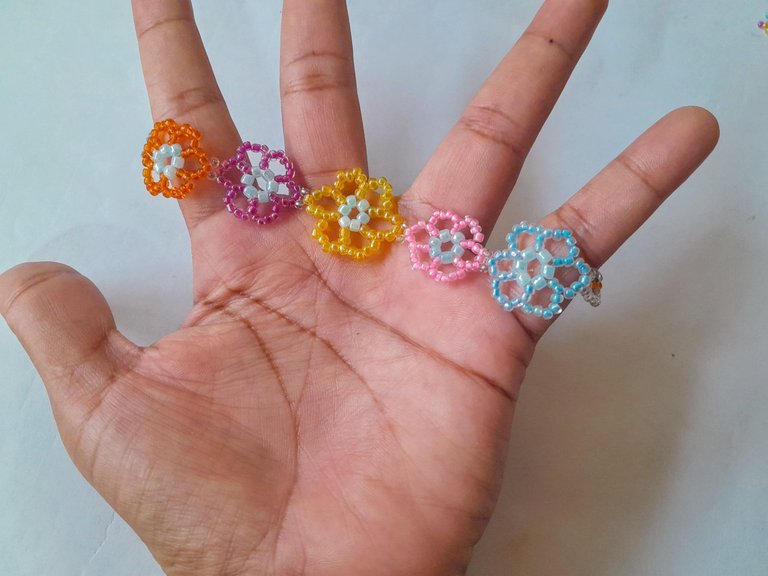
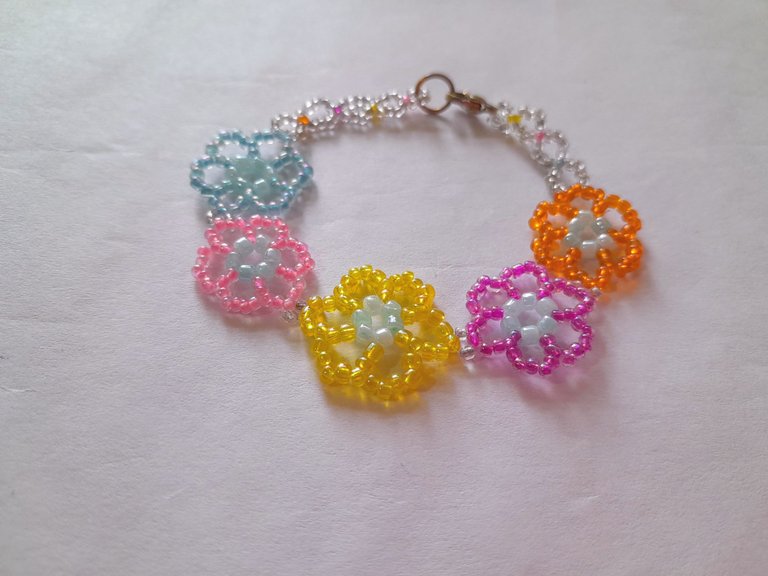
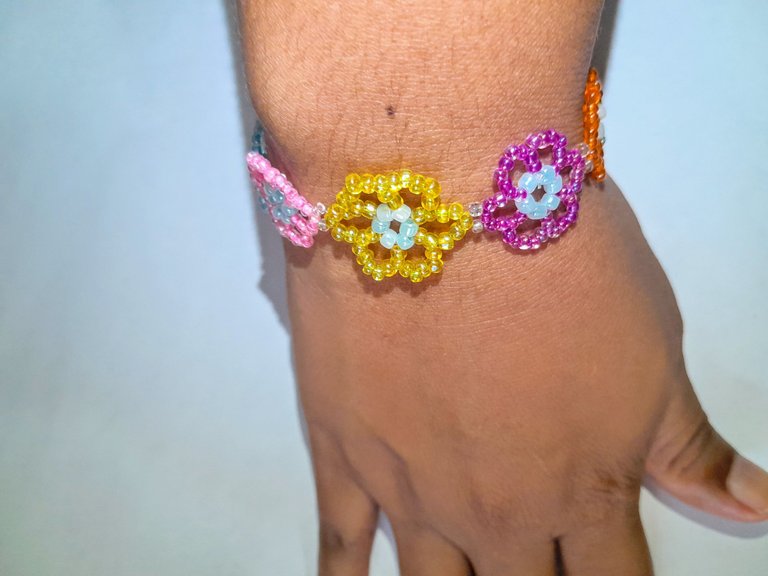
Hola amigos de Jewelry 💎, un cordial saludo para esta linda comunidad llena de creatividad y talento. Estos días mi ánimo ha estado bajo, a eso le sumo la ansiedad, así que estoy retomando las actividades que me gustan para distraerme y salir a flote, hice una pulsera de flores colorida en representación de un nuevo florecer, los colores para darle un toque de alegría, me encantó este resultado espero les guste.
Welcome 💕
Hello friends of Jewelry 💎, a warm greeting to this beautiful community full of creativity and talent. These days my mood has been low, to that I add anxiety, so I'm resuming the activities I like to distract me and get out of the way, I made a colorful flower bracelet representing a new bloom, the colors to give it a touch of joy, I loved this result I hope you like it.

Materiales| Materials
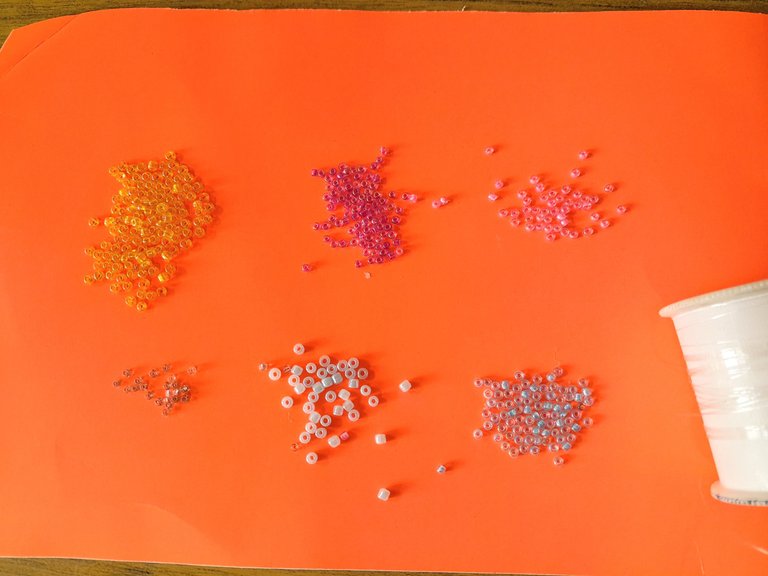
Para este proyecto necesitaremos los siguientes materiales:
❁ Mostacillas de 2 milímetros; azul, rosada, morada y transparente.
❁ Mostacillas de 3 milímetros; azul y amarilla.
❁ Nailon trasparente n° 0.30.
❁ Argolla y cerrador.
For this project we will need the following materials:
❁ 2 mm beads; blue, pink, purple and transparent.
❁ 3 mm beads; blue and yellow.
❁ Transparent nylon n° 0.30.
❁ Ring and clasp.

Paso 1| Step 1
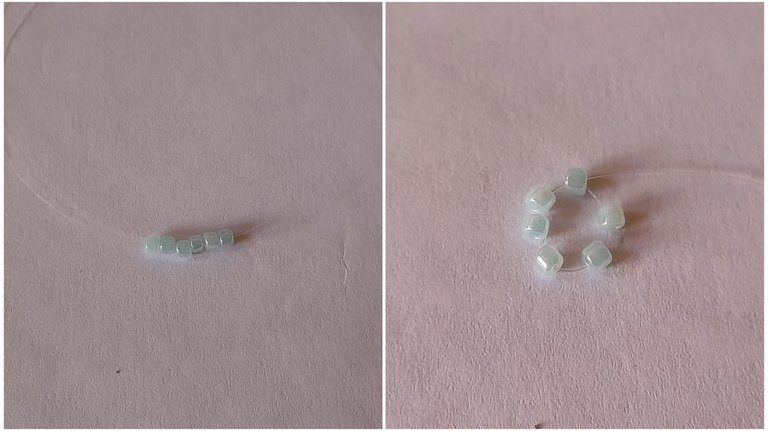
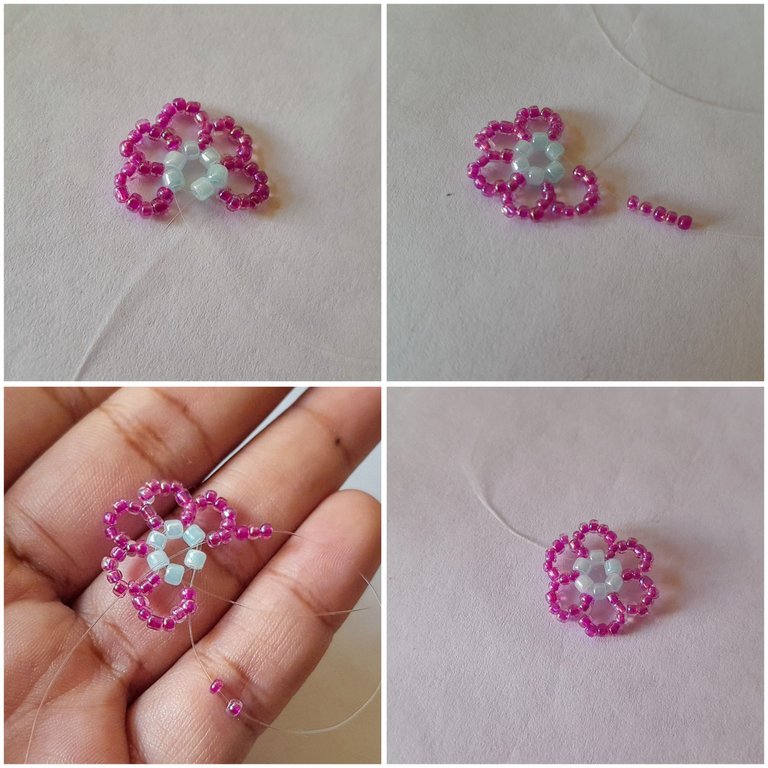
Vamos a cortar cinco tiras de nailon, cada una de 30 centímetros. En el nailon que cortamos, introducimos seis mostacillas azules de 3 milímetros, cruzamos el nailon por la primera mostacilla, formando un círculo, dejamos una punta del nailon más corta solo para amarrar al final.
We are going to cut five strips of nylon, each one of 30 centimeters. In the nylon we cut, we introduce six blue beads of 3 millimeters, we cross the nylon through the first bead, forming a circle, we leave one end of the nylon shorter just to tie at the end.

Paso 2| Step 2
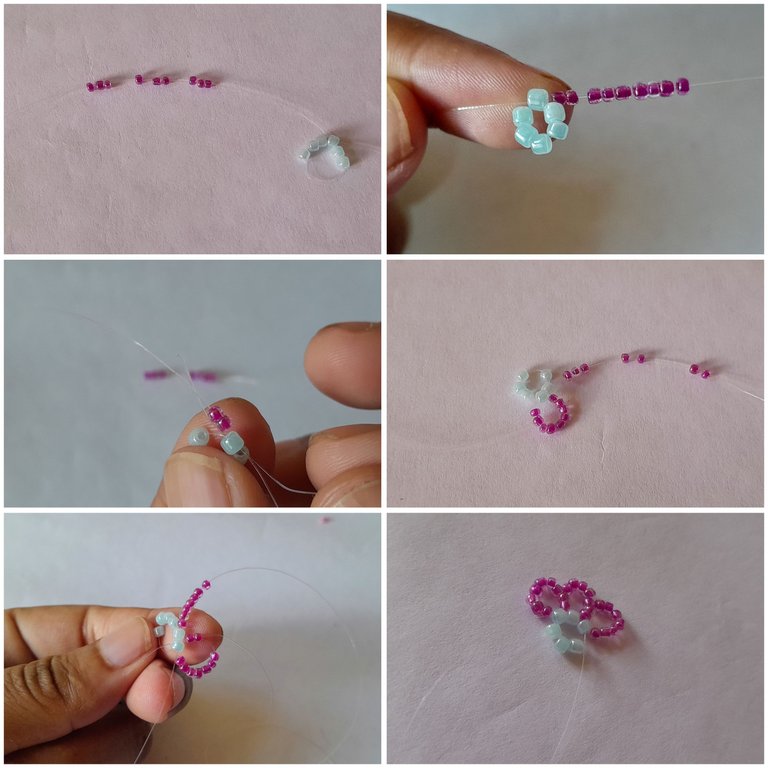
Introducimos nueve mostacillas moradas, y cruzamos el nailon por la mostacilla azul de abajo, pasamos el nailon por la siguiente mostacilla azul e introducimos siete mostacillas moradas, pasamos el nailon por las últimas dos mostacillas del pétalo anterior y cruzamos el nailon por la mostacilla de abajo, pasamos el nailon por la siguiente mostacilla azul, volvemos a introducir siete mostacillas y repetimos el mismo procedimiento del pétalo anterior, repetimos hasta hacer cinco pétalos.
We introduce nine purple beads, and cross the nylon through the bottom blue bead, pass the nylon through the next blue bead and introduce seven purple beads, pass the nylon through the last two beads of the previous petal and cross the nylon through the bottom bead, pass the nylon through the next blue bead, introduce seven beads again and repeat the same procedure of the previous petal, repeat until five petals are made.

Paso 3| Step 3
Ya con cinco pétalos listos, vamos a pasar el nailon por las primeras dos mostacillas del último pétalo que hicimos, introducimos cinco mostacillas moradas y pasamos el nailon desde arriba hacia abajo por las primeras dos mostacillas del primer pétalo, vamos a amarrar bien las dos partes del nailon, cortamos y quemamos un poco las puntas para que los nudos no se suelten y ya tenemos la primera flor.
With five petals ready, we are going to pass the nylon through the first two beads of the last petal we made, we introduce five purple beads and pass the nylon from top to bottom through the first two beads of the first petal, we are going to tie well the two parts of the nylon, we cut and burn a little the ends so that the knots do not come loose and we already have the first flower.

Paso 4| Step 4
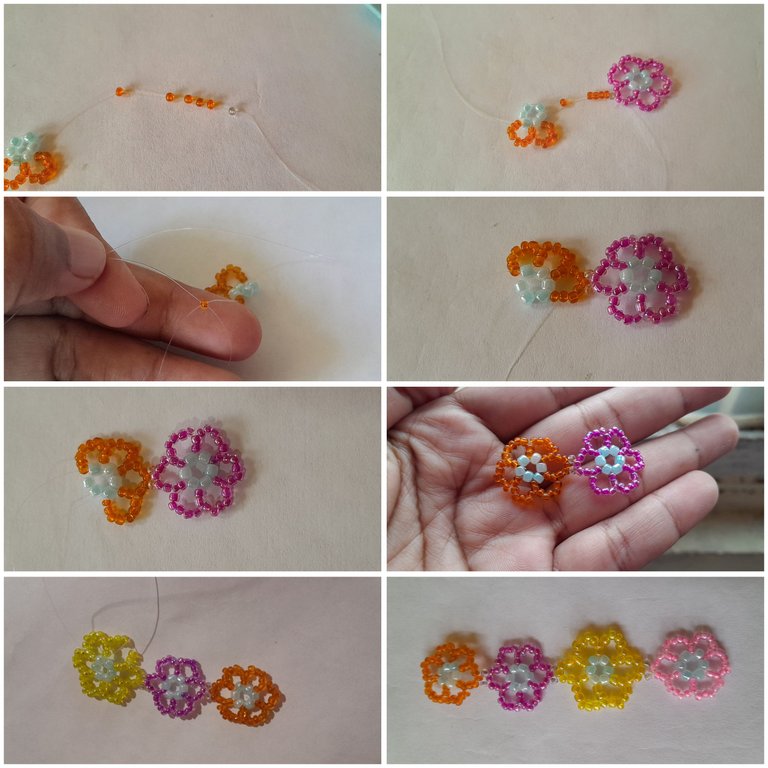
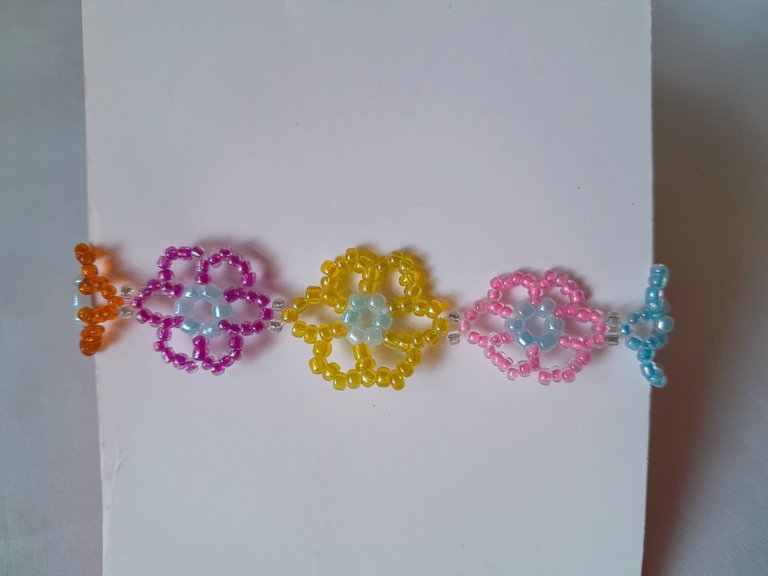
Agarramos otro nailon de 30 centímetros, repetimos el mismo procedimiento de los pasos anteriores con los pétalos, esta vez con el color anaranjado, pero solo hacemos dos pétalos, para hacer el tercero, solo introducimos cinco mostacillas anaranjadas y una transparente, para unir las flores.
Vamos a pasar el nailon por la mostacilla central de la flor que ya está lista como se muestra en la imagen, introducimos otra mostacilla transparente y cruzamos el nailon por la última mostacilla anaranjadas que introducimos, después pasamos dos mostacillas anaranjadas, pasamos el por las dos mostacillas anaranjada de abajo, volvemos a repetir el proceso de los pétalos hasta completar la flor.
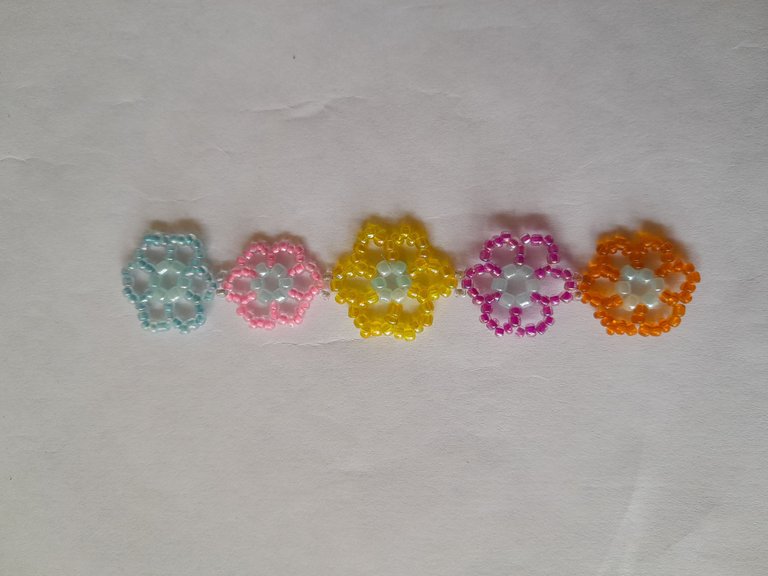
Este procedimiento lo repetimos con las otras flores, como la flor amarilla es nas grande porque se realizó con mostacillas de 3 milímetros, será nuestra flor central.
We take another nylon of 30 centimeters, repeat the same procedure of the previous steps with the petals, this time with the orange color, but we only make two petals, to make the third one, we only introduce five orange beads and one transparent one, to join the flowers.
We are going to pass the nylon through the central bead of the flower that is already ready as shown in the image, we introduce another transparent bead and we cross the nylon through the last orange bead that we introduce, then we pass two orange beads, we pass it through the two orange beads below, we repeat the process of the petals until completing the flower.
We repeat this procedure with the other flowers, as the yellow flower is nas large because it was made with 3 mm beads, it will be our central flower.

Paso 5| Step 5
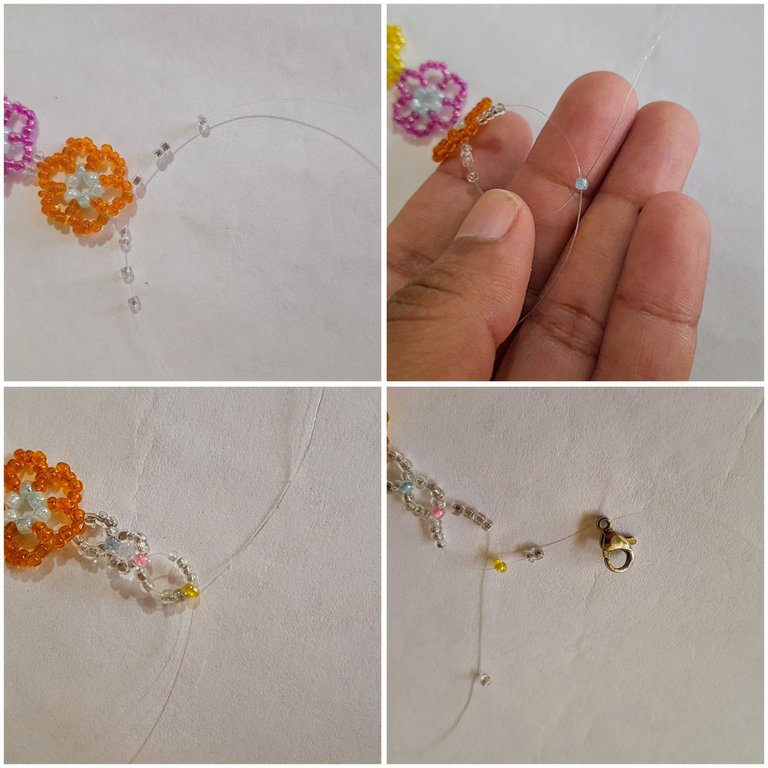
Ya tenemos todas las flores listas, ahora utilizaremos un nailon de 15 centímetros de cada lado de la pulsera para completarla. Pasamos el hilo por la mostacilla central del pétalo de la última y primera flor, pasamos cuatro mostacillas transparentes y cruzamos por una Mostacilla de color, en este caso utilicé azul en el primero y luego hice el mismo procedimiento con los mismos colores, completamos tres aros, introducimos dos mostacillas de cada lado y el trancador, del otro lado de la pulsera colocamos el aro, amarramos bien cortamos y quemamos las puntas.
Yo adoré esta pulsera, sus colores y las forma, espero les guste.🥰
We already have all the flowers ready, now we will use a nylon of 15 centimeters on each side of the bracelet to complete it. We pass the thread through the central bead of the petal of the last and first flower, we pass four transparent beads and cross through a colored bead, in this case I used blue in the first one and then I did the same procedure with the same colors, we complete three rings, we introduce two beads on each side and the latch, on the other side of the bracelet we place the ring, we tie well, cut and burn the ends.
I adored this bracelet, its colors and shape, I hope you like it.🥰

Muchas gracias por este lindo espacio, espero les haya gustado mi elaboración de hoy, mis mejores deseos, nos vemos pronto, saludos ☺️.
Thank you very much for this nice space, I hope you liked my elaboration today, best wishes, see you soon, greetings ☺️.

Fotos propias tomadas con mi teléfono Samsung A13, 50 mp. Edición de portada con Picsart collage en Gridart. Contenido exclusivo para hive.
Traducción -->deepl
Own photos taken with my Samsung A13 phone, 50 mp. Cover editing with Picsart collage in Gridart.
Exclusive content for hive.
Translation -->deepl

Amiga te quedó hermosa y delicada esa pulsera 😍 me encanta 😍 saludos 💖
Muchas gracias 🥰🥰🥰
Excellent work and design. The flowers are in total harmony. The colors are beautiful, and your step by step perfectly explained. Great post congratulations @meivys <3 // Excelente trabajo y diseño. Las flores te quedaron en total armonía. Los colores están muy bonitos, y tu paso a paso perfectamente explicado. Buen post felicidades @meivys <3
Thank you very much, I'm glad you like it.
Simplemente hermoso ame los colores el diseño todo 😍😍😍😍😍 que grato fue ver tu contenido @meivys.
Muchas gracias linda🥰
Espectacular brazalete amiga @meivys nos encantan las flores y los colores que le dan tanta vida 💛, u trabajo especial y muy bien realizado felicidades 👏
Muchas gracias, tuve duda Ai hacerla de tantos colores, pero el resultado me gustó.
Hermosa 💖
Hermoso trabajo amiga me encantó, los colores muy bellos.. Gracias por compartir el tutorial. Saludos 🤗
Muchas gracias a ti por tu visita 🥰🥰
Que bonita pulsera amiga, saludos!