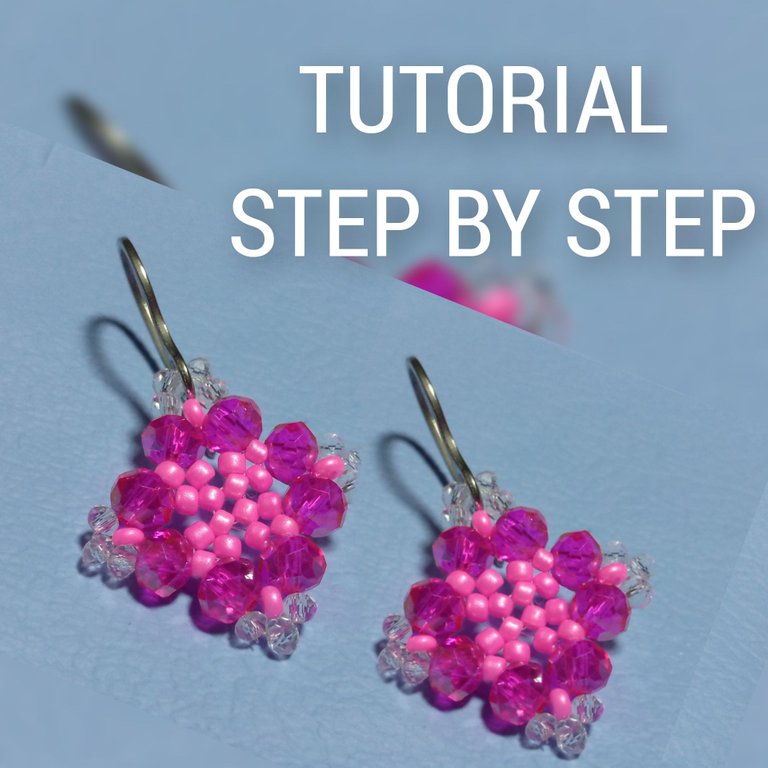
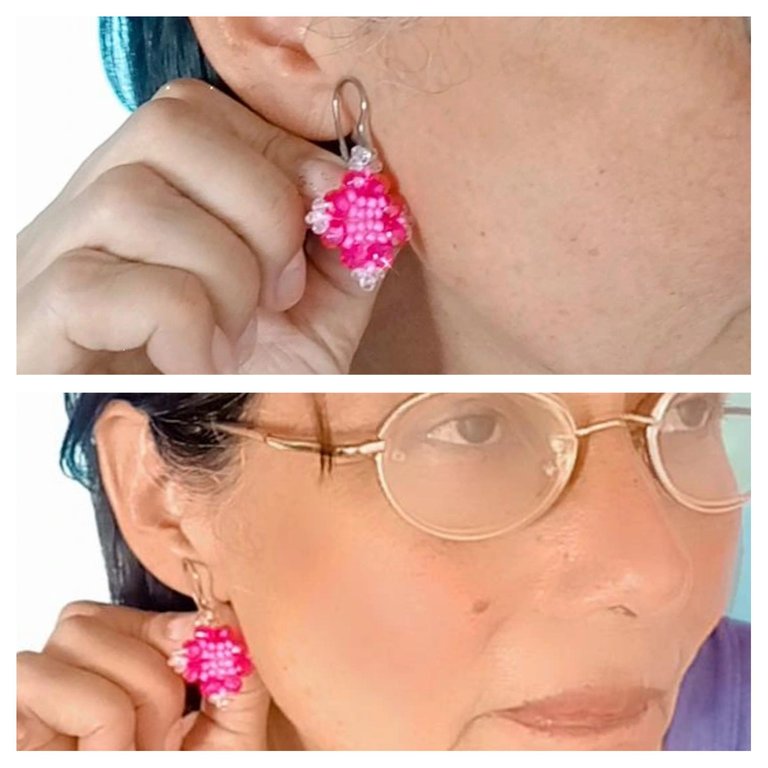
Hola mis queridos amigos creativos, lamento estar un poco distante en este tiempo, lo mas importante es que siempre las leo y las tengo presente... El día de hoy quiero unirme a la iniciativa de Un Regalo para Mama les hice unos bellos zarcillos en cristales checos paso a paso, espero que sean de su mayor agrado. y cualquier duda o sugerencia me las puedes hacer llegar por los comentarios! Mi madre lamentablemente murió hace mas de 20 años aunque en mi mente y mi corazón siempre estará a mi lado, así que decidí regalarle los zarcillos a mi hija que es de verdad una madre abnegada y dedicada a sus hijos.
Hello my dear creative friends, I'm sorry to be a little distant in this time, the most important thing is that I always read you and I keep you in mind... Today I want to join the Un Regalo para Mama initiative I made some beautiful tendrils in Czech crystals step by step, I hope you like them. and any questions or suggestions you can send them to me in the comments! My mother unfortunately died more than 20 years ago but in my mind and in my heart she will always be by my side, so I decided to give the earrings to my daughter who is truly a devoted mother and dedicated to her children more than anything else.
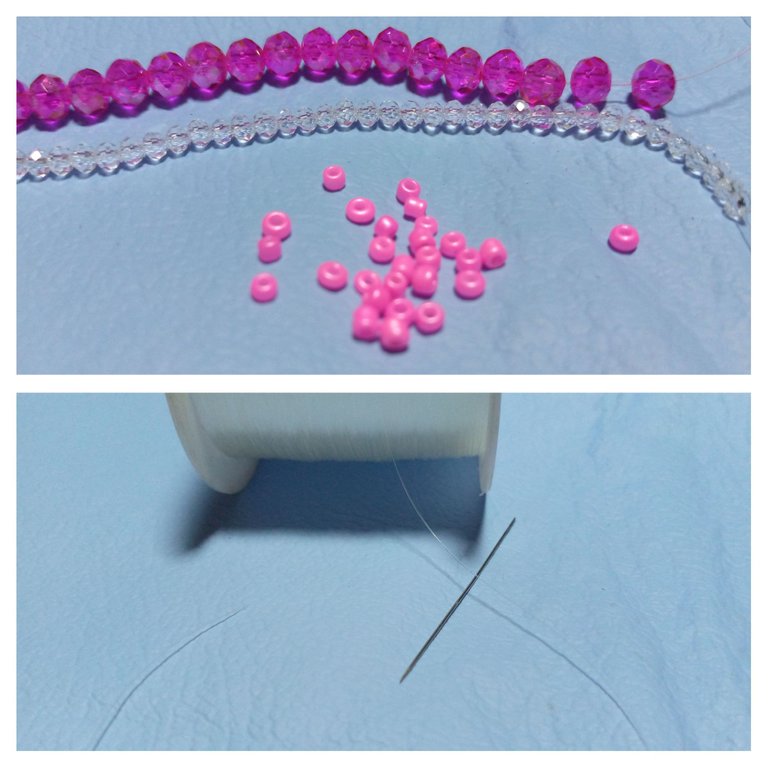
Materiales, Anzuelos para zarcillos, Cristal checo 6 milímetros fucsia, Cristal checo transparente 2 milímetros, Mostacillas fucsias, hilo nailon, aguja y tijera!!!
Materials, Earring hooks, fuchsia Czech glass 6 mm, transparent Czech glass 2 mm, fuchsia beads, nylon thread, needle and scissors!!!!
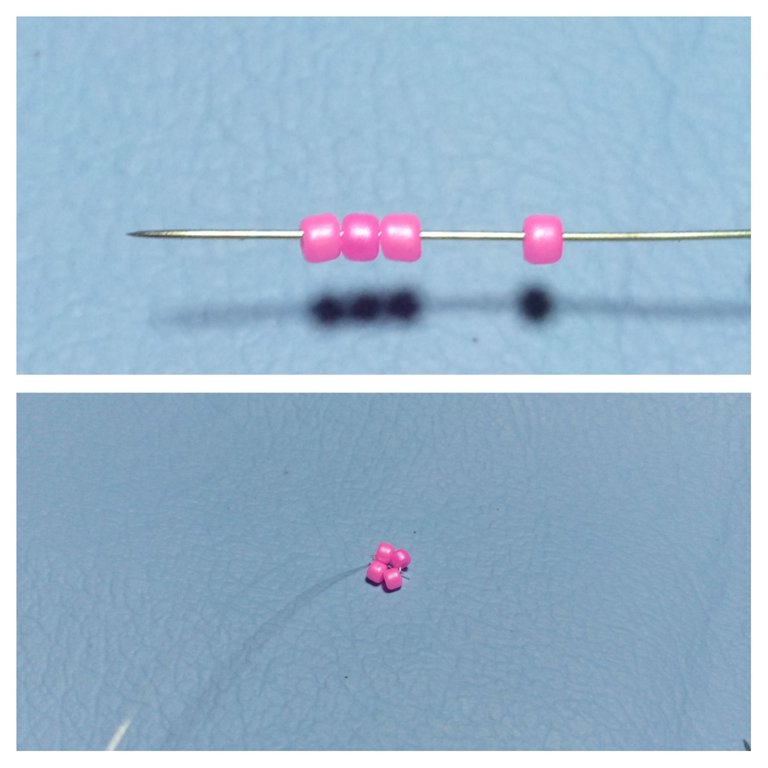
Ensarta el hilo en la aguja, y coloca 4 mostacillas, llevalas hasta el final del hilo y amarra, cortaremos el hilo sobrante. Estas mostacillas las llamaremos mostacilla 1, mostacilla 2 y así hasta la 4.
String the thread on the needle, and place 4 beads, take them to the end of the thread and tie, we will cut the excess thread. These beads will be called beads 1, 2 and so on up to 4.
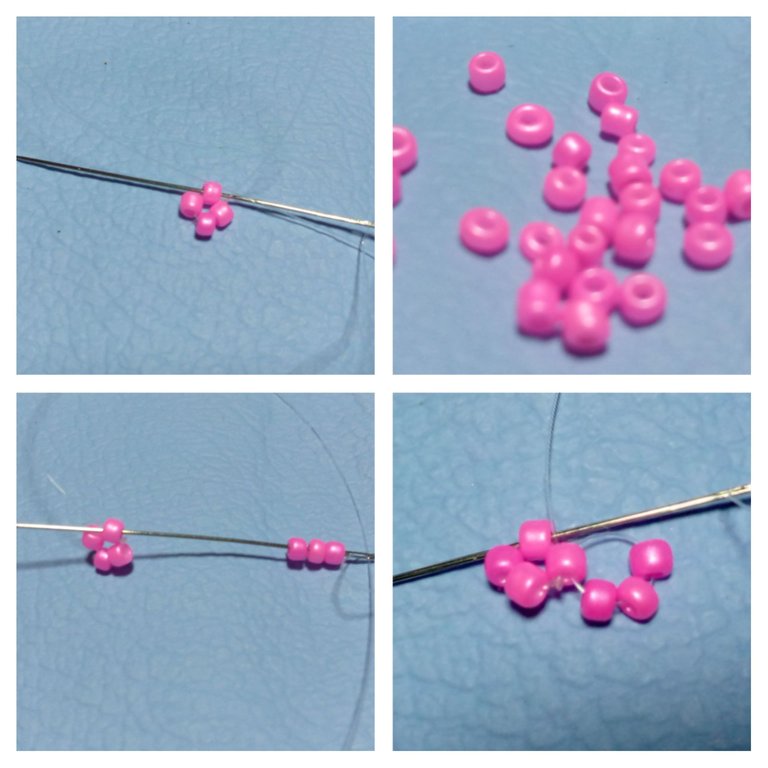
Como ves en la imagen pasa la aguja hacia arriba por la mostacilla, toma 3 mostacillas y te regresaras por esa misma mostacilla pero ahora de atras hacia adelante, continua esta vez introduce la aguja hacia la siguiente mostacilla es decir la mostacilla numero 2 de las 4 mostacillas centrales.
As you can see in the picture, pass the needle up through the bead, take 3 beads and you will go back through the same bead but now from back to front, continue this time introduce the needle to the next bead that is the bead number 2 of the 4 central beads.
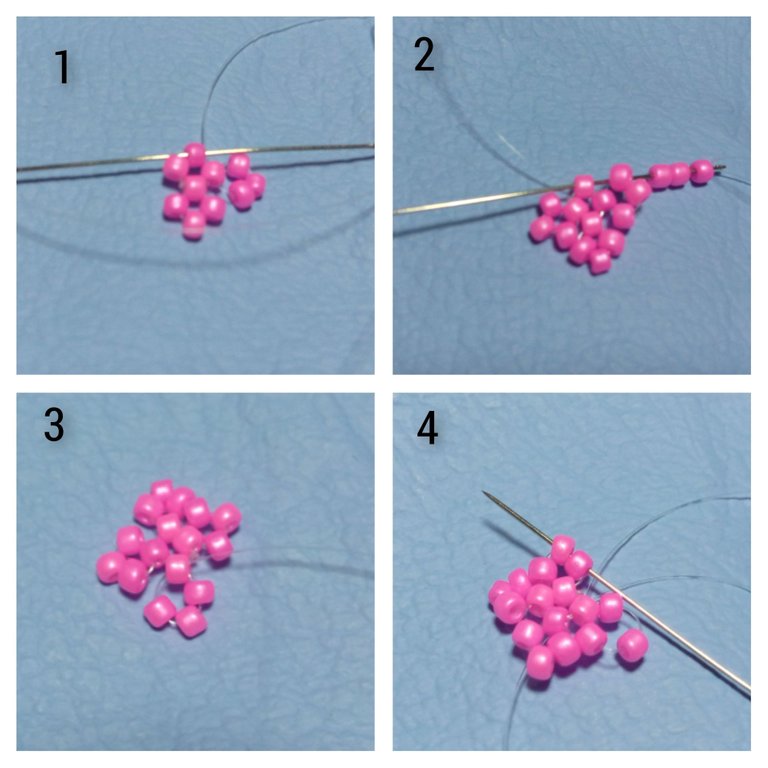
Vamos a seguir el mismo proceso anterior, en la mostacilla 3 y la mostacilla 4, es decir en las mostacillas centrales le vamos a colocar 3 mostacillas y de allí seguimos a la siguiente mostacilla central. Cuando lleguemos a la mostacilla 4 y agreguemos las 3 mostacillas subiremos la aguja 2 mostacillas hacia la principal de arriba, como ves en la imagen 4
We are going to follow the same process as before, in the bead 3 and bead 4, that is to say, in the central beads we are going to place 3 beads and from there we continue to the next central bead. When we get to the bead 4 and add the 3 beads we will raise the needle 2 beads towards the main bead above, as you can see in the image 4.
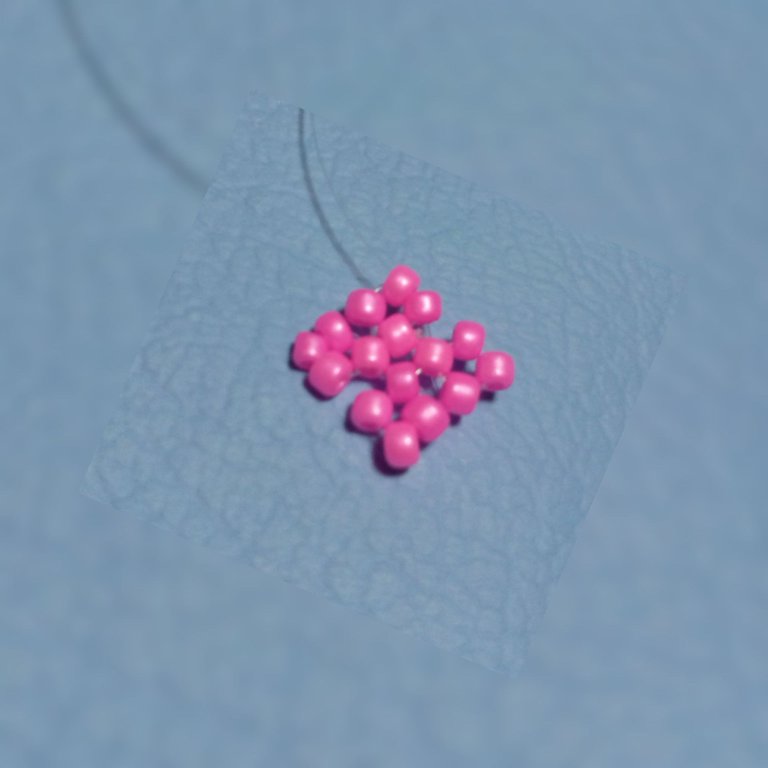
Te debe quedar como ves en esta imagen, allí puedes apreciar las 4 mostacillas centrales y sobre ellas 3 mostacillas mas en cada una, con el hilo saliendo por la superior de la parte que acabamos de agregar.
It should look like you see in this picture, there you can see the 4 central beads and on them 3 more beads on each one, with the thread coming out of the top of the part we just added.
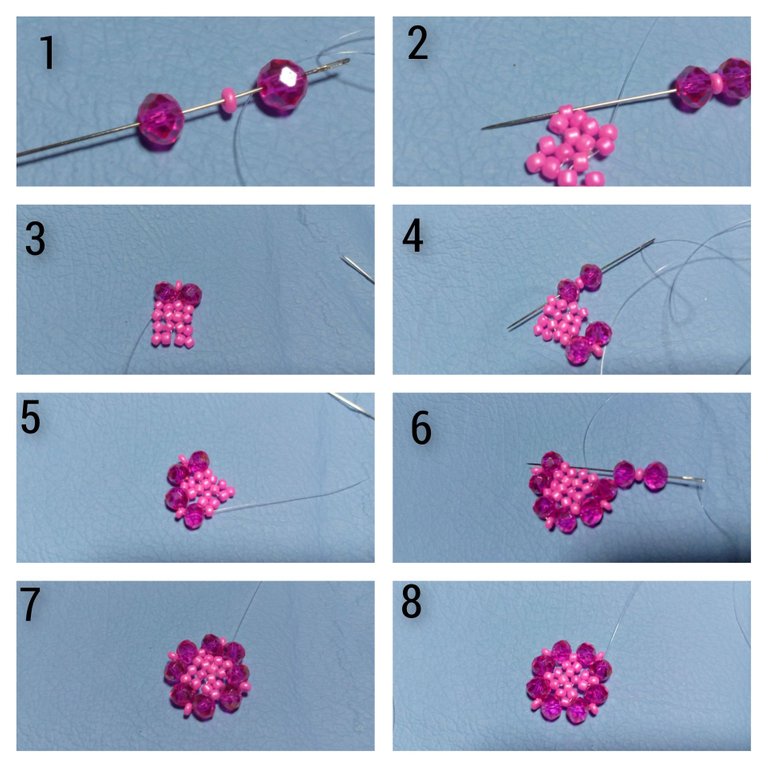
Vamos a colocar los cristales grandes, en la aguja introduce un cristal de 6 milímetros una mostacilla y seguido de otro cristal, salta 2 mostacillas e introduce la aguja en la mostacilla 3, realiza este proceso consecutivamente hasta dar la vuelta y colocar los 8 cristales de 6 milímetros. Al terminar puedes pasar la aguja varias veces por todos los cristales para reforzar el zarcillo.
We are going to place the big crystals, in the needle introduce a 6 mm crystal, a bead and followed by another crystal, skip 2 beads and introduce the needle in the bead 3, do this process consecutively until you turn around and place the 8 crystals of 6 mm. At the end you can pass the needle several times through all the crystals to reinforce the tendril.
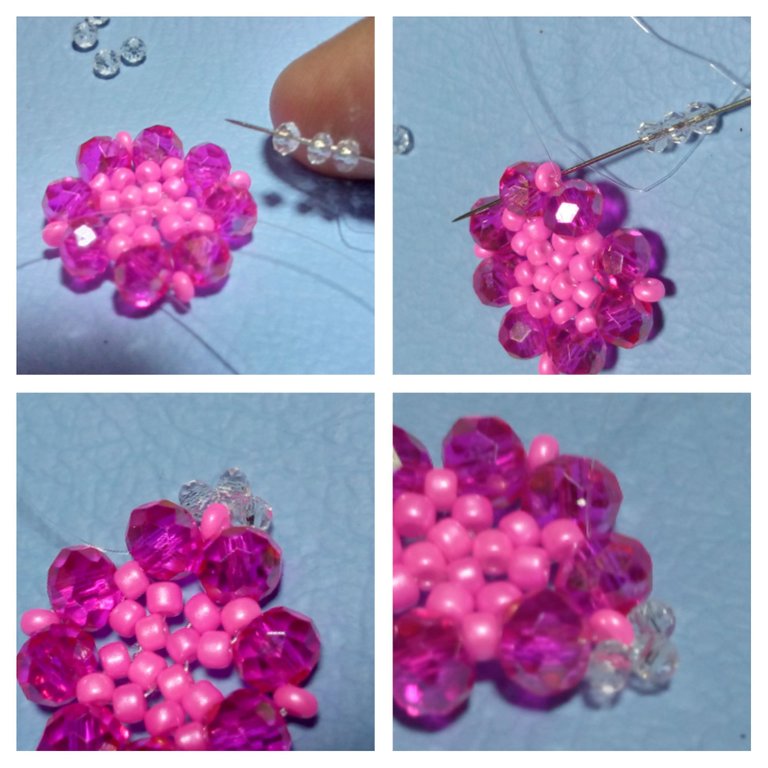
Ahora saca la aguja por uno de los cristales de 6 milímetros que tienen una mostacilla sobresaliente, introduce 3 cristales de 2 milímetros en la aguja y procede a introducirla en el siguiente cristal saltando la mostacilla, de esta manera los cristales pequeños quedan como arropando la mostacilla, pasa la aguja 2 cristales mas allá y realiza el mismo proceso en la que tengan la mostacilla que sobresale.
Now take out the needle through one of the 6 millimeter crystals that have a protruding bead, introduce 3 crystals of 2 millimeters in the needle and proceed to introduce it in the next crystal jumping the bead, in this way the small crystals are like wrapping the bead, pass the needle 2 crystals further and perform the same process in the one with the protruding bead.
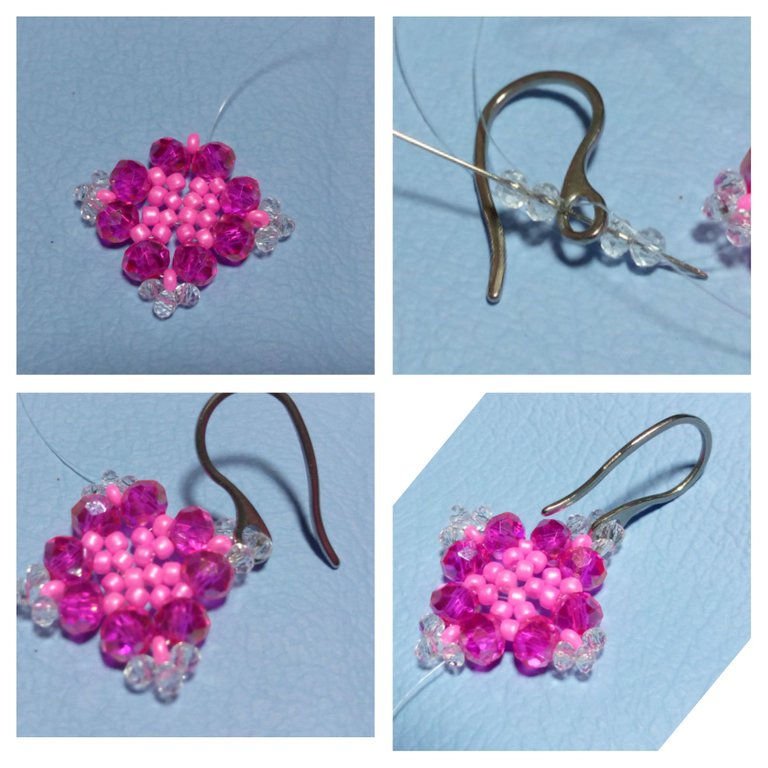
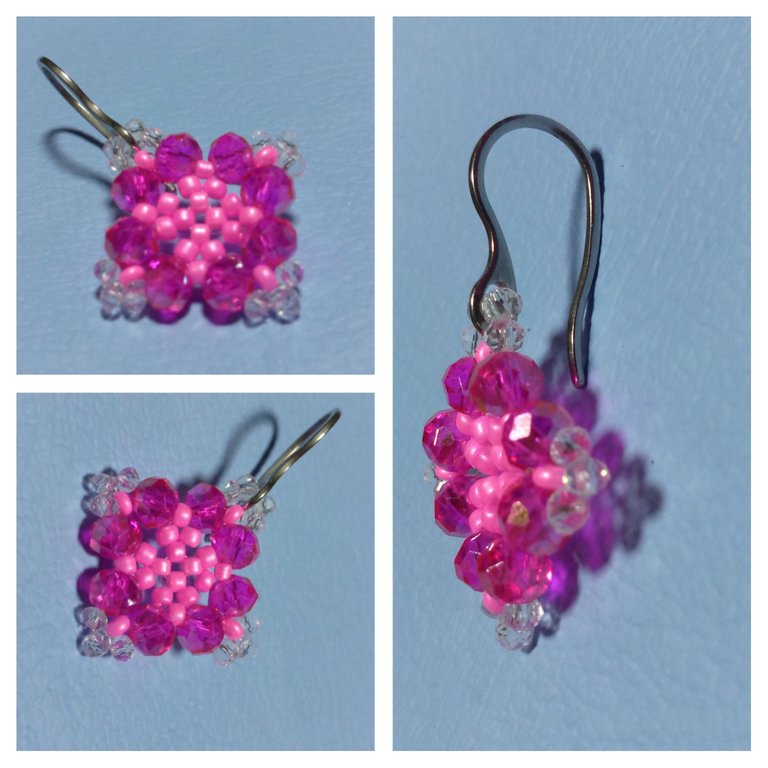
El paso anterior lo vamos a realizar 3 veces, ahora en la ultima parte vamos a colocar el anzuelo, debemos introducir 2 cristales de 2 milímetros seguido del anzuelo y nuevamente 2 cristales de 2 milímetros, salta la mostacilla central e introduce la aguja en el siguiente cristal de 6 milímetros, pasa la aguja por todos los cristales para reforzar y ve haciendo algunos amarres dobles entre ellos para que no se suelte. Al terminar corta el hilo sobrante y de esta manera estará lista la primera pieza, repite los pasos y así realizas el par de zarcillos en cristal.
The previous step we will do 3 times, now in the last part we will place the hook, we must introduce 2 crystals of 2 millimeters followed by the hook and again 2 crystals of 2 millimeters, skip the central bead and introduce the needle in the next crystal of 6 millimeters, pass the needle through all the crystals to reinforce and make some double ties between them so that it does not come loose. When finished, cut the excess thread and the first piece will be ready, repeat the steps and thus make the pair of tendrils in crystal.

¡Por favor no tomes, edites ni re-publiques mi material
Autoría del texto y todas las imágenes: @Migda
¿Deseas ponerte en contacto conmigo? Escríbeme https://discord.gg/TanA7tW allí también puedes compartir ideas y tus post para que aprendamos juntas.
Please do not take, edit or republish my material!
Authorship of the text and all the images: @Migda
Do you want to contact me? Write me https://discord.gg/TanA7tW there you can also share ideas and your posts so we can learn together.
Déjame un comentario me encantara saber como te ha ido, cualquier duda o recomendación estaré feliz de leerte de antemano gracias por el apoyo no sabes la ayuda que tan grande que me das. Lo mas importante quédate en casa así nos ayudamos todos
Leave me a comment I would love to know how it went, any questions or recommendations I will be happy to read you in advance thanks for the support you do not know the help that you give me. The most important thing is to stay at home so we all help each other

The rewards earned on this comment will go directly to the people ( chacald.dcymt ) sharing the post on LeoThreads,LikeTu,dBuzz.https://leofinance.io/threads/view/chacald.dcymt/re-chacald-dcymt-2cu2lyoqp
Te quedaron hermosos!!! 💜😘
!DIY
@migda Están muy bellos, esos colores me recuerdan a mi mamá, gracias por compartir tu creación Saludos 🤗
@anamariag Gracias, esos colores le gustaban a mi madre! Está iniciativa me puso algo emotiva al recordarla pero es bonito.
Hermoso trabajo amiga @migda me gusta el diseño y los colores, además de ese gran paso a paso que nos regalas para poder realizarlo, lindo proyecto 😉
Que bueno le ha gustado, @yolimarag aún cuando soy docente Universitaria aún me cuesta explicarme por este medio, aunque mi hija me a enseñado aún no me acostumbro.
Muy lindos zarcillos suerte en la iniciativa
Gracias @leidys01
Congratulations @migda! You have completed the following achievement on the Hive blockchain And have been rewarded with New badge(s)
Your next target is to reach 3000 upvotes.
You can view your badges on your board and compare yourself to others in the Ranking
If you no longer want to receive notifications, reply to this comment with the word
STOPCheck out our last posts:
Support the HiveBuzz project. Vote for our proposal!
Your daughter must be a resemblance to your mother. Sorry for losing her 20 years ago. Her absence still remains with you as a present. Good jewelry works you have done in her memory.
Both with the most noble and loving heart that I have ever known... Thank you for your words @apunawu
The designing pattern of this earring looks cool. Well done.
Thank you @diyhub
Hola amiga @migda, aunque no sea en el plano terrenal tu mami siempre estará contigo, un hermoso homenaje a tu mamá con estos zarcillos los colores son preciosos, saludos.
Gracias, se que tienes razón siempre me acompaña y nos cuida desde donde esté está feliz.
Hermoso trabajo y se entiende muy bien el tutorial. Felicidades 👏
Gracias @irenenavarroart