

Bienvenidos || Welcome
Luego de tener días sin poder trabajar con mostacillas por factor tiempo esta semana tuve un espacio libre donde sin duda alguna quise tomarlo para sentarme y hacer un proyecto para esta hermosa comunidad que literalmente siento como mi casa, así que tome las mostacillas y puse mano a la obra, tenía tiempo queriendo hacer este tipo de diseño de pulsera y pues gracias a Dios la pude llevar a cabo y así el día de hoy poder estar aquí compartiendo en paso a paso con cada uno de ustedes para realizar está hermosa pulsera, vamos a necesitar los siguientes materiales:
After having days without being able to work with beads for time factor this week I had a free space where without a doubt I wanted to take it to sit down and make a project for this beautiful community that I literally feel like my home, so I took the beads and put my hand to work, I had long wanted to make this type of bracelet design and thank God I could carry it out and so today I can be here sharing step by step with each of you to make this beautiful bracelet, we will need the following materials:
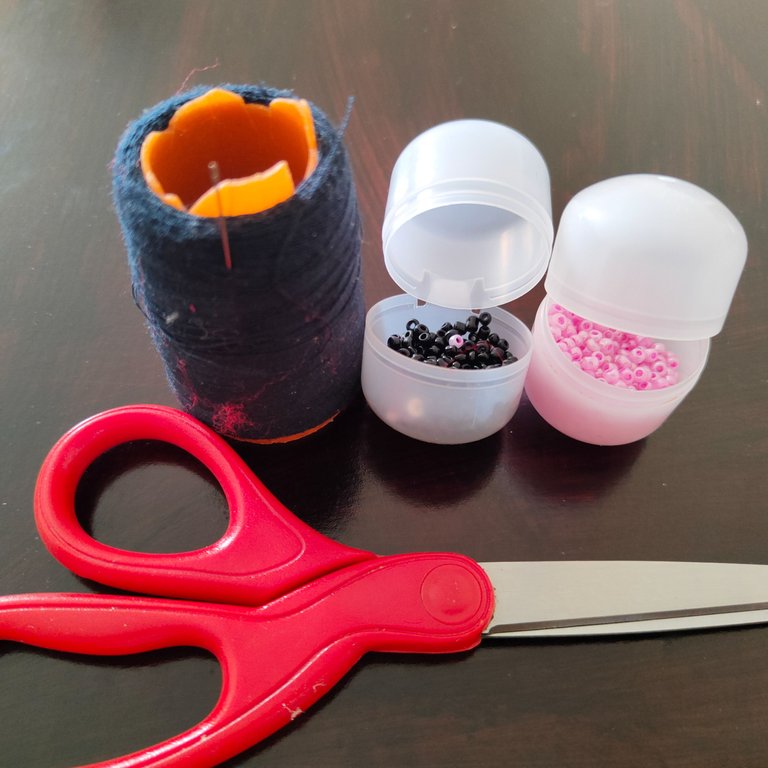
Materiales || Materials
✅ Mostacillas de color rosa y negras.
✅ Hilo nailon.
✅ Aguja.
✅ Tijera.
✅ Aros.
✅ Tranca.
✅ Pink and black beads.
✅ Nylon thread.
✅ Needle.
✅ Scissors.
✅ Hoops.
✅ Tightening strap.
Pasos ||Steps
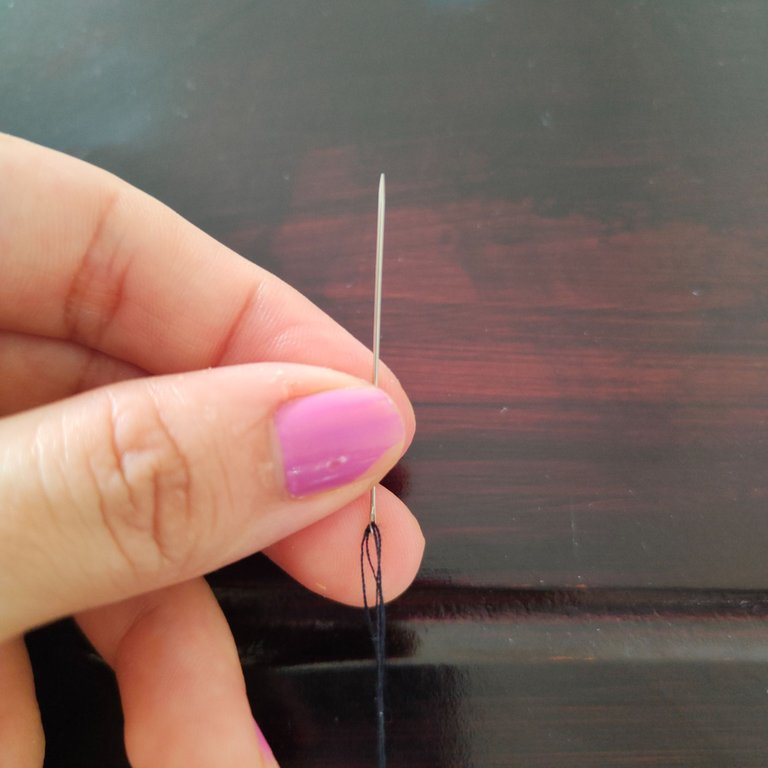
✅ Paso 1. Lo primero que vamos hacer es tomar nuestro hilo y ensartar nuestra aguja, es necesario tomar suficiente hilo ya que aunque no lo parezca está pulsera requiere bastante en mi caso utilice 10 metros porque fue doble, así que ojo con este gran detalle.
✅ Step 1. The first thing we are going to do is to take our thread and thread our needle, it is necessary to take enough thread because although it may not seem like it this bracelet requires quite a lot in my case I used 10 meters because it was double, so watch out for this great detail.
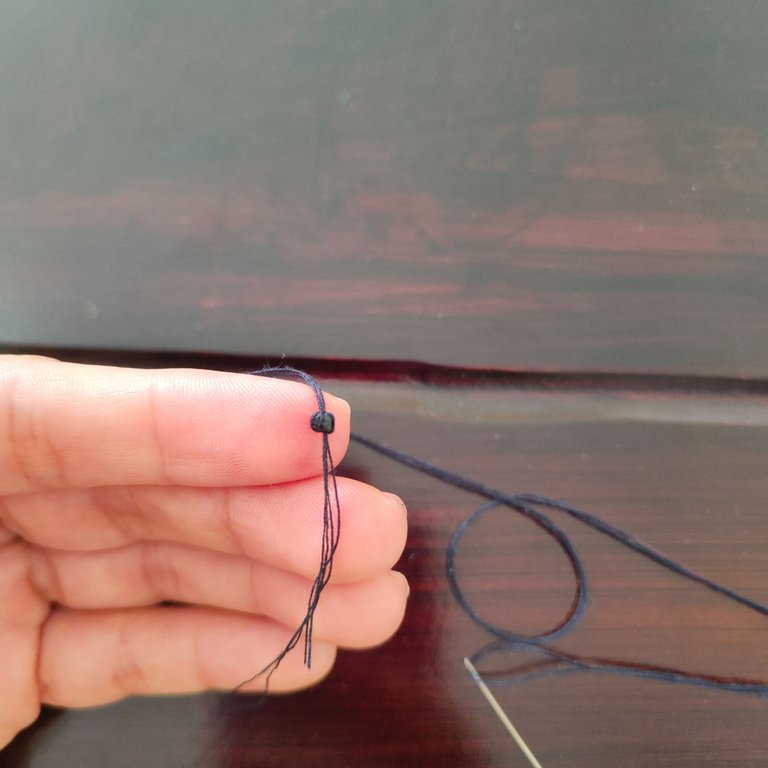
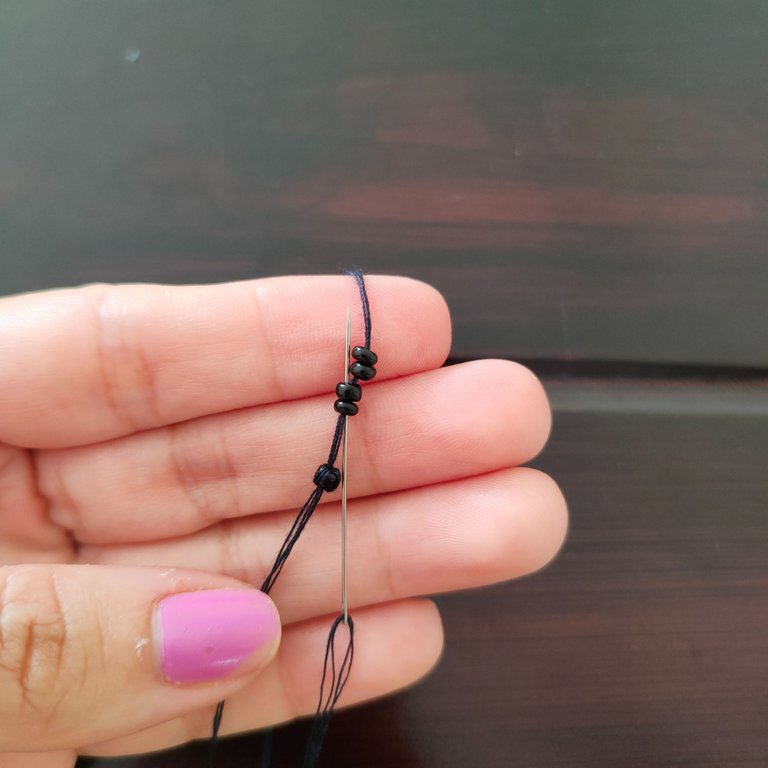
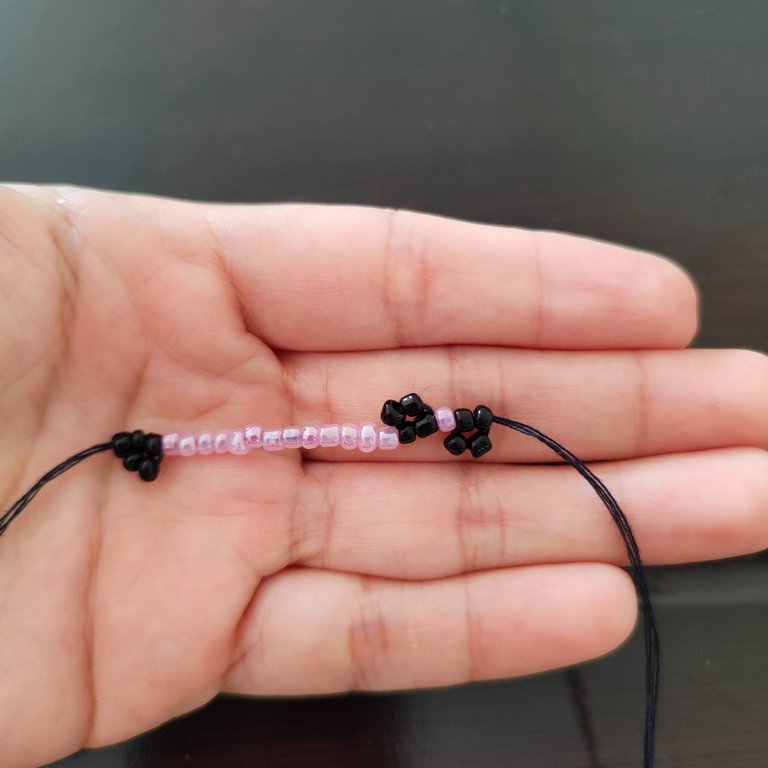
✅ Paso 2. Lo siguiente fue agregar 1 mostacilla negra la cual lleve al final del hilo y ensarte la aguja a través de el con el fin de quedara fijo para así comenzar a trabajar y que las mostacillas no se corrieran de su lugar.
✅ Step 2. Next was to add 1 black bead which I took to the end of the thread and threaded the needle through it in order to fix it so that it would be fixed and the beads would not run out of place.
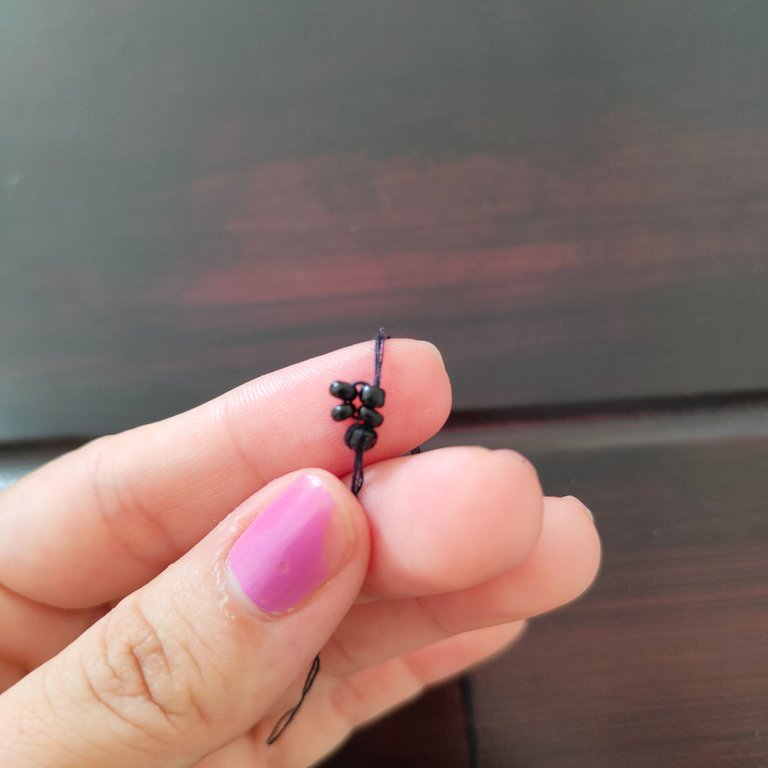
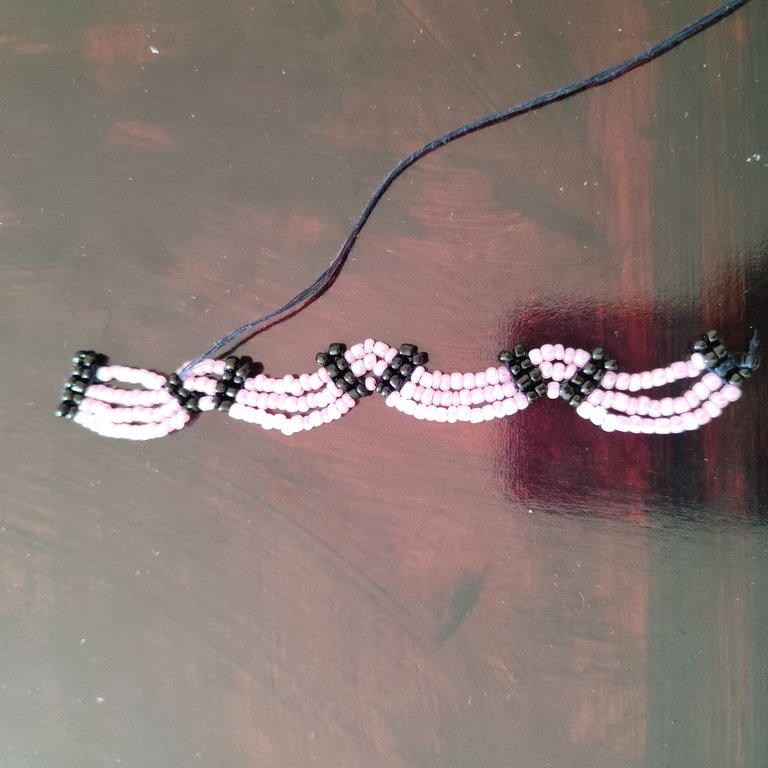
✅ Paso 3. Lo sigue te fue ensartar 4 mostacillas y llevarlas al final junto a la primera, una vez que las tenía alineadas ensarte la aguja por la primeras 2 mostacillas para así formar una especie de cuadrado, este paso es muy importante ya que lo vamos estar realizando en cada extremo de la pulsera y en cada línea de separación entre colores.
✅ Step 3. The next thing was to thread 4 beads and bring them to the end next to the first one, once you had them aligned thread the needle through the first 2 beads to form a kind of square, this step is very important because we will be doing it at each end of the bracelet and in each line of separation between colors.
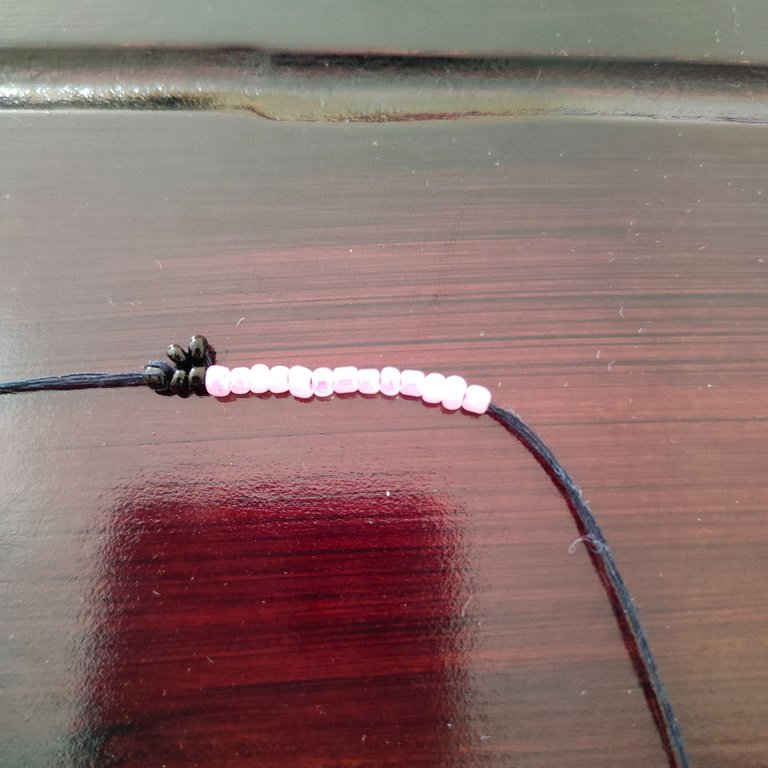
✅ Paso 4. Lo siguiente es agregar 13 mostacillas rosas, 4 negras repetimos el paso 3 con ellas, agregamos 1 mostacillas rosa y 4 negras más repitiendo el paso 3 nuevamente.
✅ Step 4. Next is to add 13 pink beads, 4 black beads repeat step 3 with them, add 1 more pink bead and 4 more black beads repeating step 3 again.
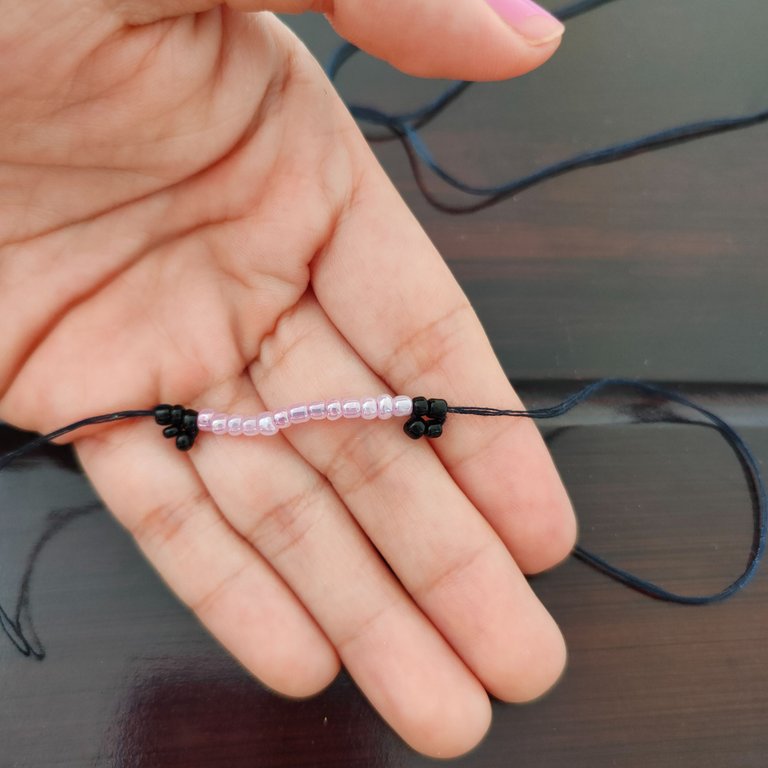
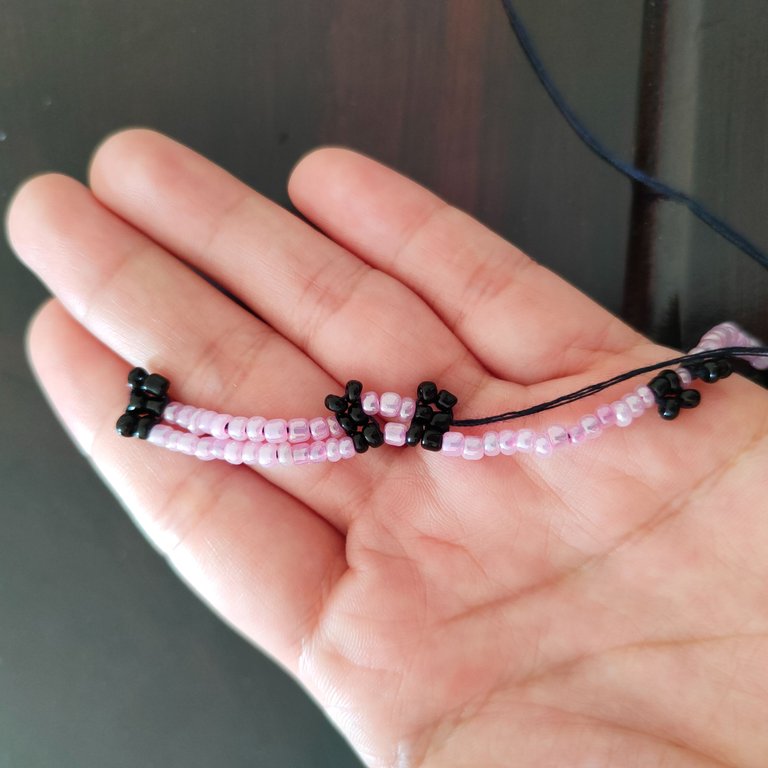
✅ Paso 5. Este será el patrón a repetir hasta que tengas el largo deseado o el que cubra tu muñeca de la mano, en mi caso fueron 4 veces que repetí es patrón.
✅ Step 5. This will be the pattern to repeat until you have the desired length or the one that covers your hand wrist, in my case it was 4 times that I repeated this pattern.
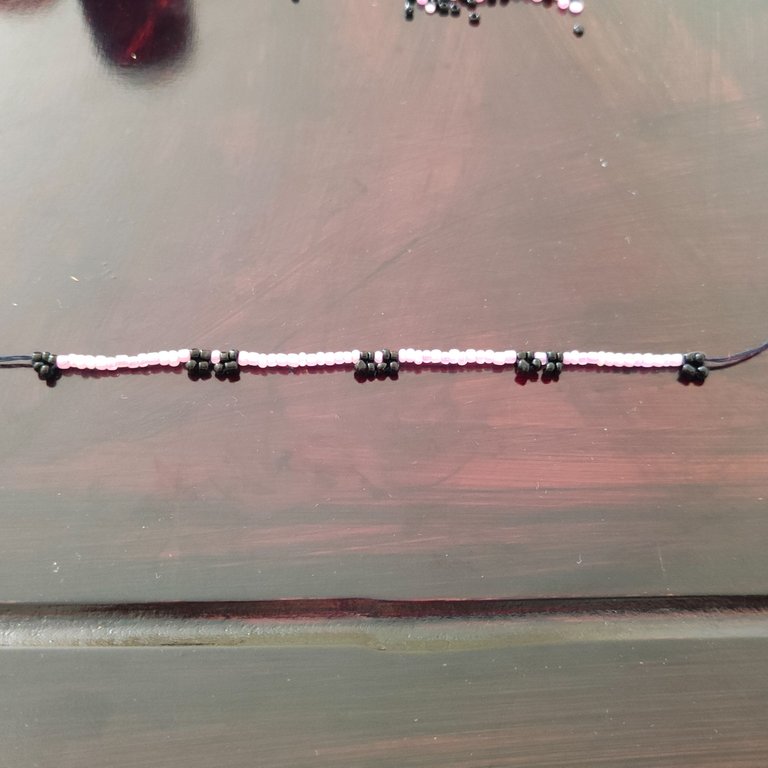
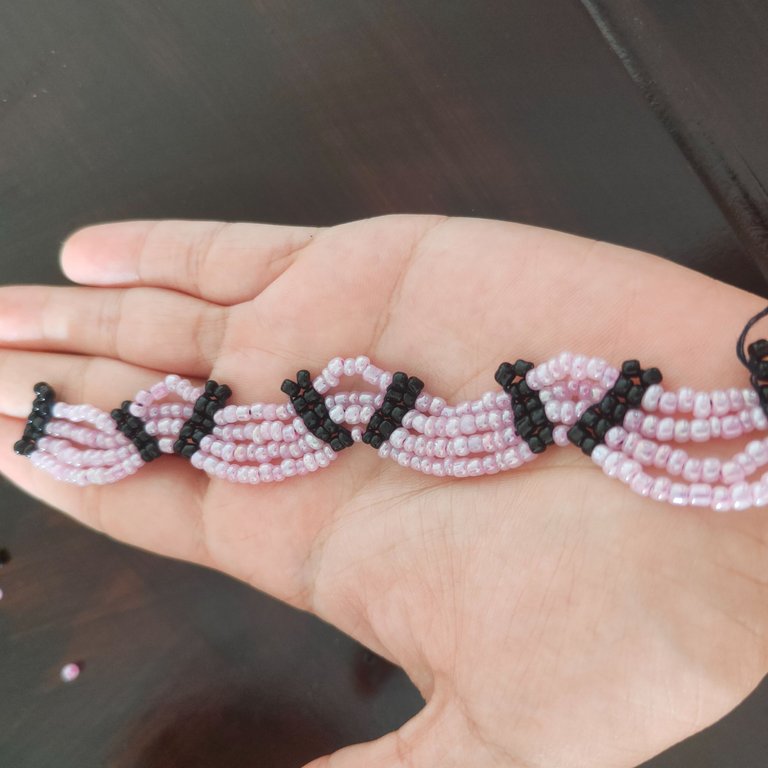
✅ Paso 6. Cuando llegamos al extremos luego de repetir el paso 3, vamos agregar 11 mostacillas rosas en los espacios largas, hacemos nuestros divisores con mostacillas negras repitiendo el paso 3, y en los espacios cortos agregaremos 3 mostacillas rosas, este será el patrón de nuestra segunda hilera. En pocas palabras en cada hilera que vayamos avanzando restaremos 2 mostacillas rosas a los espacios largos y sumaremos 2 mostacillas a los espacios cortos esto es lo que hará que nuestra pulsera tome su forma peculiar.
✅ Step 6. When we reach the end after repeating step 3, we will add 11 pink beads in the long spaces, we make our dividers with black beads repeating step 3, and in the short spaces we will add 3 pink beads, this will be the pattern of our second row. In a few words, in each row we will subtract 2 pink beads to the long spaces and add 2 beads to the short spaces, this is what will make our bracelet take its peculiar shape.
Es un trabajo repetitivo y de suma y resta así que debemos estar atentos para no equivocarnos en mi caso quise por ser primera vez trabajar solo con 2 colores por esta razón.
It is a repetitive work of addition and subtraction so we must be careful not to make mistakes. In my case I wanted to work for the first time with only 2 colors for this reason.
✅ Paso 7. Nuestra tercera hilera es cuando vamos a observar cómo va tomando forma la pulsera poco a poco al principio toca confiar en el proceso y en que estamos atentos para no colocar mostacillas de más o menos
✅ Step 7. Our third row is when we will observe how the bracelet takes shape little by little at the beginning it is time to trust the process and that we are attentive to not place beads of more or less
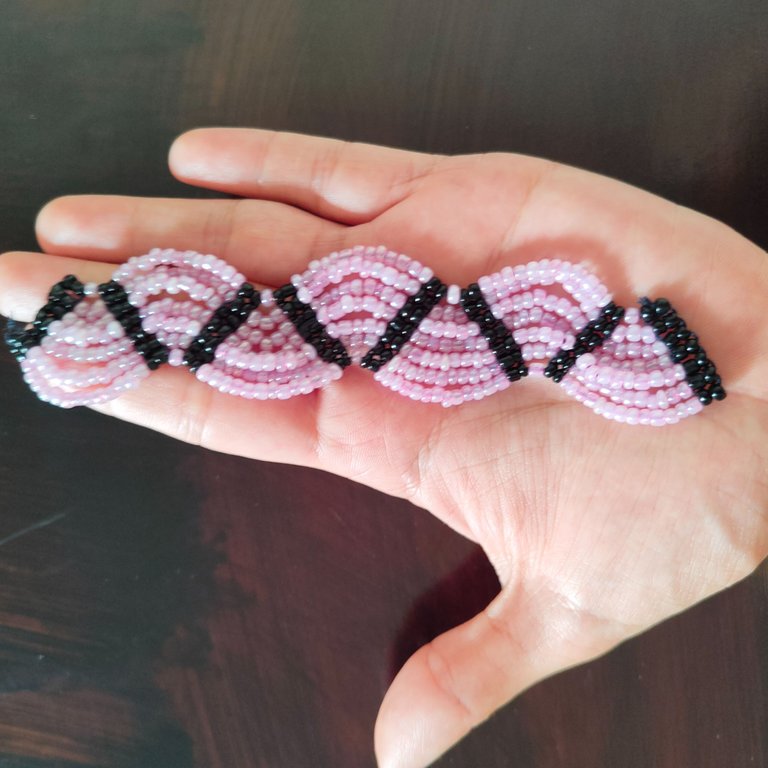
✅ Paso 8. A medida que avanzamos debido a que vamos restando mostacillas en los tramos que inicialmente eran los más largos y sumando mostacillas en los tramos cortos vemos la forma triangular que va formando cada tramo y esto nos quiere decir que vamos bien.
✅ Step 8. As we advance, as we subtract beads in the sections that were initially the longest and add beads in the short sections, we can see the triangular shape that each section is forming, which means that we are doing well.
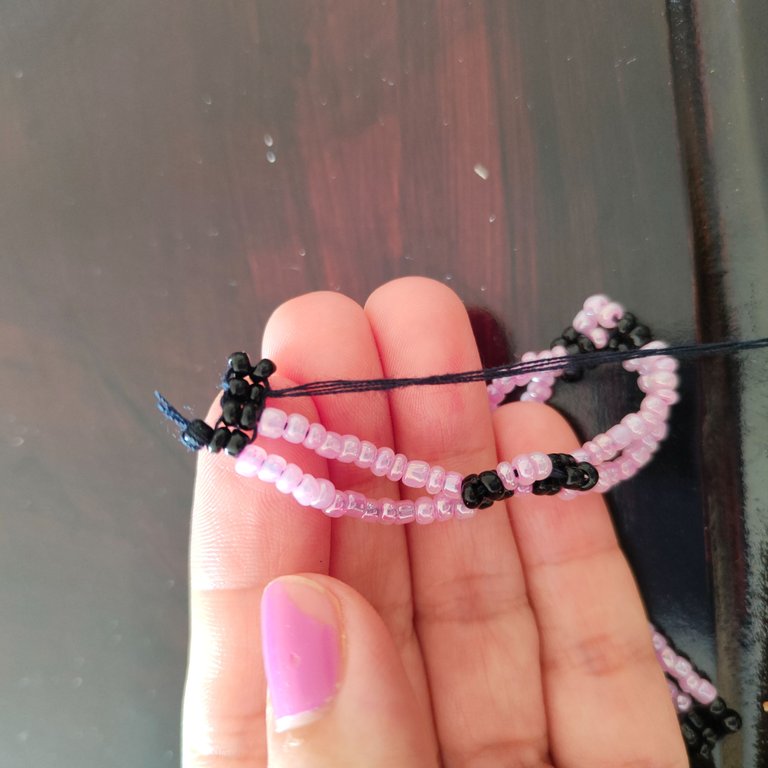
✅ Paso 9. Siempre van hacer para mí los pasos más emocionantes los pasos finales que es cuando vez que lograste terminar tu proyecto.
✅ Step 9. Always going to make for me the most exciting steps the final steps which is when you get to finish your project.

✅ Paso 10. Ya por último es agregar los aros y trancas hay otras manera y otra piezas con la que puedes culminar está pulsera sin embargo en mi caso trabajé con los materiales que tenía que son aros y tranca.
✅ Step 10. The last step is to add the earrings and strings. There are other ways and other pieces with which you can finish this bracelet, however in my case I worked with the materials I had, which are earrings and strings.
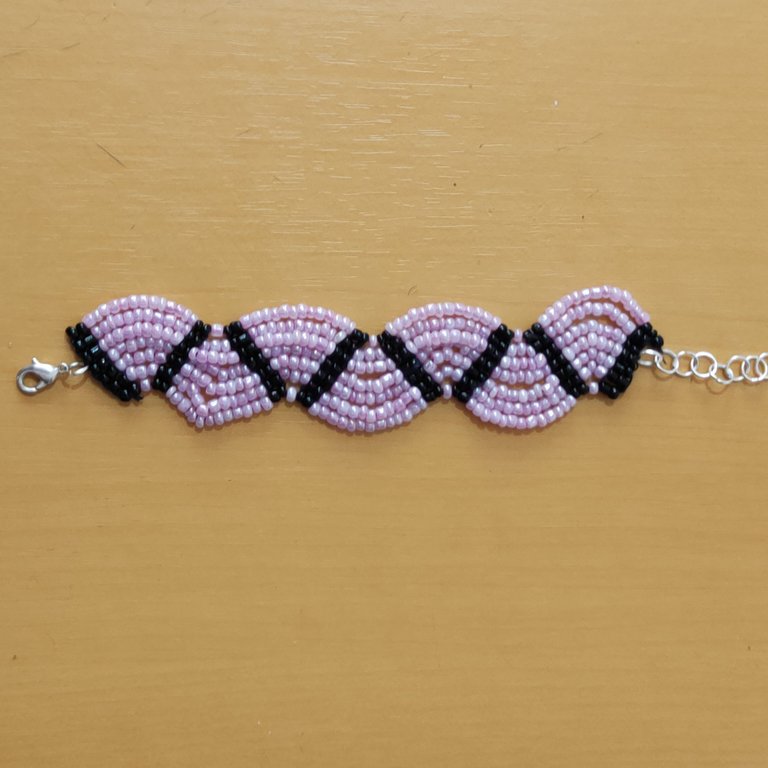
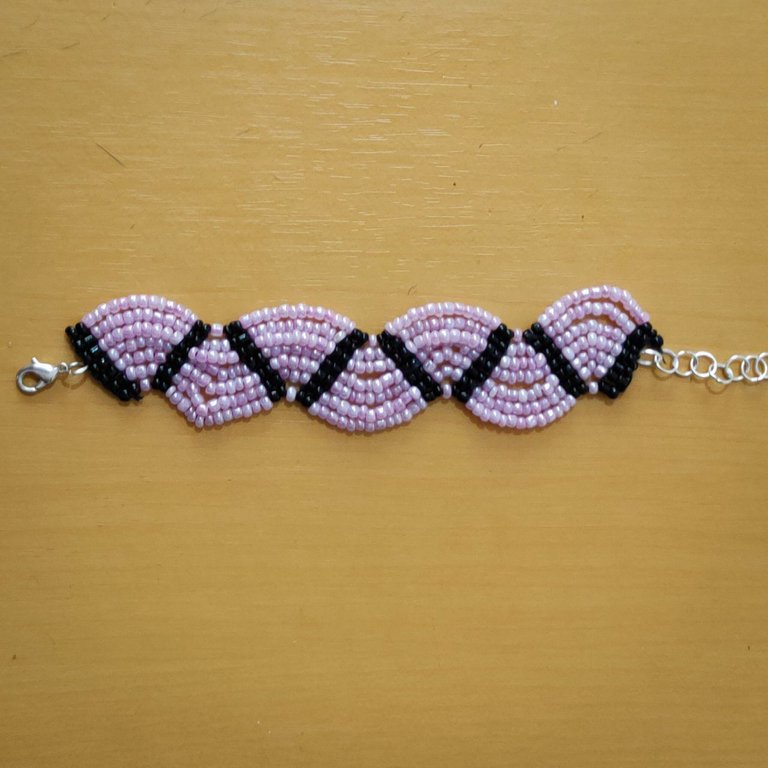
Resultado || Result
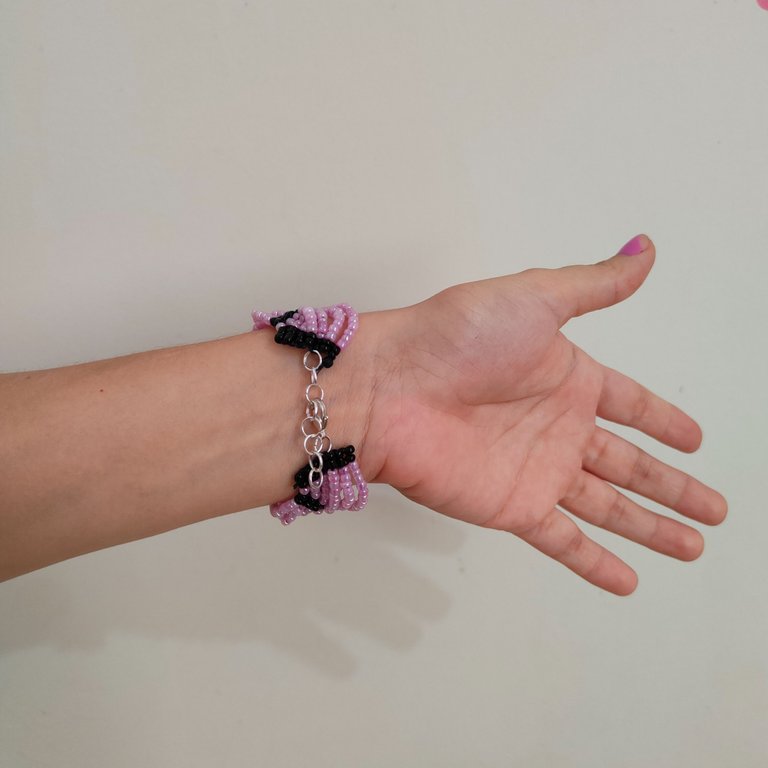
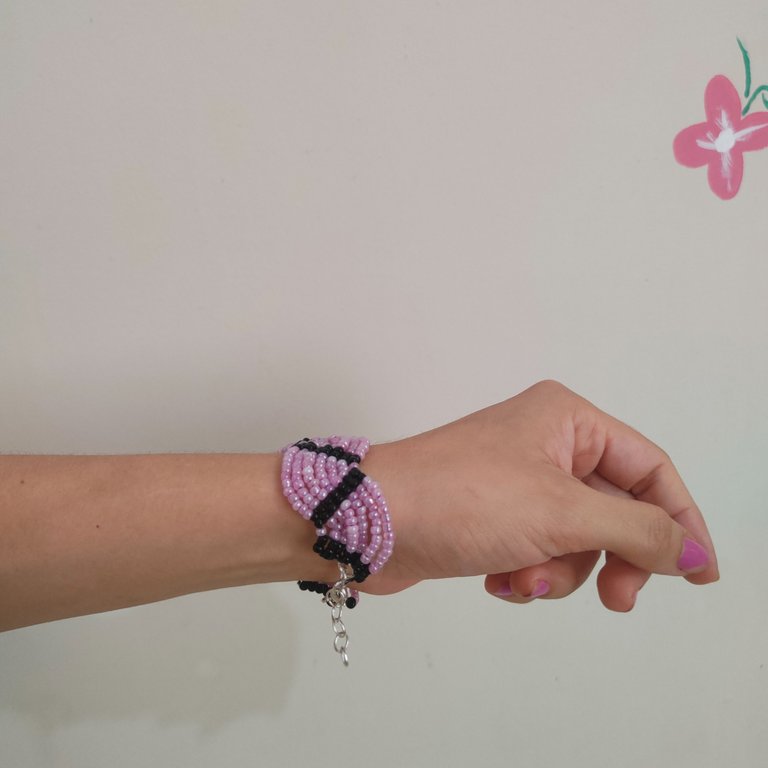

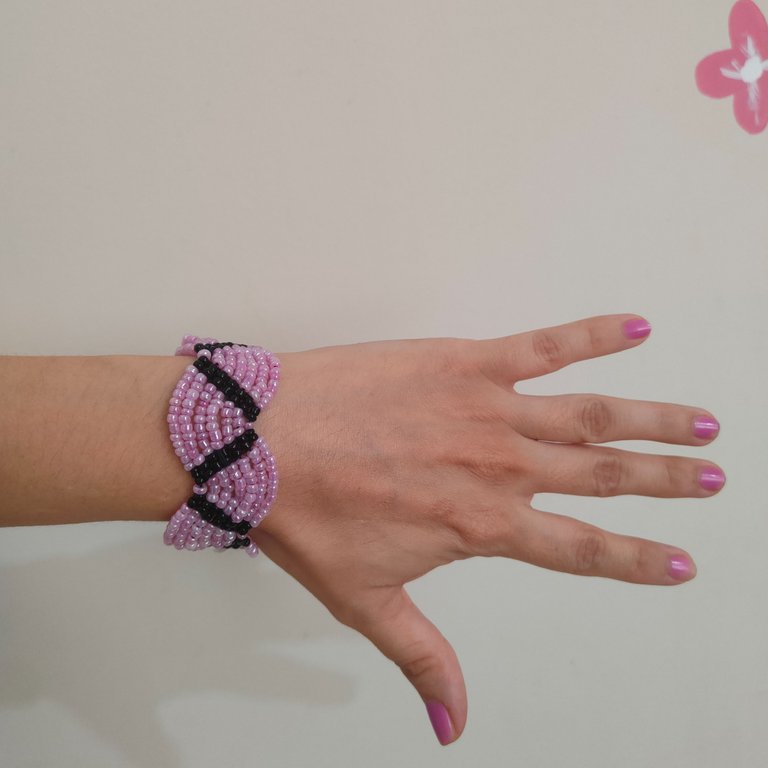
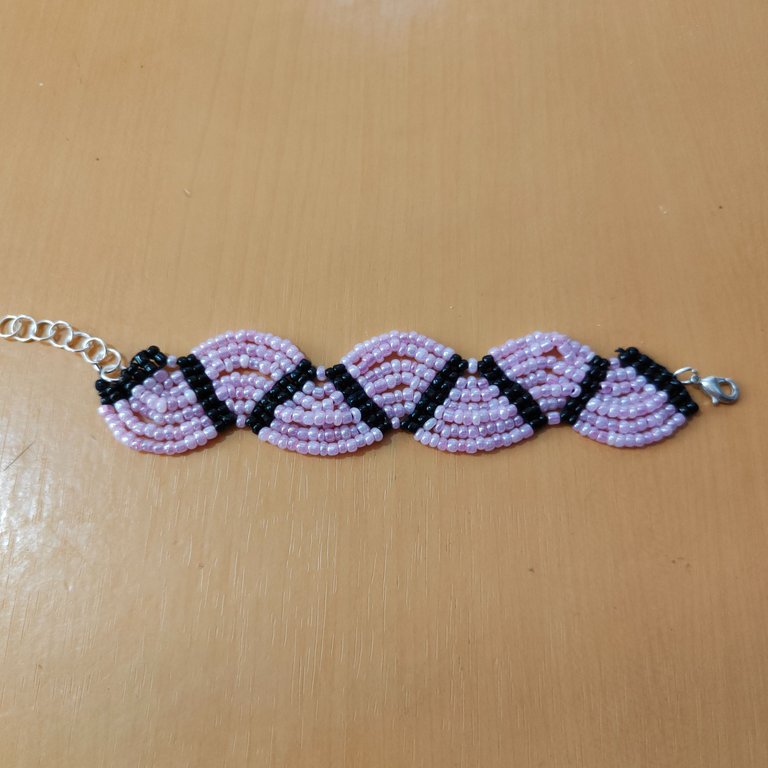
Ame realizar la primera pulsera de este estilo, ame el aprendizaje adquirido no les diré que es perfecta porque una vez que culmine el proyecto al analizar con detenimiento hay un detalle en particular que cambiaría y no lo haría para un mejor acabado pero de eso se trata ir aprendiendo técnicas nuevas espero más adelante estar en este hermoso espacio compartiendo quizás un diseño más atrevido y colorido con un acabado incluso mejor pero que opinan ustedes que le ha parecido ? Los leo en la sección de comentarios, gracias a todos por su atención apoyo y comentarios, será hasta un próximo post.
Love to make the first bracelet of this style, love the learning acquired I will not tell you that it is perfect because once I finish the project to analyze carefully there is a particular detail that would change and would not do it for a better finish but that's about learning new techniques I hope later to be in this beautiful space perhaps sharing a more daring and colorful design with an even better finish but what do you think you have liked ? I will read you in the comments section, thank you all for your attention, support and comments, I will see you in the next post.
La creatividad no tiene límite. || There is no limit to creativity. ✨💎🎉🌷

Hasta la próxima...
See you next time... 🩷

🎥Imágenes y vídeo creados con: |Images and video created with: CapCut | Giphy| Canva
🇪🇸Traducido con DeepL
!discovery 50
This post was shared and voted inside the discord by the curators team of discovery-it
Join our Community and follow our Curation Trail
Discovery-it is also a Witness, vote for us here
Delegate to us for passive income. Check our 80% fee-back Program
hola amiga, lindo diseño, me encanta, sobre todo el color está lindo. saludos.
Hermosa amiga
Excelente!!! Muy hermosa la pulsera. Un trabajo que amerita tiempo y concentración. Me gustan mucho las artesanías, las manualidades relajan la mente. Gracias por compartir!!!
Good, you made out time to make a bracelet for us today. How you weaved those sand beads with other beads is impressive and educative.
Bella amiga 😘.. Saludos 🤗💞
Muy bonito trabajo, se ve que llevo tiempo hacerlo.