Saluditos mis Artistas Creativos de las Manualidades y la Joyería, las mejores bendiciones en salud, alegría, paz, camino del éxito y mucha prosperidad, hoy de nuevo lista para empezar a compartir con ustedes un sinfín de encargos para festejar ese halloween que ya lo tenemos encima y es que aunque no lo crean como andan esas escobas ya le están sacando brillo mis colegas las brujildas 🤣🤣.
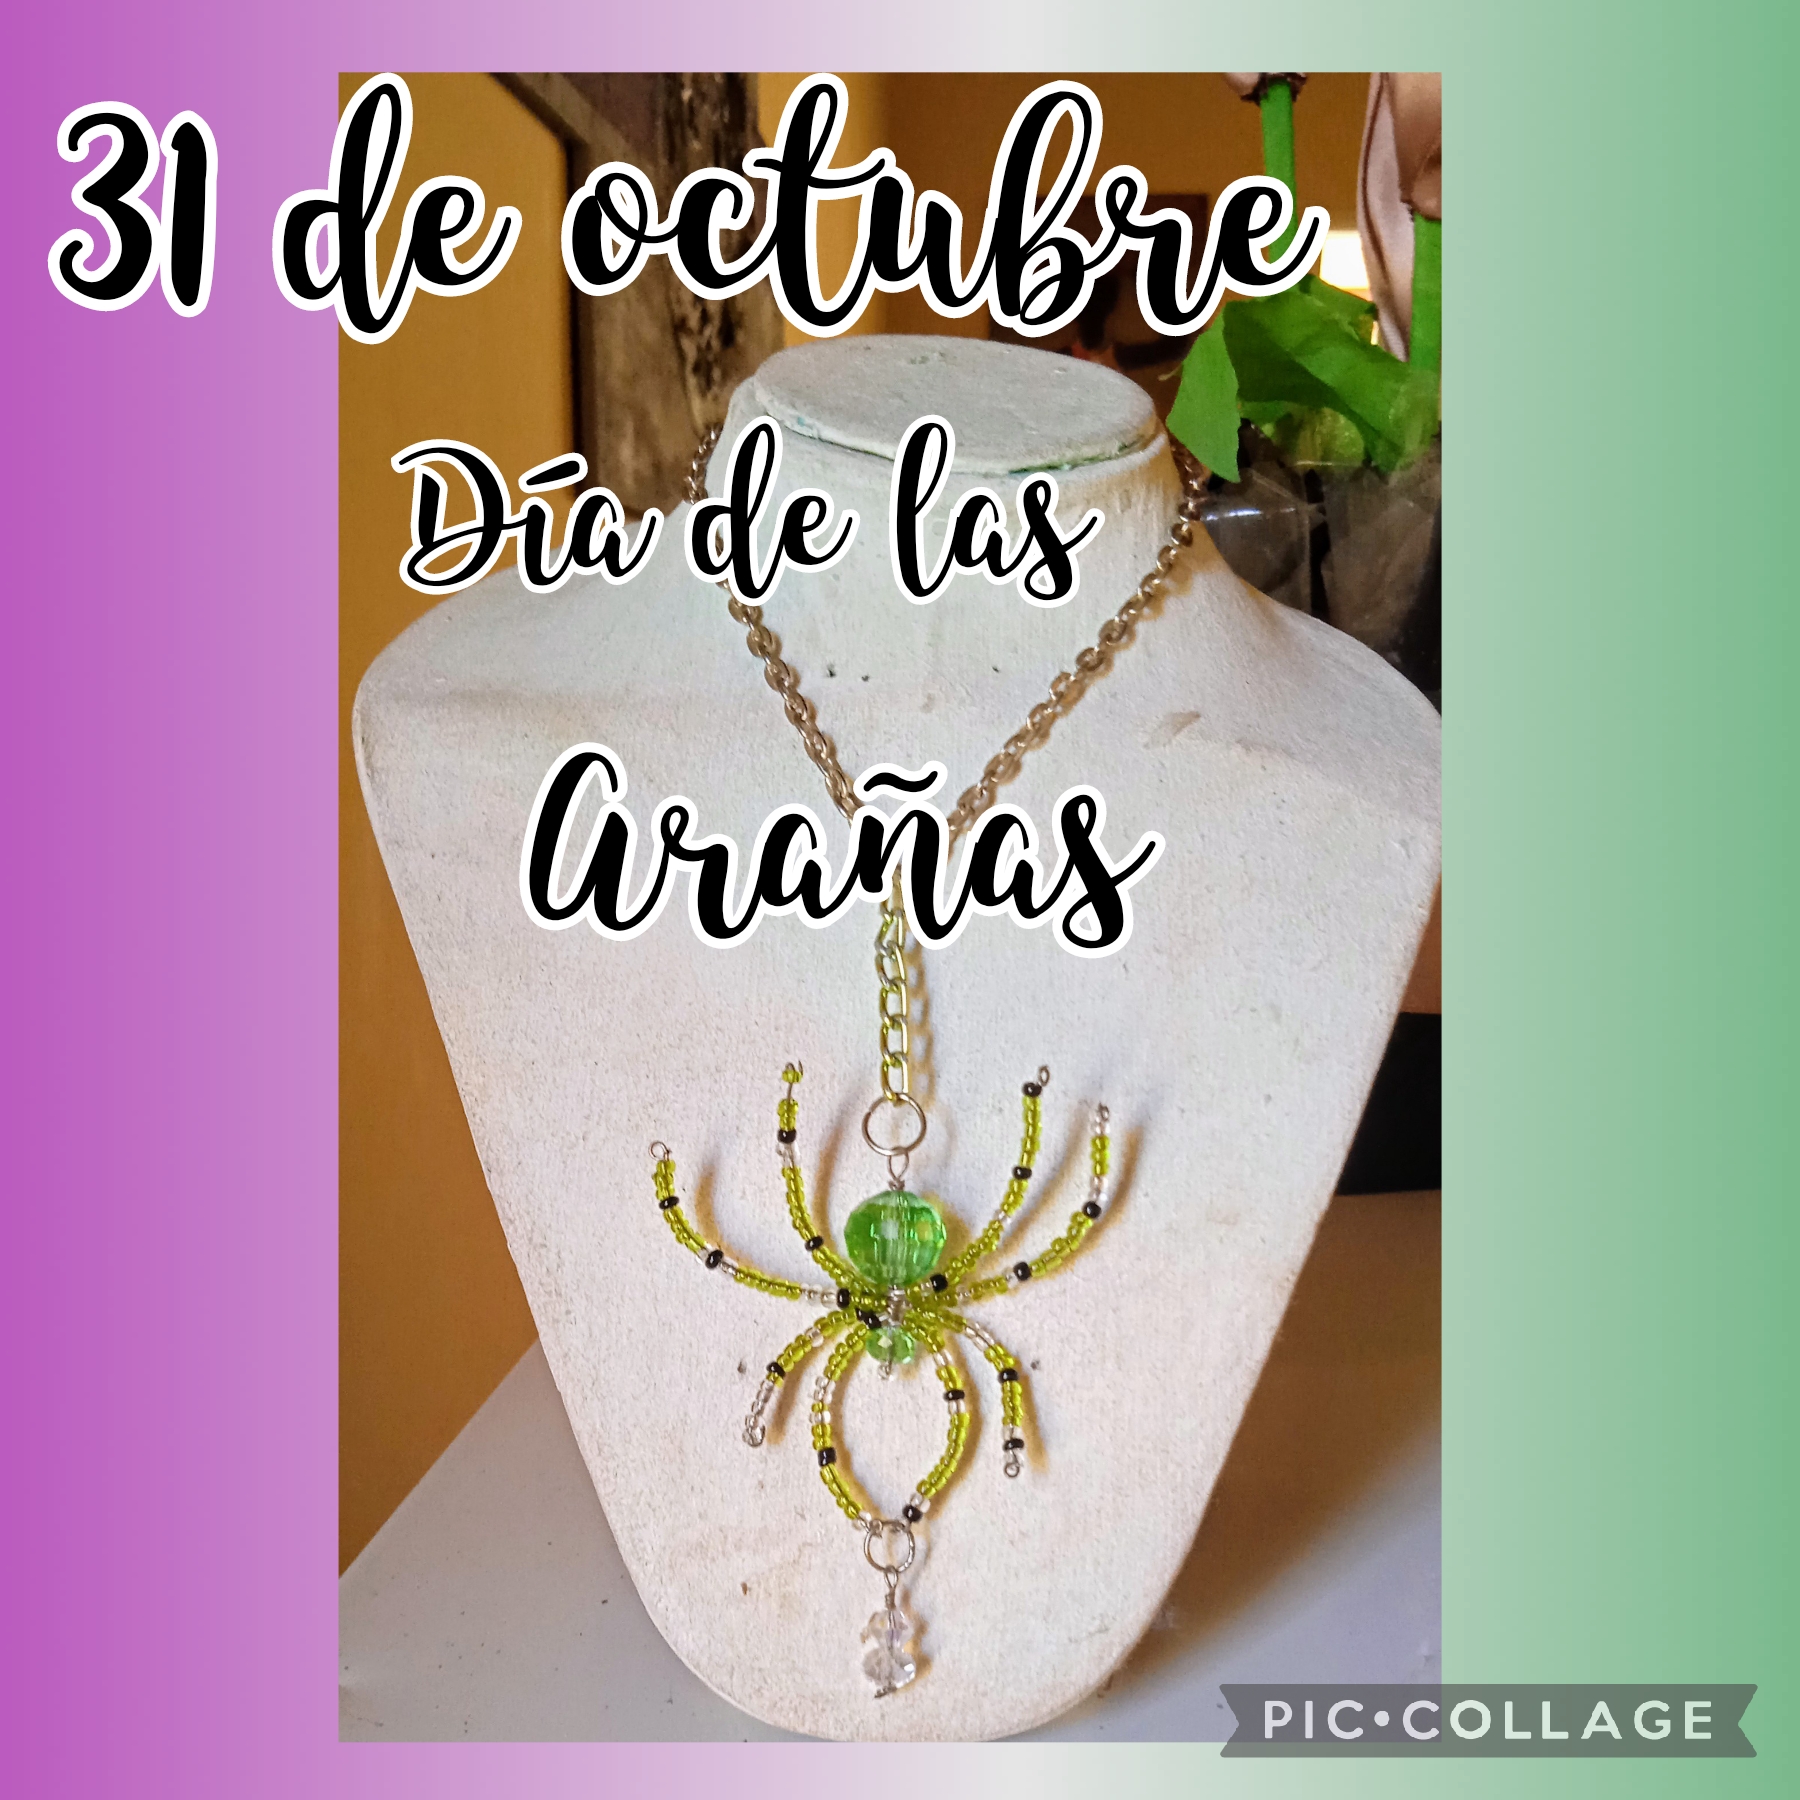
Está vez el primer encargo que voy a hacer para esa fecha se trata de un Colgante con motivo de araña 🕷️ me lo pidió una amiga para su hija, ya ustedes saben que el 31 de octubre además de Halloween también se celebra el Día de las Arañas , porque se suponía que estás ayudaban a las brujas en sus hechizos y que si comían una araña negra con pan y mantequilla eso les otorgaban mucho más poder en la hechicería 🤭 que cosas no?.
Es por eso que Halloween y las arañas parecen ir de la mano; pero bueno después les cuento más de las brujitas; ahora les diré como realicé este espectacular Colgante con motivo de Araña, sigan leyendo para que vean como lo hice aplicando la hechicería jiji jiji.
Greetings my Creative Artists of Crafts and Jewelry, the best blessings in health, joy, peace, path to success and much prosperity, today again ready to start sharing with you an endless number of orders to celebrate that Halloween that we already have upon us and is that although you do not believe it how those brooms are already shining my colleagues the witches are already polishing them 🤣🤣.
This time the first order that I am going to do for that date is a Pendant with a spider motif 🕷️ a friend asked me for her daughter, you already know that on October 31st in addition to Halloween, Spider Day is also celebrated, because they were supposed to help witches in their spells and that if they ate a black spider with bread and butter that would give them much more power in witchcraft 🤭 what things right?
That is why Halloween and spiders seem to go hand in hand; but well later I will tell you more about the witches; Now I will tell you how I made this spectacular Pendant with a Spider motif, keep reading to see how I did it applying sorcery hehe hehe.
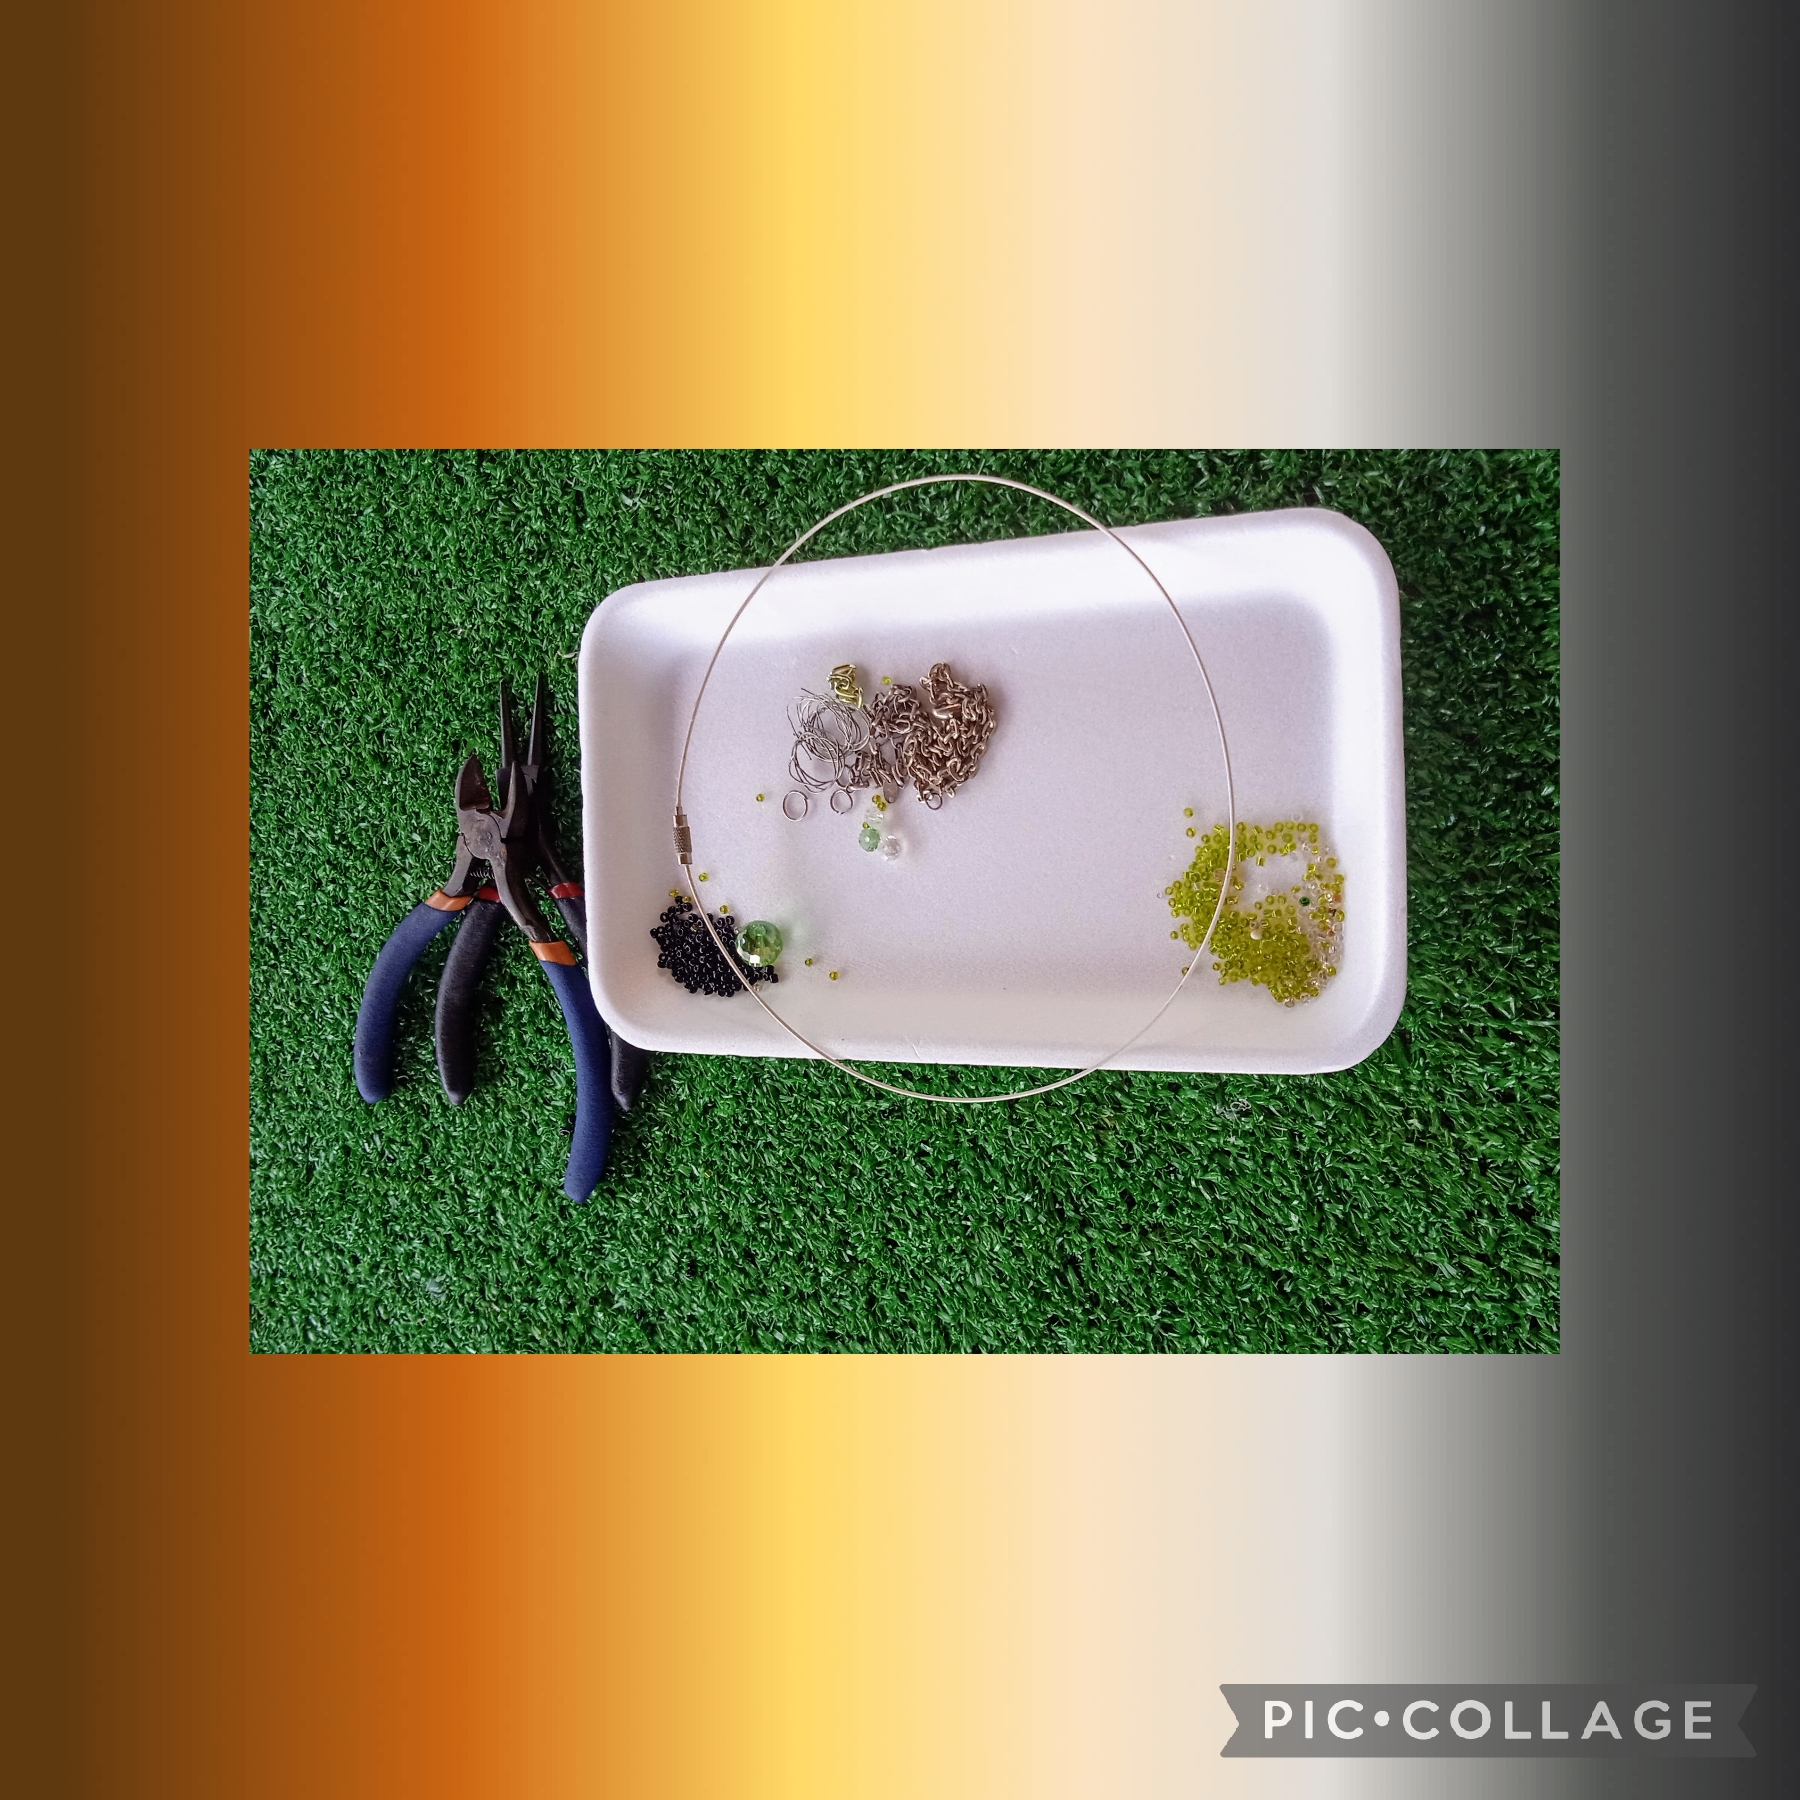
MATERIALES QUE USE EN LA ELABORACIÓN DE ESTE BRUJILDO PROYECTO:
✓ Mostacillas transparentes.
✓ Mostacillas verdes.
✓ Mostacillas negras.
✓ Hilo de plata.
✓ Cristal verde de ocho mm.
✓ Cristal verde de dos mm.
✓ Cristal transparente de cuatro mm.
✓ Un cristalito tipo rombo.
✓ 3 Argollas.
✓ Cadena de plata.
✓ Un centímetro de cadena color verde.
✓ Pinza punta redonda.
✓ Pinza de corte.
✓ Pinza de presión.
✓ Regla.
MATERIALS I USED IN THE PREPARATION OF THIS WITCH PROJECT:
✓ Transparent beads.
✓ Green beads.
✓ Black beads.
✓ Silver thread.
✓ Eight mm green crystal.
✓ Two mm green crystal.
✓ Four mm transparent crystal.
✓ A small rhombus-shaped crystal.
✓ 3 rings.
✓ Silver chain.
✓ One centimeter of green chain.
✓ Round-tip pliers.
✓ Cutting pliers.
✓ Pressure pliers.
✓ Ruler.
PASOS UTILIZADOS EN LA ELABORACIÓN DE ESTE BONITO PROYECTO:
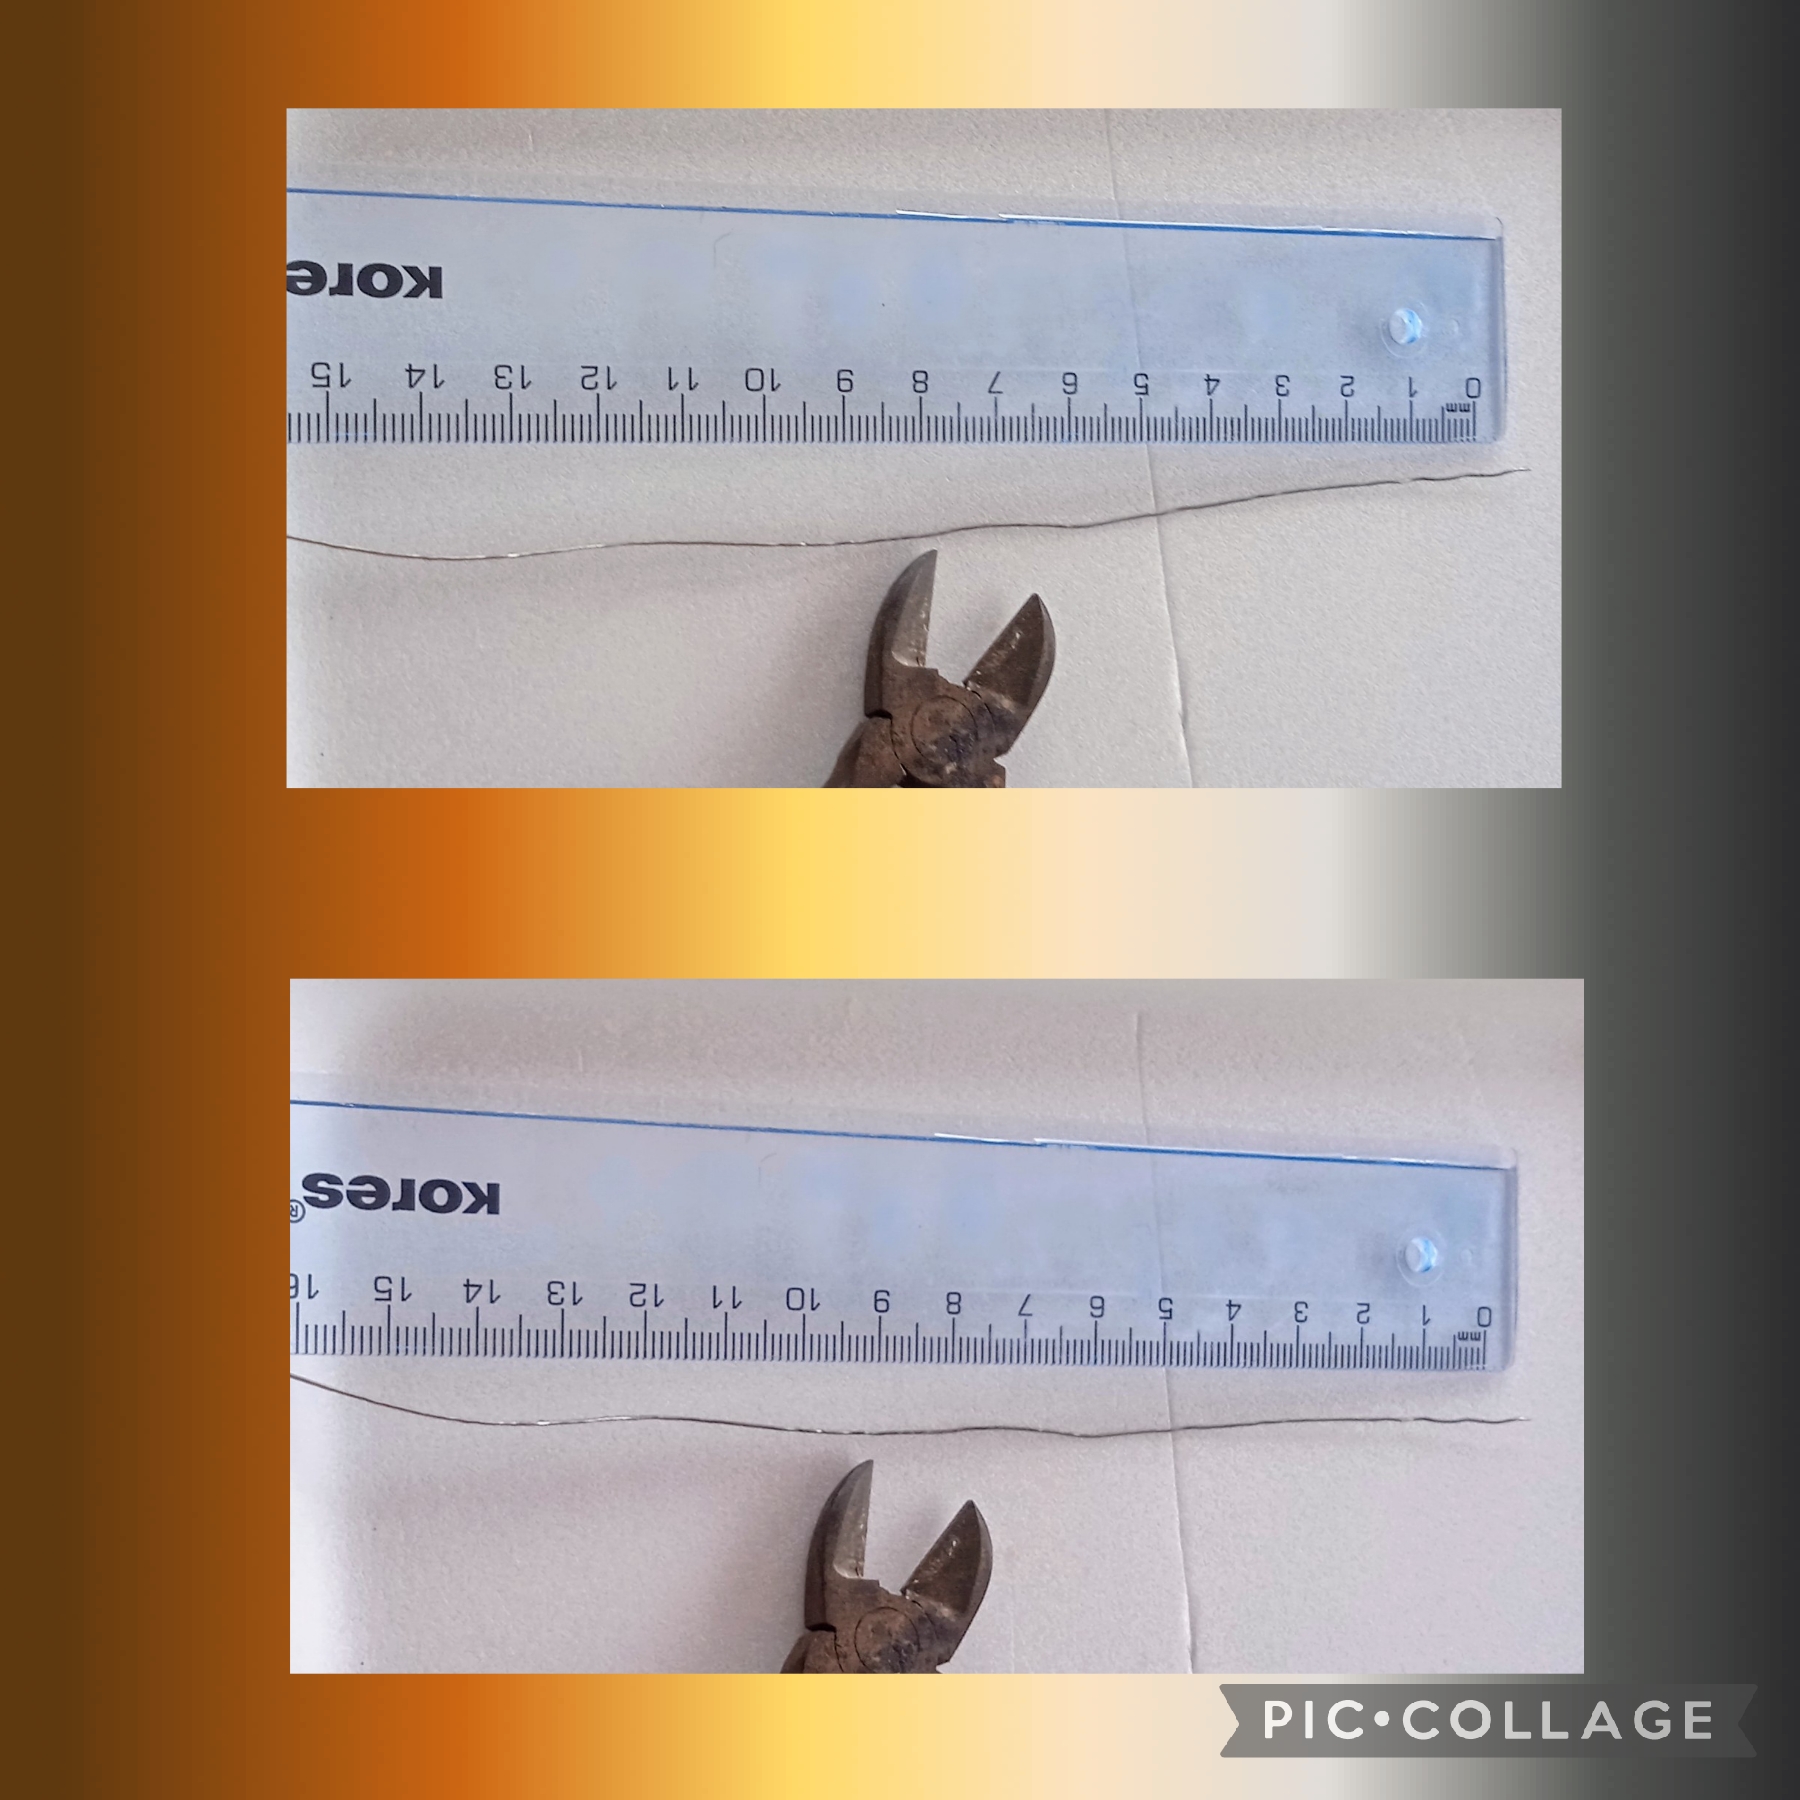
PRIMER PASO:
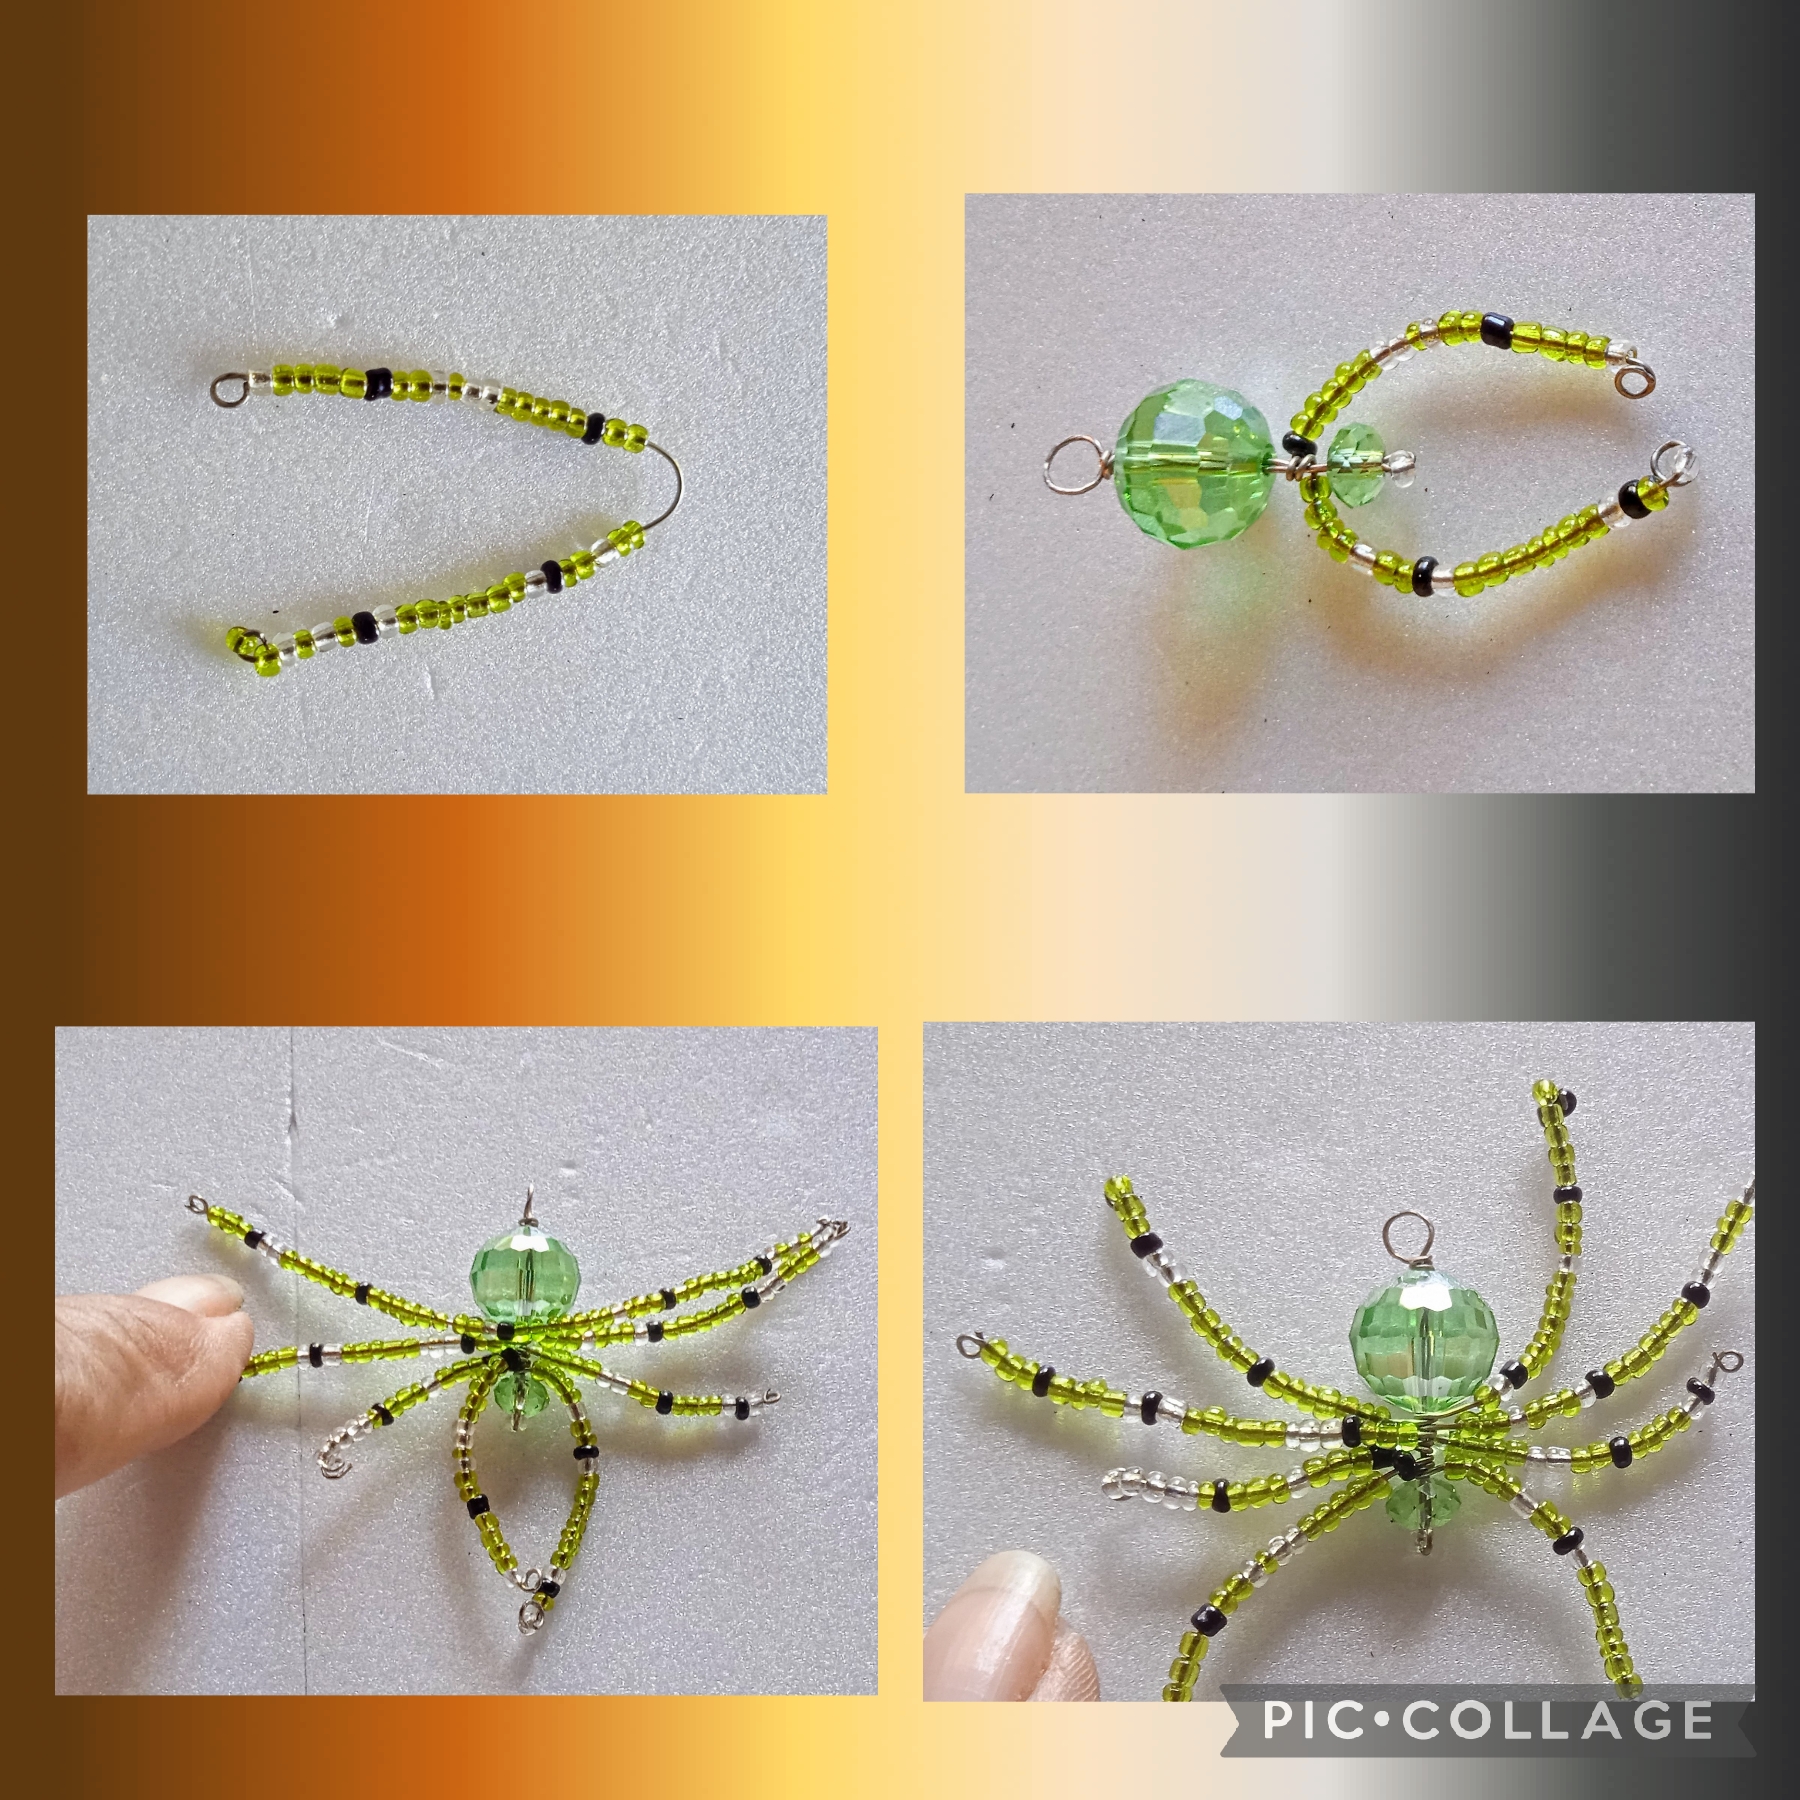
Voy a comenzar usando el hilo de plata, para medir con la regla dos trozos de ocho centímetros y dos de nueve centímetros con los que haré las patas de la araña, para luego usando la pinza de punta redonda hacer un pequeño anillo en uno de los extremos del hilo de plata, voy insertando las mostacillas negras, transparentes, y verdes sin secuencia para darle un toque mágico, ahora dejo un espacio de medio centímetro sin mostacillas y hago un anillo en el otro extremo, esto lo realizó igual en los cuatro hilos de plata, como muestran las imágenes.
STEPS USED IN THE PREPARATION OF THIS BEAUTIFUL PROJECT:
FIRST STEP:
I'm going to start by using the silver thread, to measure with the ruler two pieces of eight centimeters and two of nine centimeters with which I will make the legs of the spider, then using the round-tipped pliers make a small ring at one end of the silver thread, I insert the black, transparent, and green beads without sequence to give it a magical touch, now I leave a space of half a centimeter without beads and make a ring at the other end, I do this in the same way with the four silver threads, as shown in the images.

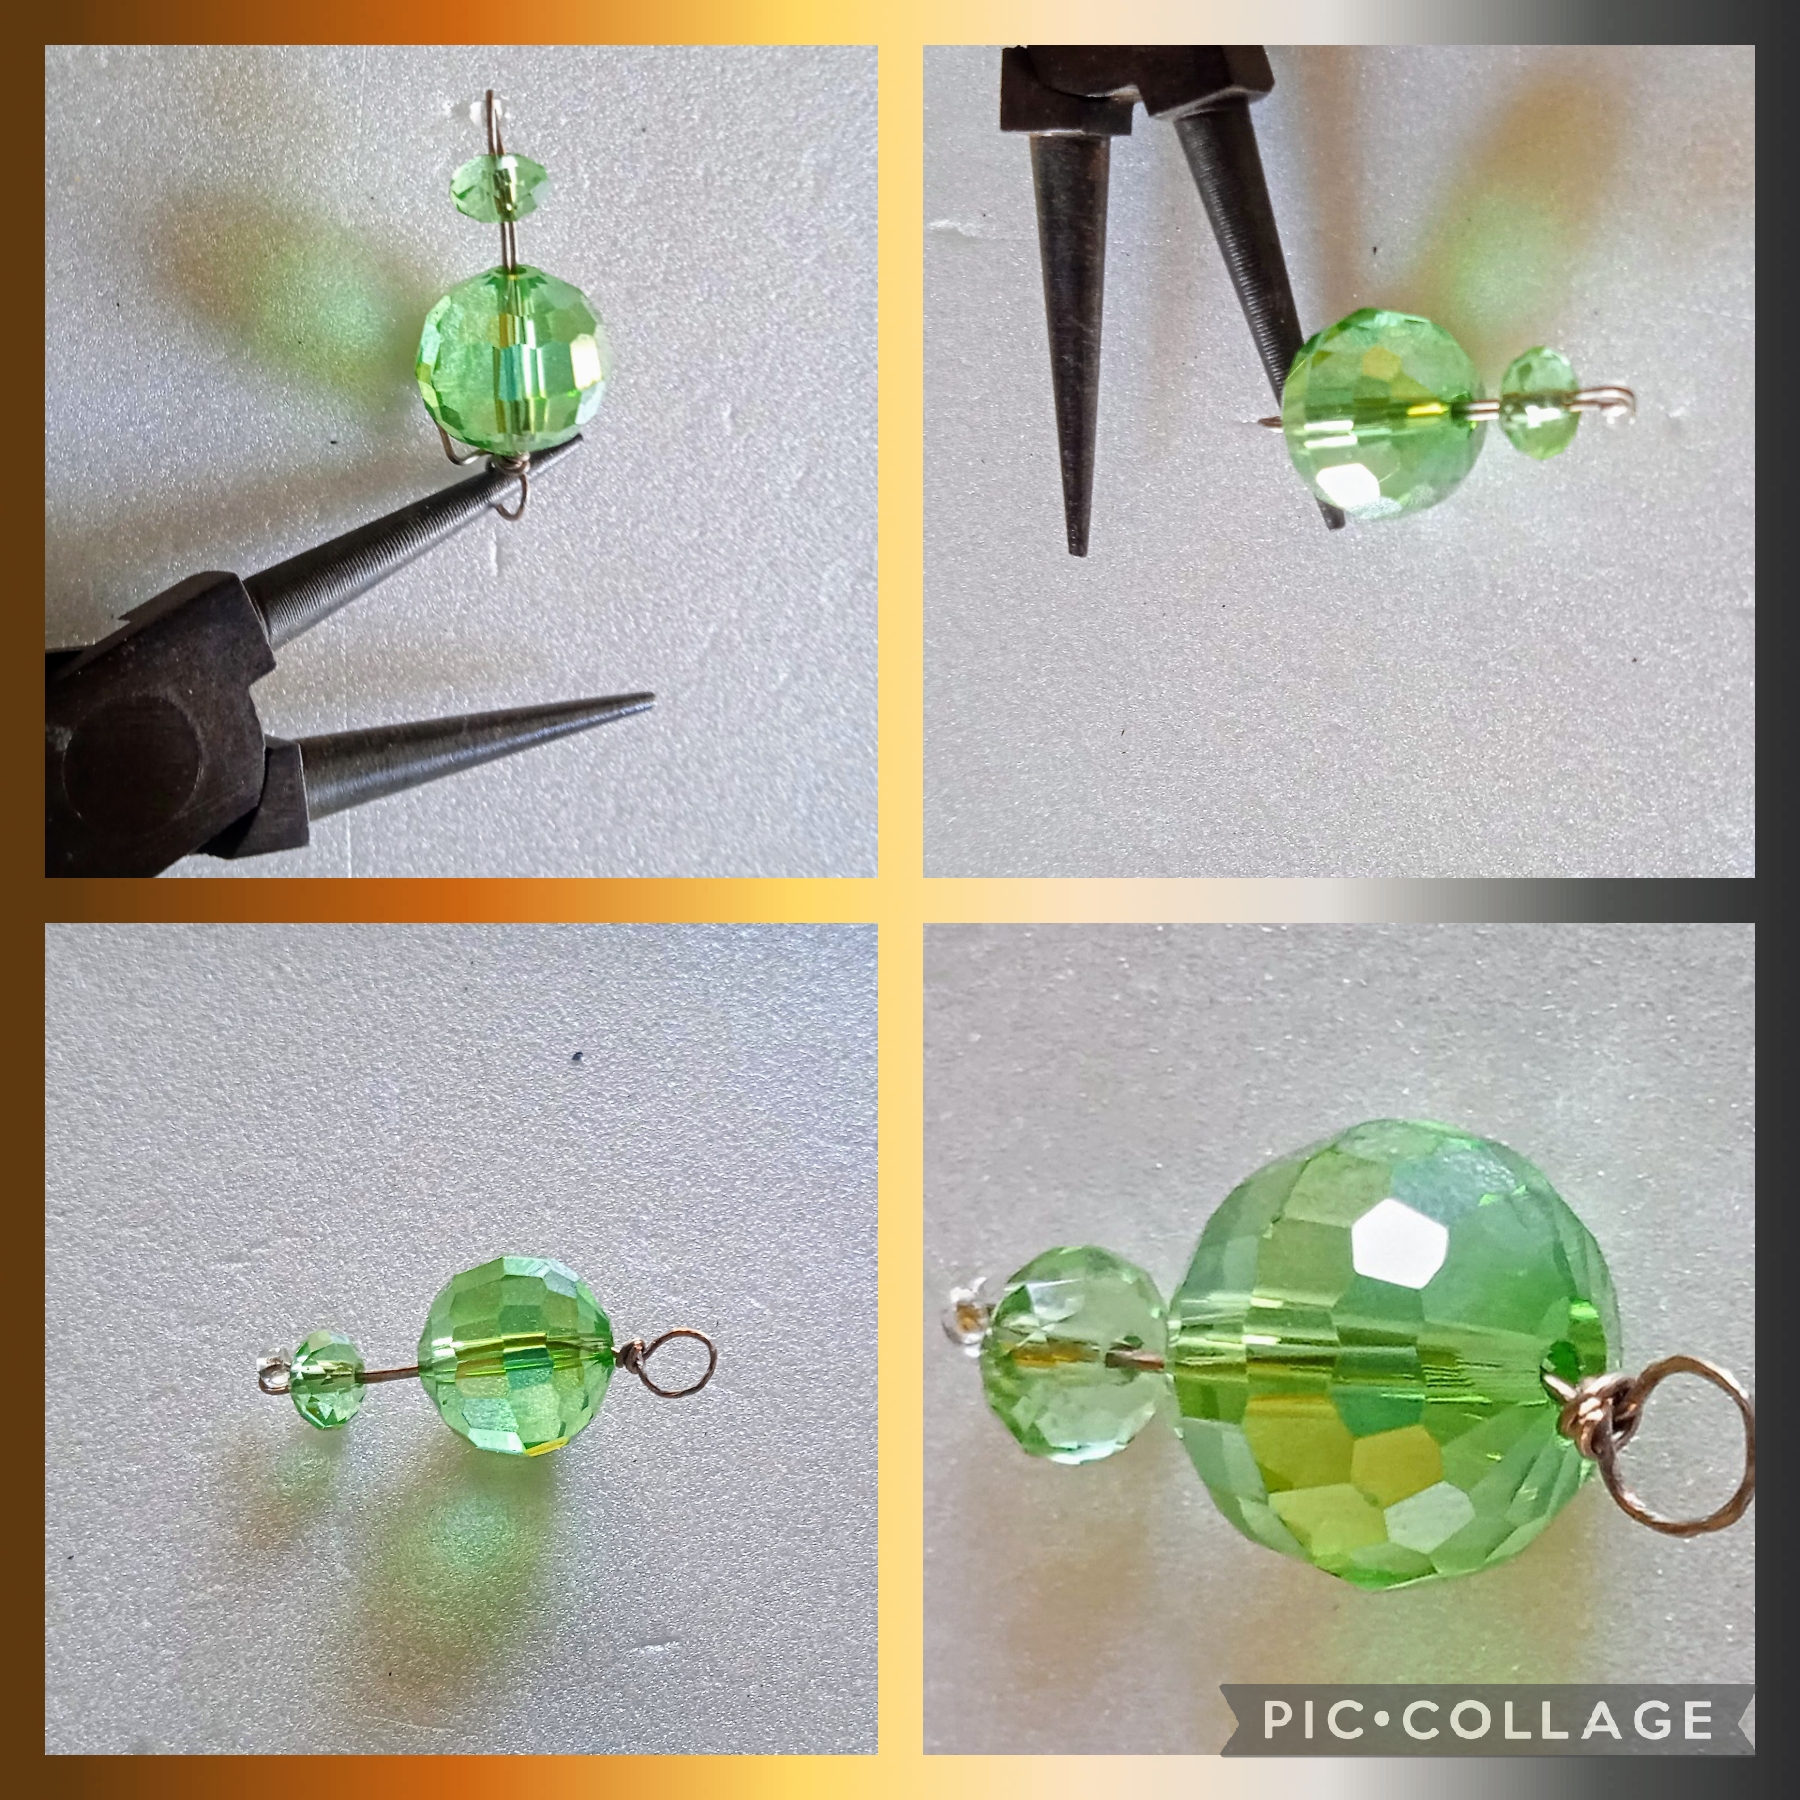
PASO DOS:
En este paso voy a formar el cuerpo de la araña, corto un trozo del hilo de plata de tres centímetros, en el inserto una mostacilla transparente hasta la mitad, doblo el hilo de plata igualo las puntas introduzco el cristal verde de dos mm., ahora inserto el cristal verde de 8 mm., dejo un espacio de medio centímetro y con la pinza de punta redonda hago un anillo, corto el excedente del hilo de plata y queda así: ver fotos.
STEP TWO:
In this step I am going to form the body of the spider, I cut a three centimeter piece of silver thread, insert a transparent bead halfway into it, fold the silver thread, match the tips, insert the two mm green crystal, now insert the 8 mm green crystal, leave a space of half a centimeter and with the round-tipped pliers I make a ring, cut the excess silver thread and it looks like this: see photos.
PASO TRES:
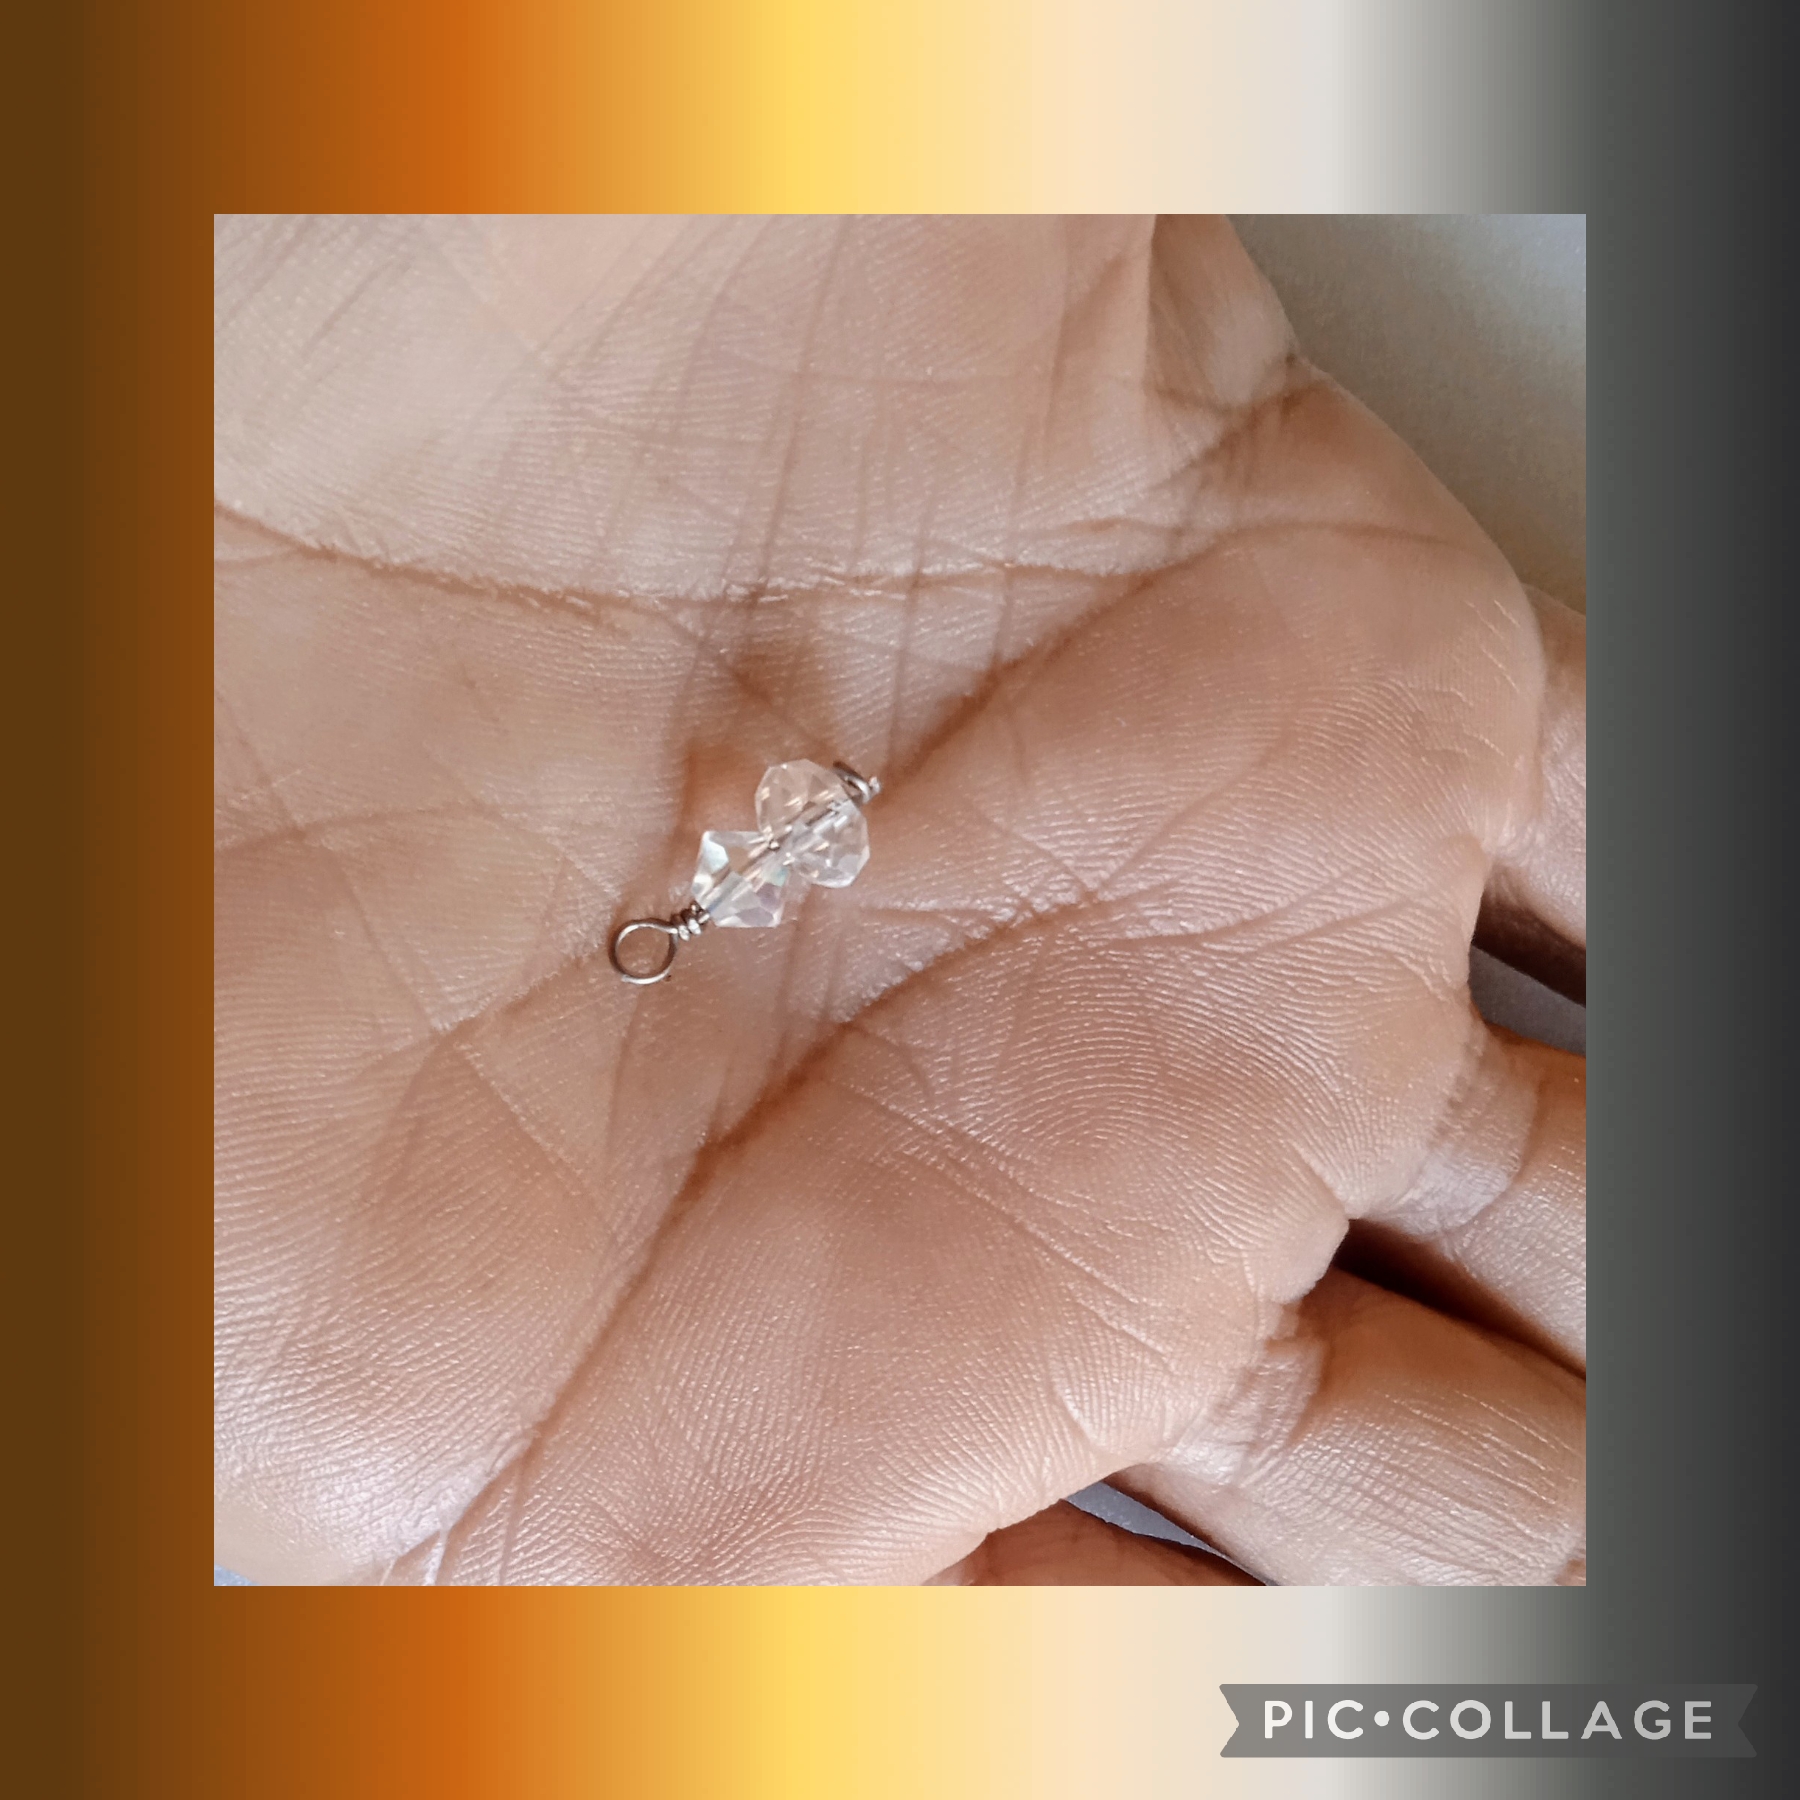
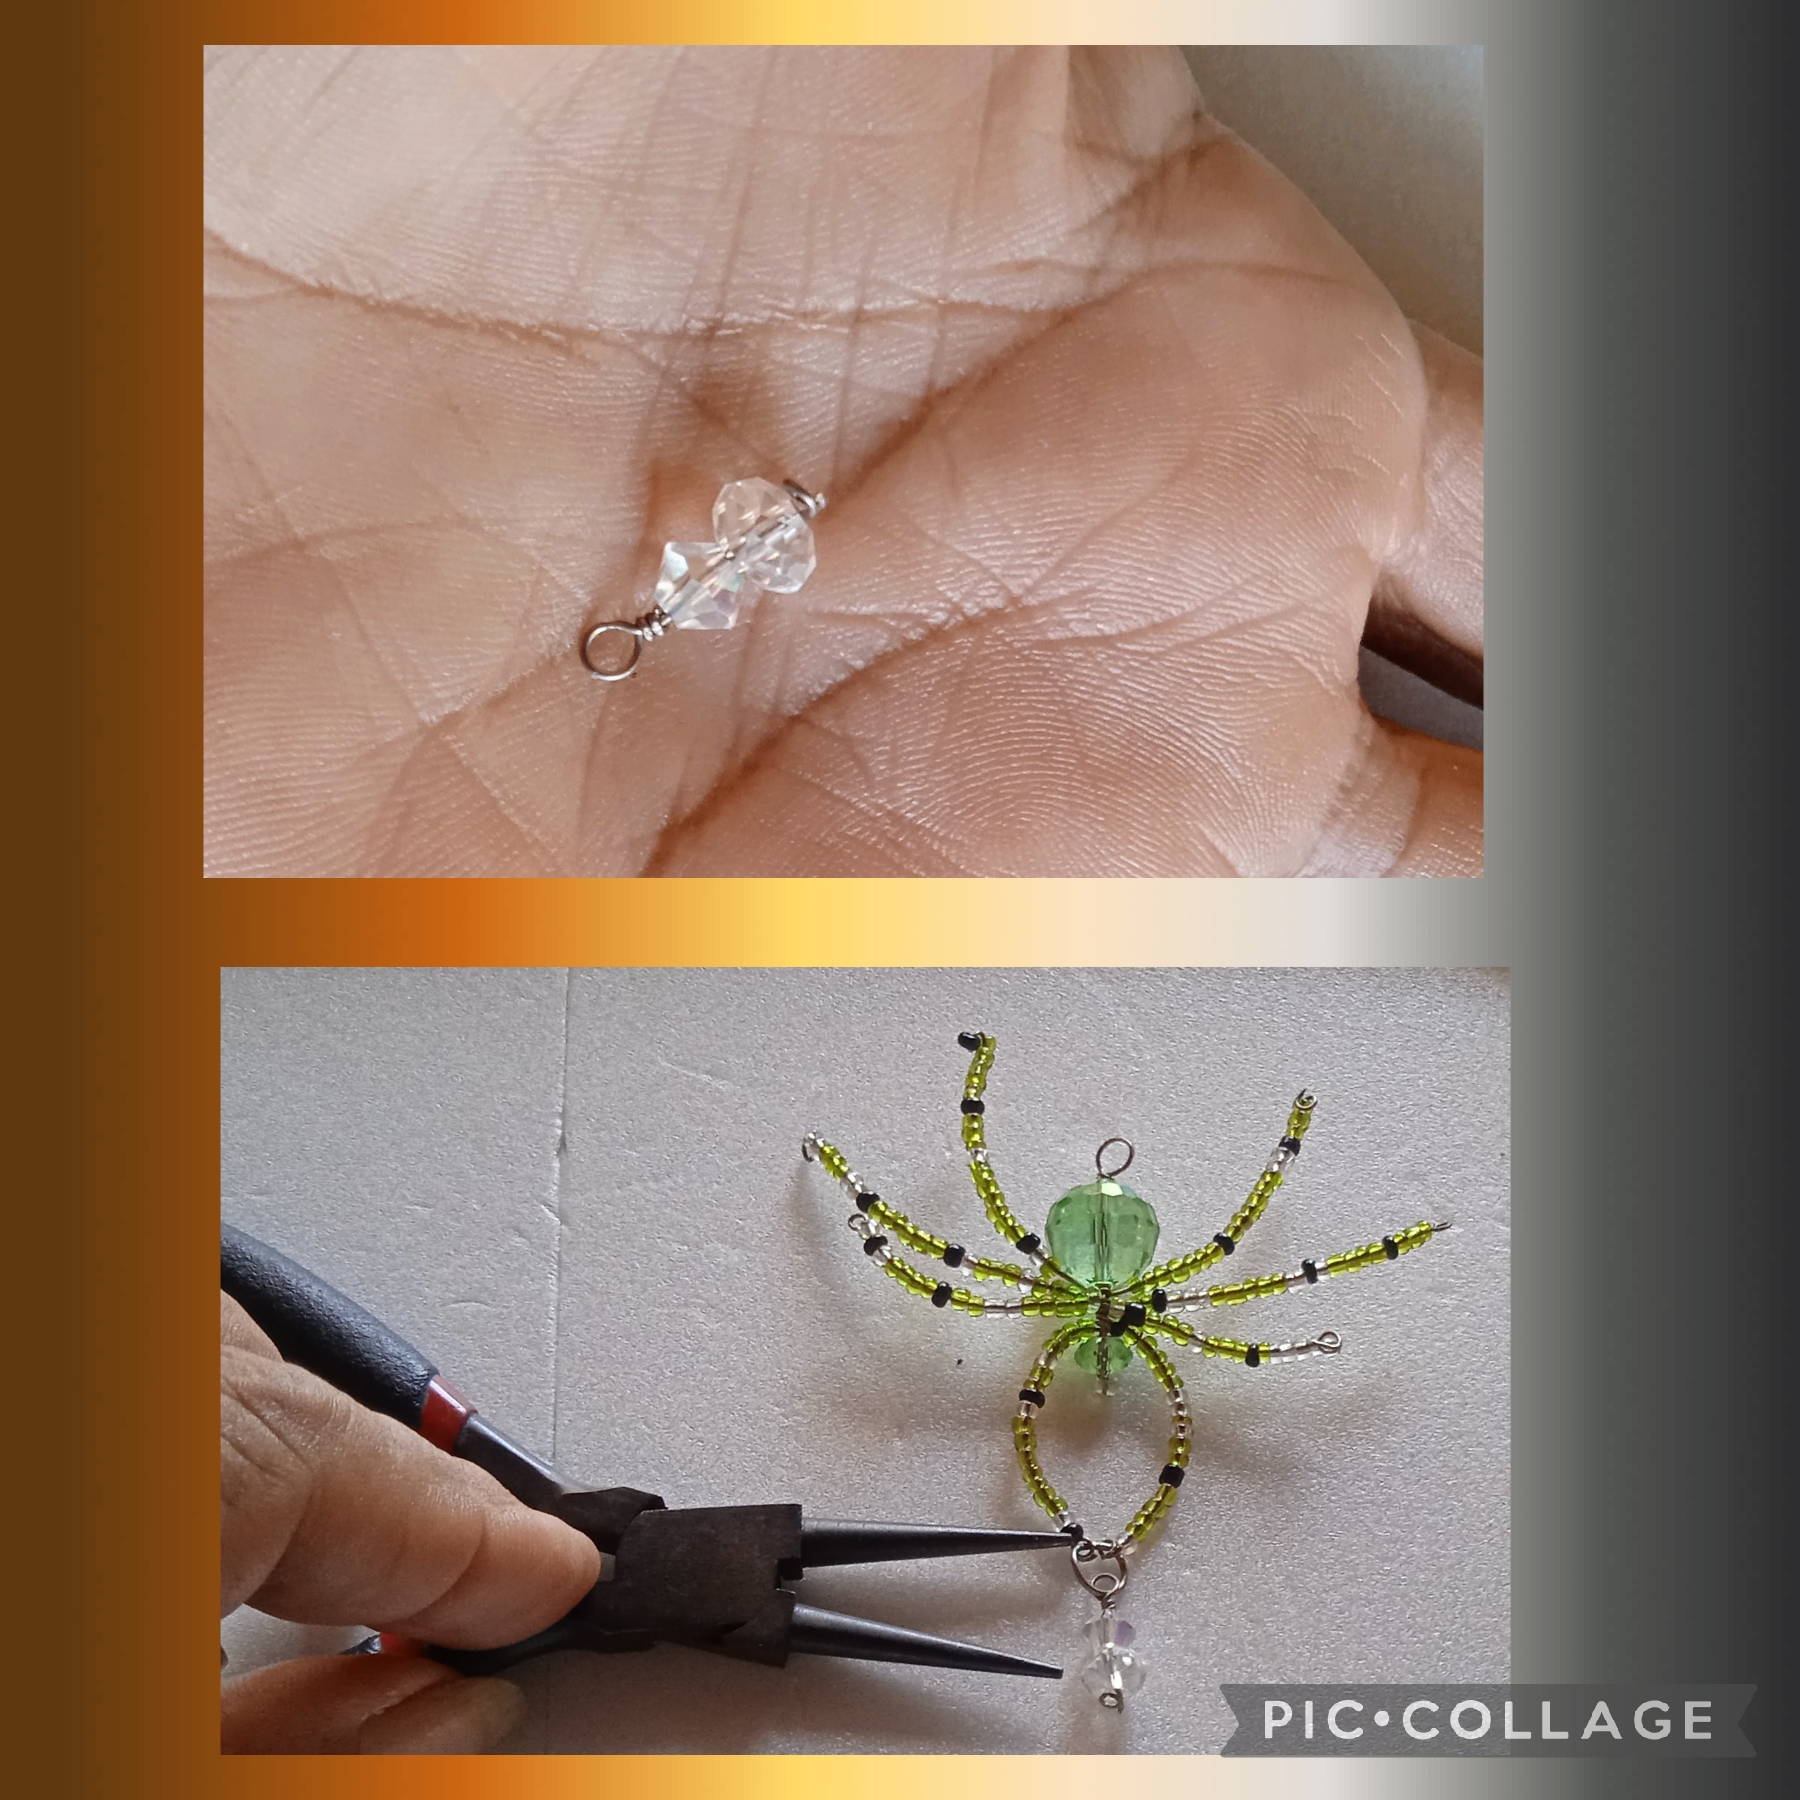
En este paso uso el cristal transparente de cuatro mm ., y el cristal tipo rombo para hacer una forma que colocaré como dije al final.
STEP THREE:
In this step I use the four mm clear glass, and the rhombus-type glass to make a shape that I will place as I said at the end.
PASO CUATRO:
En este paso voy a proceder armar la imagen de la araña, tomo una de las formas realizadas con las mostacillas de nueve centímetros y la doblo a la mitad la coloco en el espacio del cuerpo entre los dos cristales verdes hago un entorchado doble usando el sitio donde no hay mostacillas y fijo, hago lo mismo con la dos de ocho centímetros que las coloco en el centro y por ultimo pongo la otra de nueve centímetros, como muestran las imágenes, ahora le doy forma con las manos uno las dos últimas patas y coloco el dije hecho con anterioridad sigo dándole la forma deseada y así queda.
Por último uso el medio centímetro de cadena color verde para formar el colgante, realizado este procedimiento ya está listo para usar.
STEP FOUR:
In this step I will proceed to assemble the image of the spider, I take one of the shapes made with the nine-centimeter beads and I fold it in half, I place it in the space of the body between the two green crystals, I make a double twist using the place where there are no beads and fix it, I do the same with the two eight-centimeter beads that I place in the center and finally I put the other nine-centimeter bead, as shown in the images, now I shape it with my hands, I put the last two legs and I place the pendant made previously, I continue giving it the desired shape and this is how it looks.
Finally I use the half centimeter of green chain to form the pendant, once this procedure is done it is ready to use.
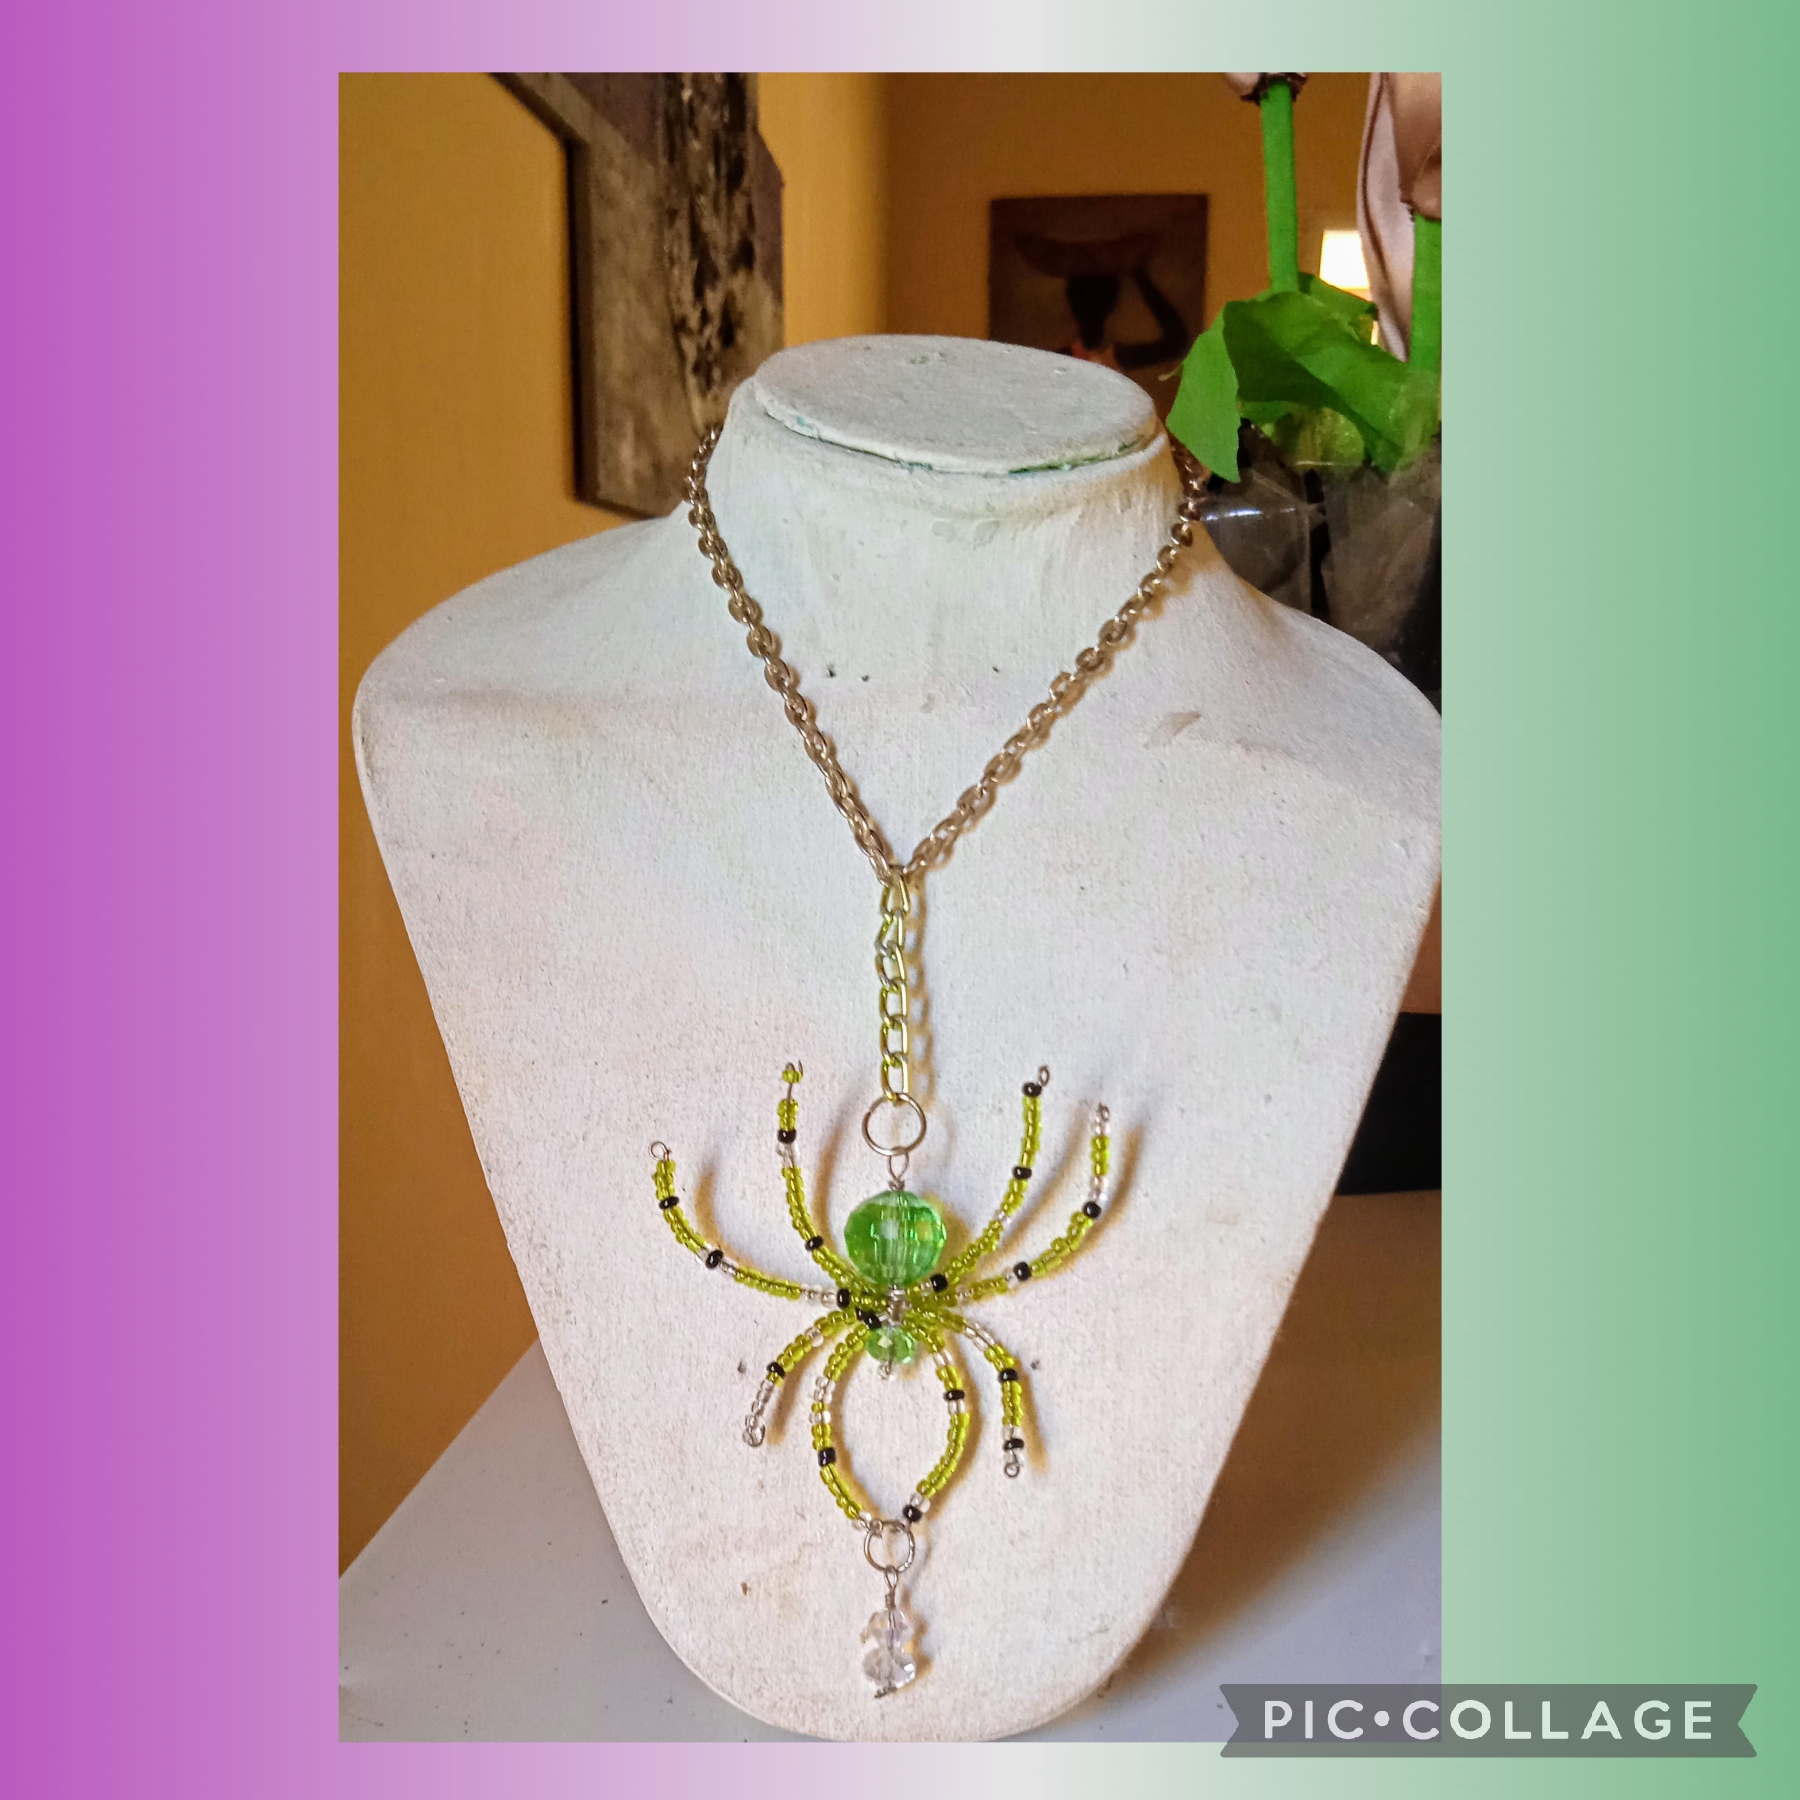
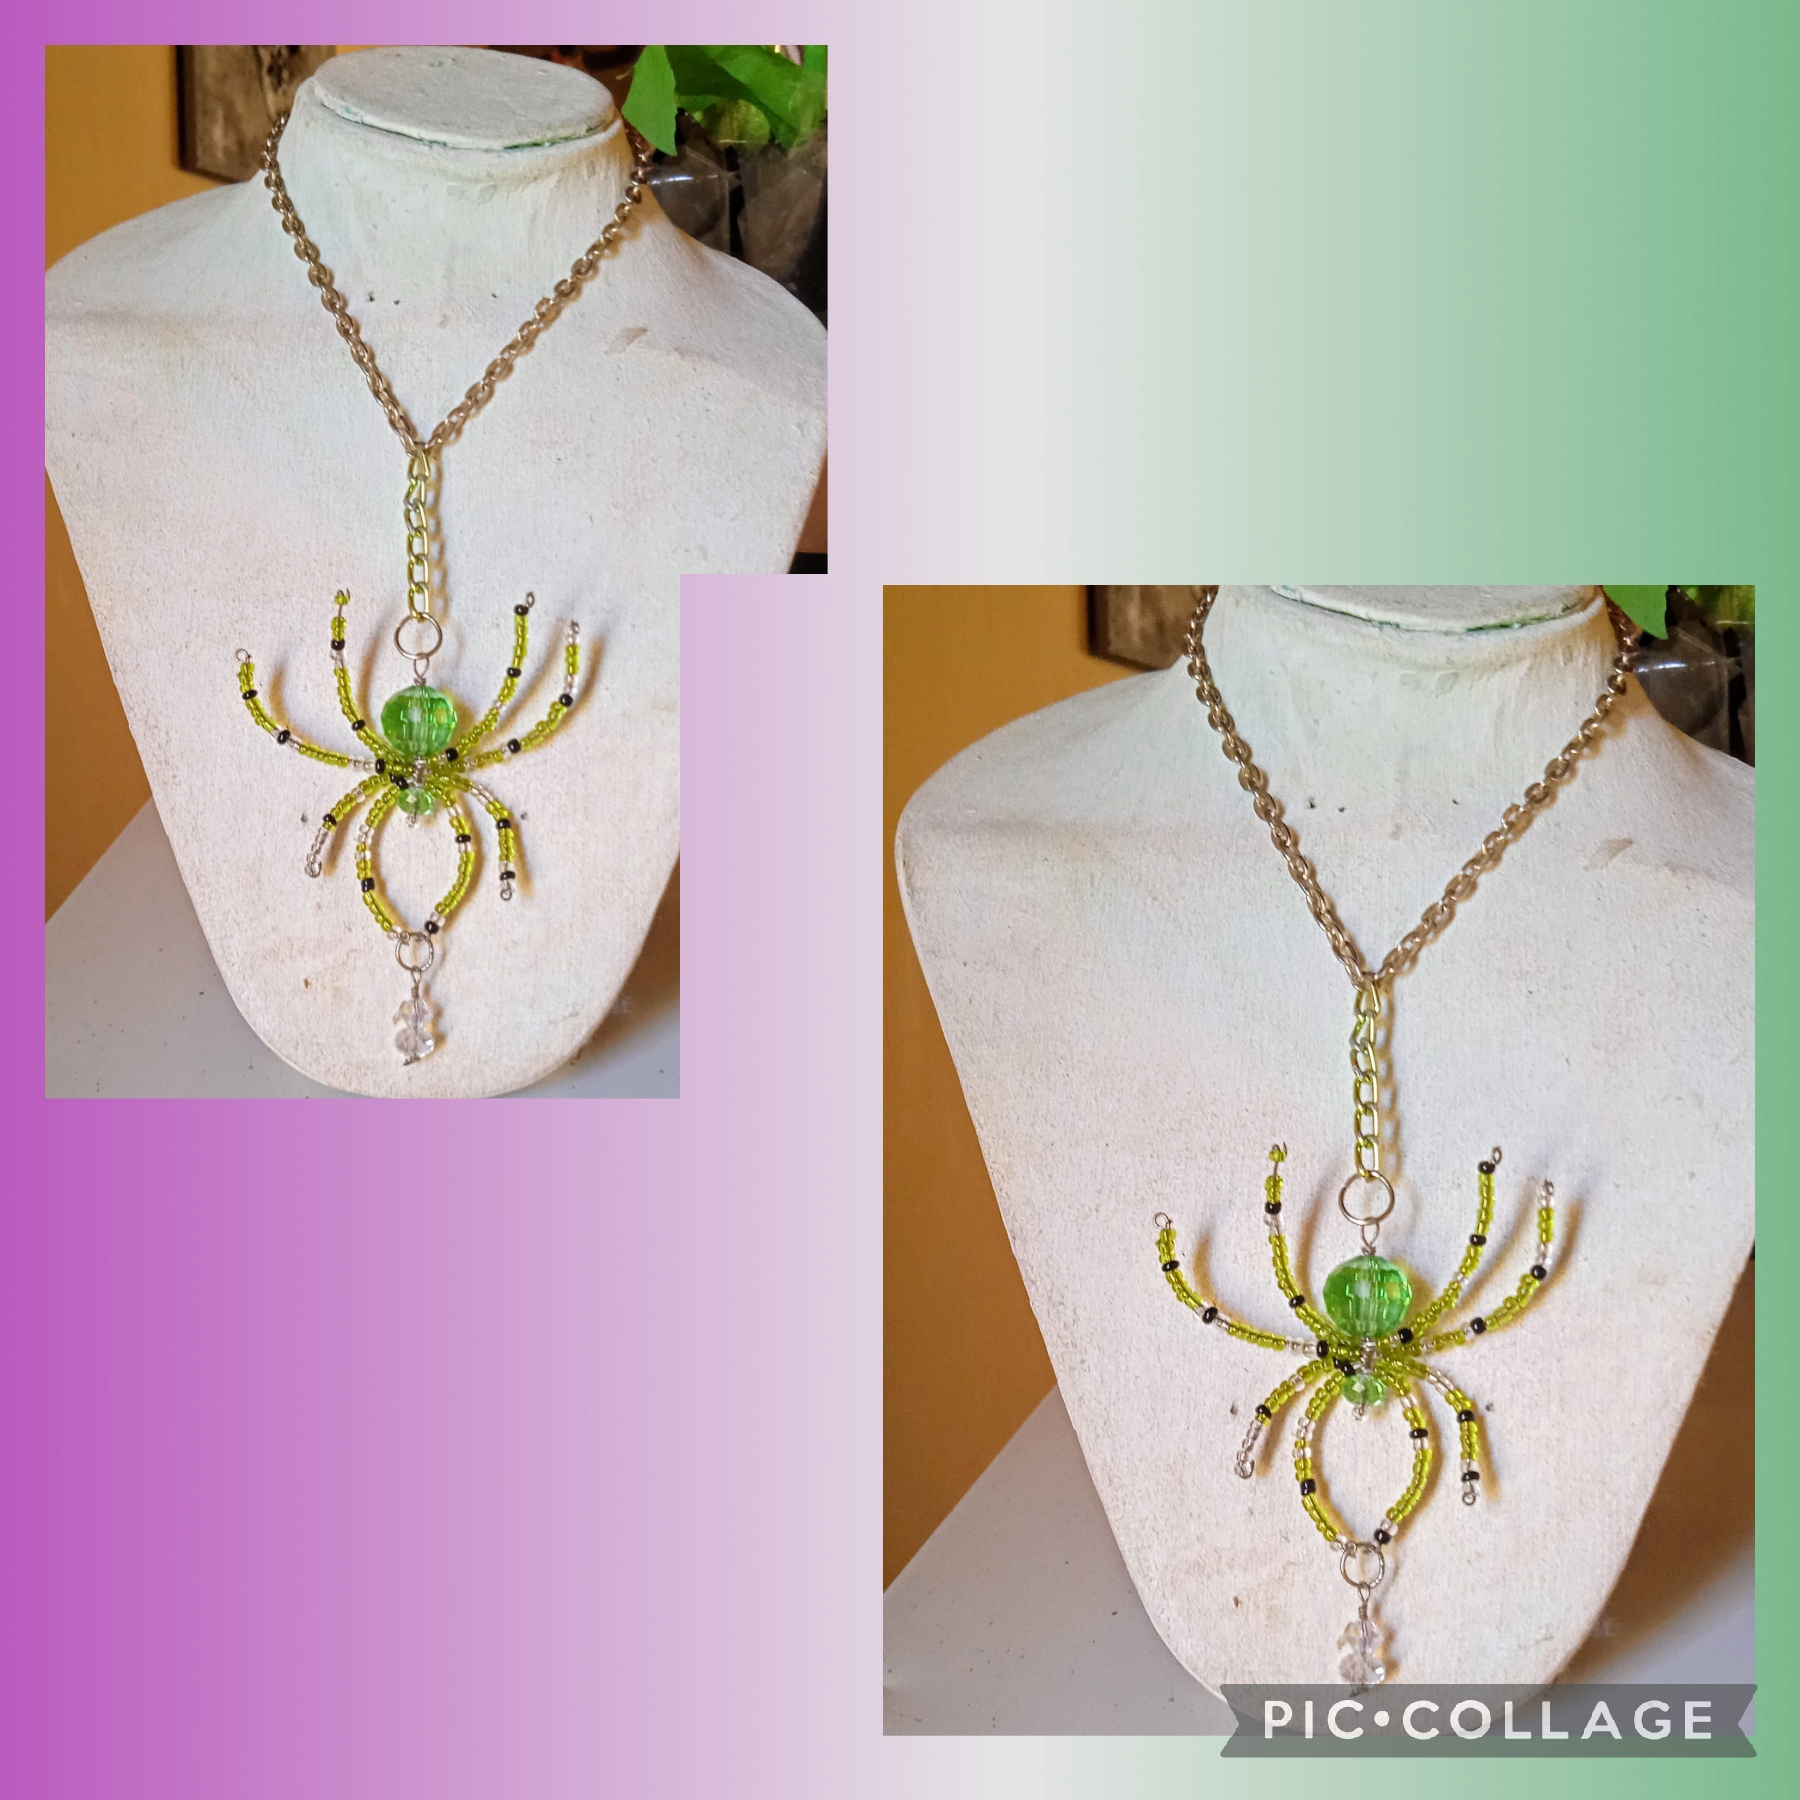
Artistas Creativos de las Manualidades y la Joyería, este es el resultado final de mi manualidad, espero que les guste la idea , yo la use para una gargantilla porque fue el pedido de mi amiga, pero tambien en llaveros, pulseras, prendedores se ve genial, como siempre agradecida con todos por leer y ver mis publicaciones, y nos vemos en la proxima manualidad, bye, bye.
Creative Artists of Crafts and Jewelry, this is the final result of my craft, I hope you like the idea, I used it for a choker because it was my friend's request, but also on keychains, bracelets, pins it looks great, as always grateful to everyone for reading and seeing my posts, and see you in the next craft, bye, bye.
Las imágenes y redacción de éste tutorial son de mi propiedad, las fotos fueron tomadas con mi teléfono celular redmi 9 y las edite con una aplicación gratis del mismo.
Para traducir texto use Google traductor
The images and writing of this tutorial are my property, the photos were taken with my redmi 9 cell phone and I edited them with a free application of the same.
To translate text use Google translator

Una muy linda propuesta para hallowen, nos encanta esta linda araña que nos regalas hoy 😉
Cómo siempre agradecida hive-189504 por ese apoyo tan valioso para mí, saludos.
What a beautiful design! It is so cute and beautiful. Love its design and color. It shows your skills. Nice work!
@nhaydu Hermoso diseño, aunque las arañas y yo, tenemos ciertas distancias jeje, este es una muy hermosa forma de hacer las paces y lucir un hermoso accesorio, Saludos 🤗
Jajajaja, que cómico @anamariag, te entiendo perfecto porque así me pasa con los animalitos que se creen príncipes (sapos) pero yo no los veo ni en fotos 🤣🤣🤣 gracias por tu comentario, saluditos.
Thank you, hive, for your support.
I am flattered by that comment. Best regards.
Excellent work. The design look beautiful . I love it