Saluditos mis Artistas Creativos de las Manualidades y la Joyería, dando inicio a una nueva semana y la última del mes de febrero, el próximo fin ya será marzo y festejando carnavales, espero que todos estén muy bien y felices en su núcleo familiar, como es mi costumbre corriendo corriendo cada vez que los festejos tienen que ver con la cultura y el folklore muy a pesar de los problemas que se han presentado en el estado en las comunidades educativas; pero siempre confiando en la gracia de Dios y su poder infinito que todo saldrá bien.
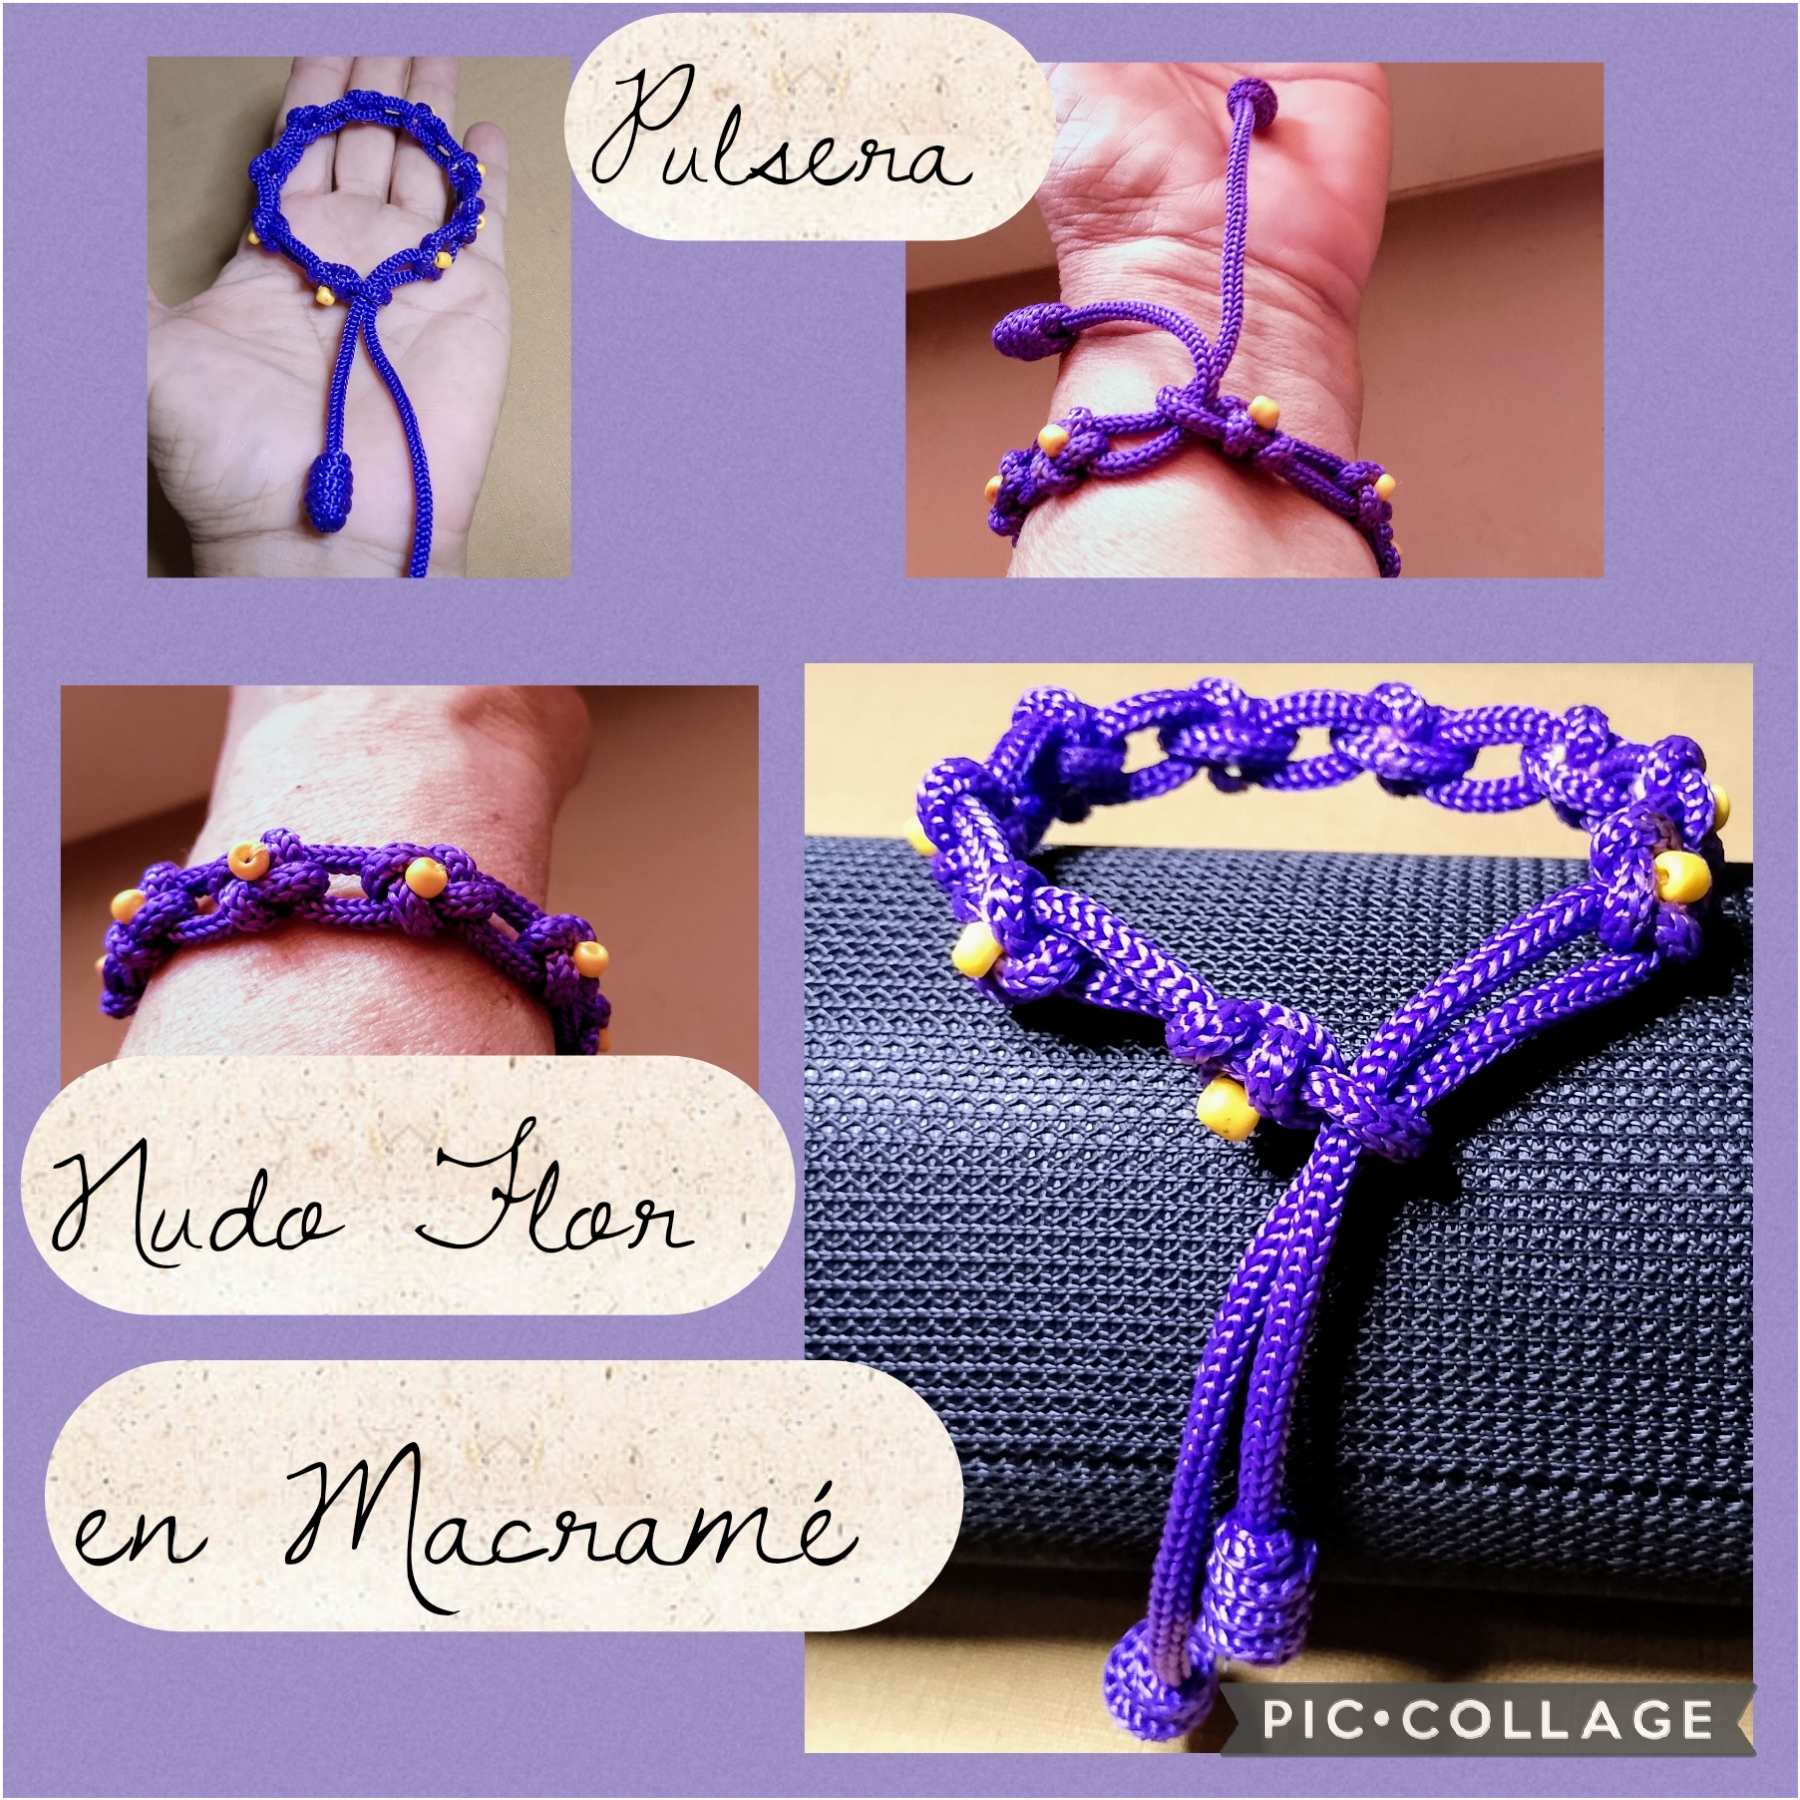
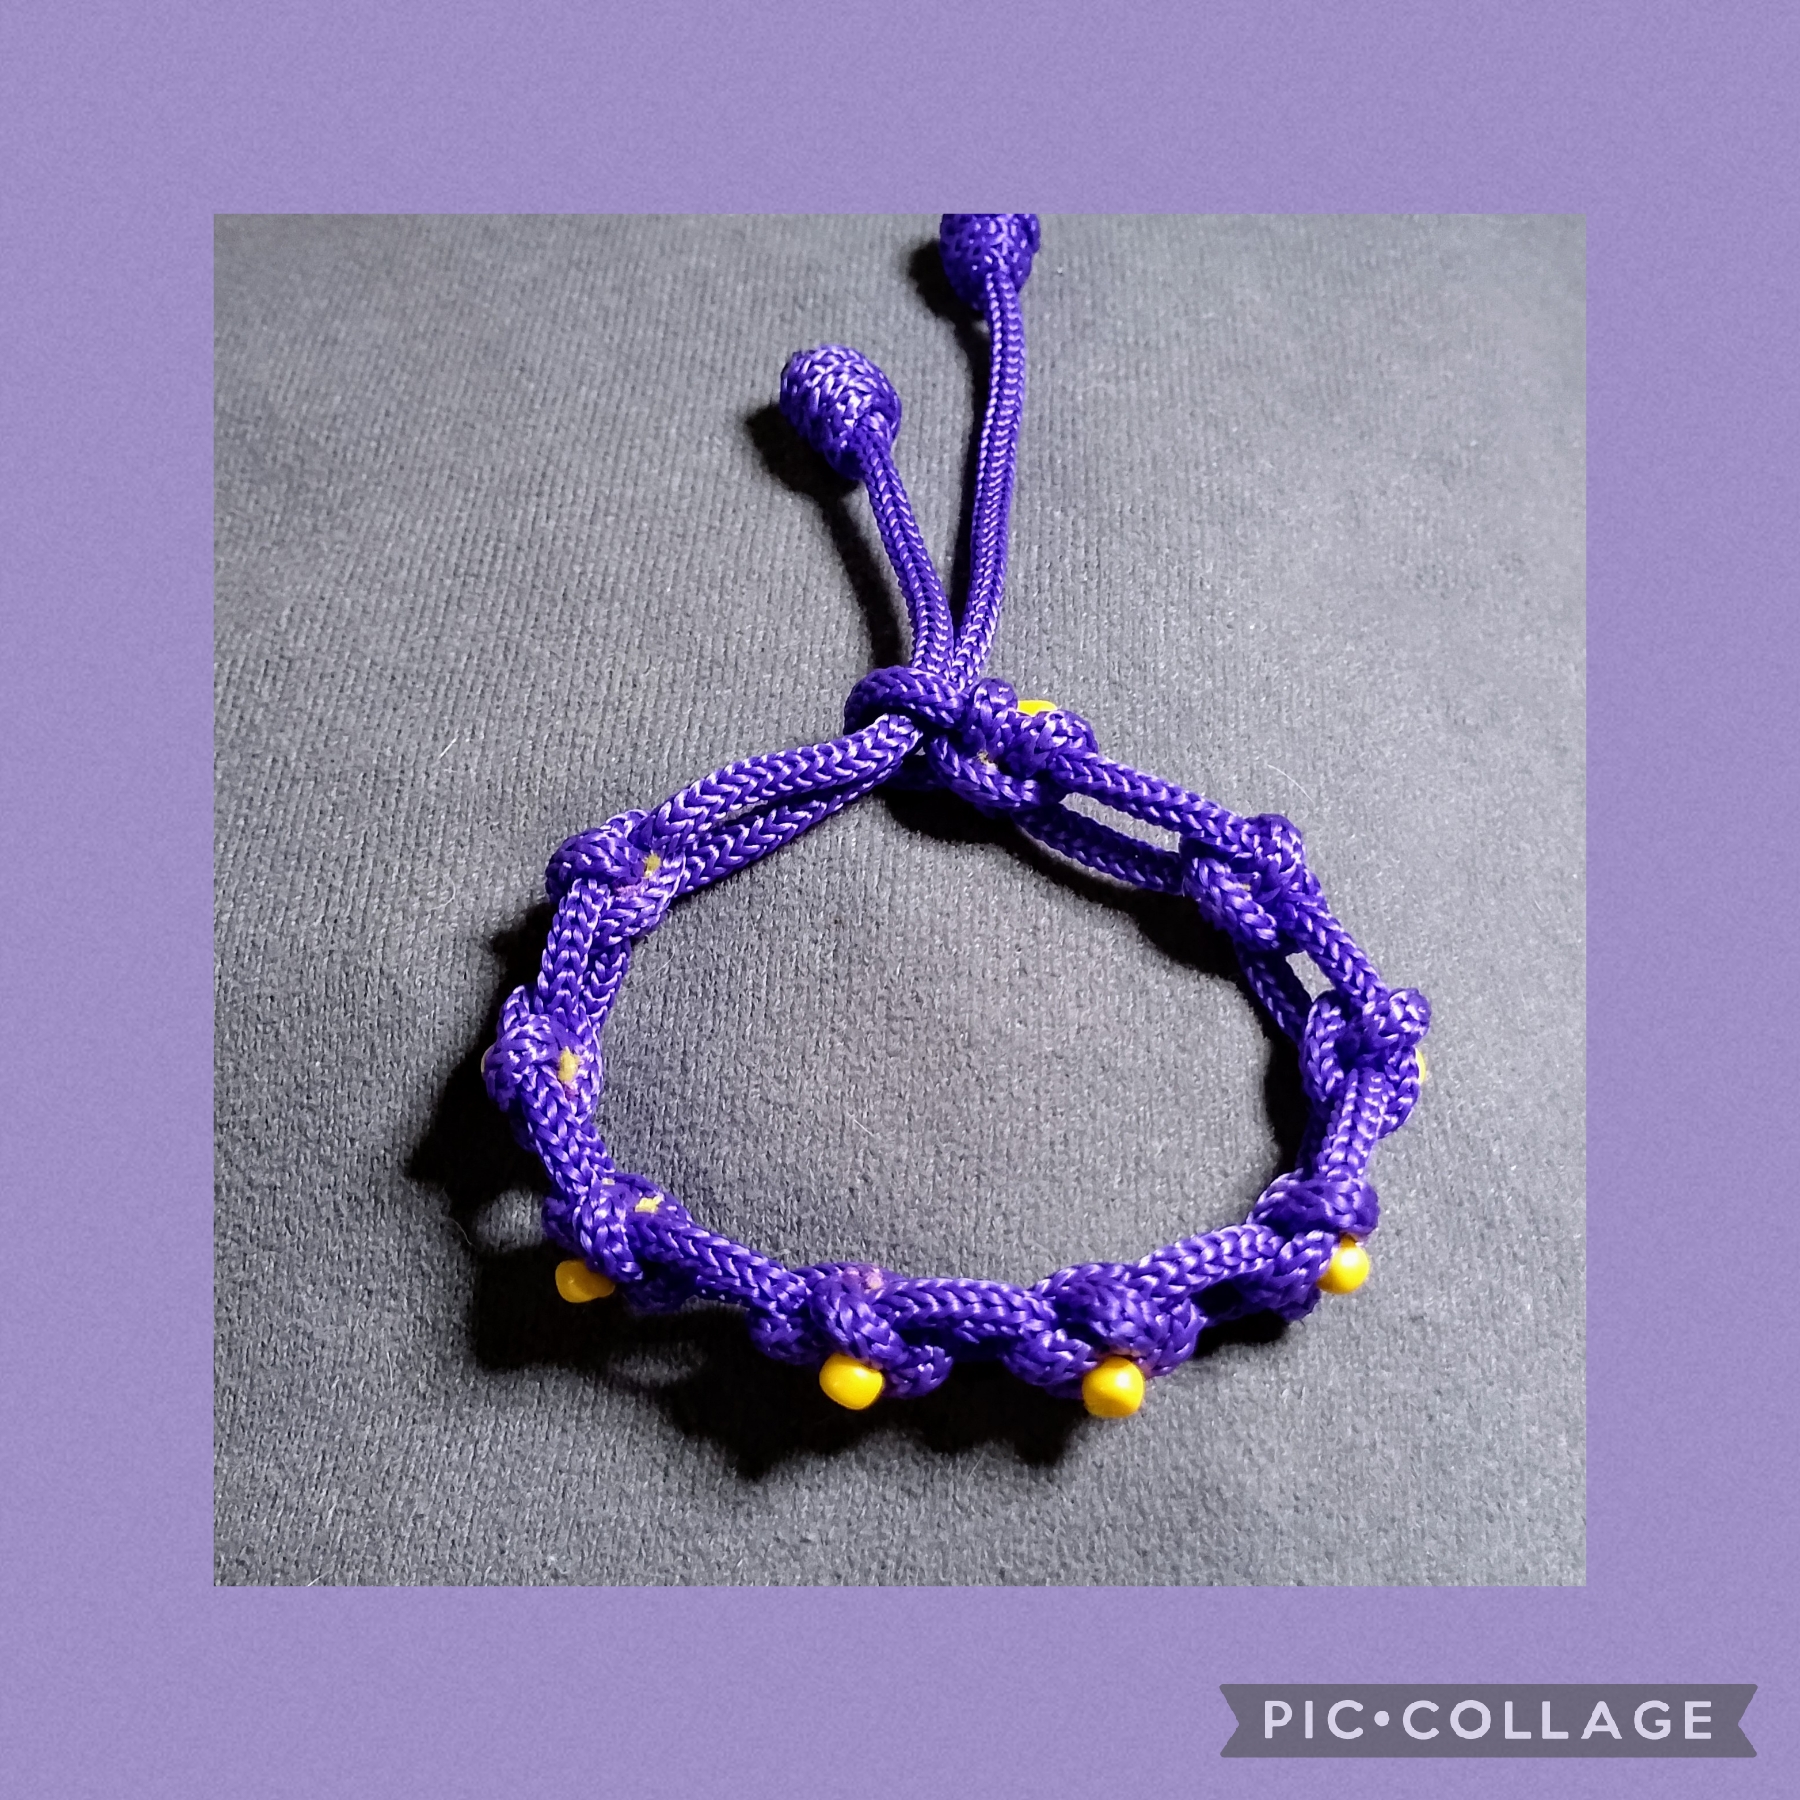
Y pasando a nuestro tema cotidiano que es la Joyería les comento que hoy traigo para compartirles una hermosa pulsera que realicé en cordón paracord con el Nudo Cuadrado le adicione unos mostacillones que coloque en el centro y lo llame nudo flor pues es parecido al Nudo trébol, este nudo es muy diferente del nudo plano y lo comento porque he visto últimamente muchos trabajos realizados en nudo plano y lo llaman nudo cuadrado y estos nudos son distintos uno de otro.
Bueno aclarado el punto de los nudos los invito a que sigan leyendo el paso a paso para que vean cómo la hice.
Greetings my Creative Artists of Crafts and Jewelry, starting a new week and the last of the month of February, the next end will be March and celebrating carnivals, I hope that everyone is very well and happy in their family nucleus, as is my custom running running every time the celebrations have to do with culture and folklore despite the problems that have occurred in the state in the educational communities; but always trusting in the grace of God and his infinite power that everything will turn out well.
And moving on to our daily topic which is Jewelry, I tell you that today I bring to share with you a beautiful bracelet that I made in paracord cord with the Square Knot. I added some beads that I placed in the center and I called it a flower knot because it is similar to the Clover Knot, this knot is very different from the flat knot and I mention it because I have seen lately many works done in a flat knot and they call it a square knot and these knots are different from each other.
Well, now that I've clarified the point about the knots, I invite you to read the step by step so you can see how I made it.
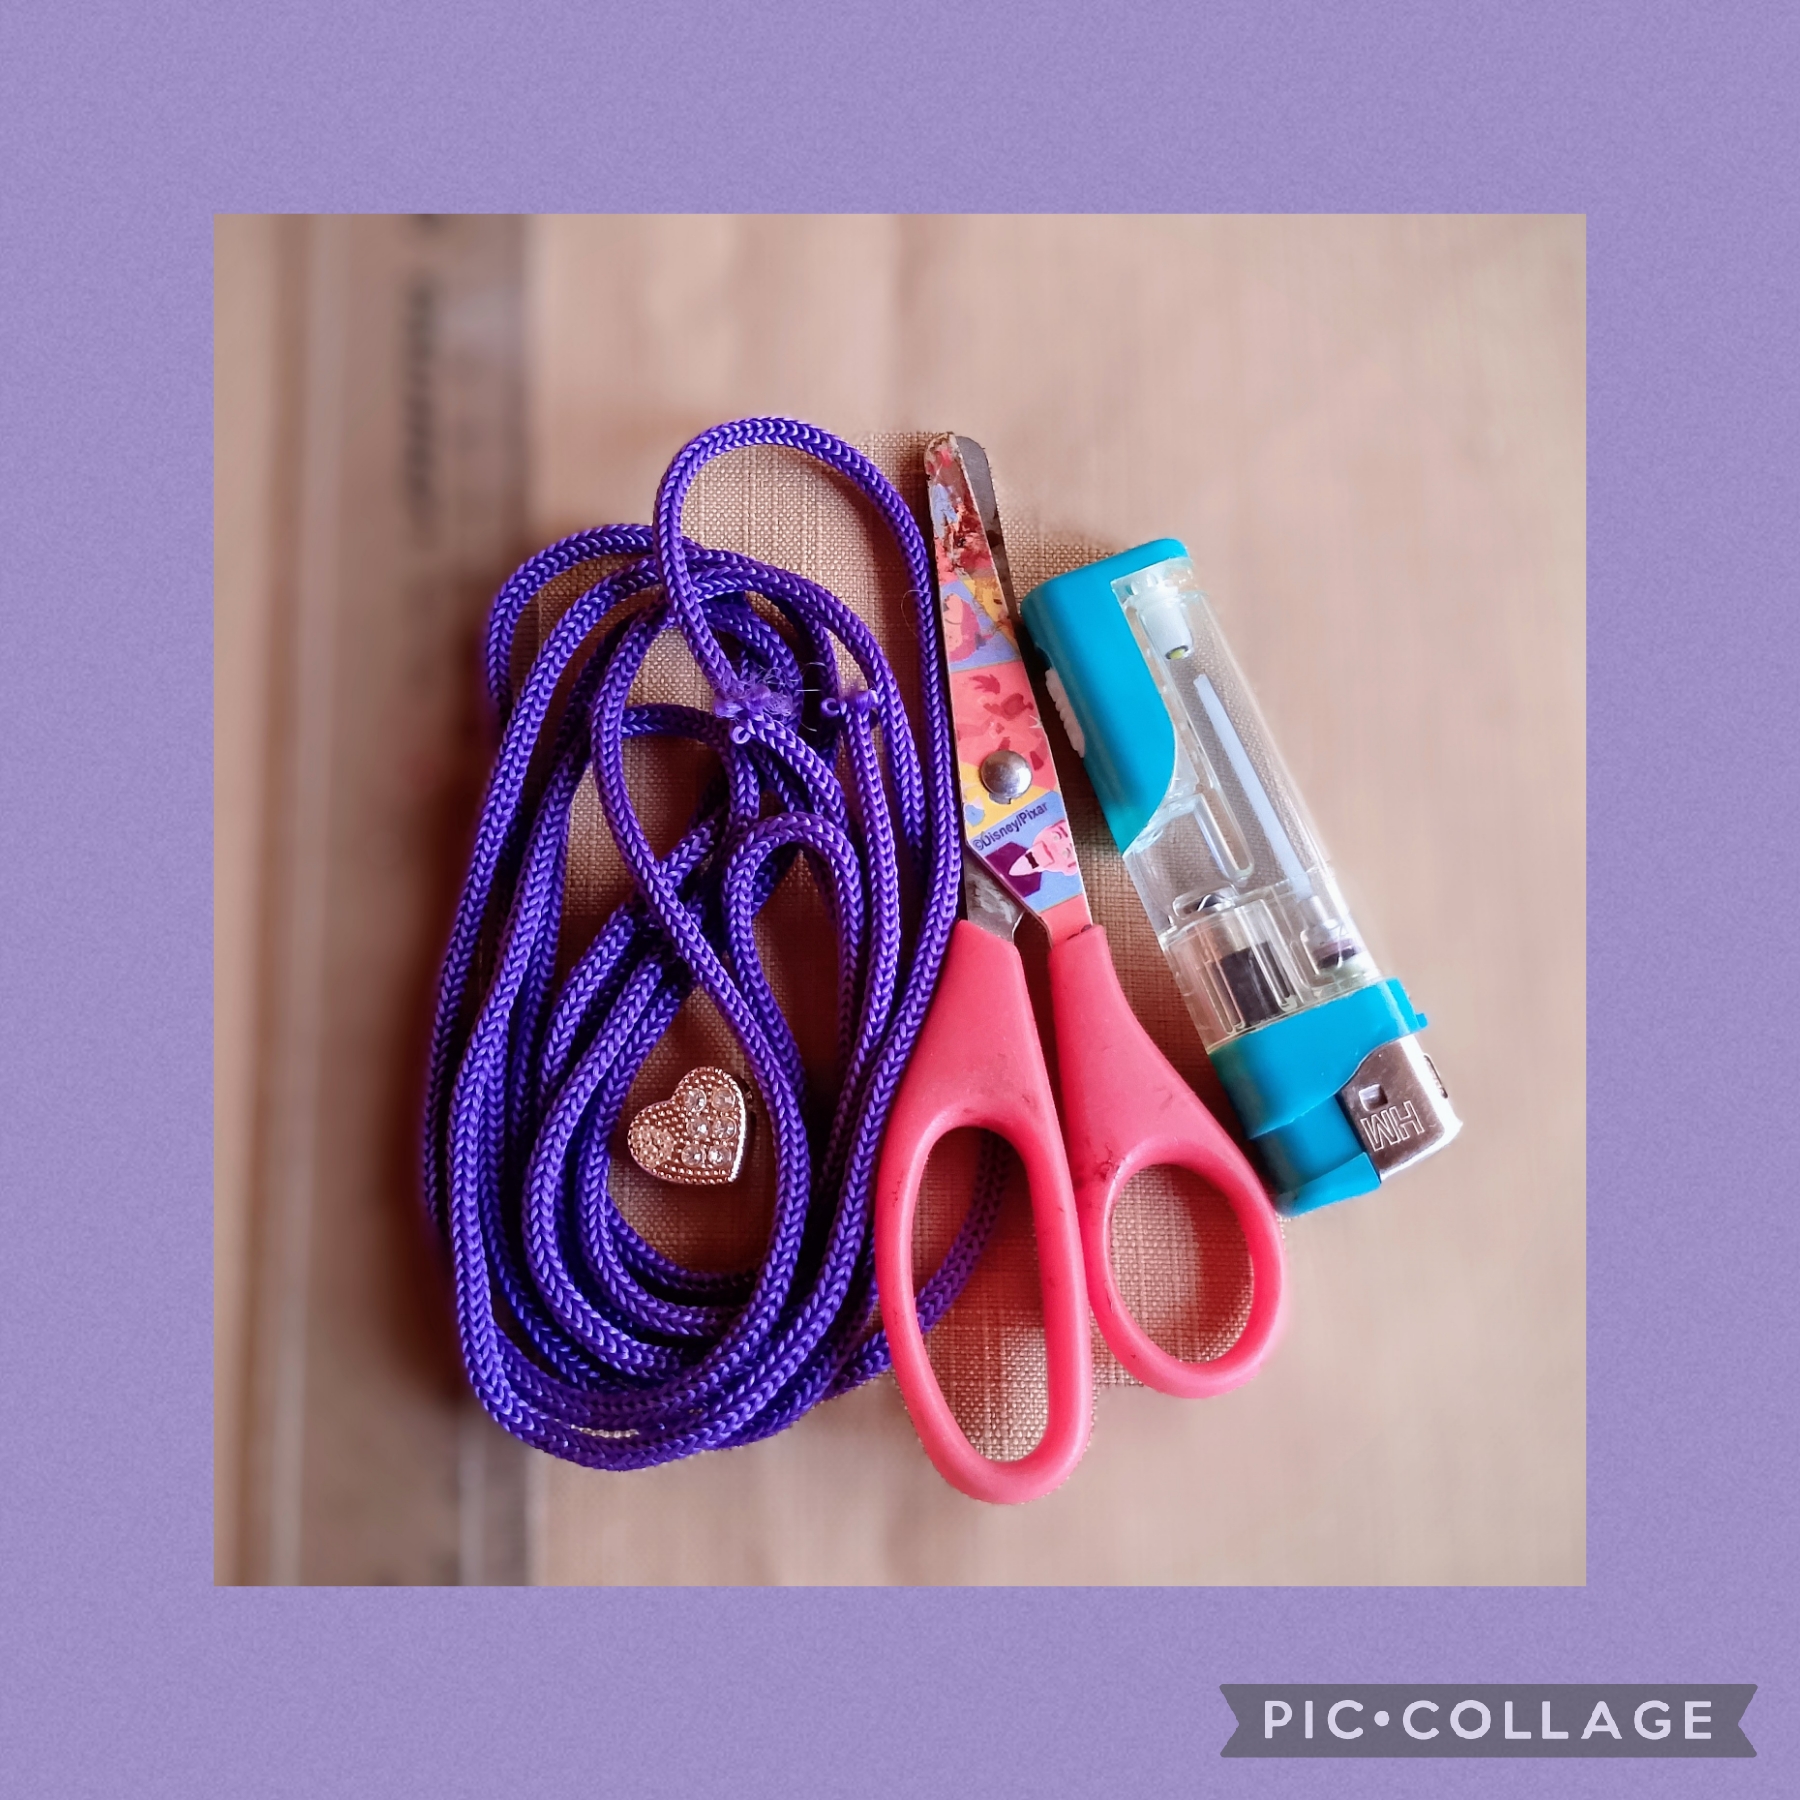
MATERIALES USADOS EN LA ELABORACIÓN DE ESTA HERMOSA PULSERA:
✓ Un metro cincuenta centímetros de
cordón paracord color morado.
✓ Encendedor.
✓ Mostacillones amarillos.
✓ Hilo de coser amarillo.
✓ Aguja.
✓ Tijeras.
✓ Regla.
MATERIALS USED IN THE PREPARATION OF THIS BEAUTIFUL BRACELET:
✓ One meter and fifty centimeters of
purple paracord cord.
✓ Lighter.
✓ Yellow beads.
✓ Yellow sewing thread.
✓ Needle.
✓ Scissors.
✓ Ruler.
USANDO ÉSTOS SENCILLOS Y POCOS PASOS REALICÉ SU ELABORACIÓN.
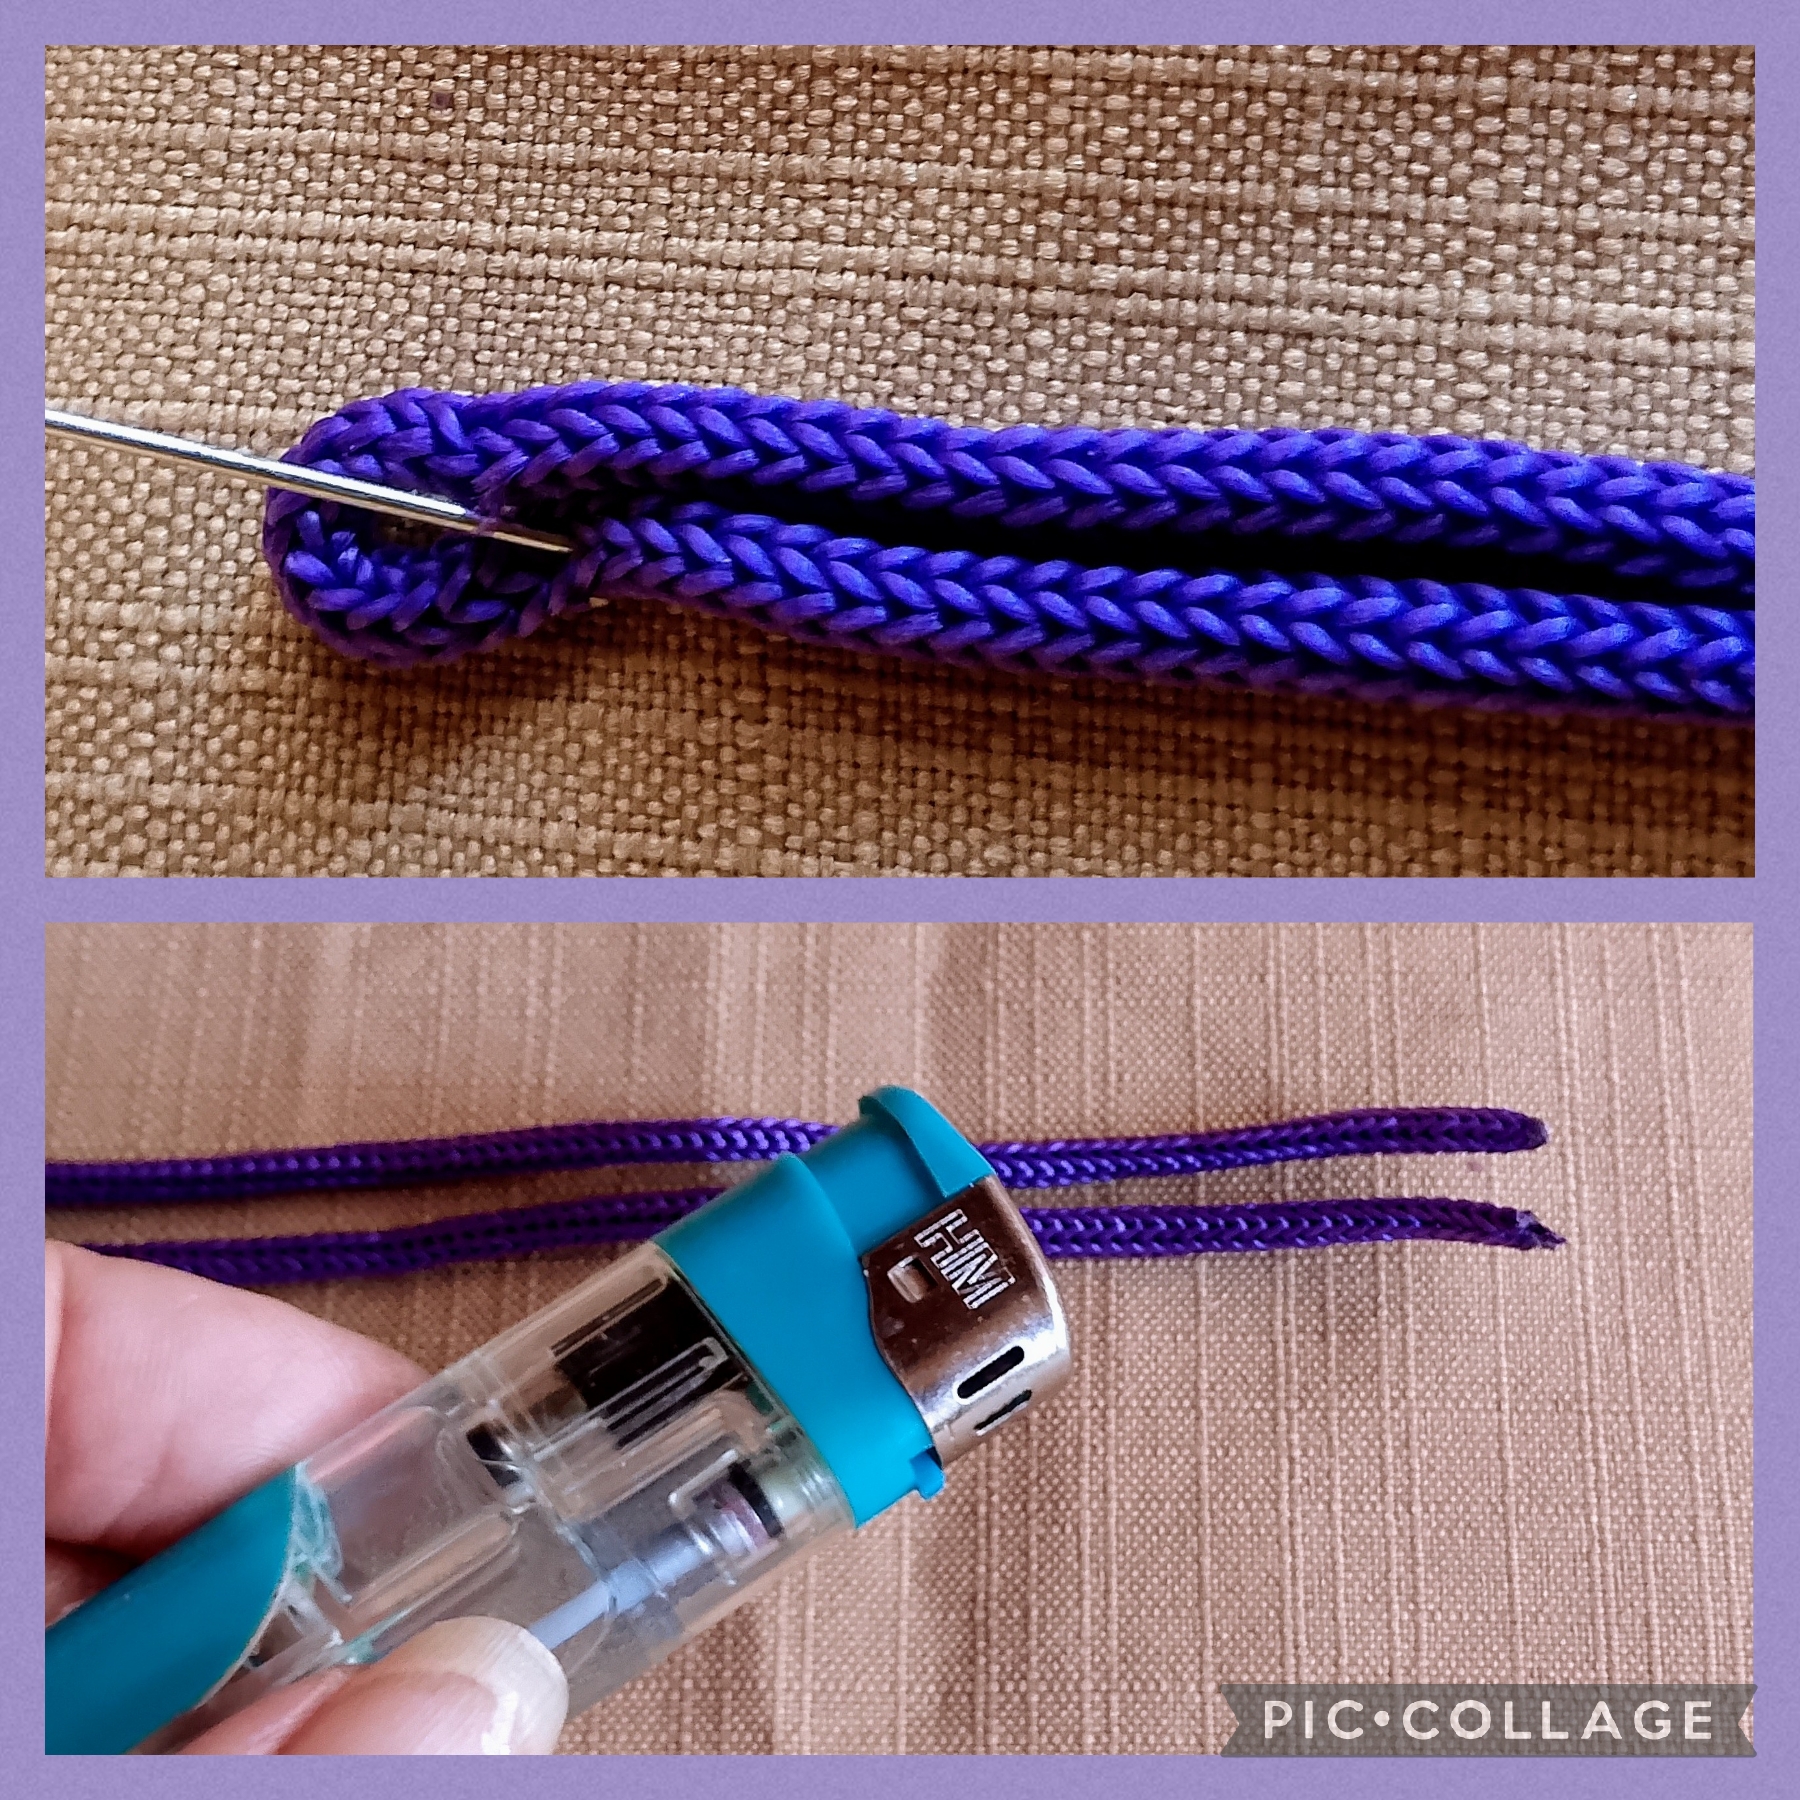
PRIMER PASO:
Voy a comenzar la elaboración de esta pulsera verificando apoyada con la regla la medida de un metro cincuenta centímetros del cordón paracord al que luego después de quemar las puntas con el encendedor doblo a la mitad para tener dos partes iguales, así:
USING THESE SIMPLE AND FEW STEPS I MADE IT.
FIRST STEP:
I'm going to start making this bracelet by checking the measurement of one meter and fifty centimeters of paracord cord supported by the ruler, which after burning the ends with the lighter I fold in half to have two equal parts, like this:
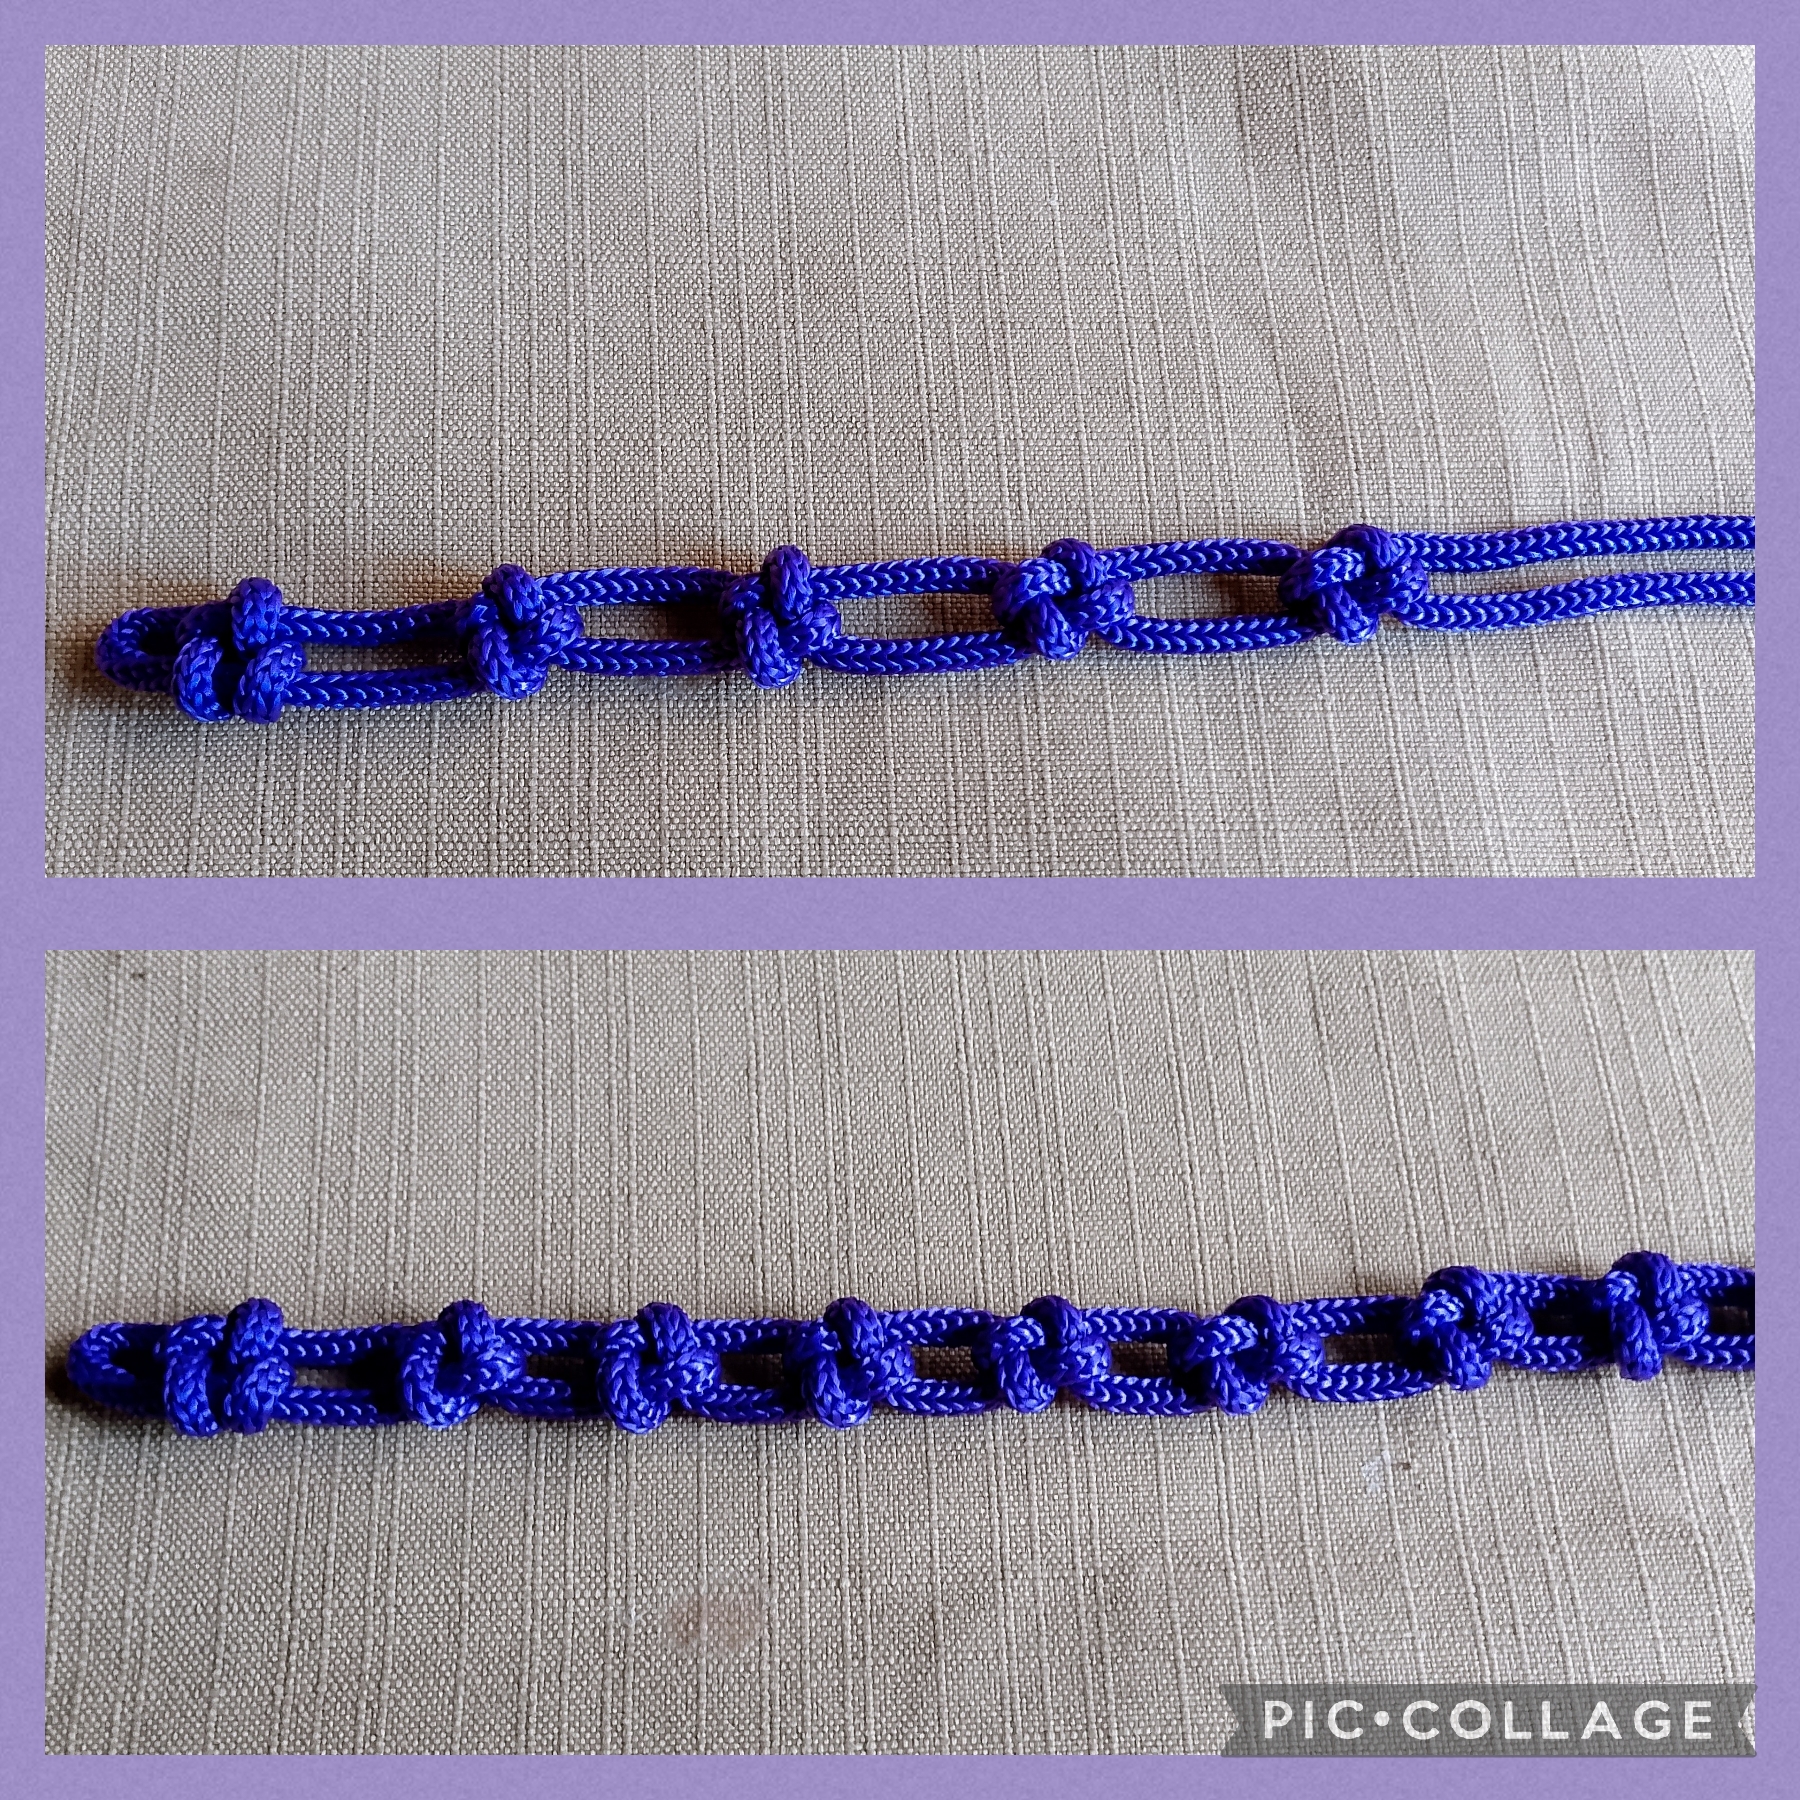
SEGUNDO PASO:
Una vez realizado el primer paso, tomo una aguja y aseguro el cordón para mostrar de una mejor manera la elaboración del Nudo, para hacer una explicación más simple voy a llamar los cordones derecho e izquierdo.
Entonces comienzo colocando el cordón del lado derecho encima del cordón del lado izquierdo y me queda una especie de orejita, ahora lo paso por debajo del cordón izquierdo y formo otra orejita como se ve, luego tomo el cordón izquierdo y por debajo lo paso por la primera orejita hacia arriba, luego lo paso por la segunda orejita hacia abajo y voy jalando para darle forma a este Nudo, así como muestro me va quedando; dejo un pequeño agujero que va a servir como terminal para luego pasar los hilos del cierre.
SECOND STEP:
Once the first step is done, I take a needle and secure the cord to better show how to make the knot. To make the explanation simpler, I will call the cords right and left.
Then I start by placing the cord on the right side on top of the cord on the left side and I get a kind of ear. Now I pass it under the left cord and form another ear as you can see. Then I take the left cord and from below I pass it through the first ear upwards, then I pass it through the second ear downwards and I pull to shape this knot. It looks just as I show; I leave a small hole that will serve as a terminal to later pass the threads of the closure.
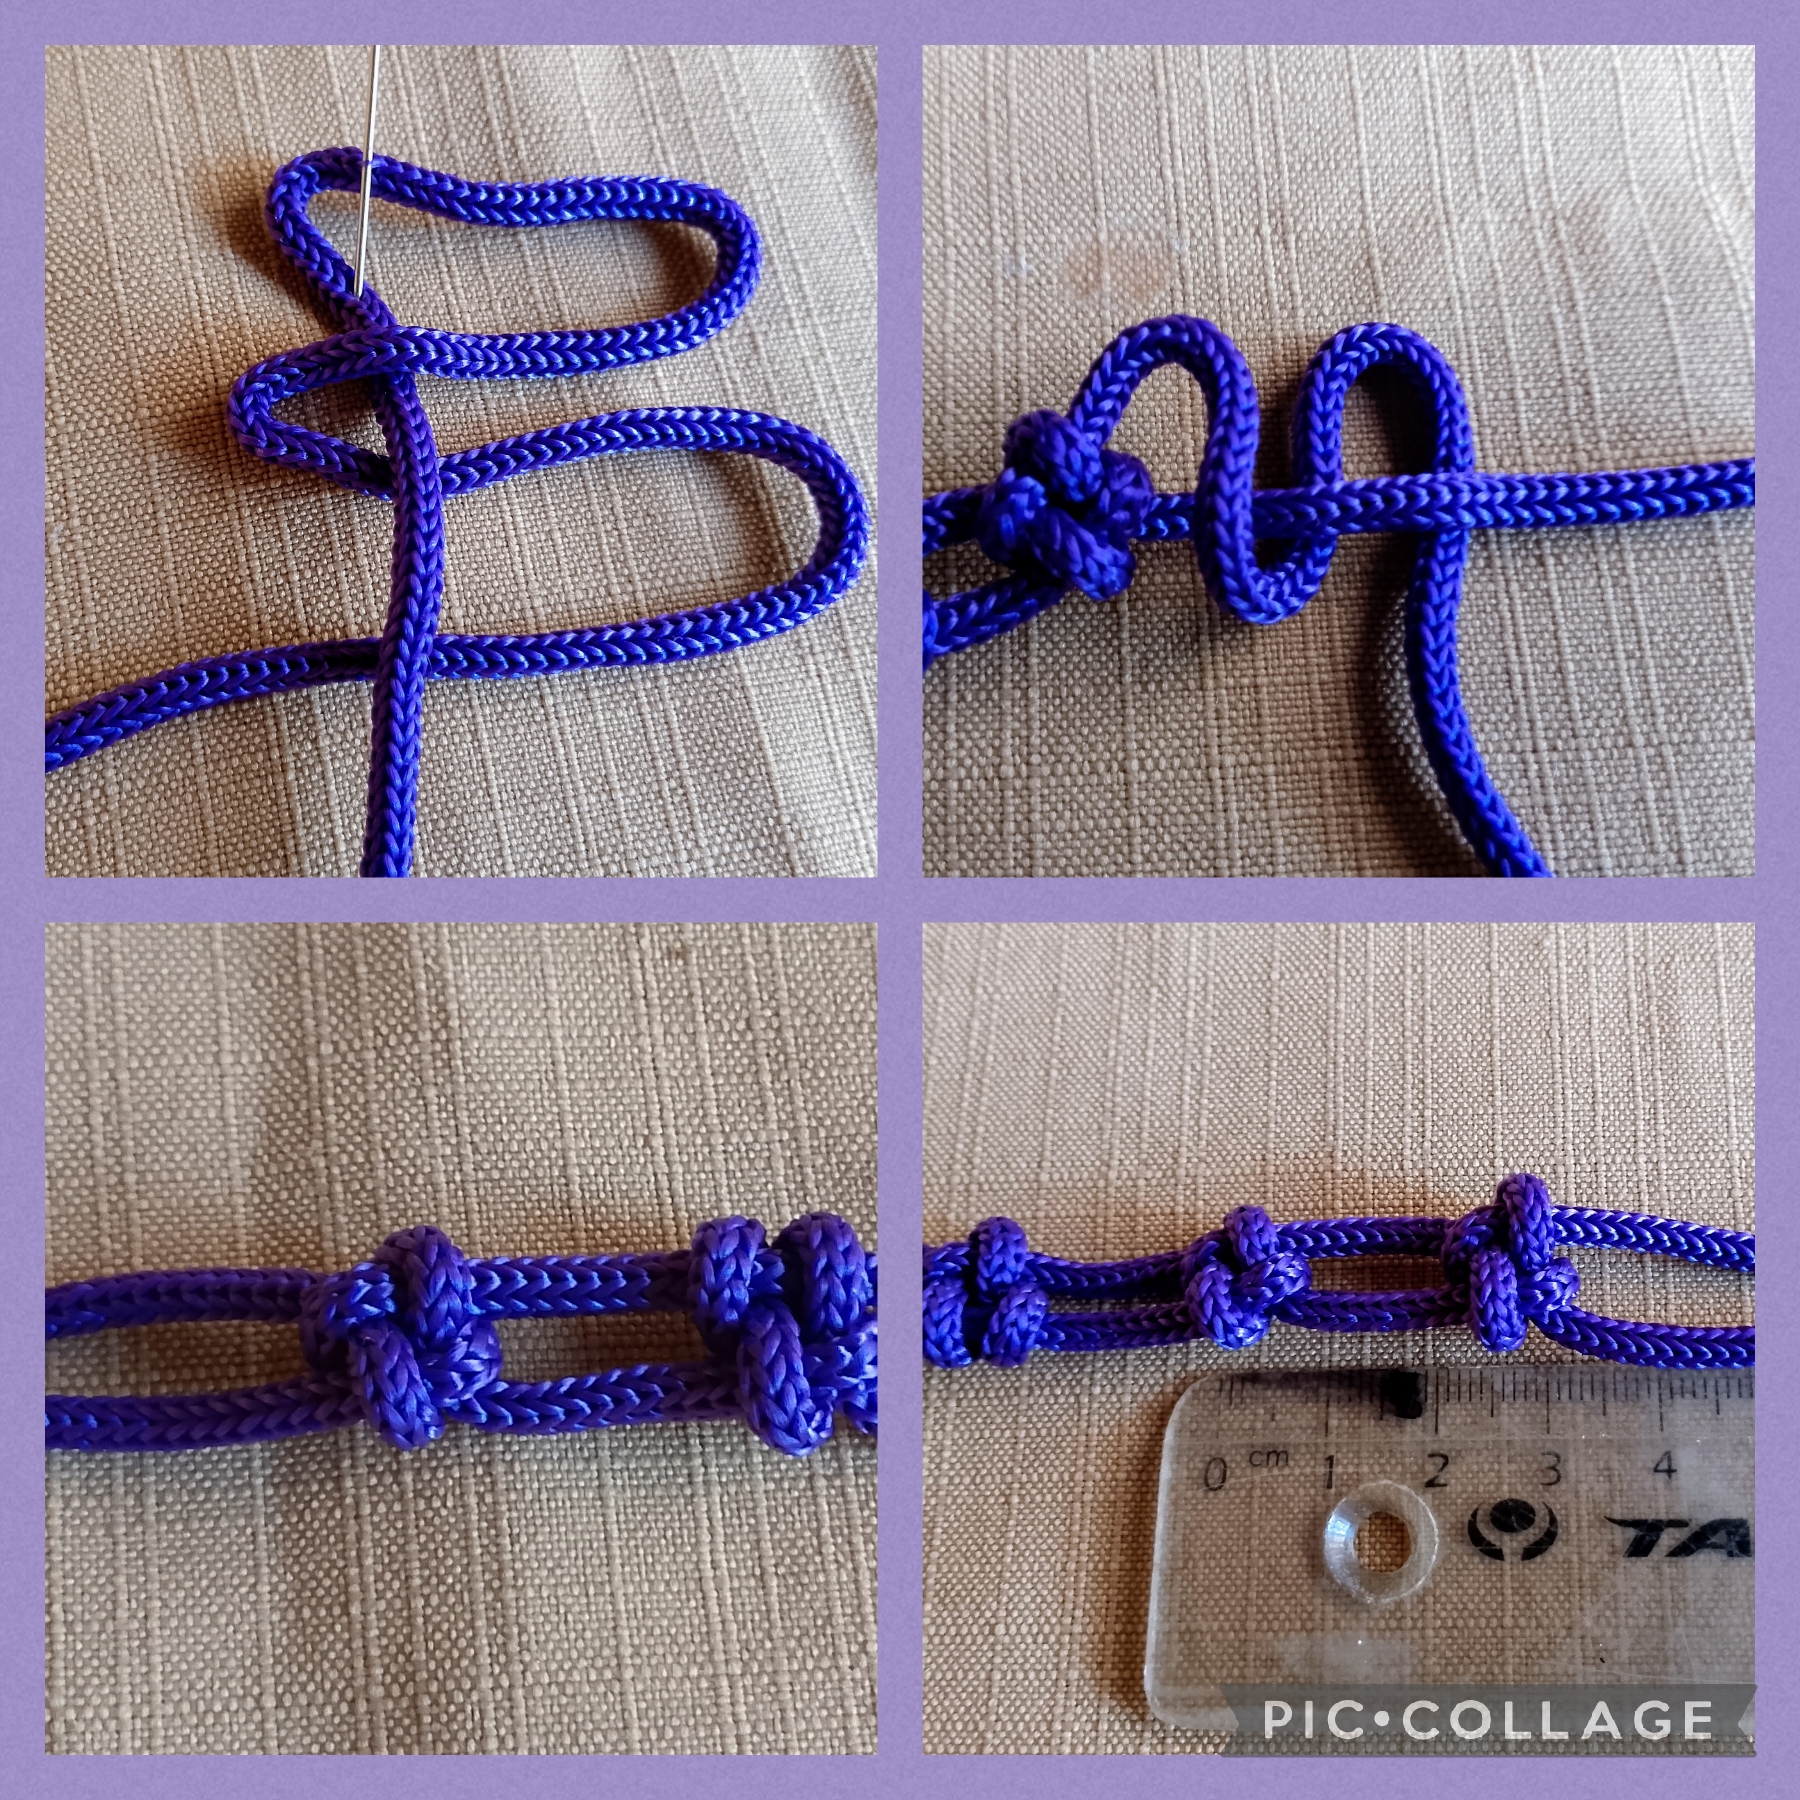
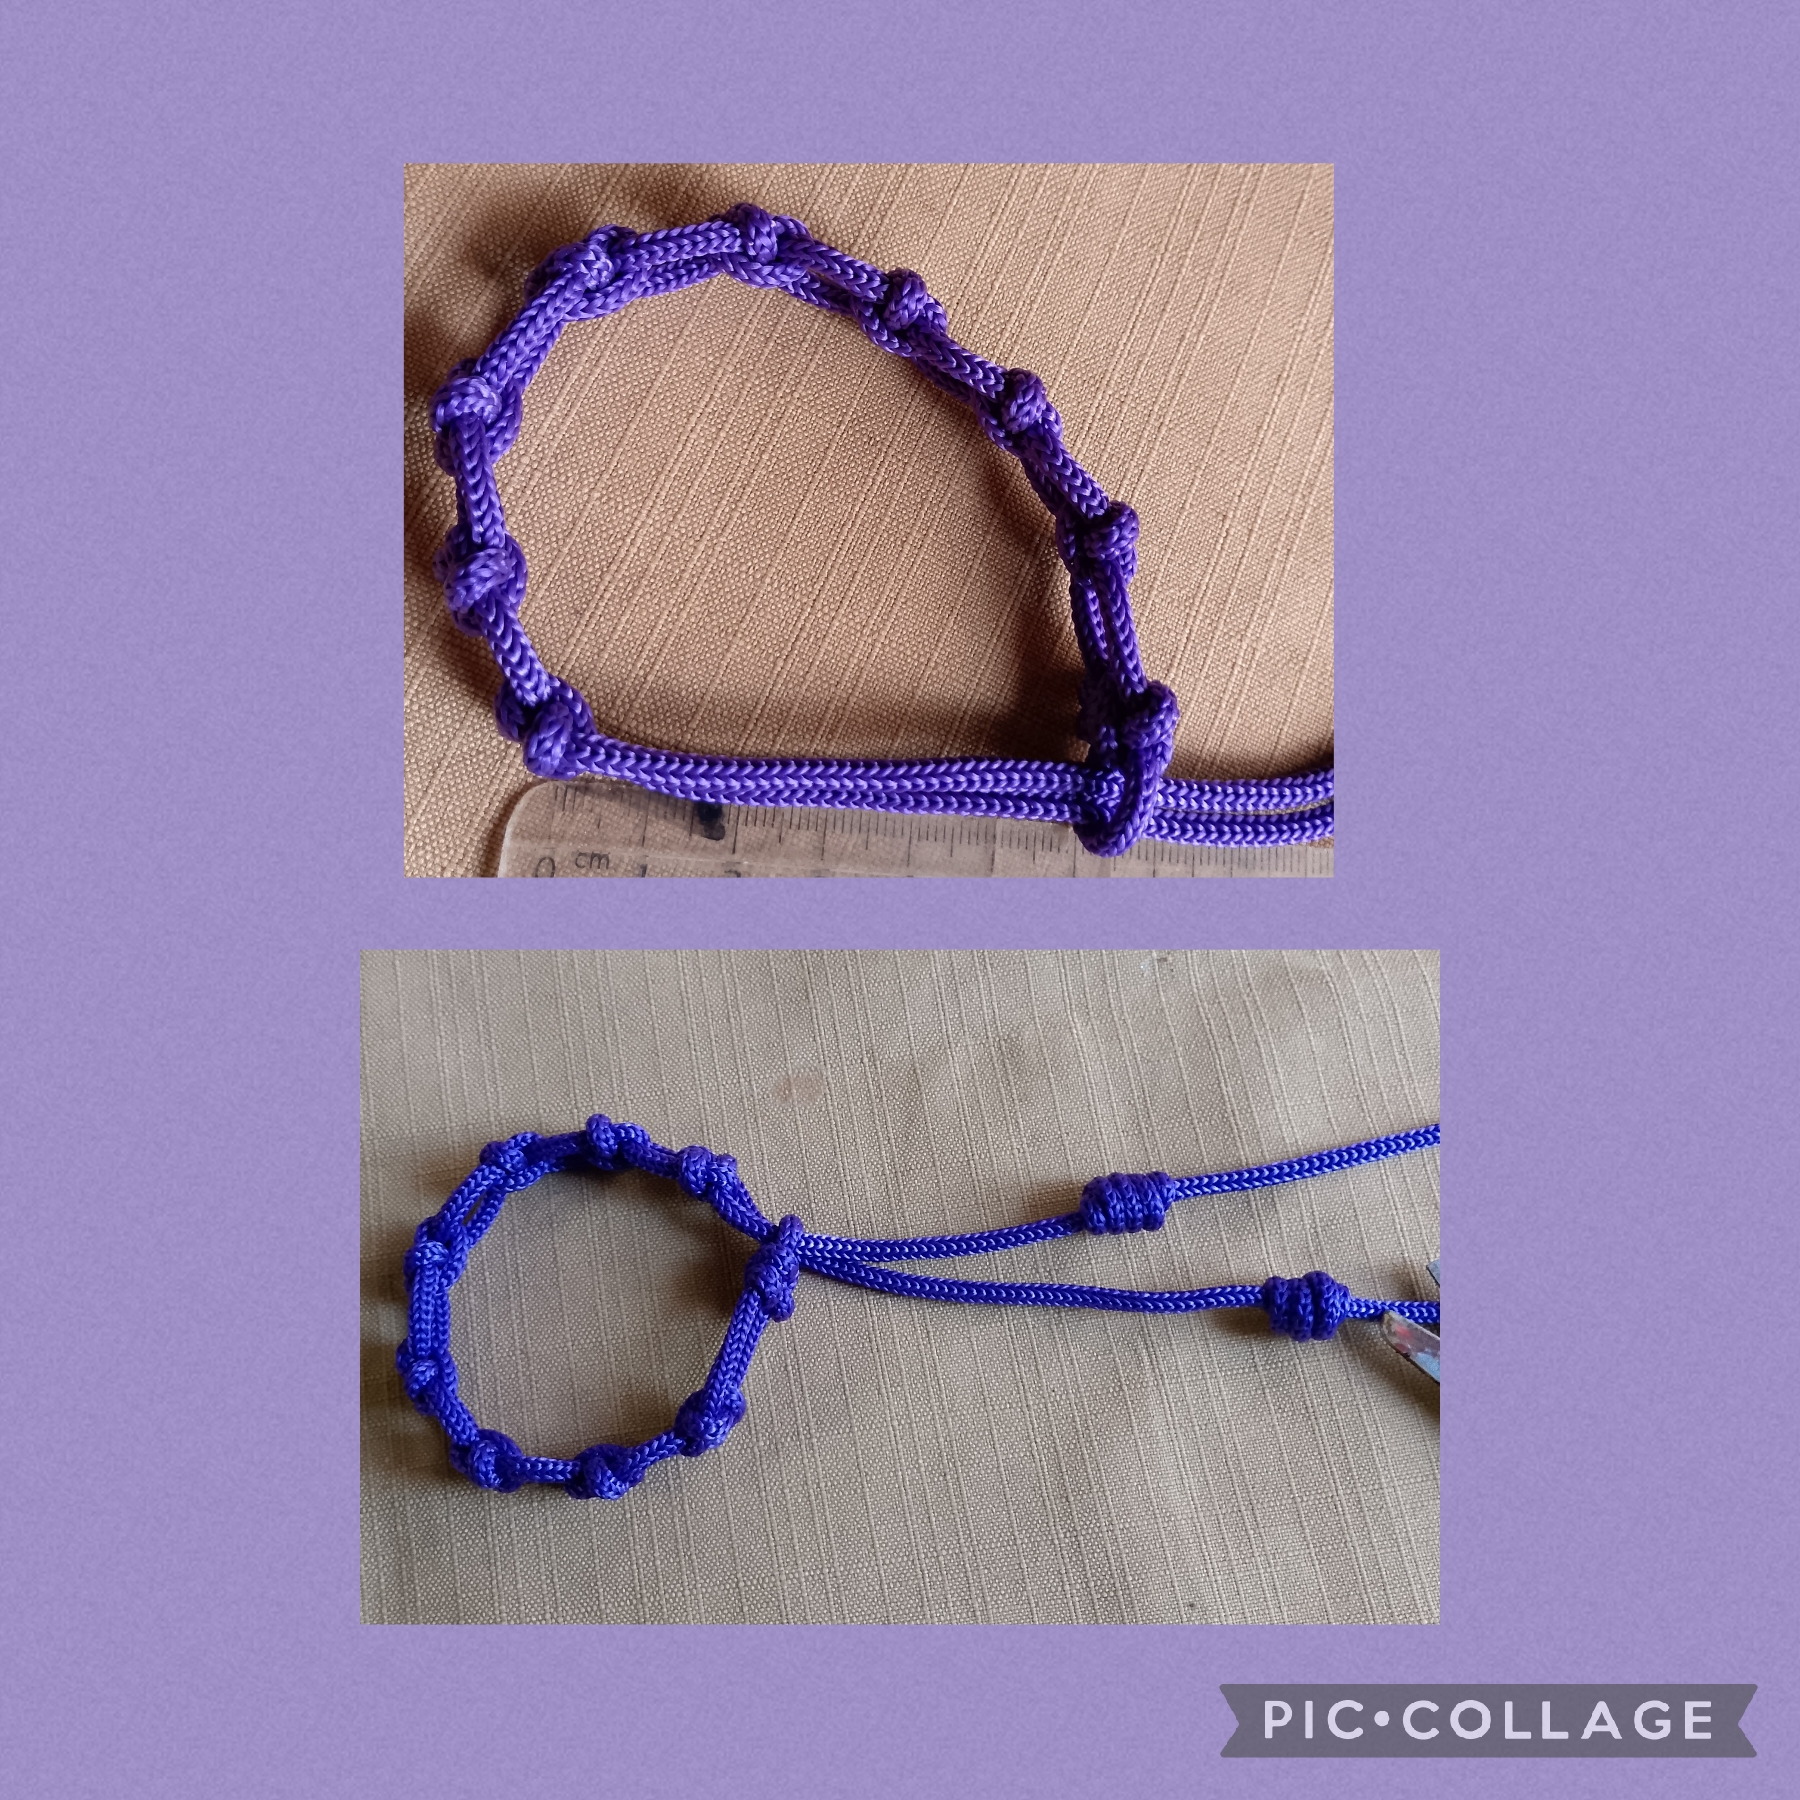
TERCER PASO:
Ahora como muestro en la imagen mido con la regla espacio de un centímetro y a esa distancia uno de otro coloco los nudos, hasta obtener el largo deseado para la Pulsera; ahora paso los cordones por el orificio que deje en el extremo donde inicie la Pulsera y que debe quedar justo para asegurar el cierre mido de nuevo con la regla diez centímetros y uso las tijeras corto los cordones y sello con el encendedor, en cada punta hago un nudo Franciscano (este Nudo ya lo he realizado en publicaciones anteriores si tienen alguna duda pueden visitar mi blog) de esta manera voy realizando la pulsera.
THIRD STEP:
Now as I show in the image I measure with the ruler a space of one centimeter and at that distance from each other I place the knots, until I obtain the desired length for the Bracelet; now I pass the cords through the hole that I left at the end where the Bracelet starts and that should be just right to ensure the closure I measure again with the ruler ten centimeters and use the scissors to cut the cords and seal with the lighter, at each end I make a Franciscan knot (I have already made this knot in previous publications if you have any questions you can visit my blog) this way I am making the bracelet.
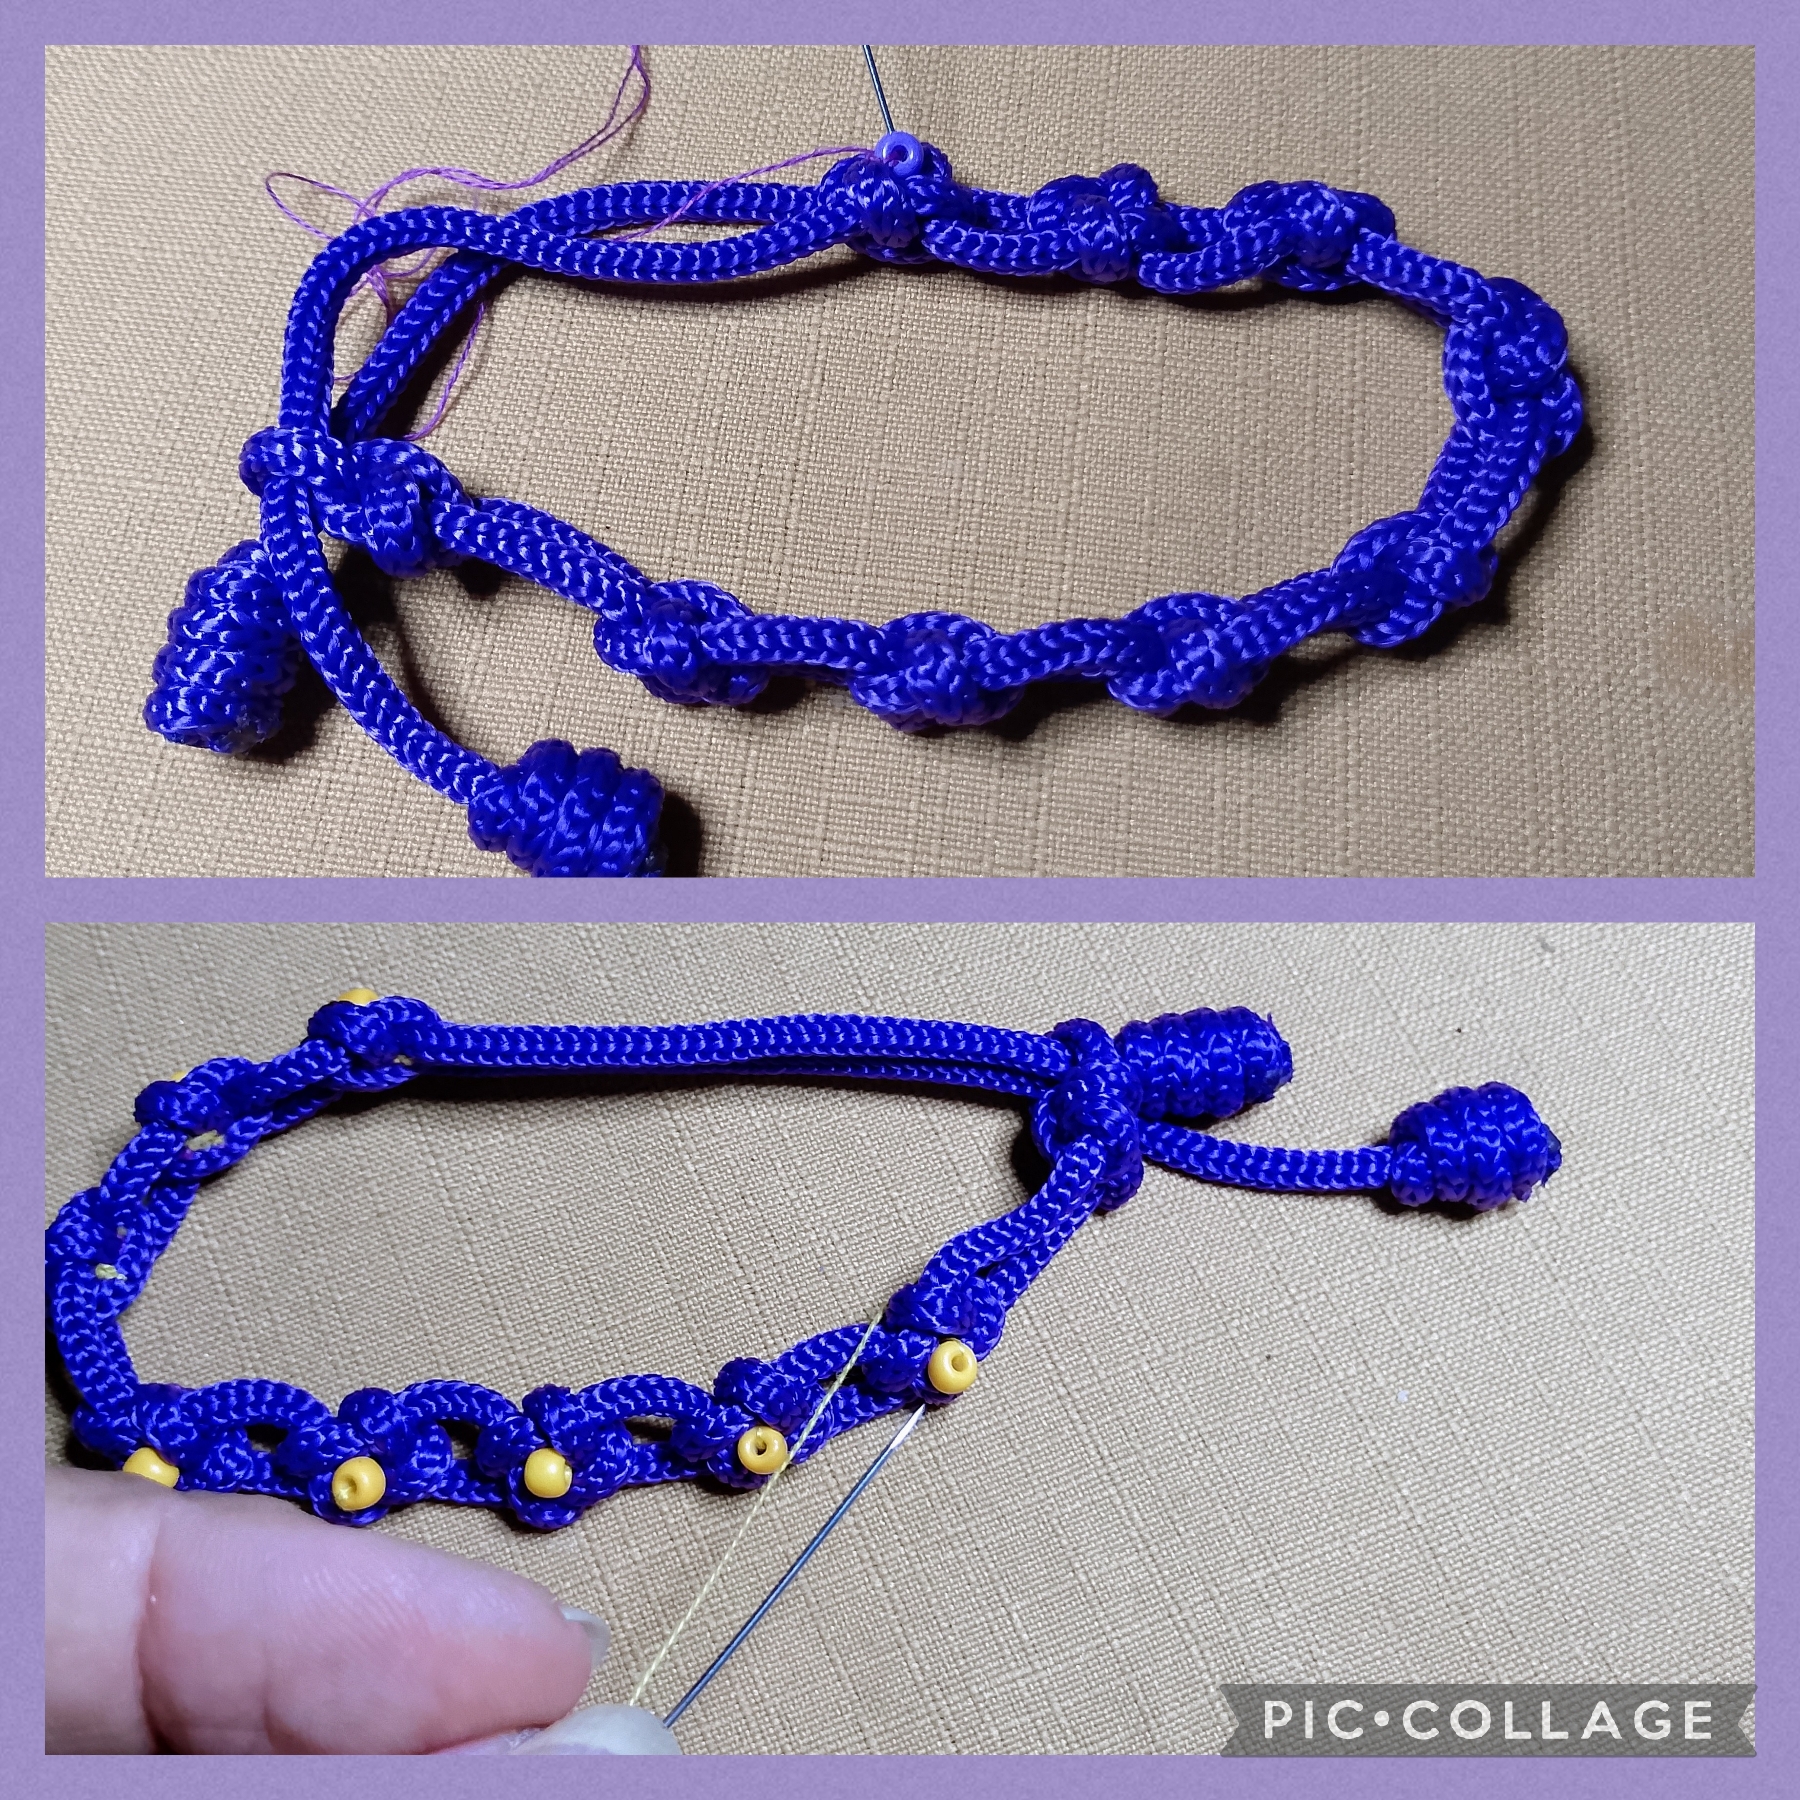
CUARTO PASO:
Una vez que realicé los nudos corte los excesos del cordón de cada lado y selle de nuevo con el encendedor. Ahora uso la aguja y el hilo y en cada centro de los nudos coloco un mostacillón amarillo usando puntadas invisibles para simular el centro de la flor como muestro.
STEP FOUR:
Once I made the knots, I cut the excess cord on each side and sealed it again with the lighter. Now I use the needle and thread and in each center of the knots I place a yellow seed bead using invisible stitches to simulate the center of the flower as shown.
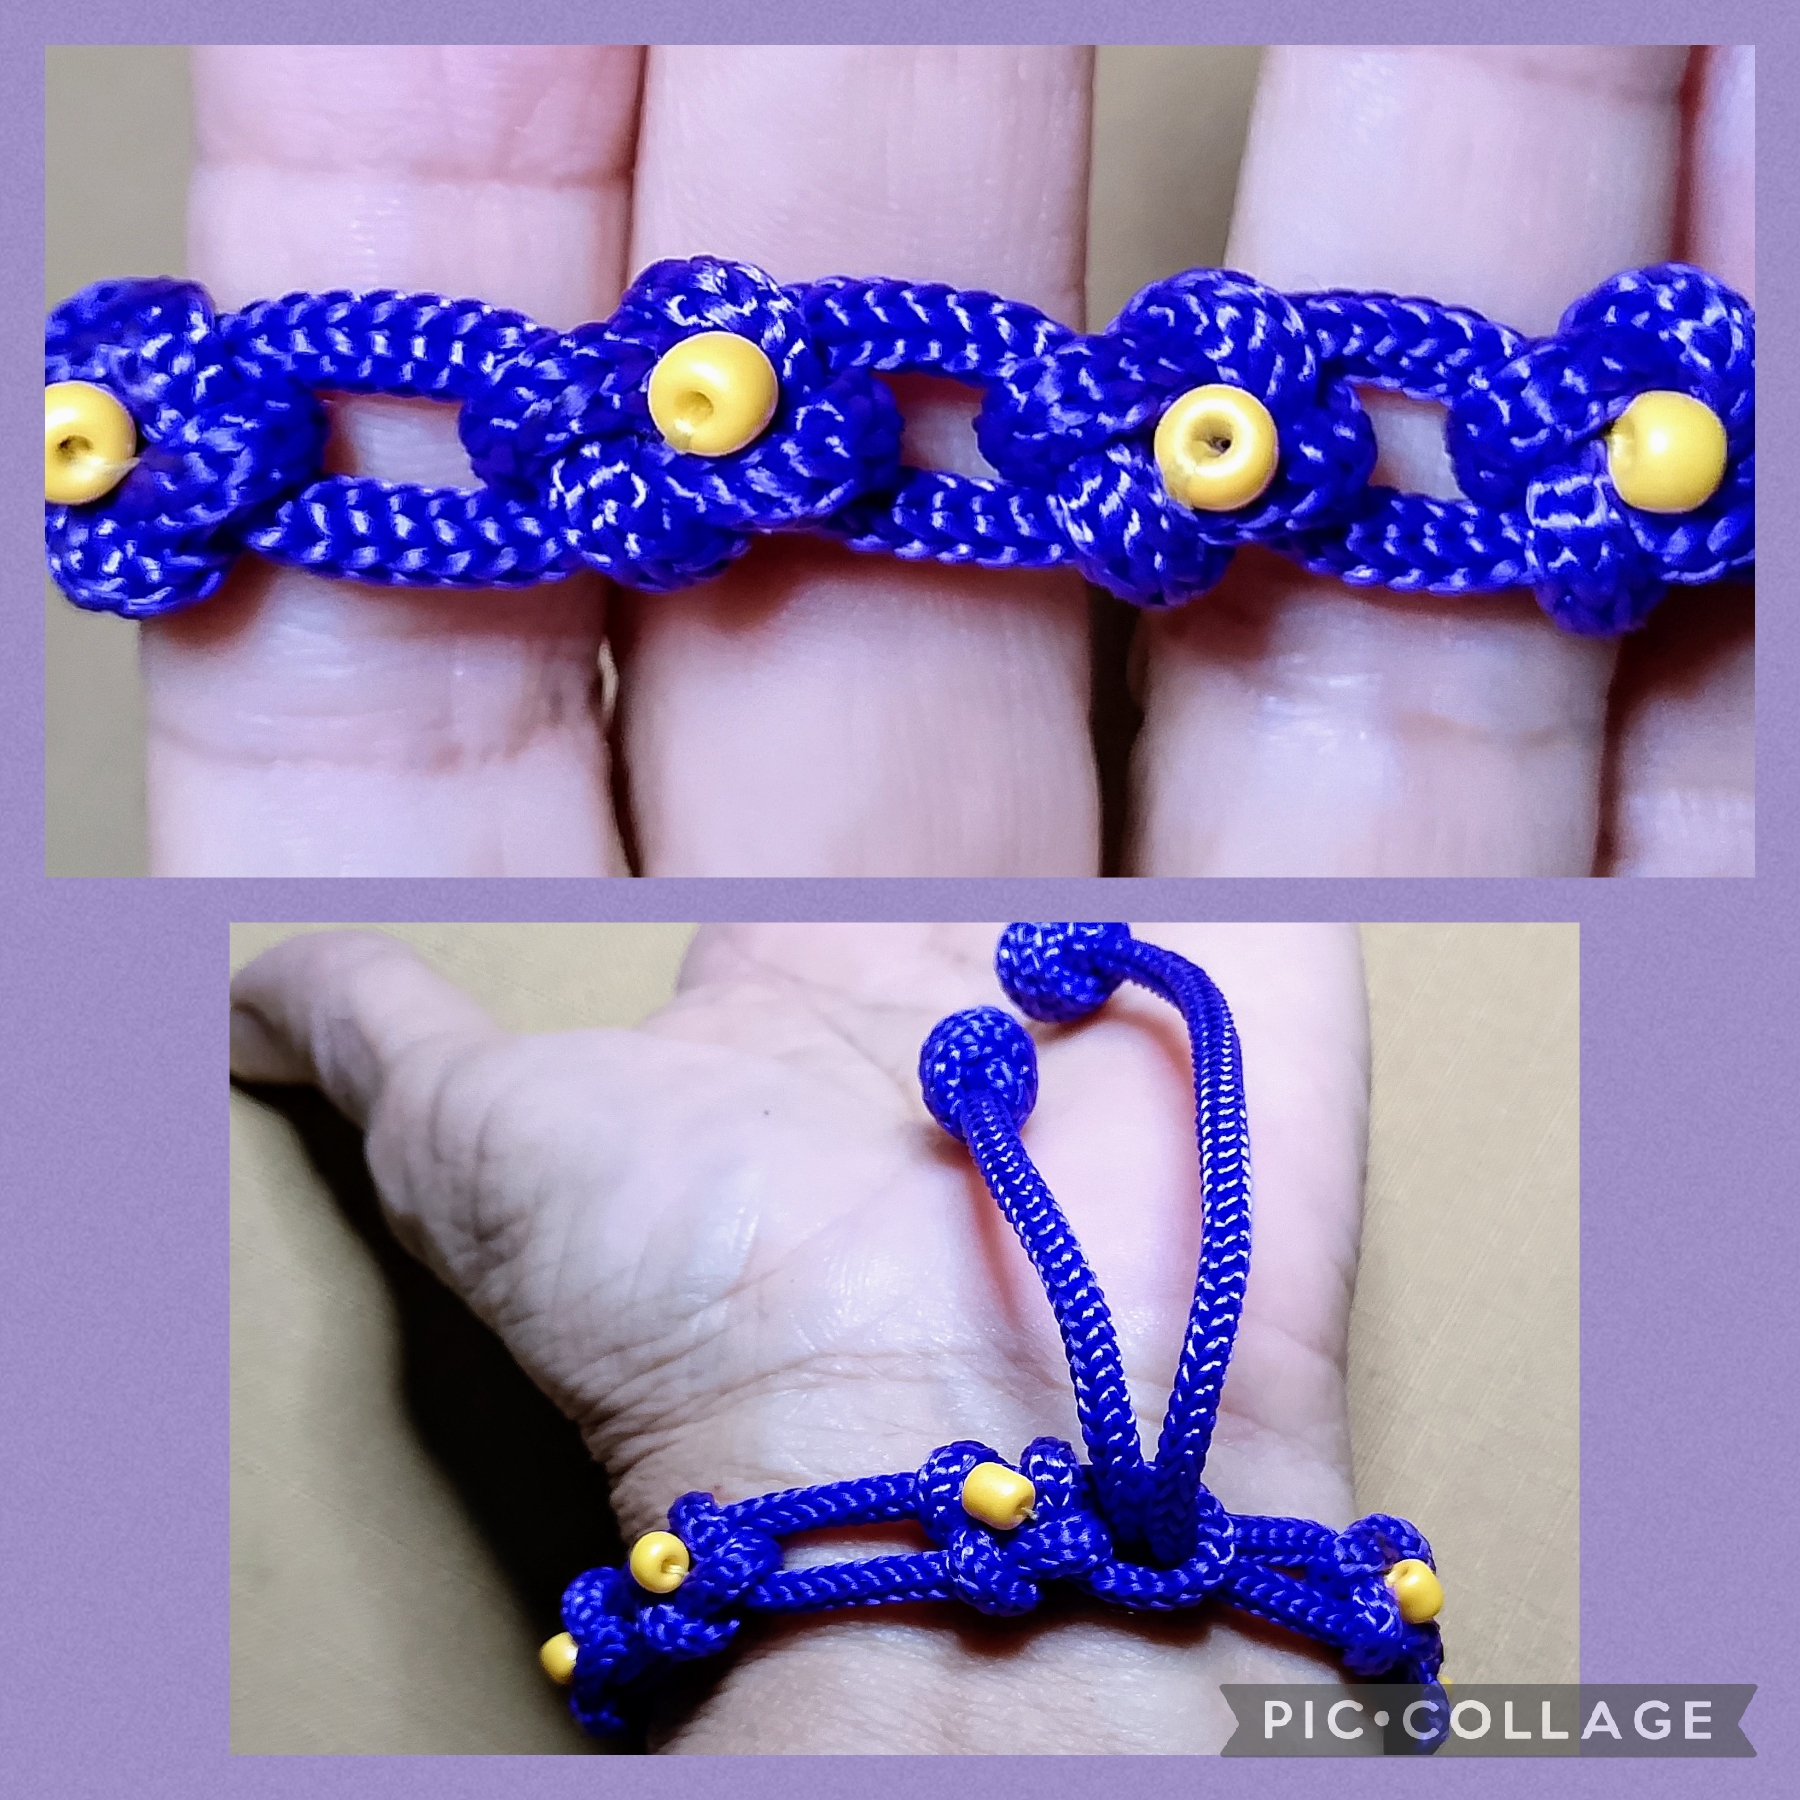
Artistas Creativos de las Manualidades y la Joyería este es el resultado final de mi tutorial del día de hoy, espero que les guste y usen está idea para sus creaciones, el Nudo Cuadrado puede usarse en pulseras de caballeros, llaveros, colgantes etcétera y además de muy bonito es poco común, como siempre agradecida con todos los que leen y ven mis publicaciones y me apoyan con sus valiosos comentarios, feliz noche, nos vemos en la próxima manualidad, bye bye.
Creative Artists of Crafts and Jewelry this is the final result of my tutorial today, I hope you like it and use this idea for your creations, the Square Knot can be used in men's bracelets, key chains, pendants etc. and in addition to being very pretty it is unusual, as always grateful to all who read and see my posts and support me with their valuable comments, happy night, see you in the next craft, bye bye.
Las imágenes y redacción de este tutorial son de mi exclusiva propiedad las fotos fueron tomadas con mi teléfono celular Tecno Spark Go 20 y las edite con una aplicación gratis del mismo.
Para traducir texto use Google traductor.
The images and writing of this tutorial are my exclusive property. The photos were taken with my Tecno Spark Go 20 cell phone and I edited them with a free application of the same.
To translate text use Google Translate.
This is a decent and nice looking bracelet and a good design as well. Blue color is looking vibrant
Thanks You.
Hola amiga 👋🏽
Está muy bonito ese cordón y el color me encanta. Es un tipo de pulsera muy bonita.
Gracias por compartir 😃
Agradezco tu comentario amiga, me contenta que te guste a mi los tejidos con nudos macrame me maravilla, saluditos 🤗
simple but interesting
Thanks 🤗