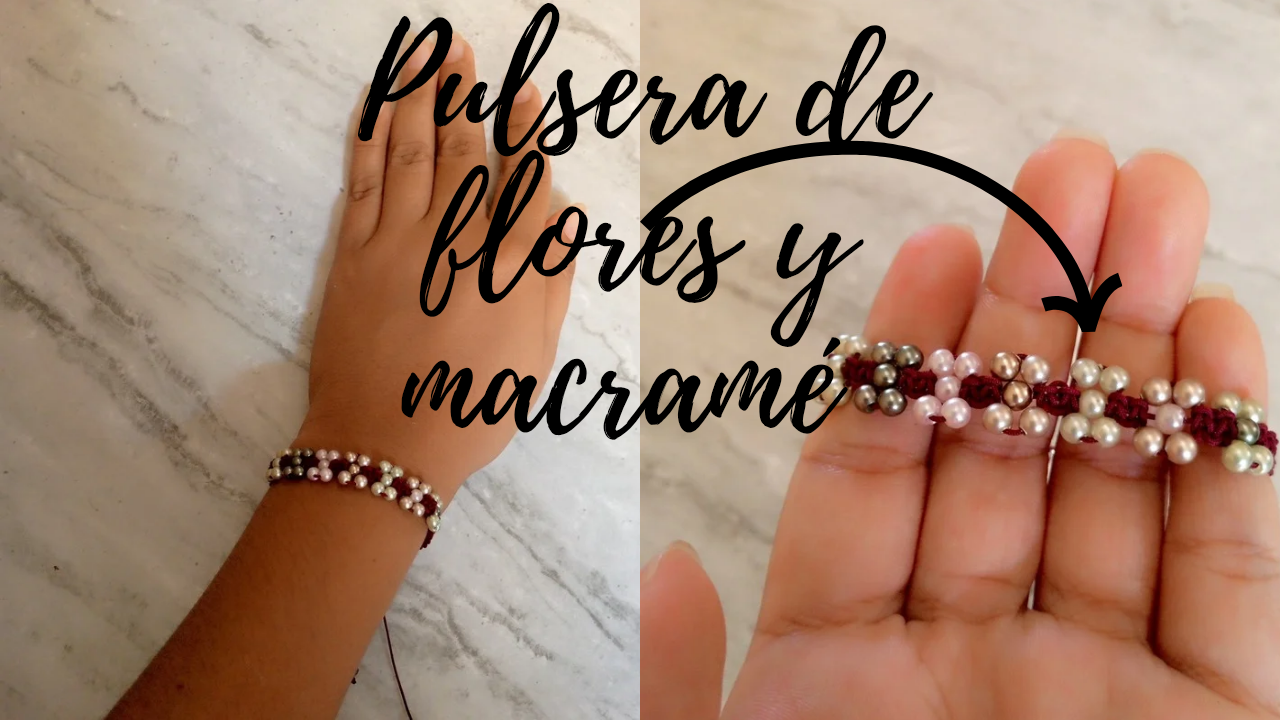
Hello everyone! It is an immense pleasure to greet this wonderful jewelry community on such a special day. Today I am excited to be here to share with you something unique, full of creativity and, above all, made with a lot of love. I present to you, for the first time in this space, the creation of a macramé bracelet with flowers made of beads. This piece is the result of hours of dedication, patience and love for manual art. It combines the elegance of macrame with the delicate charm of flowers, creating an accessory that is not only beautiful, but also full of meaning and style.
Macramé is an ancient technique that allows you to weave threads in an artisanal way, and on this occasion, I have decided to give it a special touch by incorporating flowers made with beads. Each flower is unique, carefully designed to add a touch of color and sophistication to the bracelet. The beads used have been carefully selected to ensure that every detail shines and highlights the beauty of the piece. This project is not only an expression of art, but also an opportunity to connect with nature and creativity. Each knot and each bead is designed to transmit positive energy and beauty. Furthermore, the creation process is a relaxing and rewarding experience, allowing you to disconnect from daily stress and immerse yourself in a world of colors and textures.

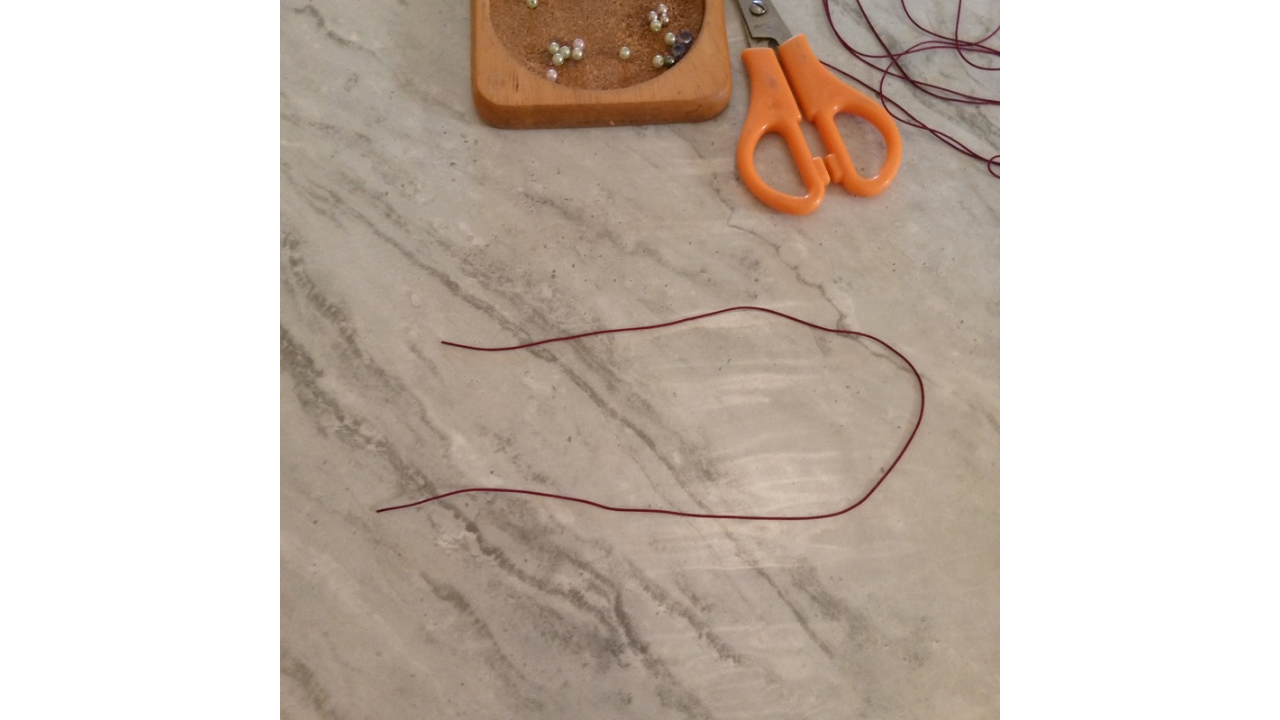
(Materiales🌹:)||(Materials🌹:)
- Hilo chino de color vinotinto
- Cuentas(en mi caso elegí colores metalizado como: plateado,verde y rosado)
- Un cristal transparente
- 2 cristales morados
- Tijeras
- Encendedor
- Chinese burgundy thread
- Beads (in my case I chose metallic colors such as: silver, green and pink)
- A transparent glass
- 2 purple crystals
- Scissors
- Lighter
(Procedimiento:)||(Procedure:)
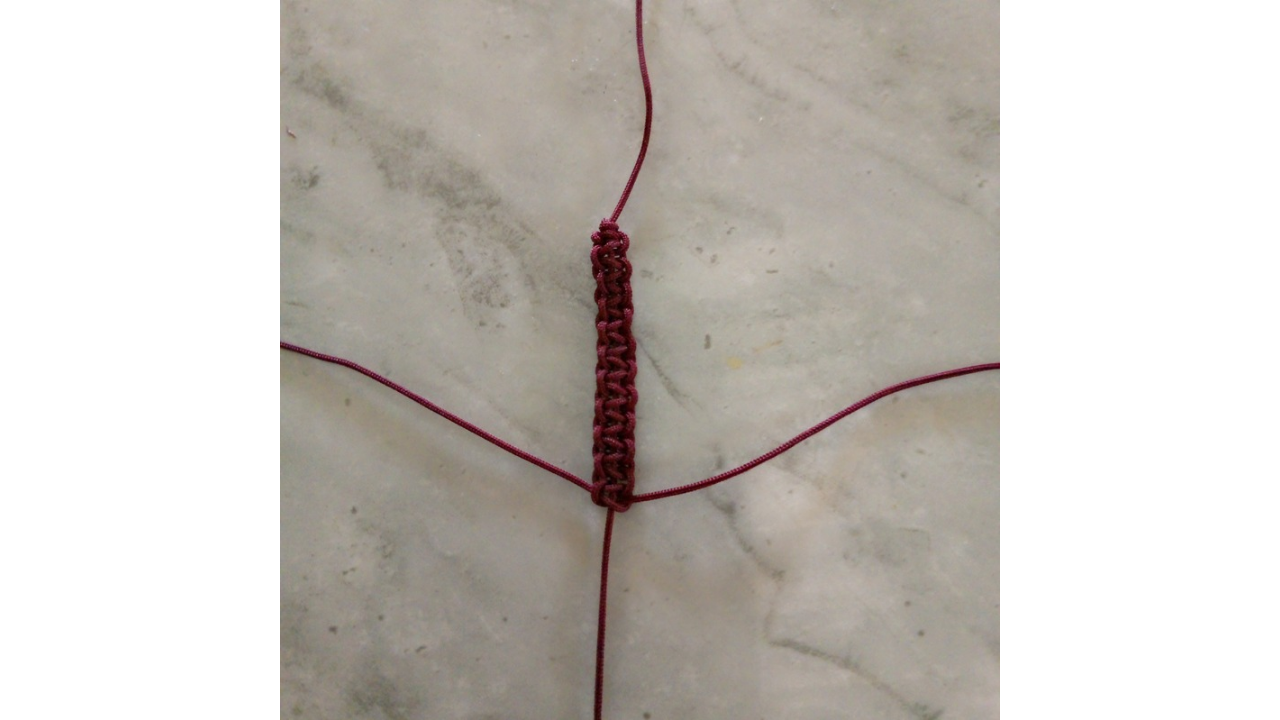
Paso nro 1
Paso nro 1
First, I prepared the materials. I cut two threads of the same length, one to be the guide thread (the one that is straight 16 centimeters) and the other to be the working thread (the one I use to tie the knots 1.20 meters). Then, I placed the threads on my work surface. I held the guide wire horizontally, securing it with some tape so it wouldn't move. I placed the working thread under the guide thread, forming an inverted "U". To tie the first knot, I took the right end of the working thread and passed it over the guide thread. Then I brought it under the left end and gently squeezed. This is how the first knot looked! For the second knot, I did the same thing but in reverse: I took the left end of the working thread, passed it over the guide thread and then brought it under the right end. I pressed again, and that's it! This is how I completed the flat knot. I repeated this process several times, alternating which side the thread passed through.
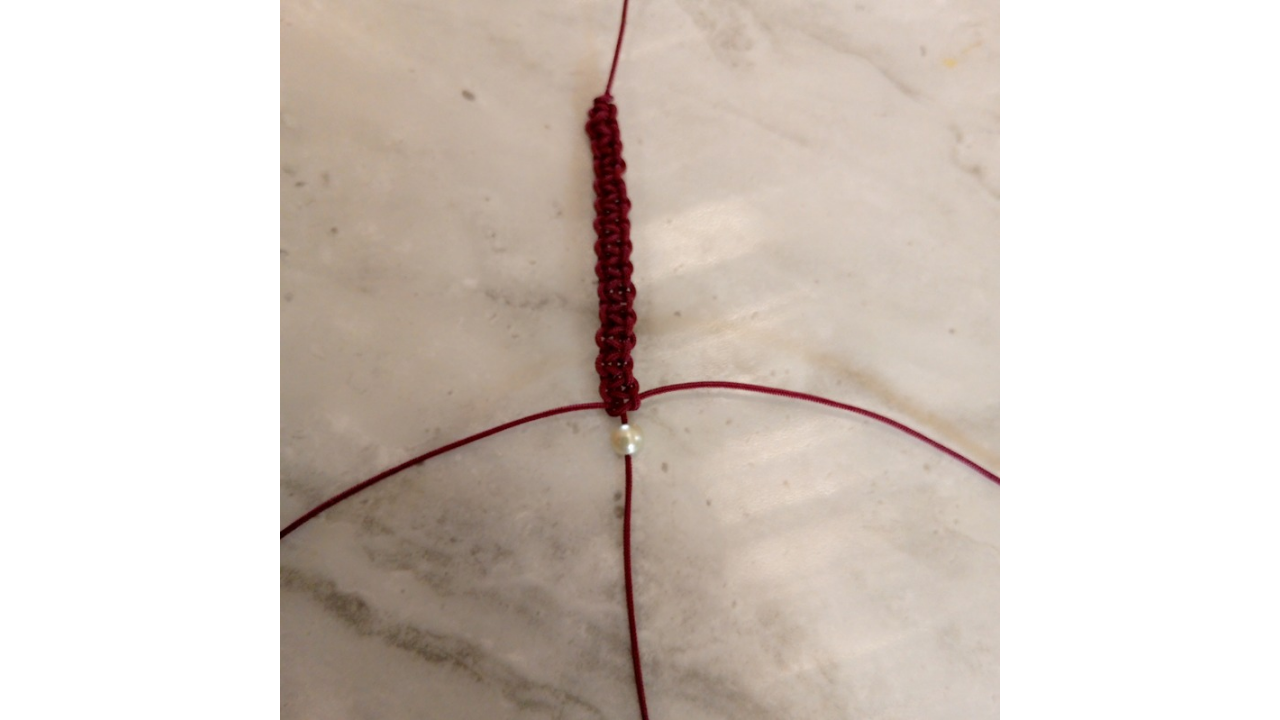
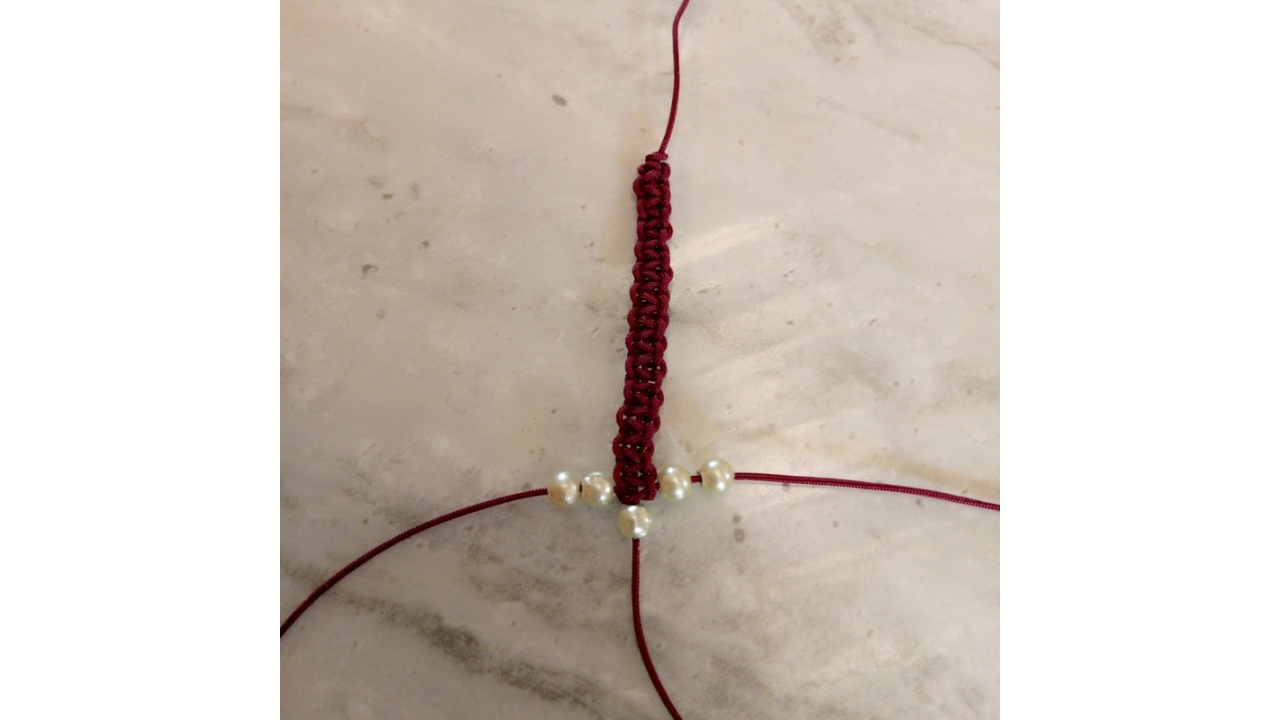
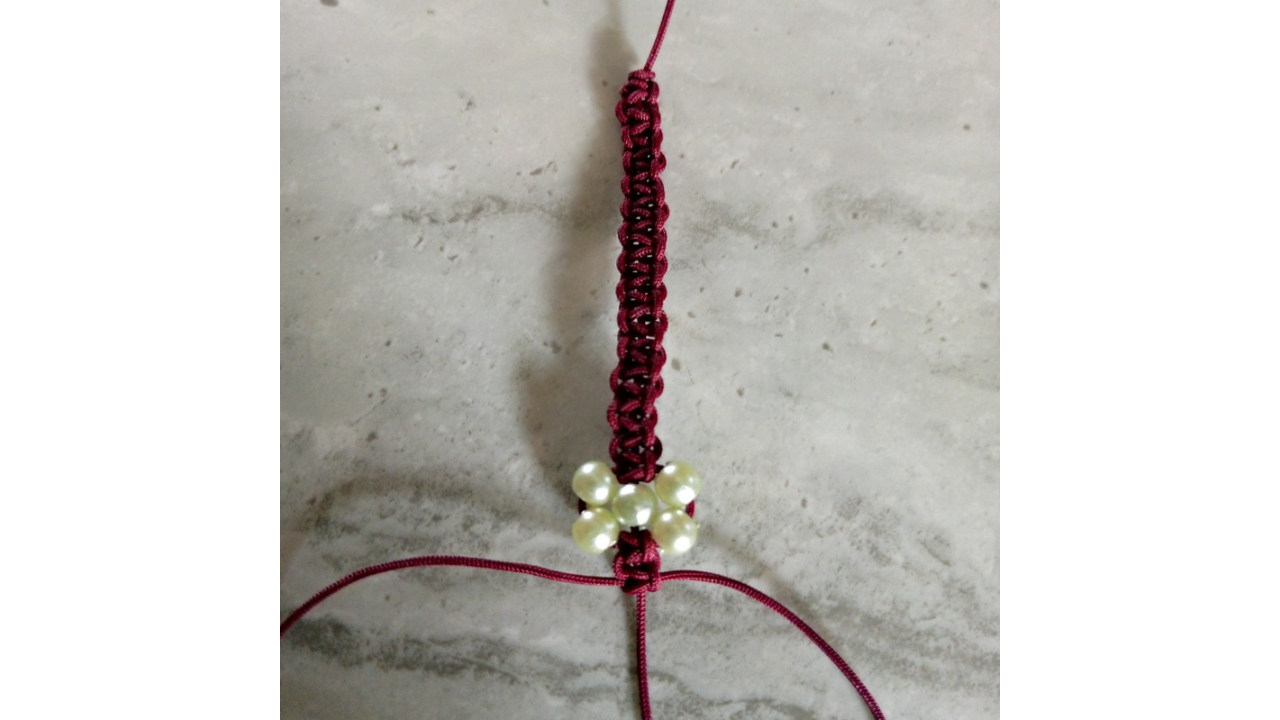
Paso nro 2
Paso nro 2
I selected the beads I would use for each flower. I chose different colors for each one, as I wanted each flower to be unique and full of life. Since I was working with the two threads and the main thread, I didn't need to cut additional thread. I used the same threads that I already had for the bracelet. For each flower, I used two beads on each side and one bead in the center, and placed them on each thread. To secure the flower, I gently adjusted the threads so that the beads were firm and in place.
Paso nro 3
Paso nro 3
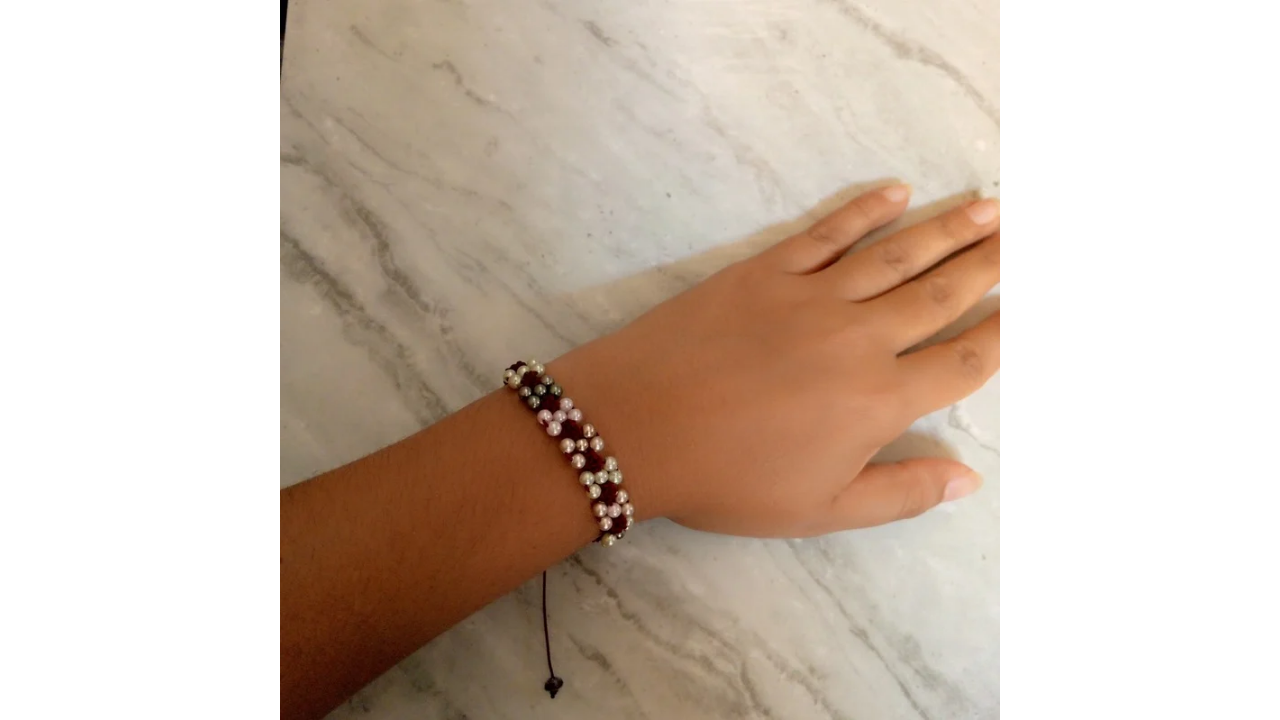
Once the flowers were ready, I carefully attached them along the bracelet. I made sure they were securely fastened and in the position I wanted. I distributed the flowers evenly, leaving space between them so that it didn't look overcrowded.
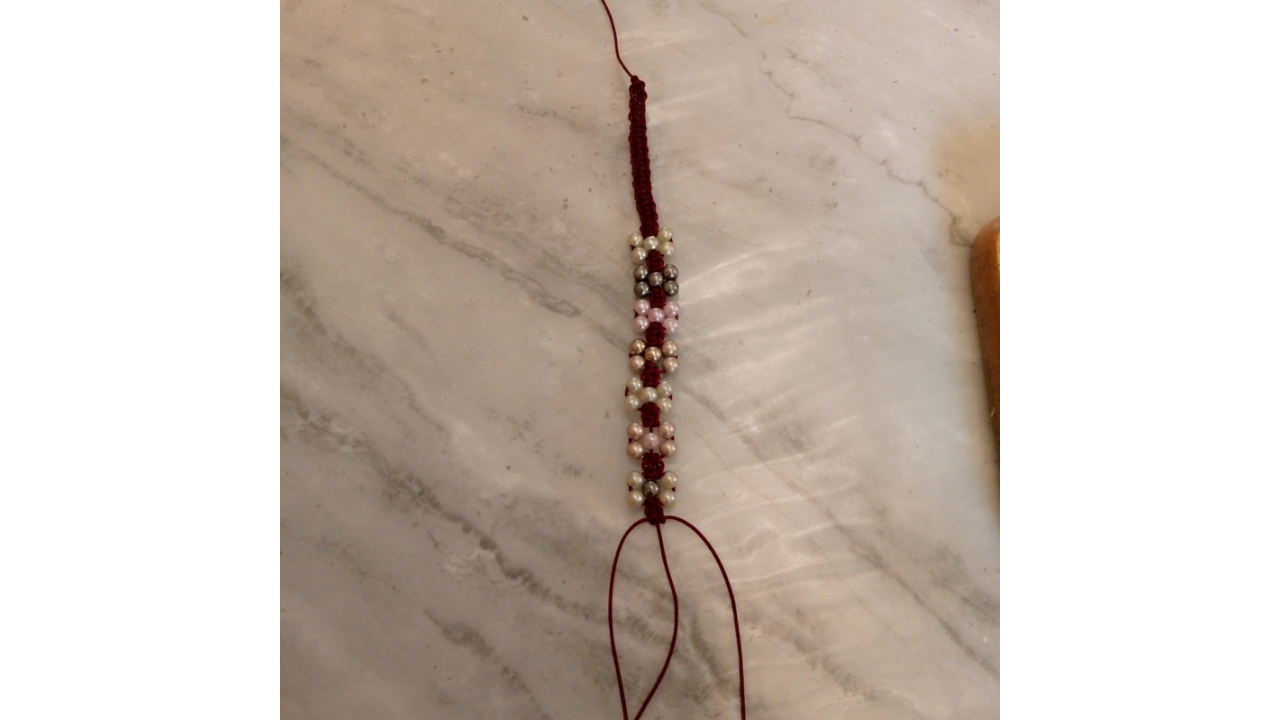
Paso nro 4
Paso nro 4
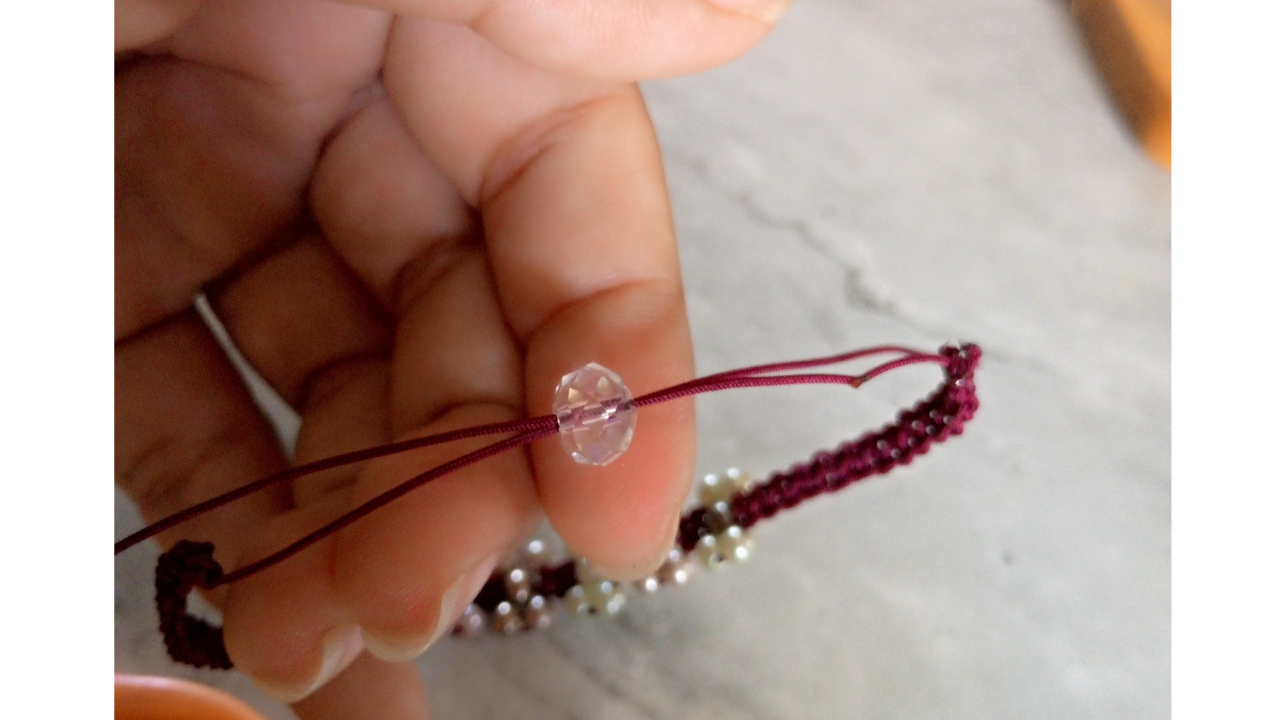
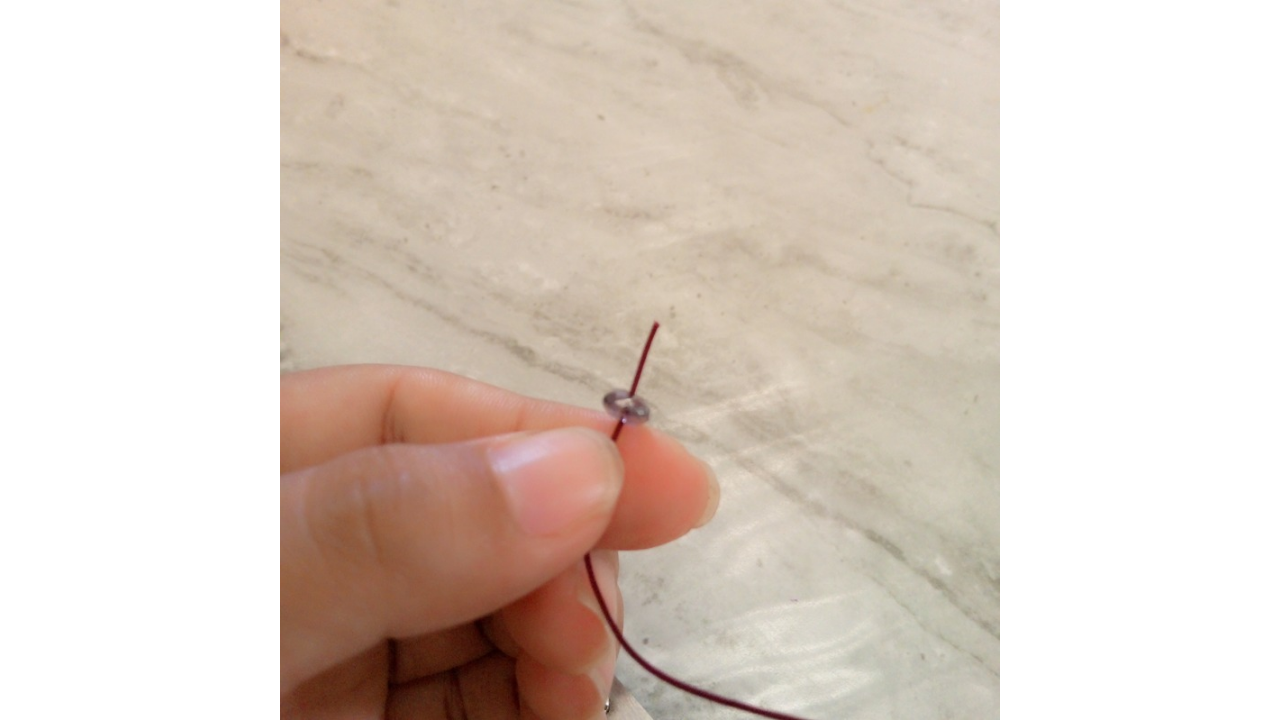
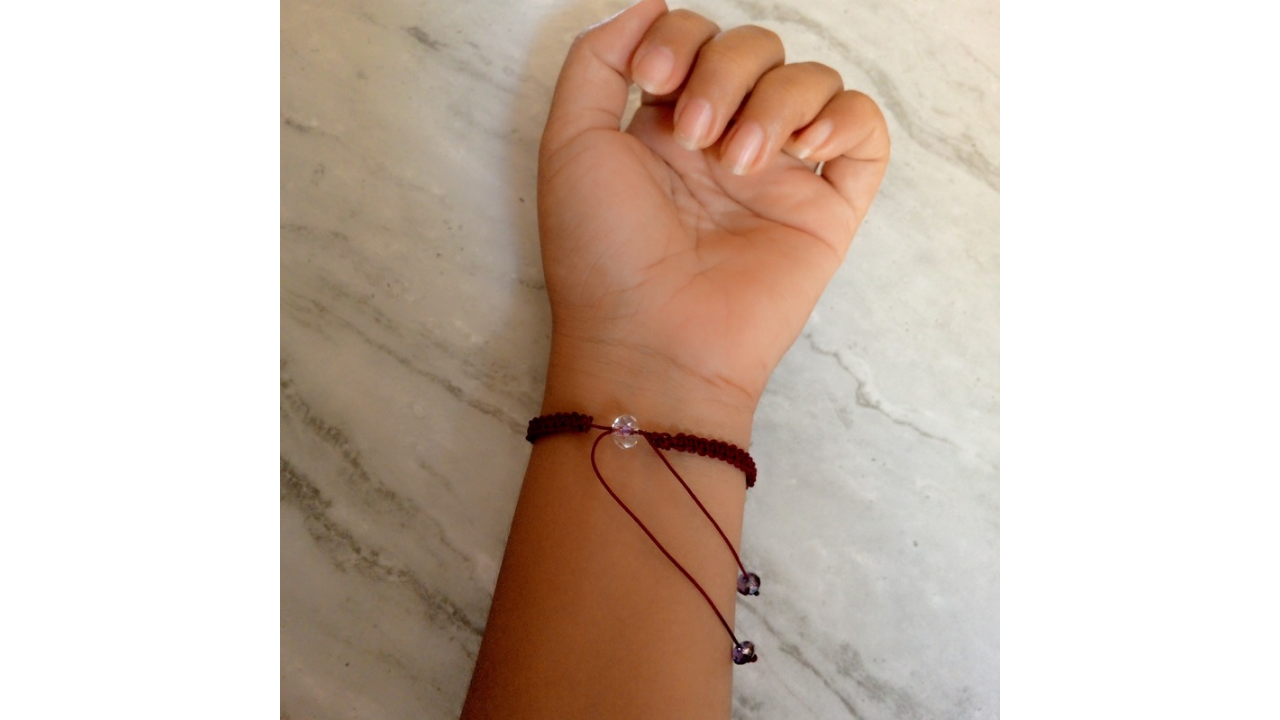
After making the 7 flowers, I continued weaving the base of the bracelet until it reached the perfect length for my wrist. Instead of using an adjustable knot, I decided to give it a more special and elegant touch with crystals. I chose a medium-sized transparent crystal, which would be the center of attention on the closure of the bracelet, I took the excess threads from the bracelet and carefully passed them through the hole of the medium crystal. I made sure it was centered and the threads were firm, but not too tight. For an extra touch of decoration, I placed a small crystal on each side of the excess thread. These crystals not only served as a decorative detail, but also helped balance the design of the bracelet.
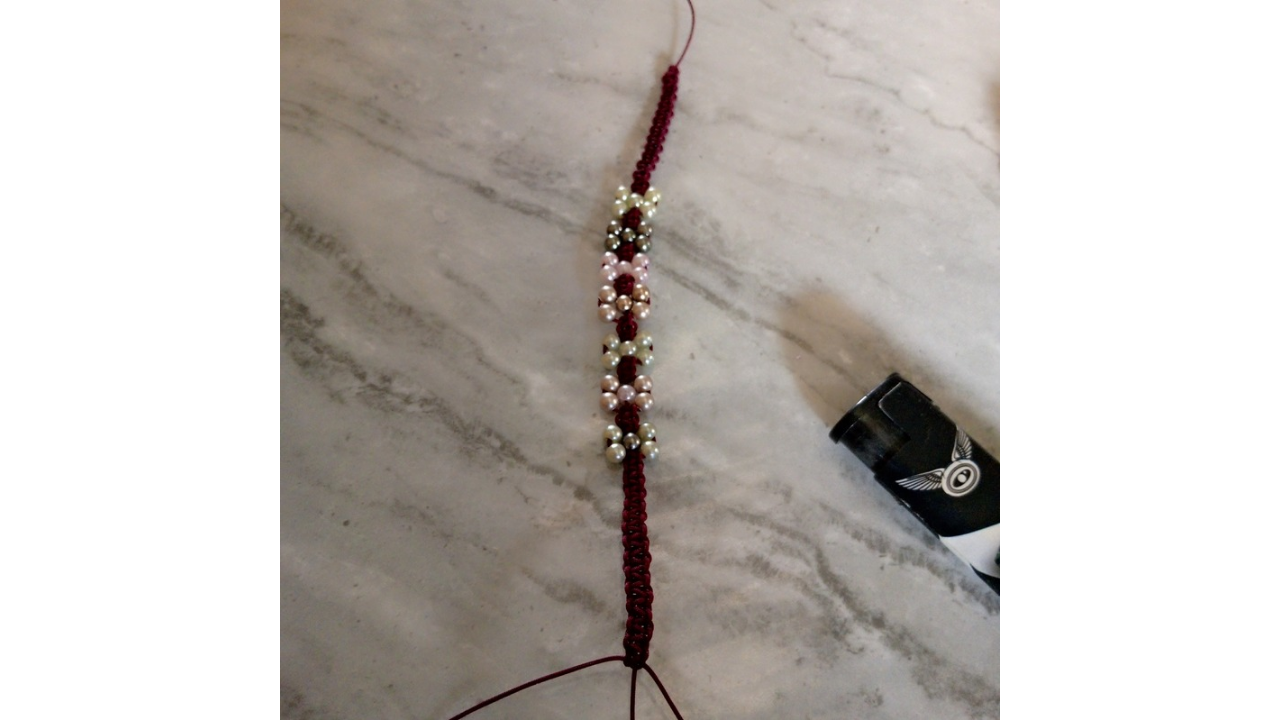
Paso nro 5
Paso nro 5
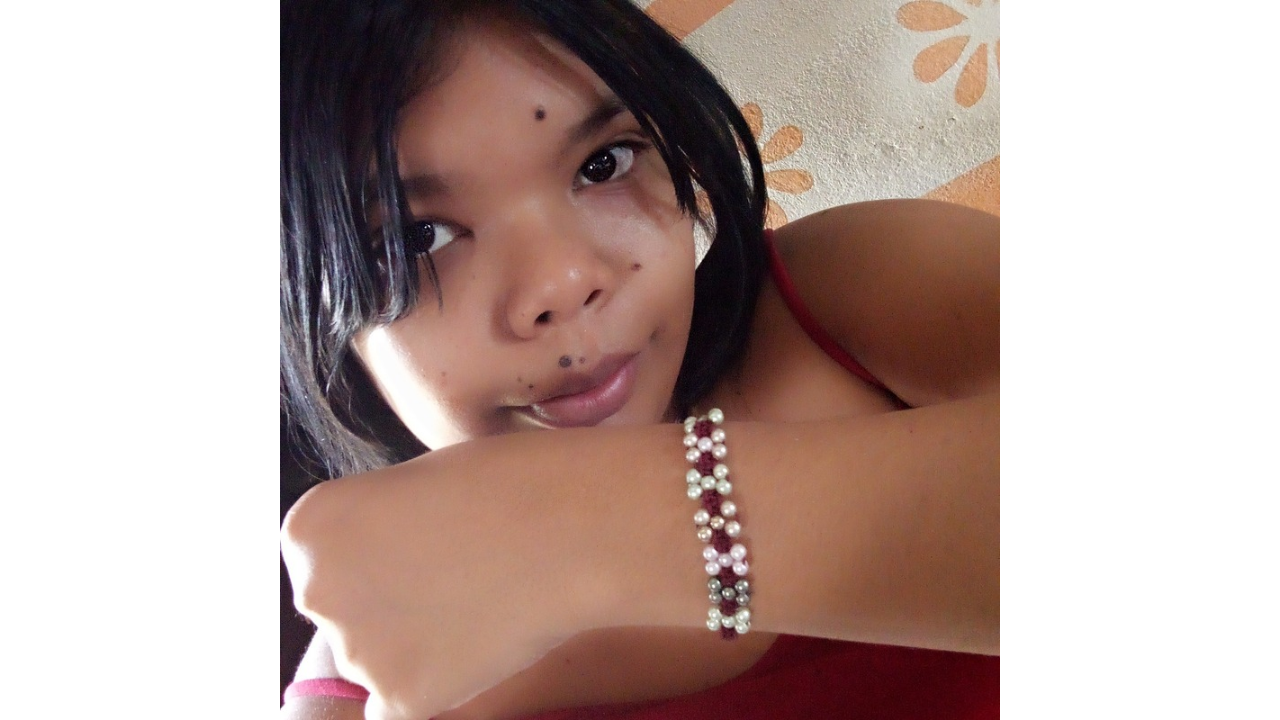
Finally, I checked the entire bracelet to make sure the flowers and crystals were securely attached. I loved how the medium crystal stood out as a centerpiece, while the small ones added a touch of delicacy.
(Resultado final:)||(Bottom line:)
I am very happy with the result, not only because of how the bracelet turned out, but because of everything this process taught me. Creating something with my own hands is an experience that goes beyond the material; It is a way to connect with myself, to express myself and to find joy in the small details. I hope to continue sharing more macramé jewelry ideas with you.
Las fotos de este blog son de mi propiedad|Las imágenes son editadas en canva|Fotografías tomadas en mi celular infinix Smart 7|El contenido está traducido en el traductor de Firefox.
Nos en abrazo ver el esmero y la dedicación que has puesto en la pieza, sin duda es un accesorio maravilloso que llama mucho la atención, es bueno verte hacer piezas con Macramé y que el esfuerzo valga la pena, sigue creando 😉
Hola gracias me alegra que te haya gustado que bueno la verdad si espero seguir compartiendo más accesorios aquí en la comunidad
Hello.
Part of the writing (like the first paragraph and summary) appears to have been AI-generated.
Thank you, we will be more attentive to it.
Your bracelet looks very beautiful, interesting design.
Color combination is really good. Thanks for sharing with us.
Nice design.
Hello.
There is reasonable evidence that parts of this article have been machine-generated.
We would appreciate it if you could avoid publishing AI-generated content (full or partial texts, art, etc.).
Thank you.
Guide: AI-Generated Content = Not Original Content
Hive Guide: Hive 101
If you believe this comment is in error, please contact us in #appeals in Discord