| Esp | Eng |
|---|---|
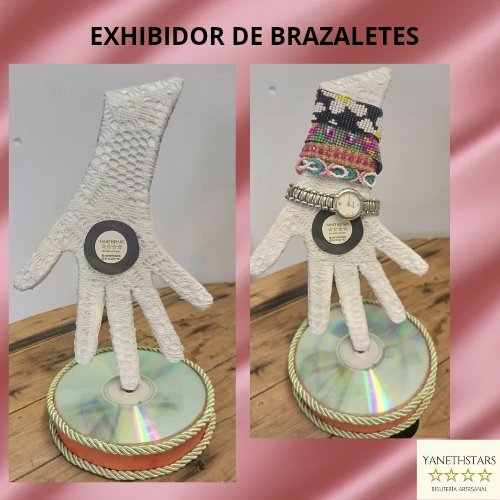
| Hola amigos creativos de nuestra Comunidad Jewelry, el día de hoy traigo para ustedes esté útil tutorial de la que elaboración de EXHIBIDOR DE BRAZALETES, ya sea que lo necesiten para exhibir sus brazaletes para el comercio, para sus publicaciones en redes sociales o también para uso personal. En mí caso lo elaborare para exhibir mi trabajo en está plataforma, pero elaborare uno para mi uso personal, y así poner un poco más en orden mis brazalete, espero les guste y disfruten mi post, y se animen a realizarlo. A continuación la lista de materiales y procedimientos. | Hello creative friends of our Jewelry Community, today I bring for you this useful tutorial of the elaboration of BRAZELET EXHIBITOR, whether you need it to display your bracelets for trade, for your publications in social networks or also for personal use. In my case I will elaborate it to exhibit my work on this platform, but I will elaborate one for my personal use, and thus put a little more in order my bracelet, I hope you like and enjoy my post, and that you are encouraged to make it. Below is the list of materials and procedures. |

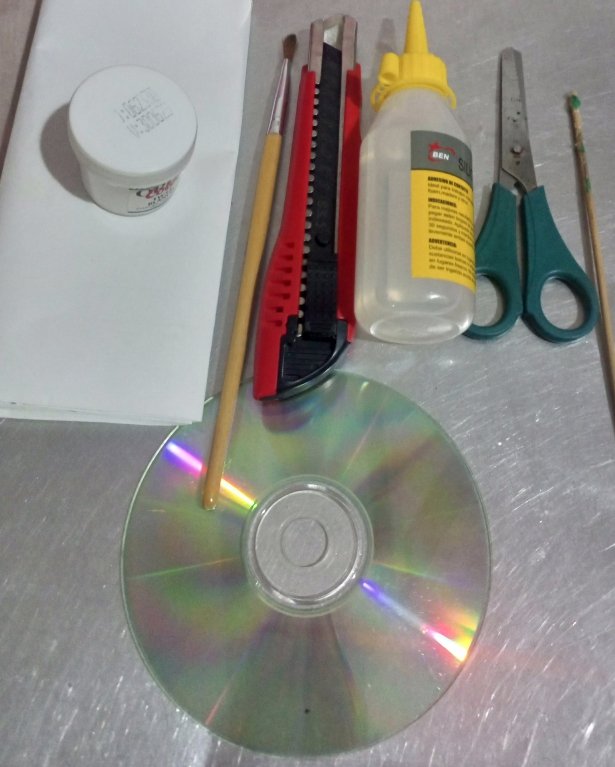
| Materiales: | Materials: |
|---|---|
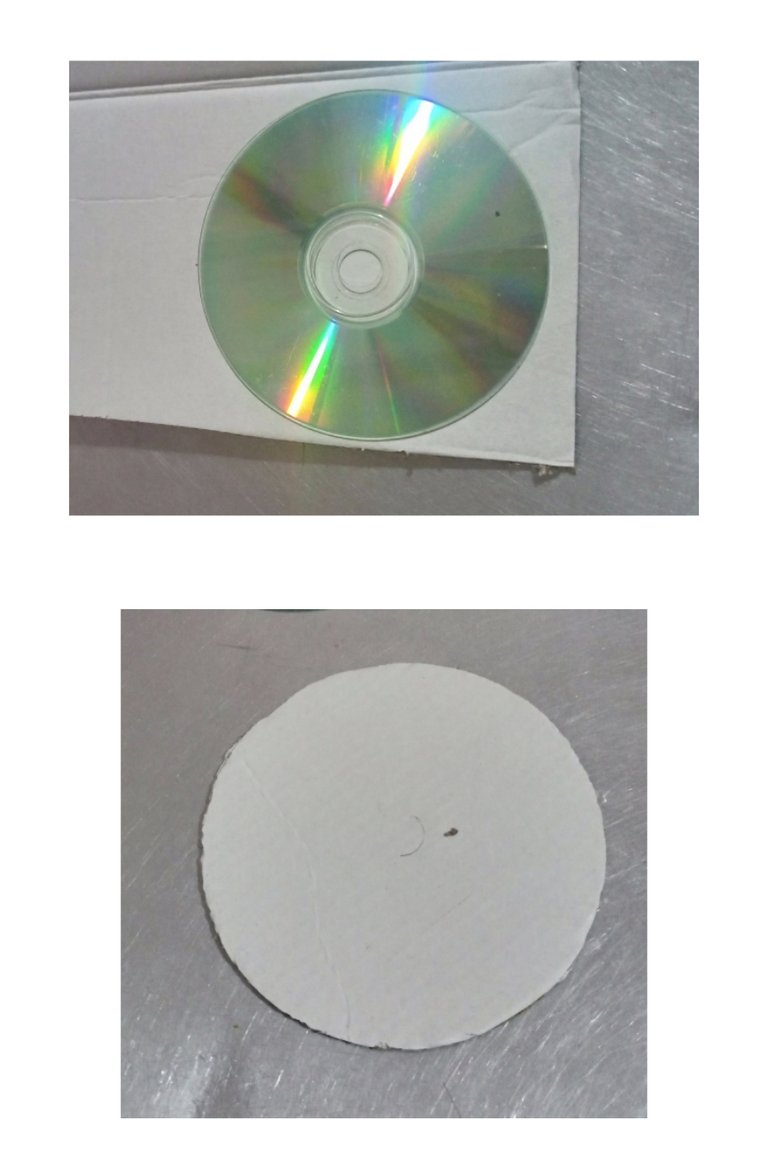
| Cartón, papel bond, silicón, tela blanca de encaje, tela naranja satinada, palito de altura, tijeras, 2 cd, exacto o pinza de corte, cordón verde. | Cardboard, bond paper, silicone, white lace fabric, orange satin fabric, height stick, scissors, 2 CDs, exacto or cutting clamp, green cord. |
| Instrucciones: | Instructions: |
|---|
| Paso 1 | Step 1 |
|---|---|
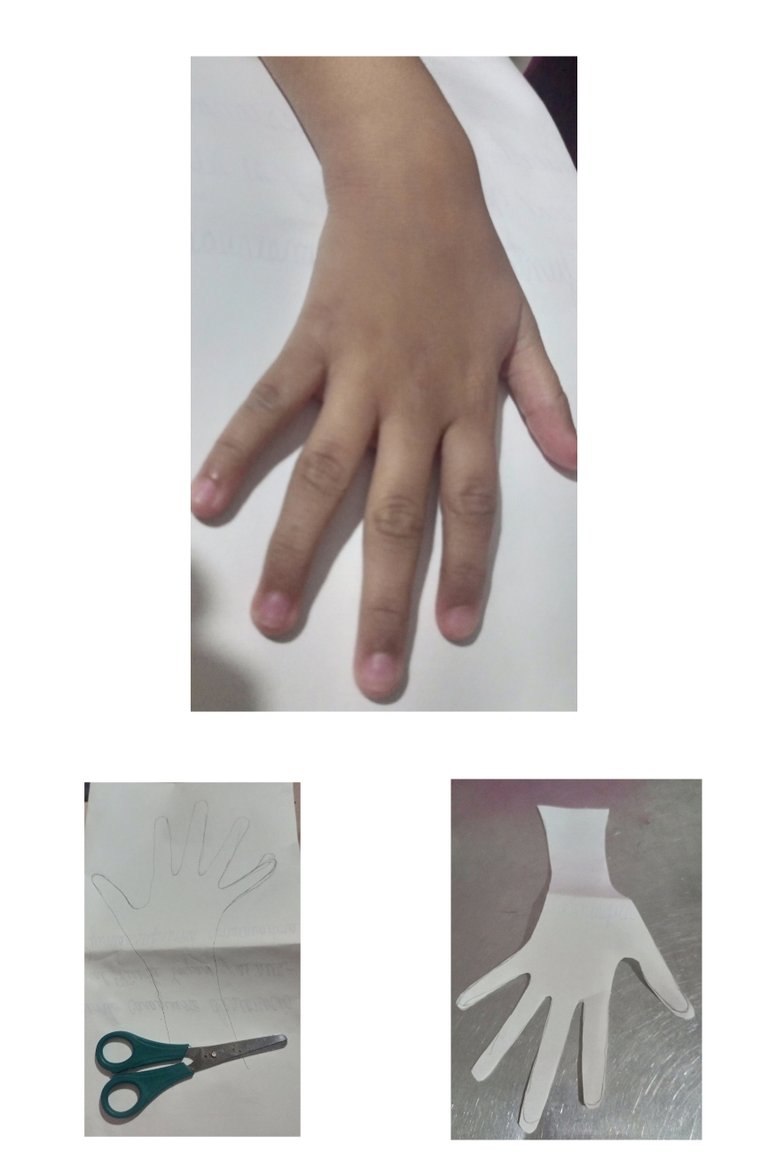
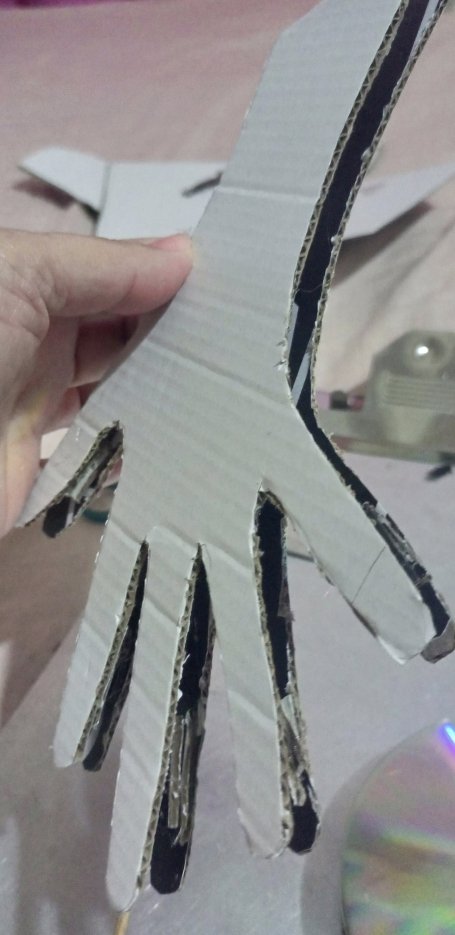
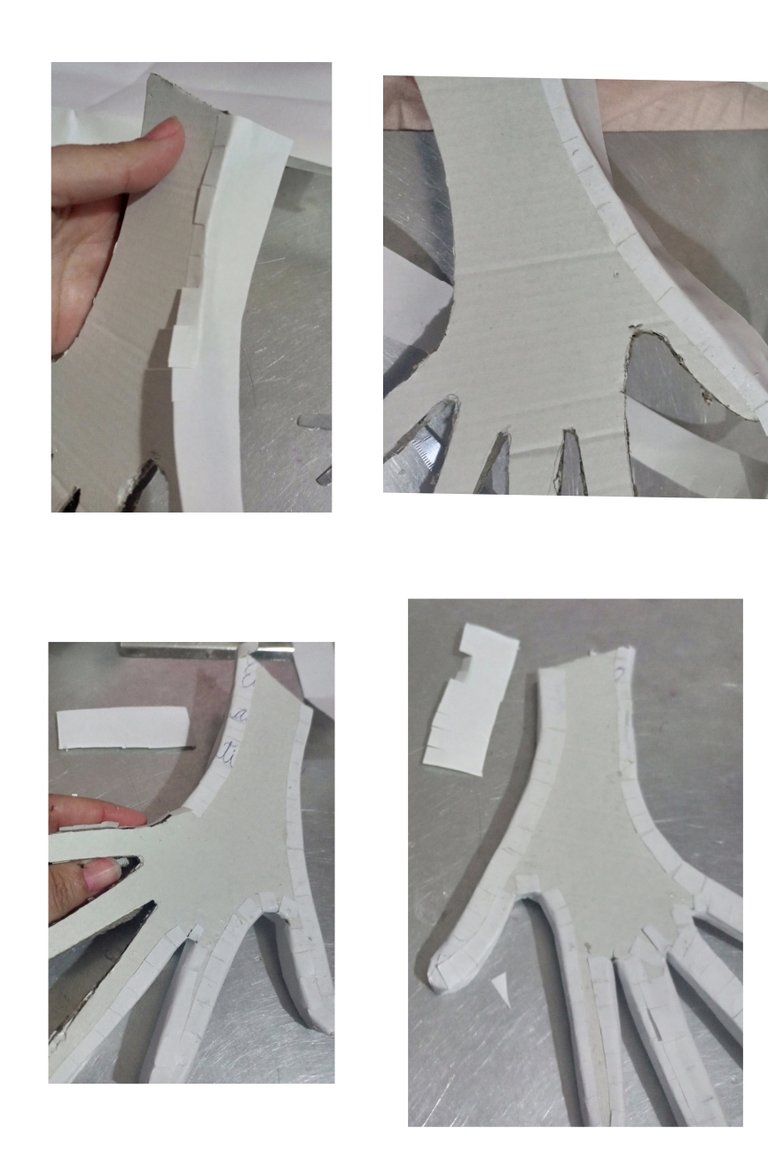
| El primer paso es obtener el patrón de la silueta de la mano, calcando la mano en una hoja de papel bond. Luego recortar con tijeras y así obtener el patrón. | The first step is to obtain the pattern of the hand silhouette by tracing the hand on a sheet of bond paper. Then cut it out with scissors to obtain the pattern. |
| Paso 2 | Step 2 |
|---|---|
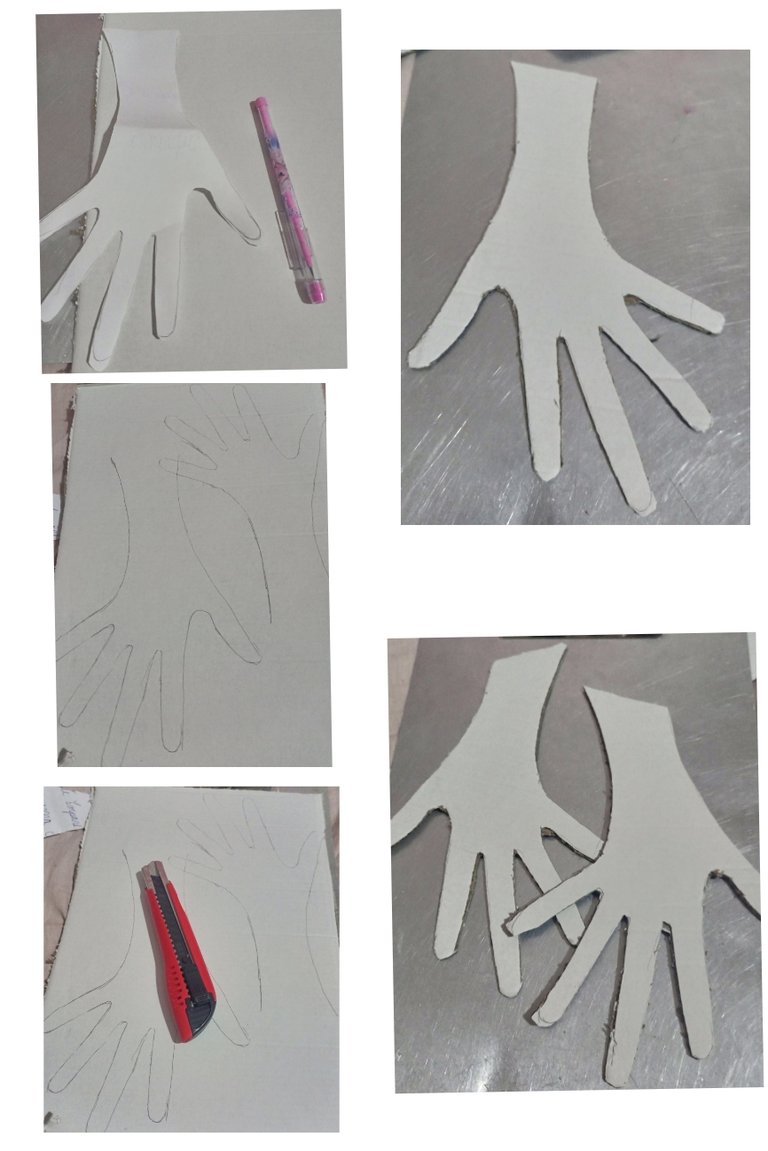
| Transferir el patrón al cartón para luego utilizando la hojilla de corté obtener las dos piezas para armar la silueta de la mano. | Transfer the pattern to the cardboard and then use the cutter blade to obtain the two pieces to assemble the silhouette of the hand. |
| Paso 3 | Step 3 |
|---|---|
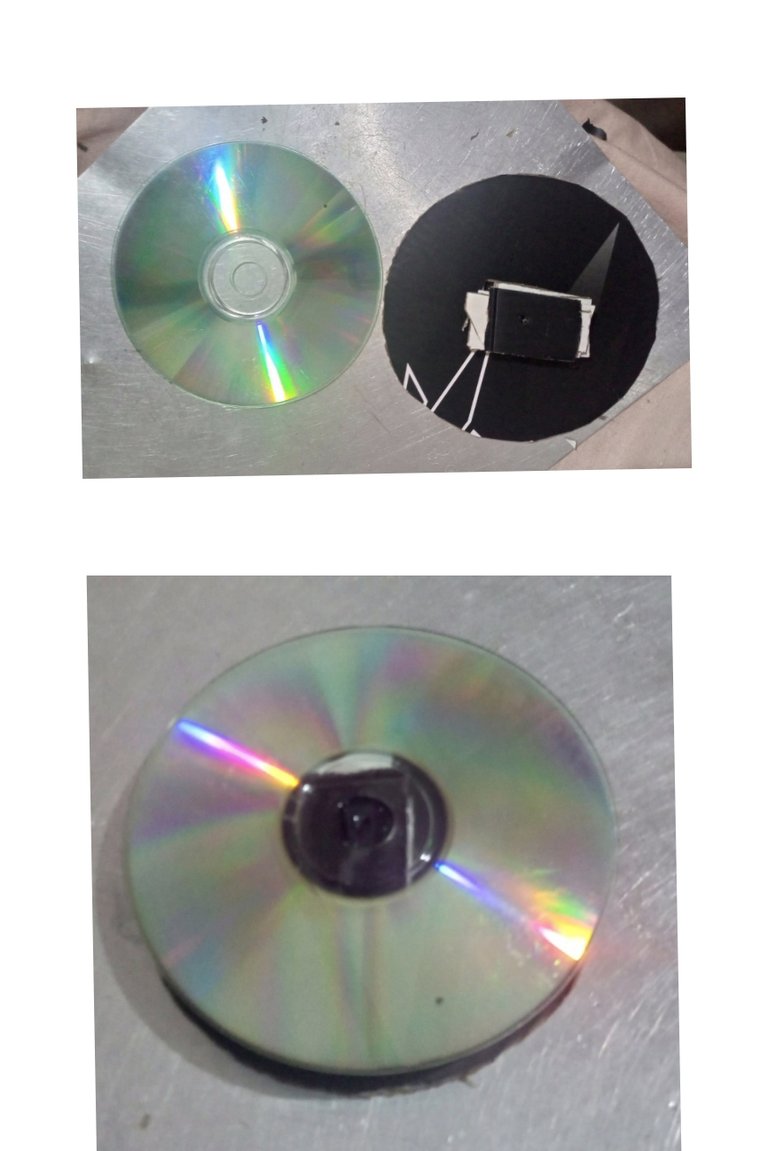
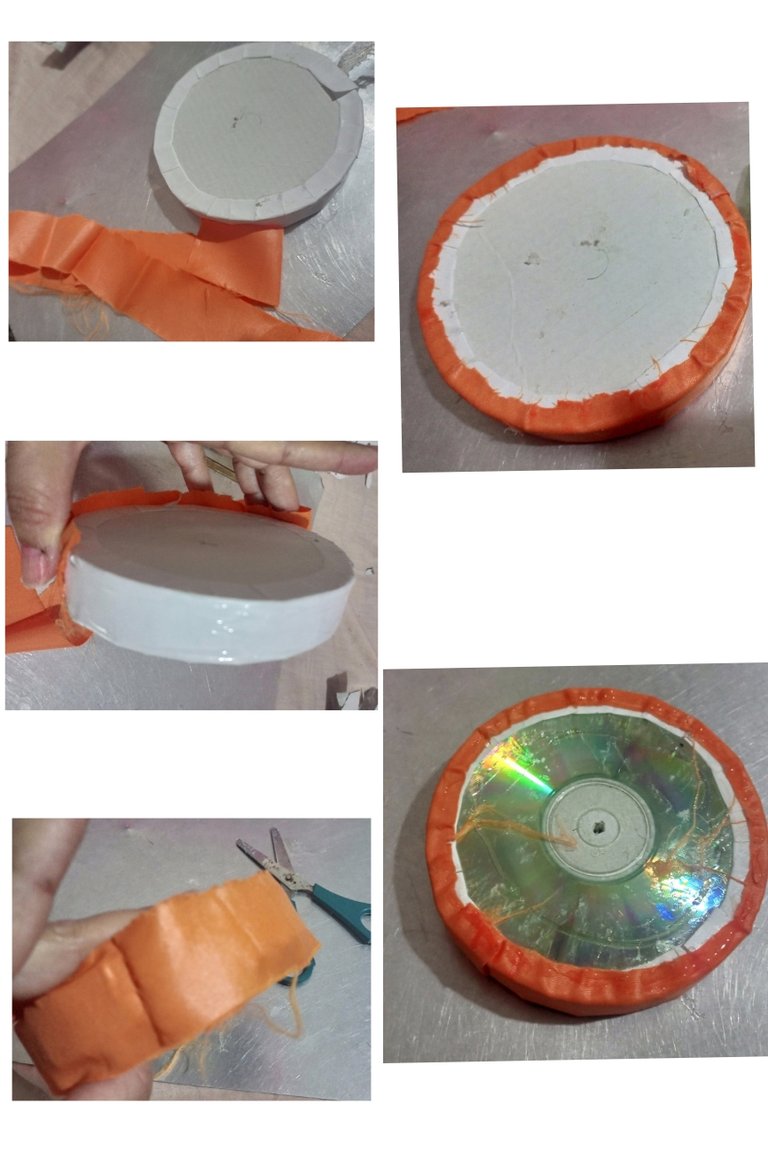
| Coloqué el cd en el cartón y transferí al cartón y luego recorte la figura. | I placed the cd on the cardboard and transferred it to the cardboard and then cut out the figure. |
| Paso 4 | Step 4 |
|---|---|
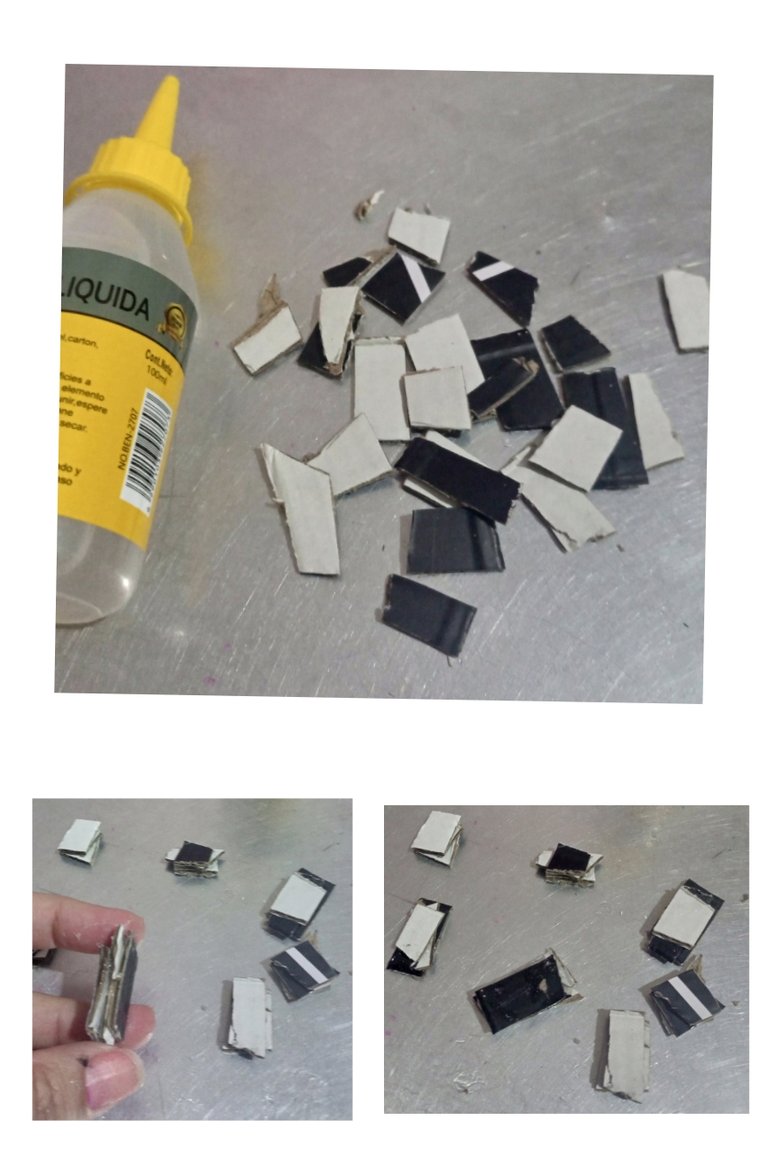
| Recorte cuadritos de cartón y formé bloques de 3 piezas pegandolos con silicón. | I cut out cardboard squares and formed blocks of 3 pieces by gluing them together with silicone. |
| Paso 5 | Step 5 |
|---|---|
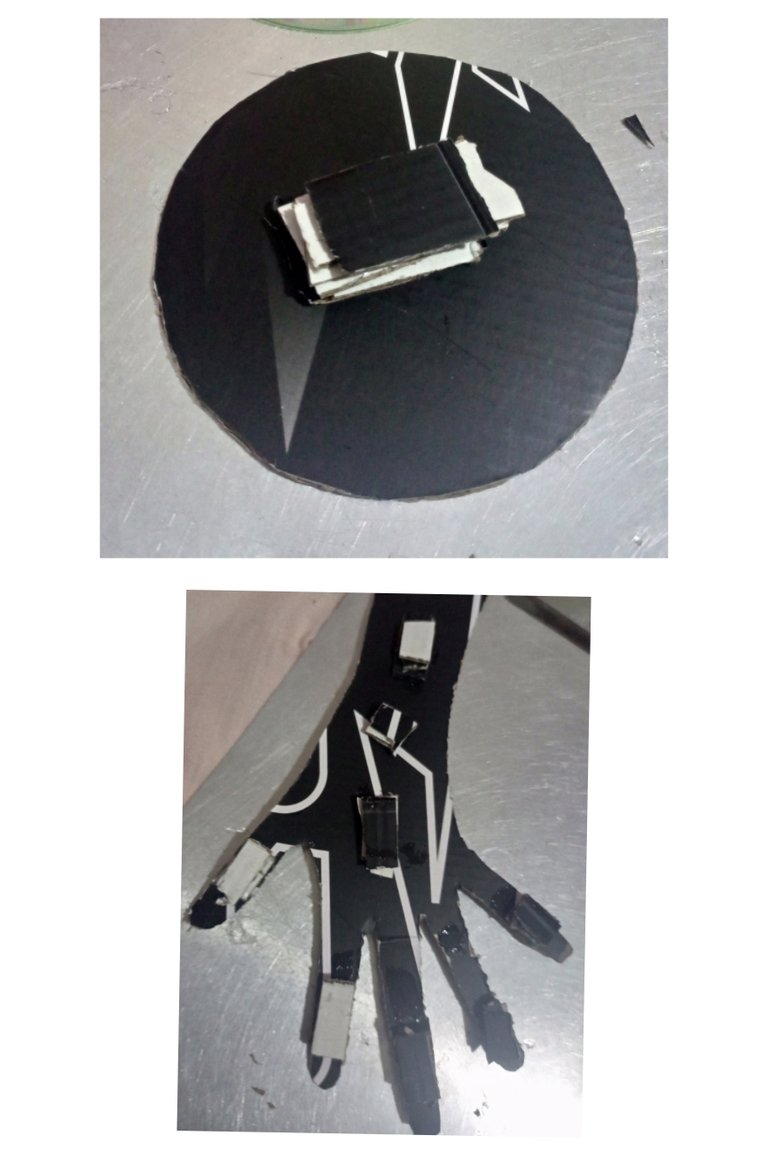
| Pegué los bloques sobre cada una de las piezas: la base del circulo y una de las manos. | I glued the blocks on each of the pieces: the base of the circle and one of the hands. |
| Paso 6 | Step 6 |
|---|---|
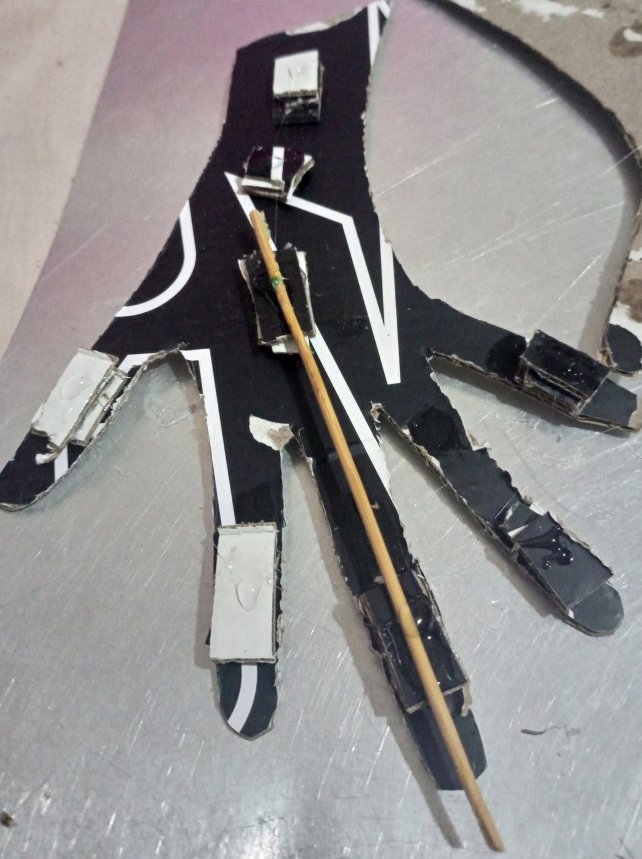
| Coloqué el palito del altura y lo pegué a la base de la mano con silicón. | I placed the height stick and glued it to the base of the hand with silicone. |
| Paso 7 | Step 7 |
|---|---|
| Agregué silicón en la otra pieza de la mano y la pegué a la pieza que tiene el palito de altura y pegué muy bien dejando secar el silicón. | I added silicone to the other piece of the hand and glued it to the piece with the high stick and glued it very well, letting the silicone dry. |
| Paso 8 | Step 8 |
|---|---|
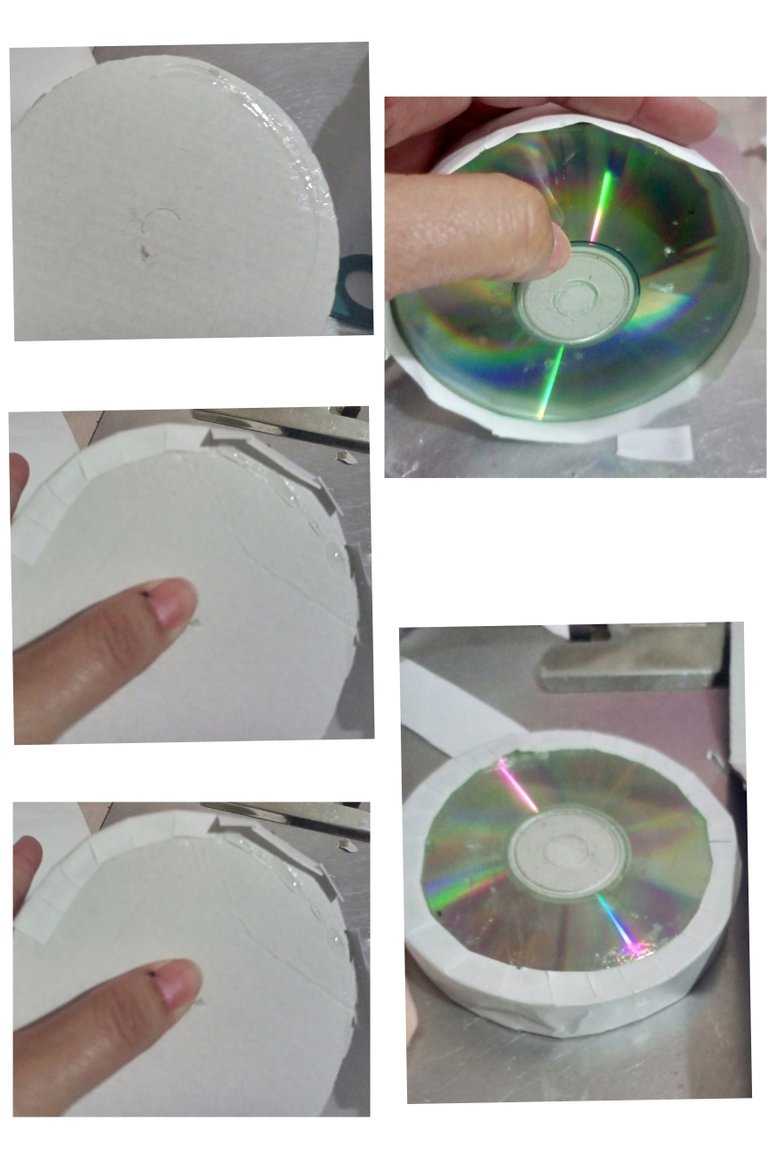
| Uní la pieza circular al cd con silicón y deje secar. | I attached the circular piece to the cd with silicone and let it dry. |
| Paso 9 | Step 9 |
|---|---|
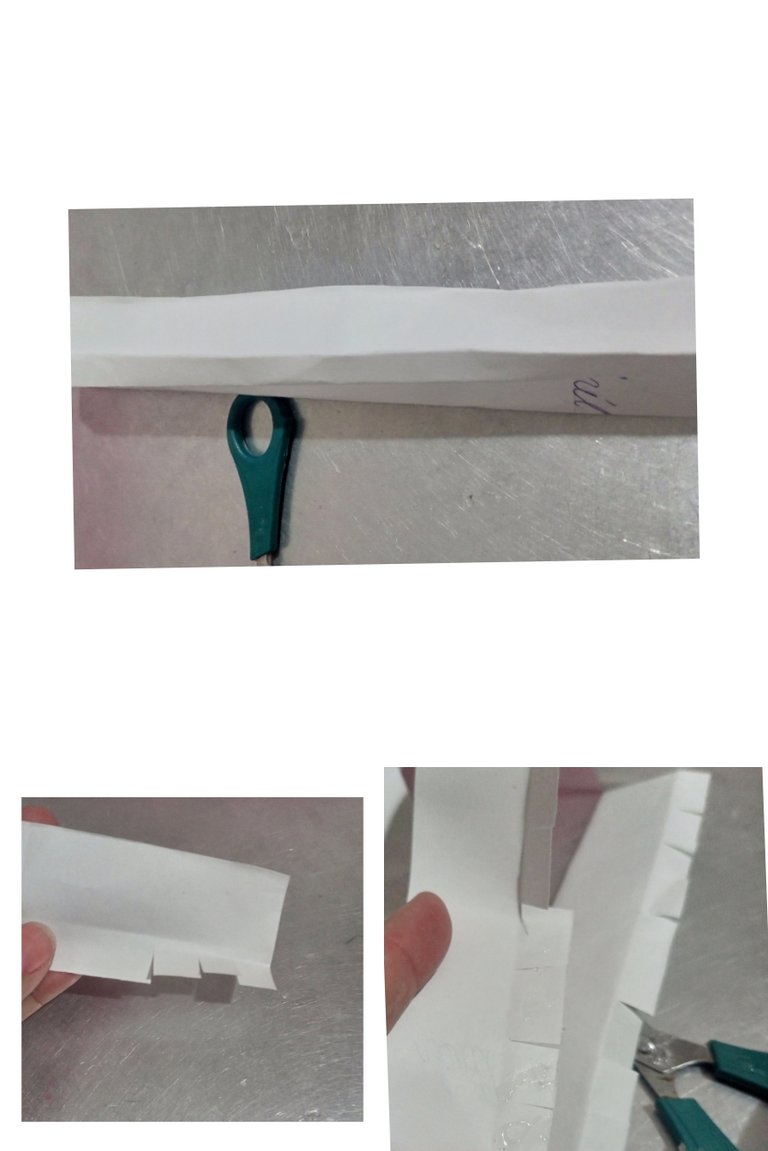
| Corté 3 cintas de papel de 30 cm y le realicé flecos en las dos orillas del papel. | I cut three 30 cm paper ribbons and made bangs on both edges of the paper. |
| Paso 10 | Step 10 |
|---|---|
| Pegué con silicón al cartón y al cd una de las cintas de papel a través de los flecos del papel. | I glued one of the paper ribbons to the cardboard and the CD with silicone through the paper bangs. |
| Paso 11 | Step 11 |
|---|---|
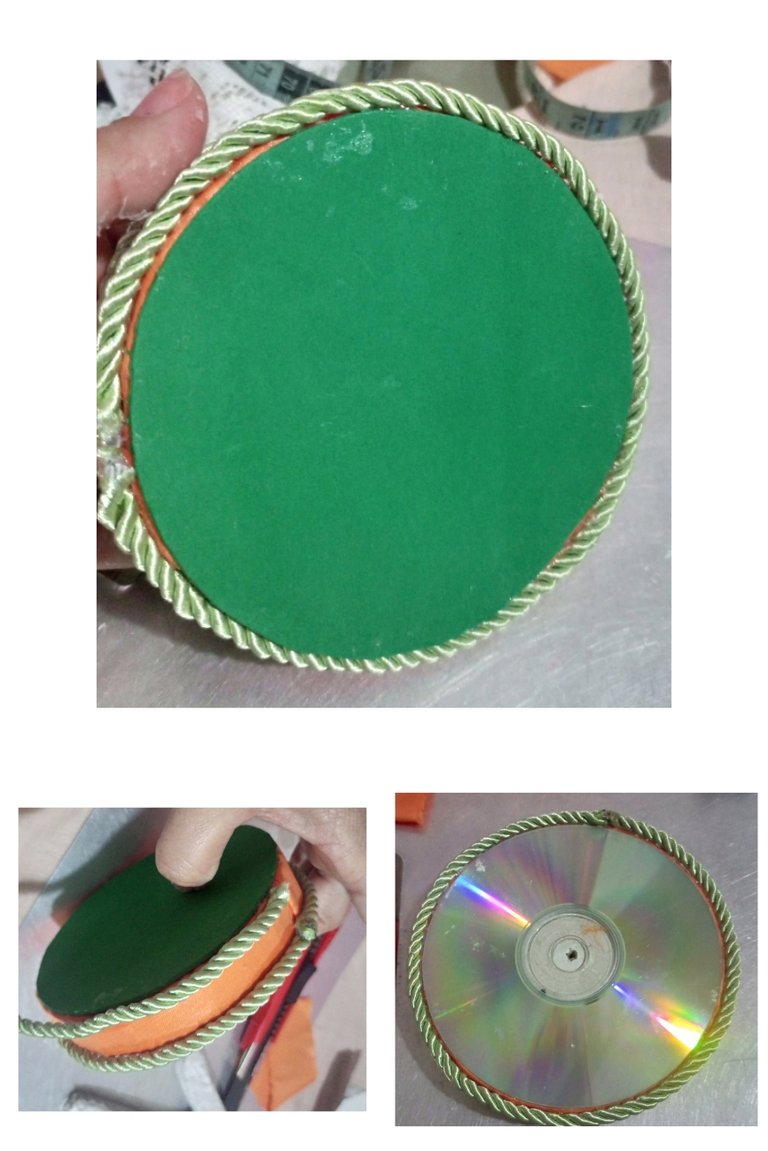
| La otras dos cintas la pegué con silicón a la orilla de la siluetas de la mano para terminar la silueta de la mano. | The other two ribbons were glued with silicone to the edge of the hand silhouette to finish the hand silhouette. |
| Paso 12 | Step 12 |
|---|---|
| Corté una cinta de tela color naranja de 4 cm de ancho por 30 cm de largo, y la pegue en la orilla de la pieza circular. | I cut an orange fabric ribbon 4 cm wide by 30 cm long, and glued it to the edge of the circular piece. |
| Paso 13 | Step 13 |
|---|---|
| Corté una pieza de foami y lo pegue del lado donde esta el cd. | I cut a piece of foami and glued it to the side where the CD is. |

| Paso 14 | Step 14 |
|---|---|
| Pegué en las dos orilla el cordón verde. | I glued the green cord on the two banks. |
| Paso 15 | Step 15 |
|---|---|
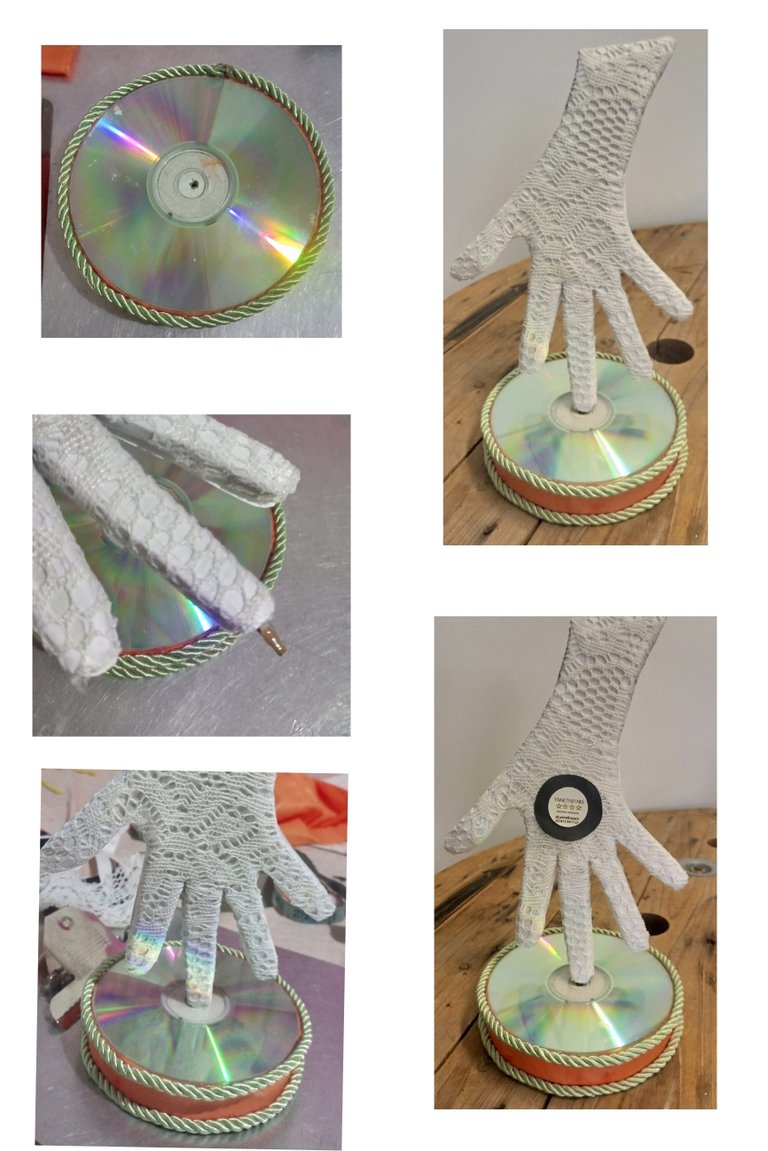
| Forré con la tela de encaje toda la silueta de la mano. | I lined the entire silhouette of the hand with the lace fabric. |

| Paso 16 | Step 16 |
|---|---|
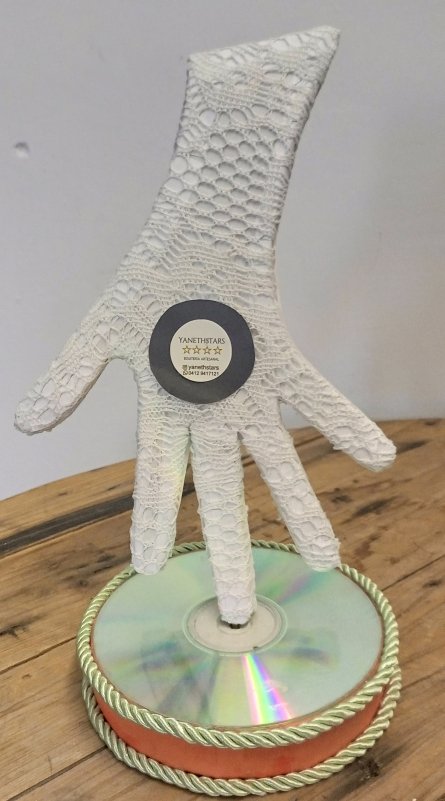
| Con un alfiler grueso realicé una perforación en el medio de la pieza redonda, coloqué silicón a la punta del palito de altura e introduje en la pieza circular, dejé secar y listo mi exhibidor. | With a thick pin I made a perforation in the middle of the round piece, put silicone on the tip of the height stick and introduced it into the circular piece, let it dry and my display is ready. |
| Despedida | Farewell |
|---|---|
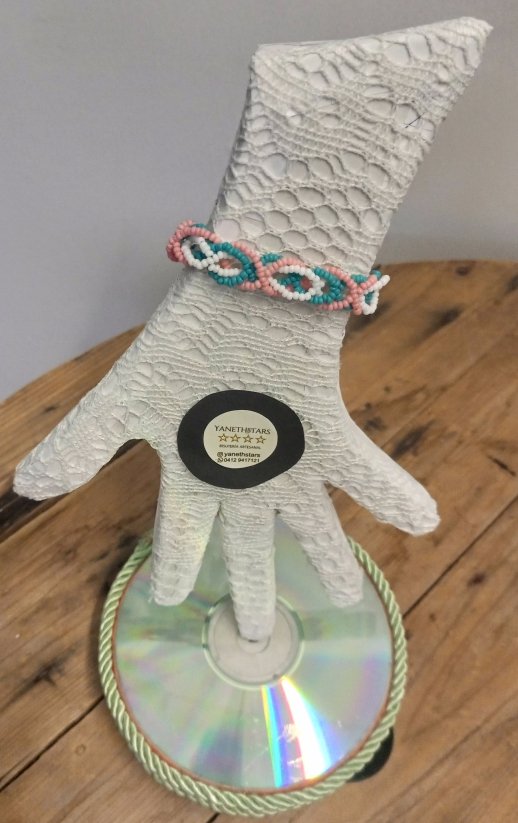
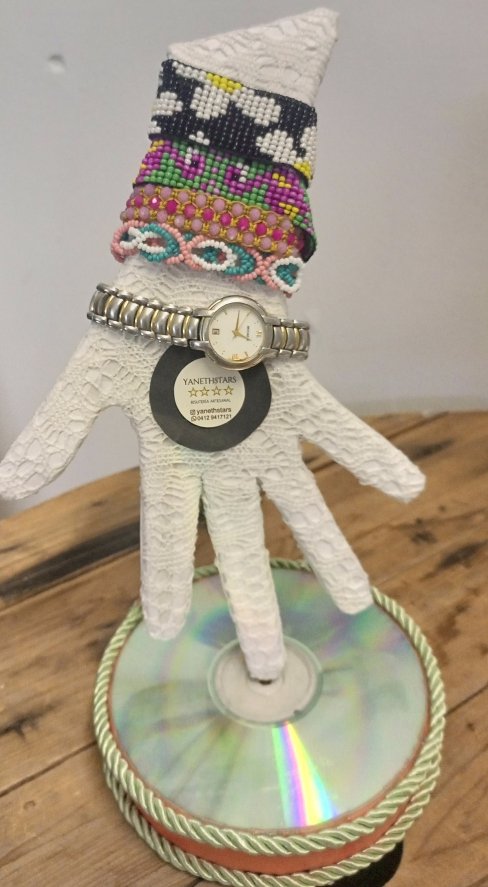
| Y esté es mi post para el día de hoy EXHIBIDOR DE BRAZALETE muy contenta y agradecida con Dios por el resultado. | And this is my post for today BRACELET DISPLAY very happy and grateful to God for the result. |
| Créditos | Credits |
|---|---|
| Traductor: www.DeepL.com/Translator (free version). Las fotos fueron tomadas con mi Celular Tecno Sport 7T. Foto de portada editada con Canva y PhotoRoom. Banner:https://images.app.goo.gl/5N3pujMb9u2AePz87. | Translator: www.DeepL.com/Translator (free version). The photos were taken with my Tecno Sport 7T cell phone . Cover photo edited es Canva and PhotoRoom. Banner:https://images.app.goo.gl/5N3pujMb9u2AePz87. |
Que bello y original este organizador de pulseras y anillos , una excelente manera de reciclar esos CD que tenemos guardados por allí y la tela de encaje lo hizo ver muy delicado 😍
Hola amiga, gracias. Saludos.
Hats off to you friend, this is a masterpiece! We appreciate the time and effort spent in making this bracelet display. Well done and thanks for sharing.
Thanks. Greetings
@yanethstars Excelente idea y sobre todo muy útil para quienes queremos colocar orden en nuestros accesorios, me encantó, Saludos 🤗
Si amiga, y también para que se conserven mejor, saludos.
Un excelente trabajo de reciclaje para rus accesorios, nos encanta como cuidas cada detalle del proceso y lo fácil que lo haces sentir en cada fotografía, ese trabajo ha quedado magnífico, sigue rockeando 😎😎
Gracias ☺️. Saludos linda comunidad de @jewelry
It is a great craft/project. It also looks easy to make and you don't need any specific things to make it. I would love to see more from you in the future.
Genial idea te quedo hermoso y muy práctico para guardar y cuidar de los accesorios.