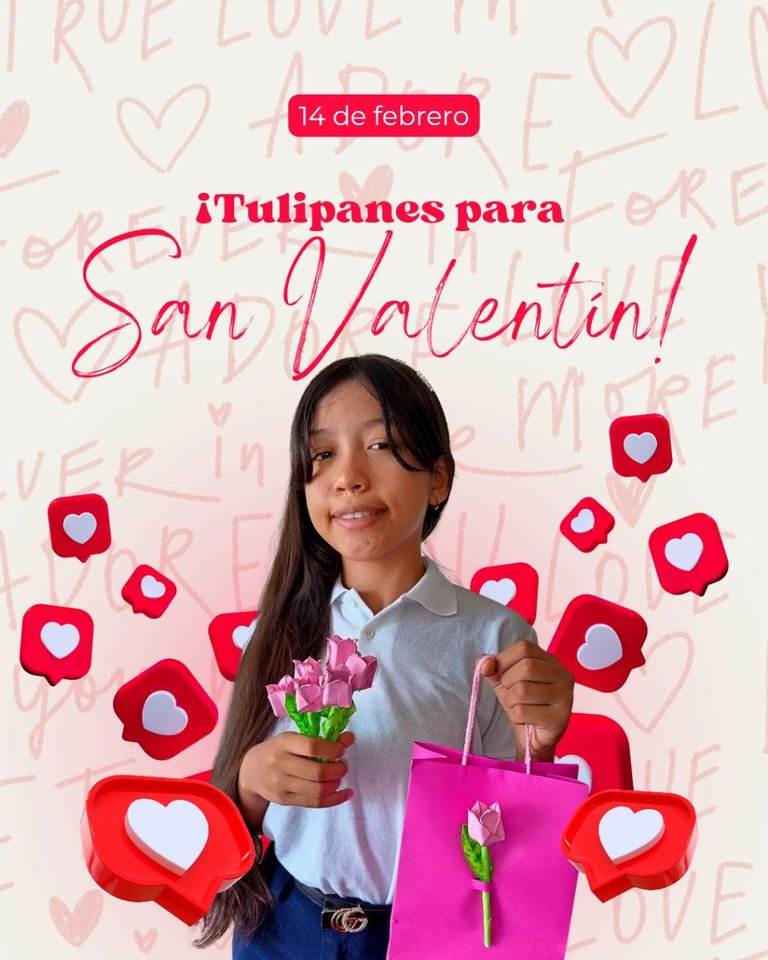
iniciativa que tiene la comunidad, hoy les vengo a hablar sobre unas flores o tulipanes, aunque ya está por terminar la iniciativa, quiero mostrarles como hice con cartulina, con la técnica de origami qué estuve viendo en línea un video, estas lindas flores rosadas para regalárselas a mis amigas del colegio el pasado 14 de febrero y les voy a enseñar cómo fue el procedimiento.Hola, amigos de @diyhud, espero estén bien. Para participar en la

Los materiales que utilicé fueron cartulina tipo carta, color rosado, hojasqq blancas, papel crepé de color verde, silicona y marcadores de tonalidades rosadas y amarillas para hacer los detalles
Paso 1
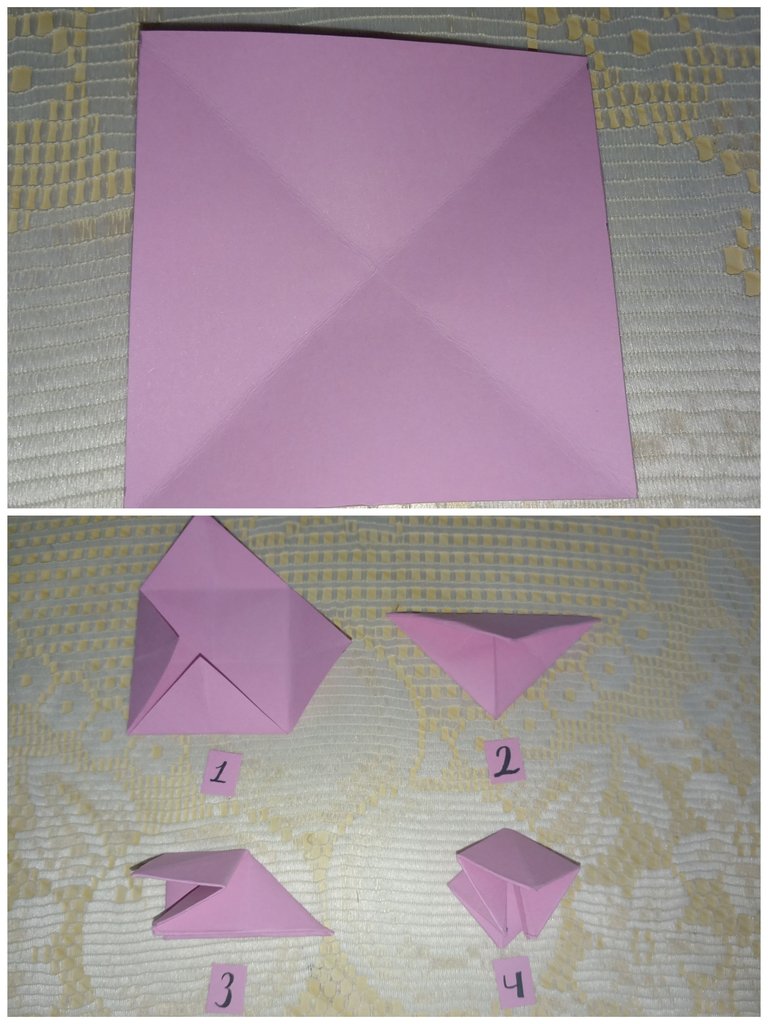
Primero recorté cuadrados de 9 cm por 9 cm en la cartulina rosada, después empecé a hacer los dobleces. Primero doblé el cuadrado punta con punta haciendo una x.
Paso 2
Después que ya había Doblado punta con punta el cuadrado haciendo una x doble todas las puntas del cuadrado hacia adentro haciendo uno más pequeños como se ve en la imagen, después ese cuadrado lo doble por la mitad creando un triángulo que luego hice una especie de doblez quedando otro mini cuadrado que eso lo hice por los dos lados de lo que ya había Doblado y al final nos queda este cuadrado pequeño de dónde va a partir la flor Cómo se ve la imagen.

Paso 3
Después de que tenemos el cuadrado, doblamos las puntas laterales hacia adentro. Cómo se ve la imagen y las pegamos para después abrir el capullo que ya hicimos para poder hacer la flor y las esquinas que nos quedan arriba, las doblamos hacia afuera.
Paso 4
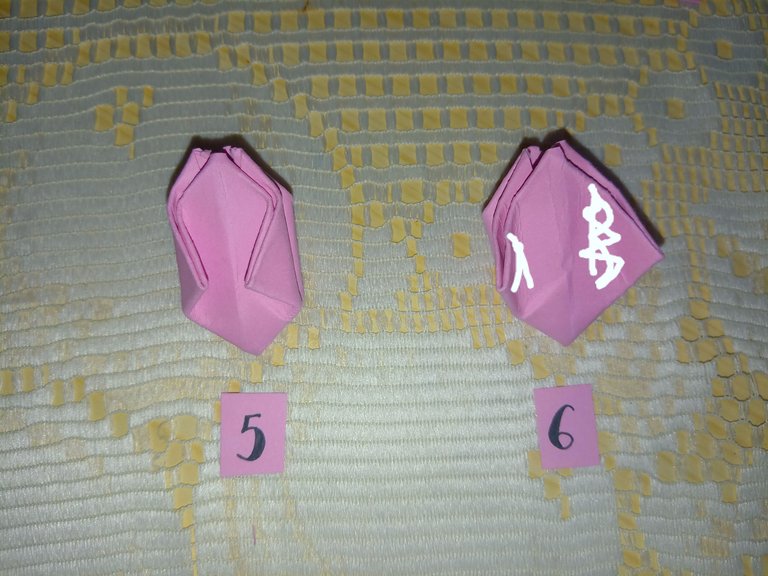
Ahora para hacer el pistilo utilicé una tira de papel de hojas blancas y las pinté de amarillo y naranja con los marcadores para que se viera como un difuminado después le hice varios recortes y lo enrollé para que quedara el pistilo hecho, y ahora para hacer el palito de la flor utilicé un cuadrado de 9 por 9 cm de papel que enrollé como si fuera un palito y después lo forré con una tira de papel crepé verde.
Paso 5
Ahora para armar todo pegué el pistilo adentro de la flor y con el palito le hice unas hendiduras para poderlo pegar bien a la flor también le hice una hoja y la decoré un poco con marcadores verdes también la flor con dos marcadores de tonalidades rosadas lo decoré por las partes donde se doblaban para que se vieran mejor.
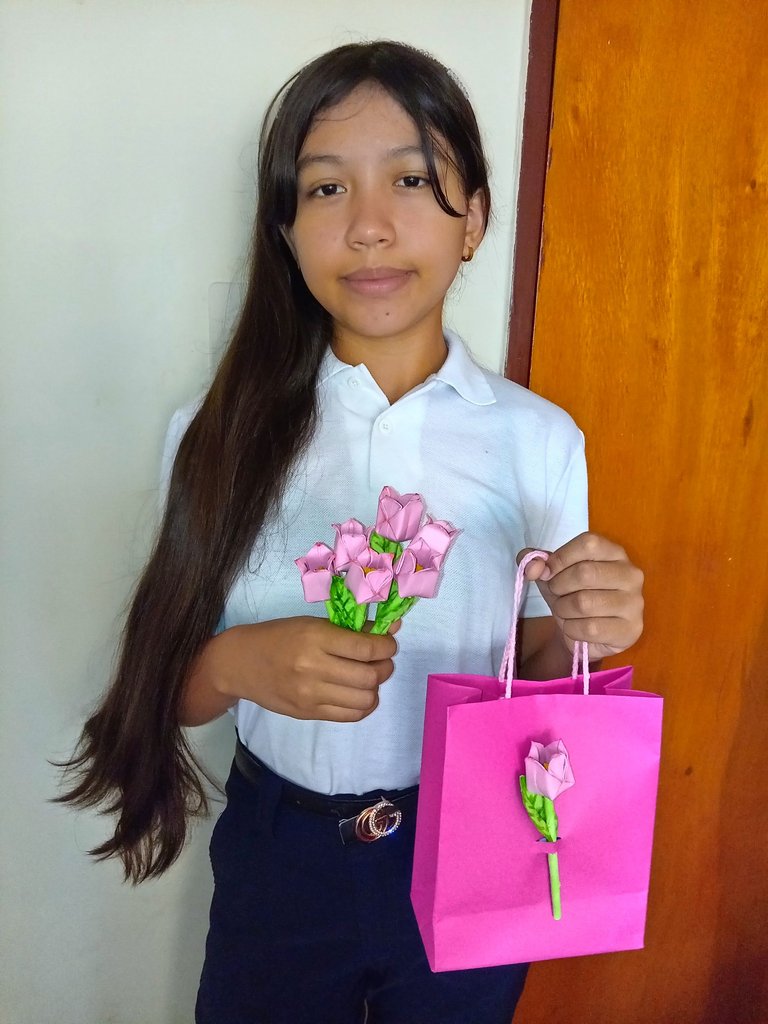
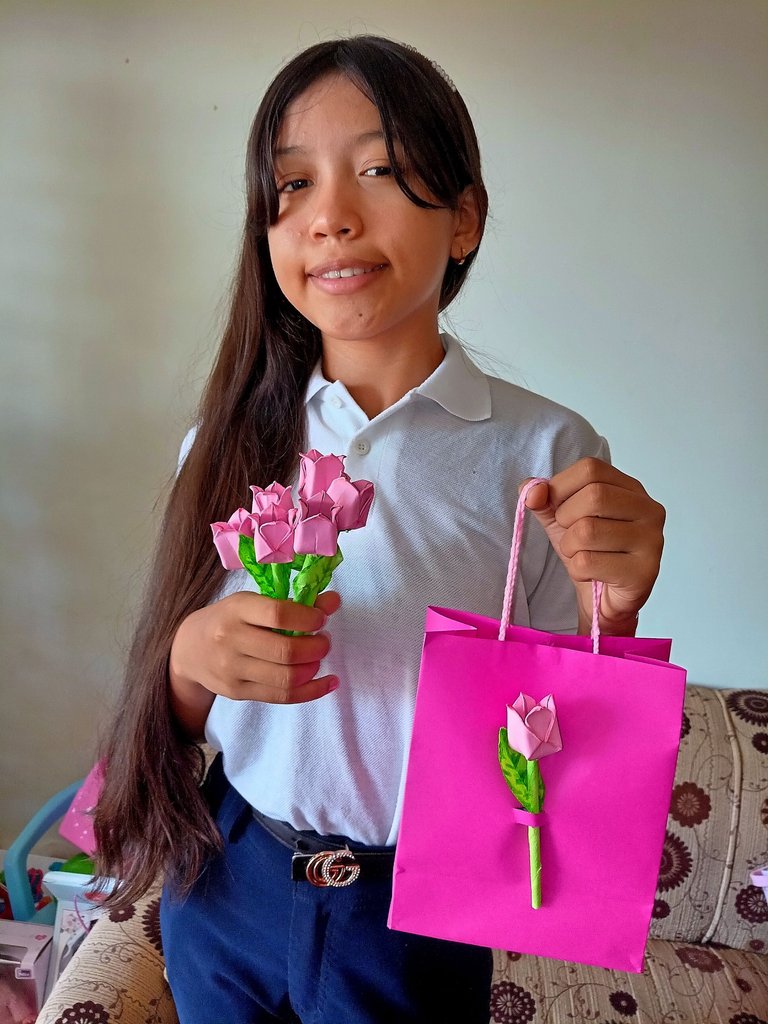
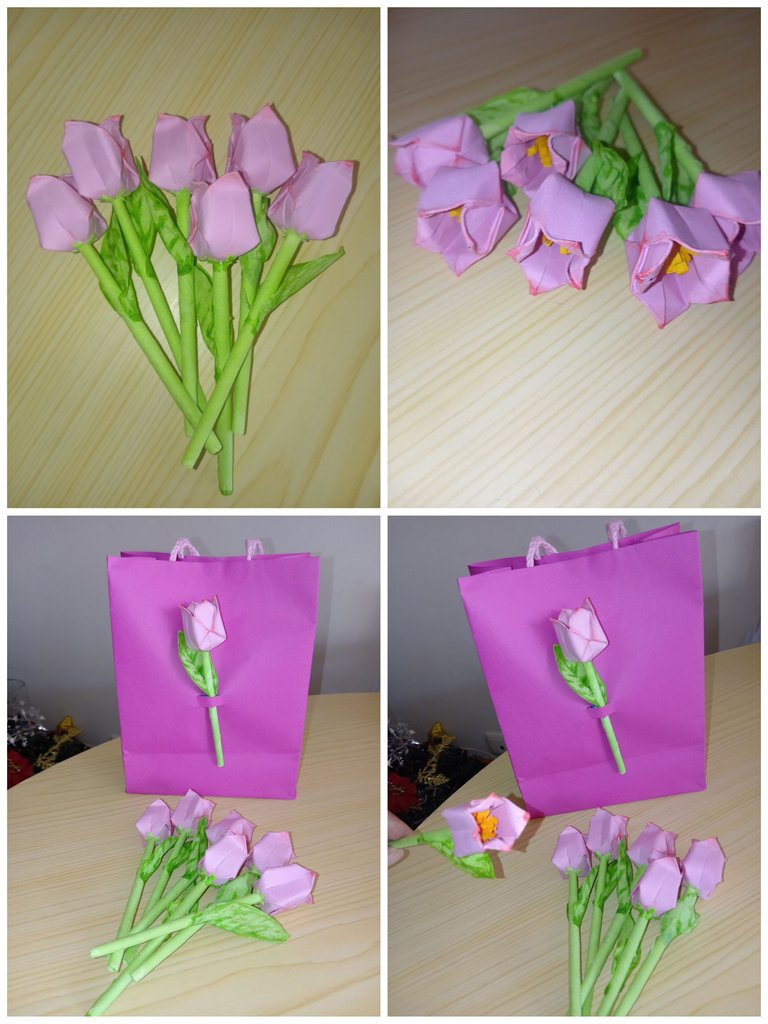
Y listo, así quedaron nuestros tulipanes de cartulina que posiblemente puede ser que se vean fáciles, pero a mí me tardó un poco de tiempo hacerlos; al final quedaron muy bonitos.
El 14 de febrero fue un viernes y en clases hicimos un intercambio de regalos, para esto mi mamá le compro una bolsa a mi hermana para llevarla con algunas golosinas y a mí me la tuvo que hacer desde cero con una cartulina que compro fucsia y como le iba a regalar a una de mis amigas, aproveche de colocar el tulipán en la bolsa, además de las golosinas y se veía más bonita.
Esto ha sido todo por hoy, amigos, espero que les guste esta manualidad, así como le gustaron a mis amigas.

Tulips for Valentine's Day
Hello, friends of @diyhud, I hope you are well. To participate in the initiative that the community has, today I come to talk about some flowers or tulips, although the initiative is about to end, I want to show you how I made with cardboard, with the origami technique that I was watching online a video, these pretty pink flowers to give them to my friends at school last February 14 and I'll show you how was the procedure.
The materials I used were pink cardboard, white sheets, green crepe paper, silicone and pink and yellow markers to make the details.
Step 1
First I cut out squares of 9 cm by 9 cm on the pink cardboard, then I started to make the folds. First I folded the square point to point making an x.
Step 2
After I had already folded the square tip to tip making an x I folded all the tips of the square inwards making a smaller one as shown in the image, then I folded that square in half creating a triangle and then I made a kind of fold leaving another mini square that I did on both sides of what I had already folded and at the end we have this small square where the flower will start as shown in the image.
Step 3
After we have the square, we fold the lateral ends inwards. As shown in the image and glue them to then open the cocoon we already made to make the flower and the corners that we have left above, we fold them outward.
Step 4
Now to make the pistil I used a strip of white leaf paper and painted them yellow and orange with markers to look like a blurred then I made several cuts and rolled it so that the pistil was made, and now to make the stick of the flower I used a square of 9 by 9 cm of paper that I rolled as if it were a stick and then lined it with a strip of green crepe paper.
Step 5
Now to assemble everything I glued the pistil inside the flower and with the stick I made some slits to be able to stick it well to the flower I also made a leaf and decorated it a little with green markers also the flower with two markers of pink tones I decorated it by the parts where they were folded so that they looked better.
And that's it, that's how our cardboard tulips turned out. They may look easy, but it took me a little time to make them; in the end they turned out very pretty.
February 14 was a Friday and in class we did a gift exchange, for this my mom bought a bag for my sister to take it with some candy and I had to make it from scratch with a cardboard that I bought fuchsia and as I was going to give it to one of my friends, I took the opportunity to place the tulip in the bag, in addition to the candy and it looked prettier.
That's all for today, friends, I hope you like this craft as much as my friends did.
Este post fue realizado en mi teléfono Honor X6s, usando las aplicaciones Canva para la edición de las imágenes. Traducción con DeepL.
No autorizo a usar mis fotos sin mi consentimiento y el de mi mamá @leidimarc.
This post was made on my Honor X6s phone, using Canva applications for image editing. Translation with DeepL.
I do not authorize the use of my photos without my and my mom's consent @leidimarc.
Your tulips look really nice, you did a great job friend, and thanks for participating in the monthly contest, Good luck!
Una belleza esos tulipanes mi niña, a tus amigas les debe haber gustado mucho el regalo sobre todo porque lo hiciste tu y tiene más valor
Si, a ellas le gustaron mucho. Gracias
Discord Felicitaciones, su publicación ha sido votada por @ dsc-r2cornell. Puedes usar el tag #R2cornell. También, nos puedes encontrar en
Que bonitos amiga te quedaron lindos te felicito
Hola amiga, me alegra que te hayan gustado, a mis amigas también.
Qué bellos tulipanes, lo que más me gustó fue el detalle de lo que está dentro de la flor, he visto muchos tutoriales pero ninguno donde le añadieran tantos detalles. 🩷✨ La bolsa también quedó muy linda con ese toque especial.
Gracias, esos los hice pintando hoja blanca con varios tonos de amarillo.
Si la bolsa le quedo bien bonita a mi mamá.
Te quedaron preciosas hija, vi que te llevaron trabajo y que lo hiciste con mucho cariño para tus amigas.
Súper bellos y delicados estos tulipanes, me encantaron, tienen excelentes acabado.
Muchas gracias, que bueno que le ha gustado.
Todavía me quedaron muchas por hacer, le faltan tallas y hojas.
https://bsky.app/profile/did:plc:rag2mftdy2alo7rtmyttmpk4/post/3lj7wi44rbi2a
The rewards earned on this comment will go to the author of the blog post.https://bsky.app/profile/did:plc:rag2mftdy2alo7rtmyttmpk4/post/3lj7wi44rbi2a
Que linda manualidad, y mucho más que hayas aplicado la técnica del origami, que es tan precisa y con la que se pueden hacer muchas bellezas.
Me imagino que ese detalle le gustó mucho a tu amiga.
Que bellas te quedaron, me encanta como se ve en la bolsa. Gran trabajo.