Tengan mis queridos amigos artesanos un lindo y bendecido día.
Have a nice and blessed day my dear artisan friends.
.jpg)
Hoy les quiero compartir está linda manualidad realizada con unas perlas en color rosado y blanco.
Se trata de un tierno angelito, que lo podrás lucir en cualquier lugar de la casa y se verá muy bonito, aún con lo pequeño que es.
Today I want to share with you this beautiful craft made with some pink and white pearls.
It is a tender little angel, which you can wear anywhere in the house and it will look very pretty, even with how small it is.
Me levanté pensando que hacer y viendo lo que tenía en mí mesa de trabajo, ví las perlitas y se vino a mente hacer un ángel con alas, porque ya había hecho uno pero sin ala.
Por lo que este lo quería con alas y vería si me salía...y aunque no me quedaron muy prolijas, me gustaron mucho como quedaron. Y bueno en un ángel sus alas son imprescindibles.
I got up thinking what to do and seeing what I had on my work table, I saw the pearls and it came to mind to make an angel with wings, because I had already made one but without a wing.
So I wanted this one with wings and I would see if it came out... and although they didn't turn out very neat, I really liked how they turned out. And well, in an angel, his wings are essential
Les menciono los materiales que utilice para su elaboración:
- Perlas rosadas y blancas y las perlitas más pequeñas para las alas.
- Alambre de cobre.
- Una cuenta grande blanca, que será la cabeza del ángel.
- Pinza.
I mention the materials I used for its preparation:
- Pink and white pearls and the smallest pearls for the wings.
- Copper wire.
- A large white bead, which will be the head of the angel.
- Gripper
.jpg)
✨ Elaboración ✨🪽
✨ Preparation ✨
- Paso # 01.
En un pedazo de alambre de unos cuarenta centímetros introduje siete perlas rosadas y las lleve al centro del alambre.
Luego por una de las punta del alambre Introduje siete perlas y las cruce con el otro extremo del alambre, y las lleve junto a las otras perlas ajustando... Y así para ir formando la pirámides.
- Step #01.
In a piece of wire about forty centimeters long I inserted seven pink pearls and brought them to the center of the wire.
Then through one of the ends of the wire I introduced seven pearls and crossed them with the other end of the wire, and took them together with the other pearls, adjusting... And so on to form the pyramids.
.jpg)
- Paso # 02.
Cómo se mira en las fotos en cada vuelta se disminuyen las perlas hasta llegar a una ( blanca) pero en aquí coloque otra ( rosada); es decir repetí dos veces este paso.
- Step #02.
As you can see in the photos, in each round the beads are decreased until you reach one (white) but here I place another (pink); That is, I repeated this step twice.
.jpg)
- Paso # 03.
Aquí en este paso extiendo los alambres y en cada uno coloco cuatro perlas y una más pequeña, pasando luego el alambre por las cuatro y llevando y ajustando las bien a la perla central...estos serían los brazos del ángel.
- Step #03.
Here in this step I extend the wires and in each one I place four pearls and one smaller one, then passing the wire through the four and taking and adjusting them well to the central pearl...these would be the arms of the angel.
.jpg)
- Paso # 04.
Para hacerle las alas, llevo los alambres hacia atrás y en cada uno coloco las perlas blancas más pequeña, primero nueve. Paso el alambre por dos y luego coloco siete perlitas más y paso el alambre por la perla central.
Hago lo mismo con el otro alambre, quedando así las alas.
- Step #04.
To make the wings, I take the wires back and on each one I place the smallest white pearls, first nine. I pass the wire through two and then I place seven more beads and pass the wire through the central bead.
I do the same with the other wire, leaving the wings like this.
.jpg)
- Paso # 05.
Por último le coloca la cuenta más grande y le hago con mostacillas el aro.
Pasando los sobrantes de los alambres por las perlas para ajustar bien el tejido y luego cortar los sobrantes.
- Step #05.
Finally, he places the largest bead on it and I make the ring with beads.
Passing the excess wires through the beads to adjust the fabric well and then cutting the excess.
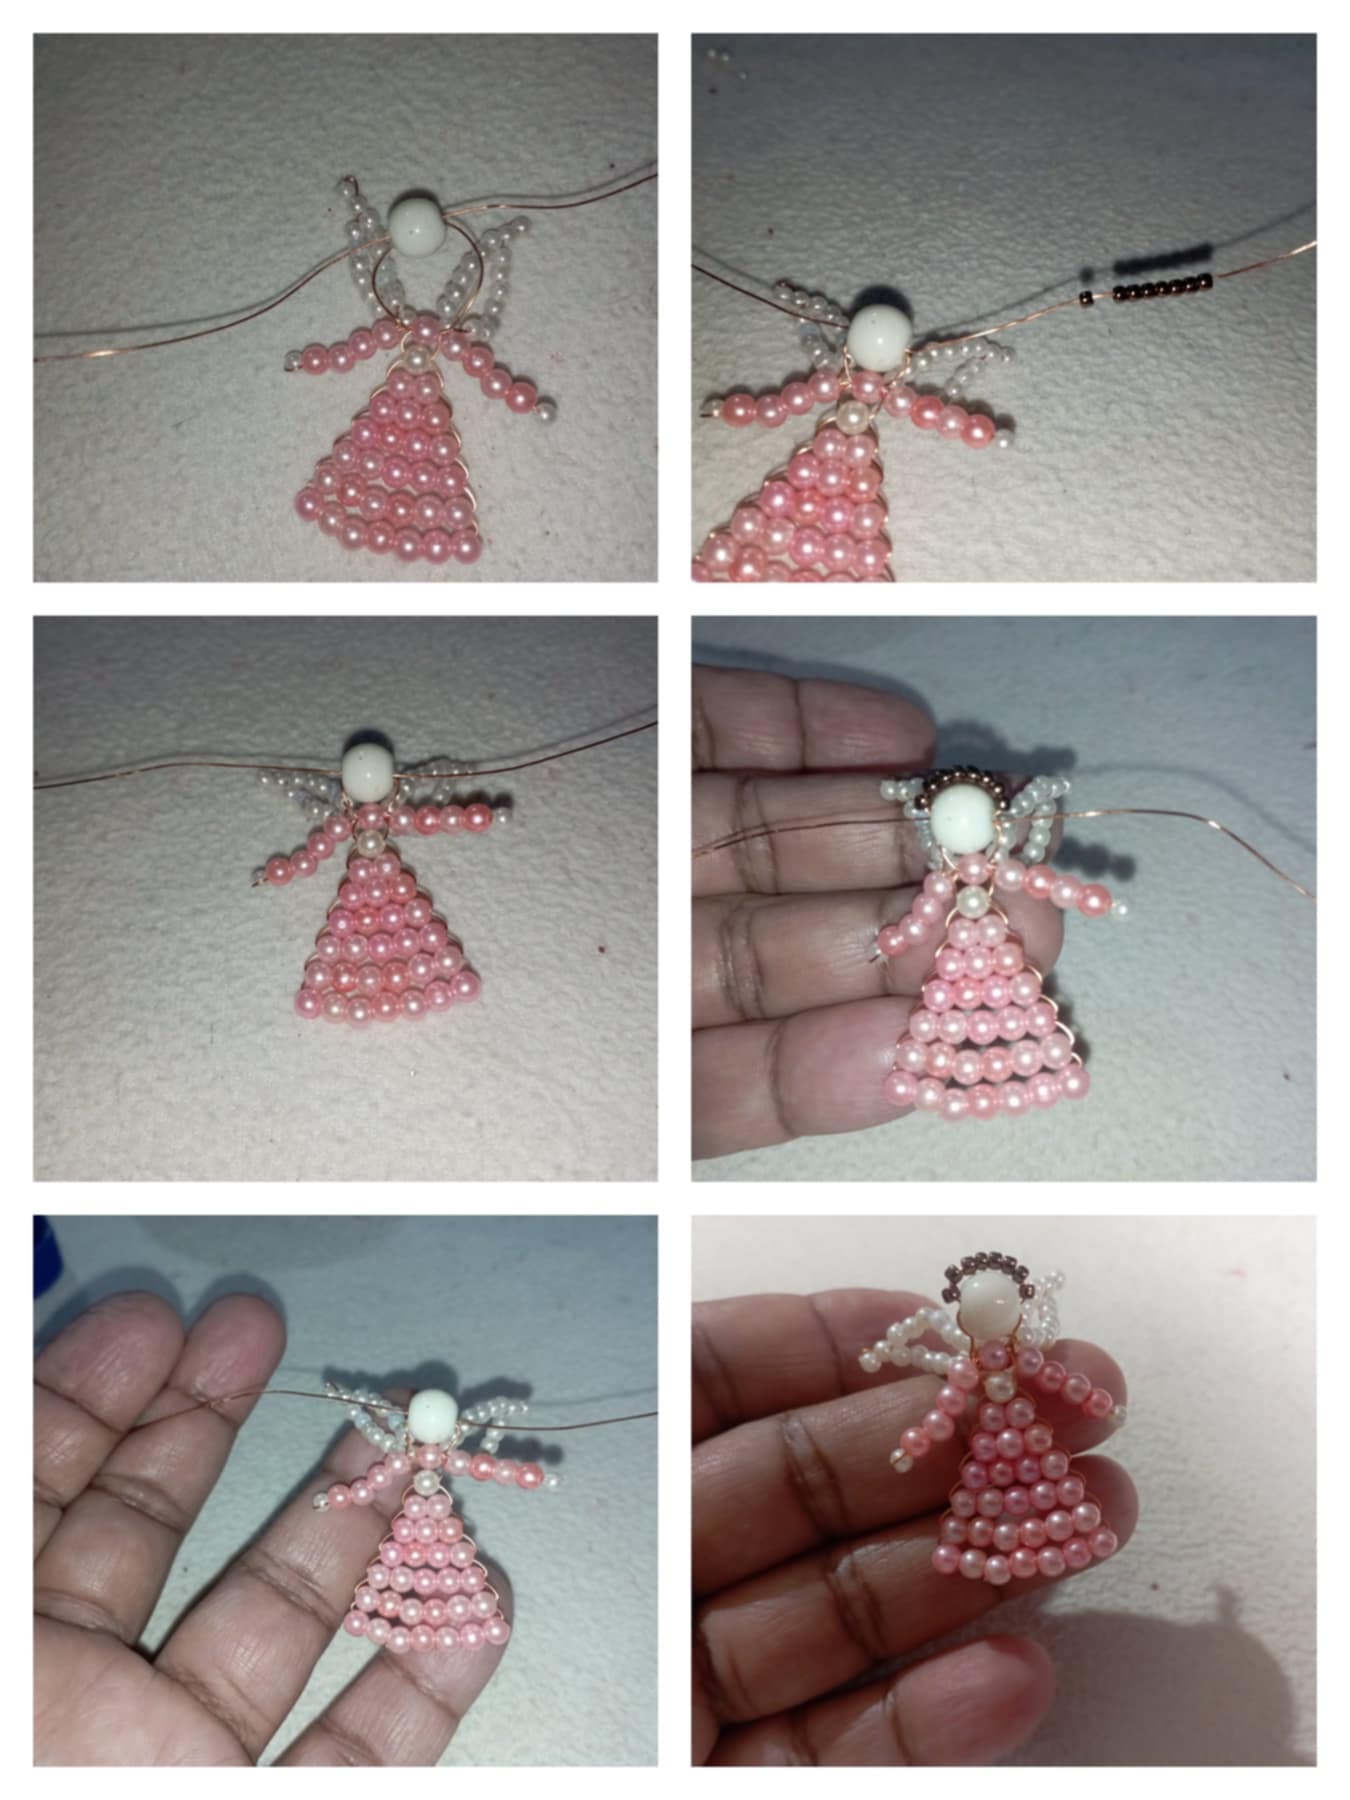
Y este es el resultado, un lindo y tierno angelito, que lo podemos colocar dónde quieras.
Siempre feliz de compartir mis post con ustedes y gracias por estar.
And this is the result, a cute and tender little angel, which we can place wherever you want.
Always happy to share my posts with you and thanks for being there.
.jpg)
Dios los bendiga..
God bless you..

This angel design would serve as a great pendant. Beautiful work
Beautifull doll with the help of pearl
muy bonito y tierno!
very nice and tender!
Hola, muy delicada y llamativa tu creación.
!DIY
You can query your personal balance by
@virgilio07 just sent you a DIY token as a little appreciation for your post dear @carolycesar15! Feel free to multiply it by sending someone else !DIY in a comment :) You can do that x times a day depending on your balance so:!DIYSTATSOh que bonito! 😍 debe ser ideal para un recuerdo. Gracias por compartir el paso a paso
Oh how pretty 😍 it must be ideal for a keepsake. Thanks for sharing the step by step
Que bonito te quedó este angelito, los colores son muy lindos. Saludos.