Hola, hola amigos de @diyhub reciban un caluroso abrazo 🤗
Nuevamente por aquí con otro proyecto en honor a los tiernos, graciosos y traviesos gatos 🐱, estoy encantada con esta iniciativa he visto trabajos muy hermosos de los miembros de esta comunidad, creo que será difícil elegir a los ganadores.
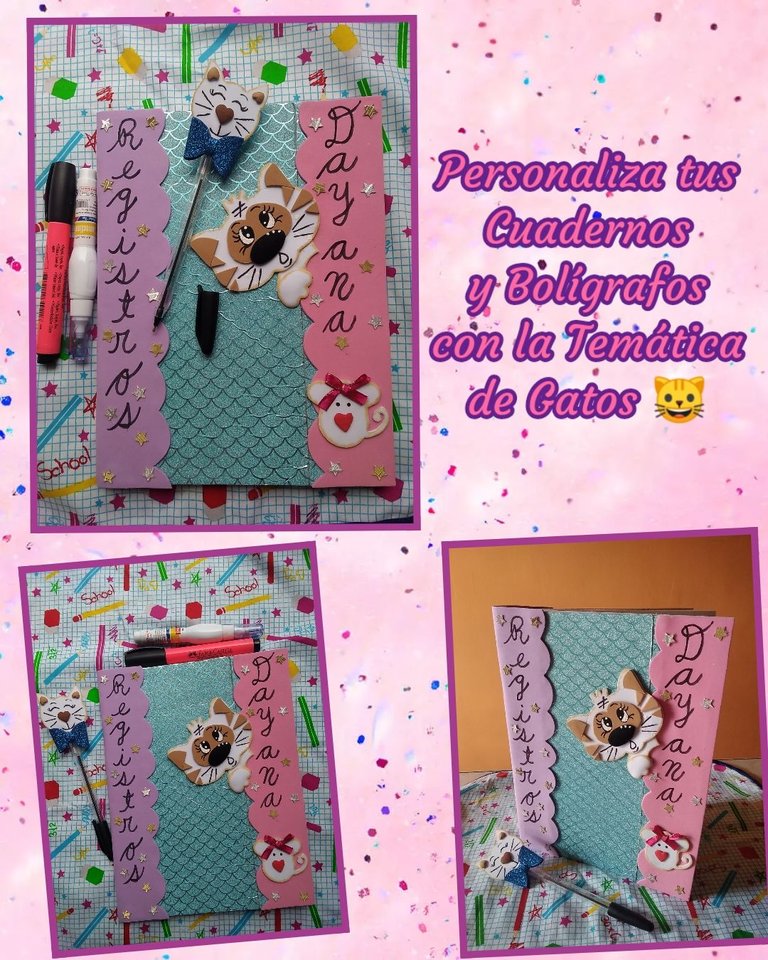
Lo que les traigo hoy es un hermoso proyecto, ya que como maestra cada nuevo año escolar me gusta personalizar mi libreta y bolígrafo y que mejor diseño que el de un bello minino, por ello los invito a que me acompañen al paso a paso.
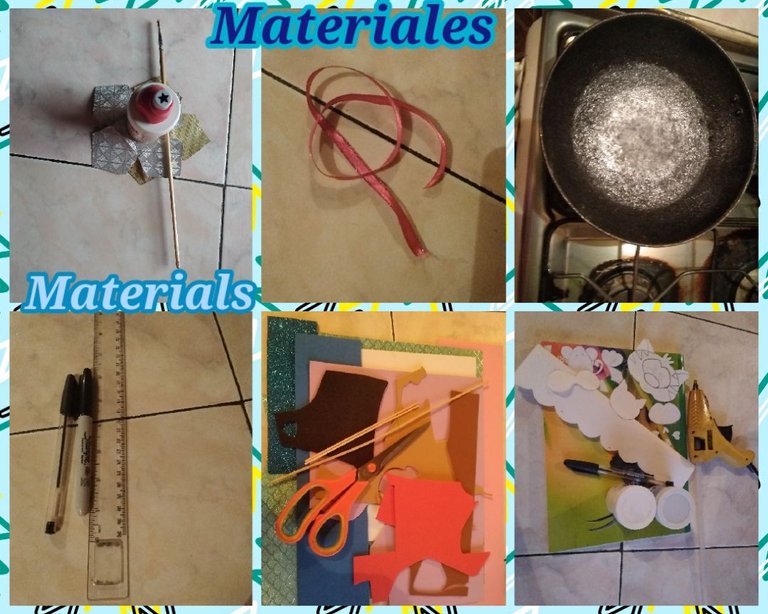
Materiales:
🐾 Foami (goma eva) negro, blanco, marrón claro y oscuro,lila, rojo, rosado,azul escarchado, azul claro texturizado.
🐾 Retazo de cartulina metalizada dorada y plateada.
🐾 1 Libreta y bolígrafo.
🐾 Pinturas al frio color piel, negro y blanca.
🐾 Pistola de silicón, palito de altura, regla, marcador fino negro, tijera,pincel fino.
🐾 Cinta delgada fucsia, patrones y perforador en forma de estrella.
🐾 Sartén.
Hello, hello friends of @diyhub receive a warm hug 🤗
Here again with another project in honor of the cute, funny and naughty cats 🐱, I am delighted with this initiative, I have seen very beautiful works by the members of this community, I think it will be difficult to choose the winners.
What I bring you today is a beautiful project, since as a teacher every new school year I like to personalize my notebook and pen and what better design than that of a beautiful pussycat, so I invite you to accompany me step by step.
Materials:
🐾 Foami (eva rubber) black, white, light and dark brown, lilac, red, pink, frosty blue, textured light blue.
🐾 Golden and silver metallic cardboard piece.
🐾 1 Notebook and pen.
🐾 Skin-colored, black and white cold paintings.
🐾 Silicone gun, height stick, ruler, black fine marker, scissors, fine brush.
🐾 Thin fuchsia ribbon, patterns and star-shaped perforator.
🐾 Skillet.
Comenzaremos pasando al foami (goma eva) usando el palito de altura:
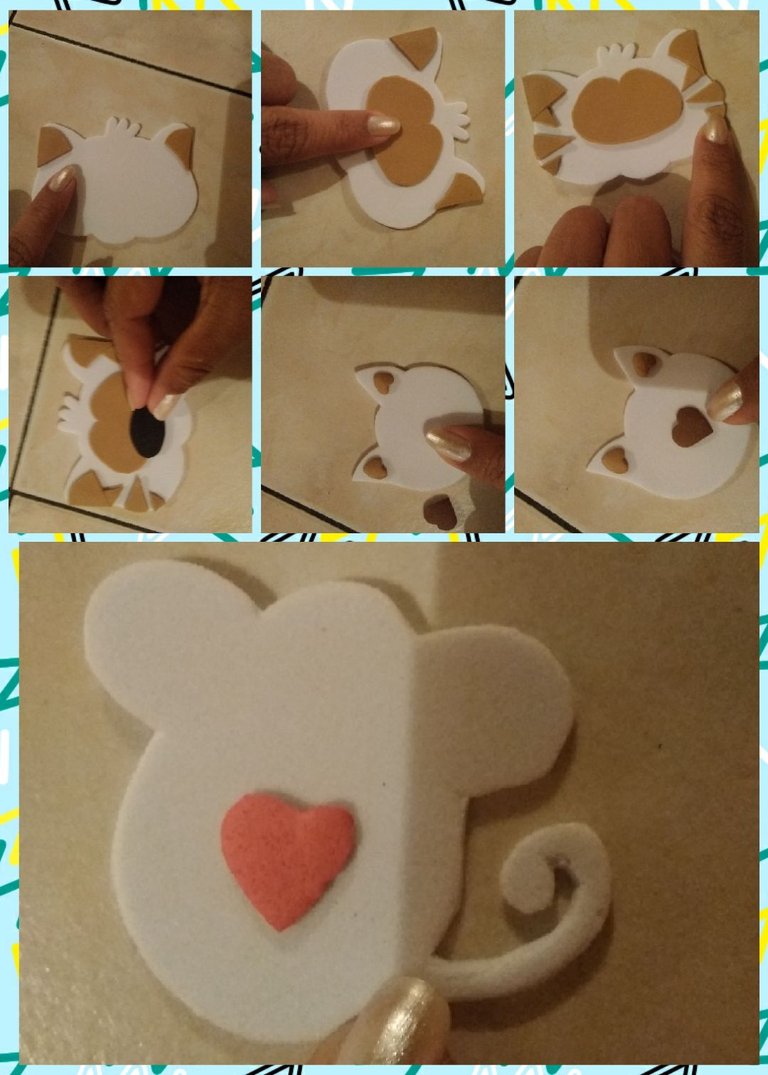
En el blanco: las caras de los dos gatos, la patita y el pecho del mismo también el ratón.
Marrón claro: el antifaz de la cara, las seis manchitas de forma triangular y los lóbulos de las orejas de ambos gatos.
Marrón oscuro: la nariz del gato que va a ser para el bolígrafo.
Negro: la nariz del gato para el cuaderno.
Rojo: el corazón para el ratón.
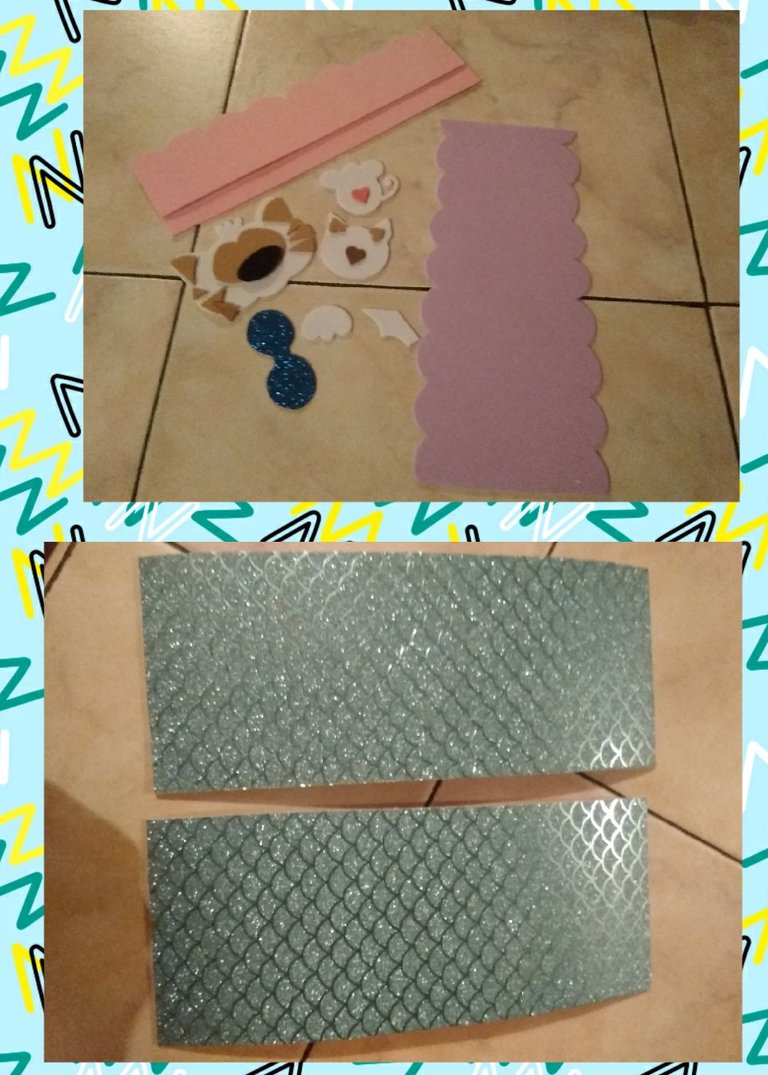
Rosado: los laterales del cuaderno de ello sacaremos dos.
Lila: El patrón para el lomo del cuaderno se sacara uno.
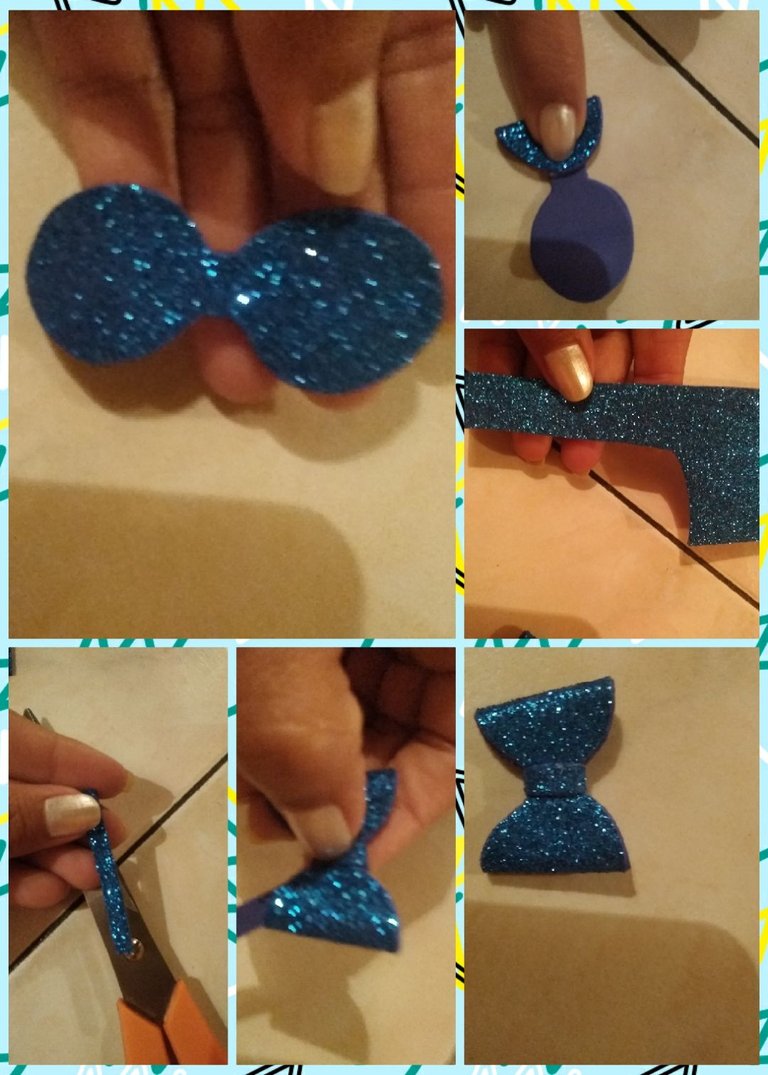
Azul texturizado: dos rectángulos de 10cm ancho X 24cm largo.
Azul escarchado: el lazito para el gato del bolígrafo.
We will start by going to the foami (eva rubber) using the height stick:
In the target: the faces of the two cats, the paw and the chest of the cat, also the mouse.
Light brown: the face mask, the six triangular-shaped spots and the earlobes of both cats.
Dark Brown: the nose of the cat that will be for the pen.
Black: the cat's nose for the notebook.
Red: the heart for the mouse.
Pink: the sides of the notebook we will take two out of it.
Lila: The pattern for the spine of the notebook will be taken out one.
Textured blue: two rectangles 10cm wide X 24cm long.
Frosty Blue: the little bow for the pen cat.
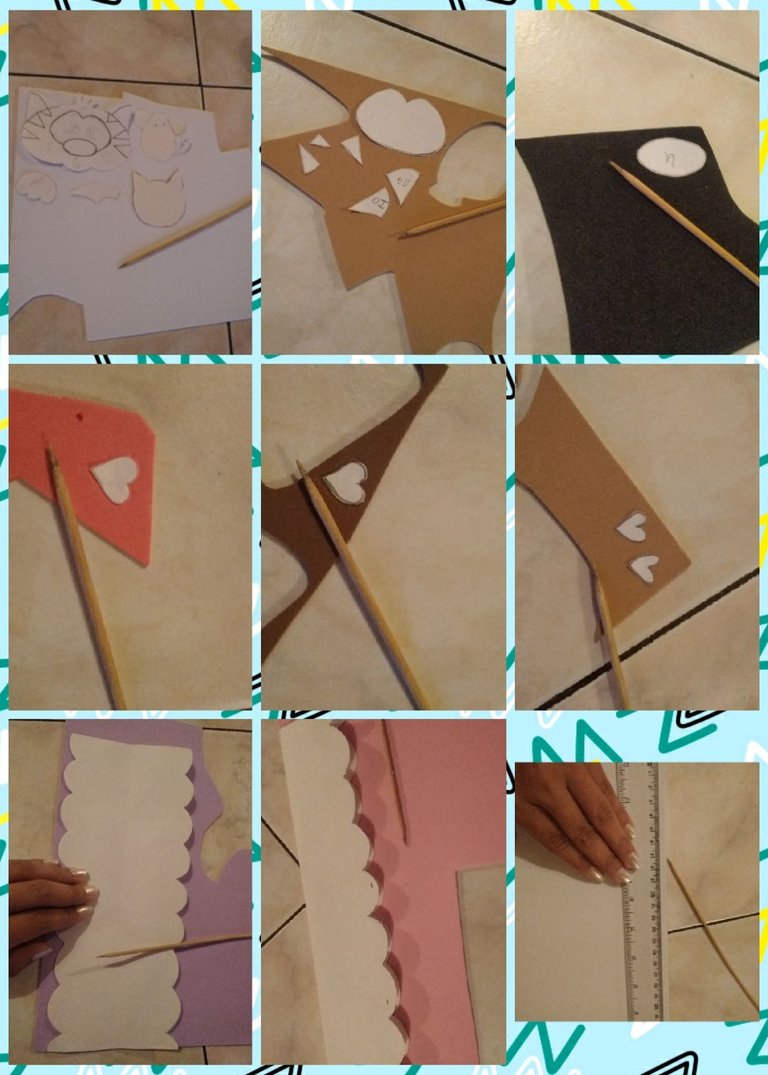
Hora de recortar ✂️
Tomaremos la tijera y recortaremos cada uno de los patrones que pasamos al foami en el paso anterior, es importante al hacerlo cuidar de no picotear el material ya que de un buen recortado depende que nuestro trabajo nos quede impecable.
Time to trim ✂️
We will take the scissors and cut out each of the patterns that we passed to the foami in the previous step, it is important when doing it to take care not to peck the material since a good cut depends on our work being impeccable.
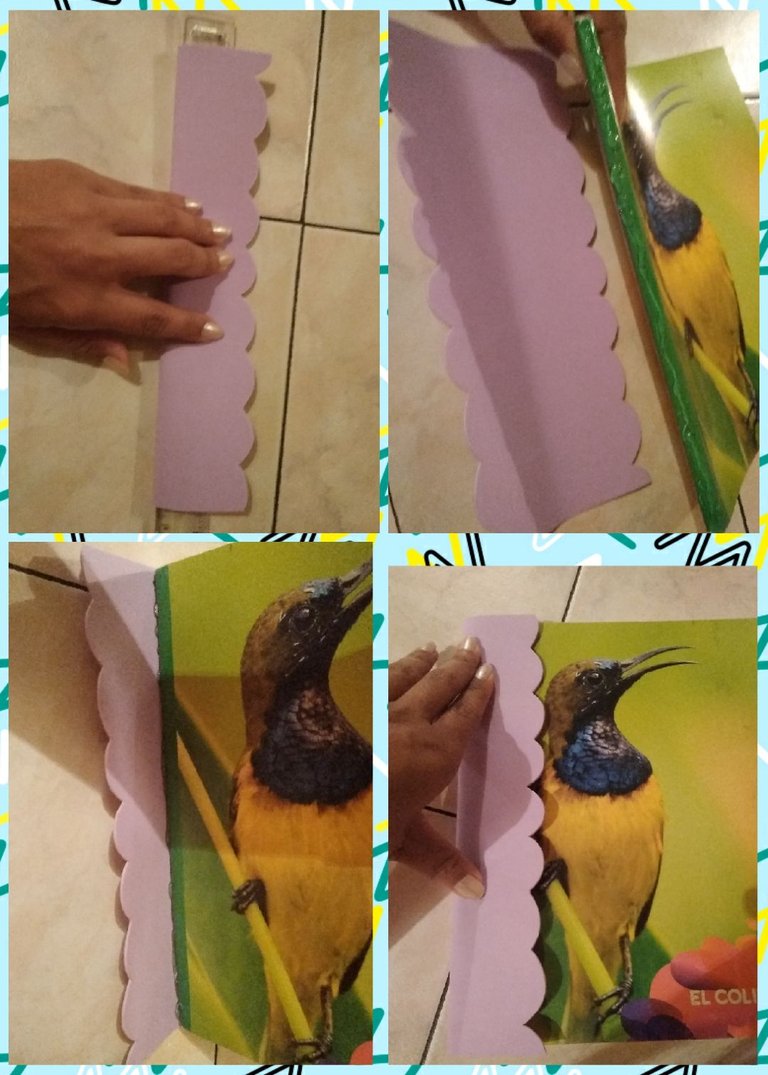
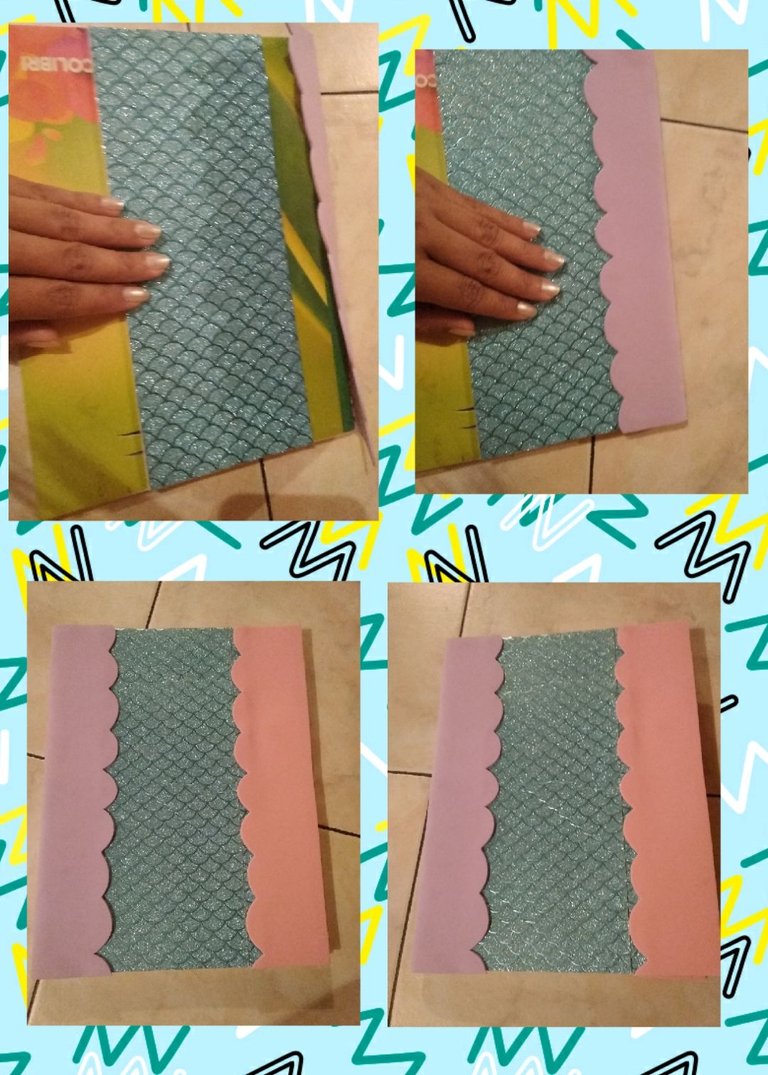
Decoración de la libreta 📓
Iniciaremos doblando el lomo que sacamos en el foami lila para la libreta, para ello doblaremos a la mitad le colocaremos la regla en medio presionamos para que el foami agarre el doblez para que sea mucho más fácil al pegarlo, le colocaremos silicón y lo pegamos primero en el borde, continuaremos pegando en el centro de la libreta el rectángulo que sacamos en azul texturizado buscando que nos quede uno de los extremos debajo de las onda del que pegamos anteriormente, ahora tomaremos las ondas que sacamos en rosado y se pegara en el espacio que nos queda de la libreta es decir el otro borde, este paso se repetirá en la parte trasera de la la misma.
Notebook decoration 📓
We will start by folding the spine that we took out in the lilac foam for the notebook, for this we will fold it in half, we will place the ruler in the middle, press so that the foam grips the fold so that it is much easier to paste it, we will place silicone and paste it first on the edge, we will continue pasting the rectangle that we took in textured blue in the center of the notebook, looking for one of the ends to remain under the waves of the one we pasted previously, now we will take the waves that we took in pink and it will stick in the space that we have left of the notebook, that is, the other edge, this step will be repeated on the back of it.
En el sartén previamente caliente colocaremos las piezas para inflarla un poquito: la patita, las narizitas de los gatos, el corazón y el lóbulo de las orejitas del gato pequeño.
In the previously hot frying pan we will place the pieces to inflate it a little: the paw, the cats' noses, the heart and the lobe of the little cat's ears.
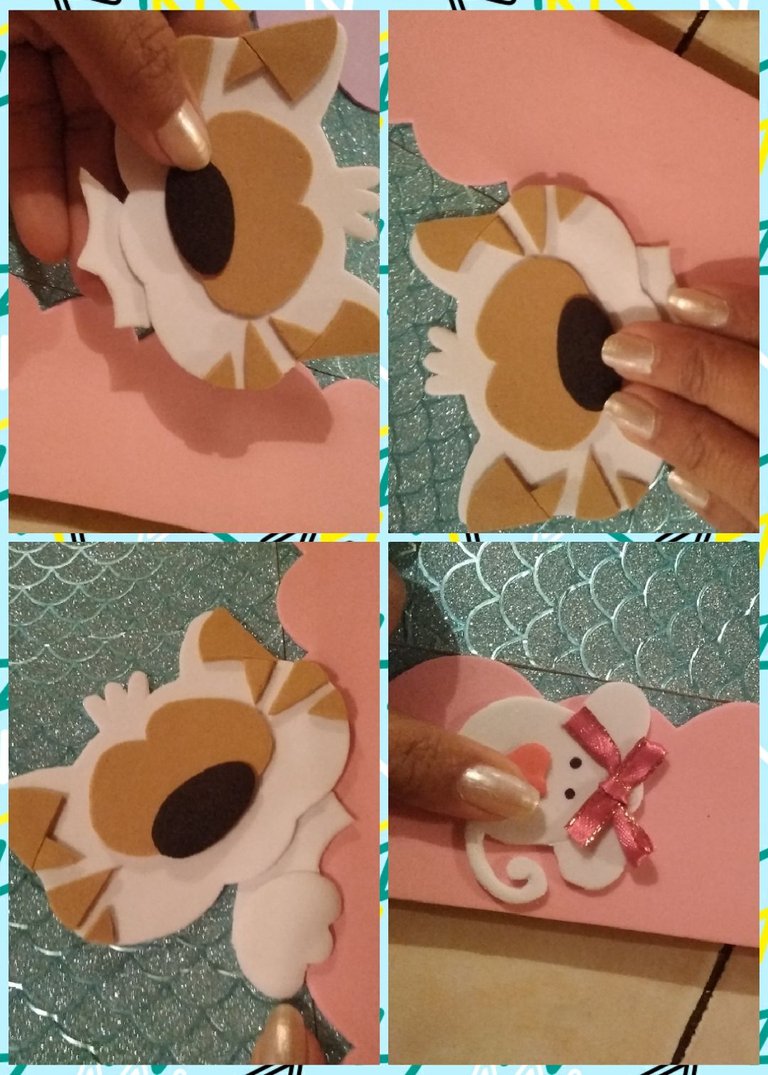
Ahora tomamos las piezas de la cara de gato para la libreta con silicón pegamos los lóbulos de as orejas, el antifaz de los ojos y abajo de este justo en el centro se pegara la nariz que sacamos en negro, ahora ubicaremos de ambos lados las tres manchas que tiene en su cara.
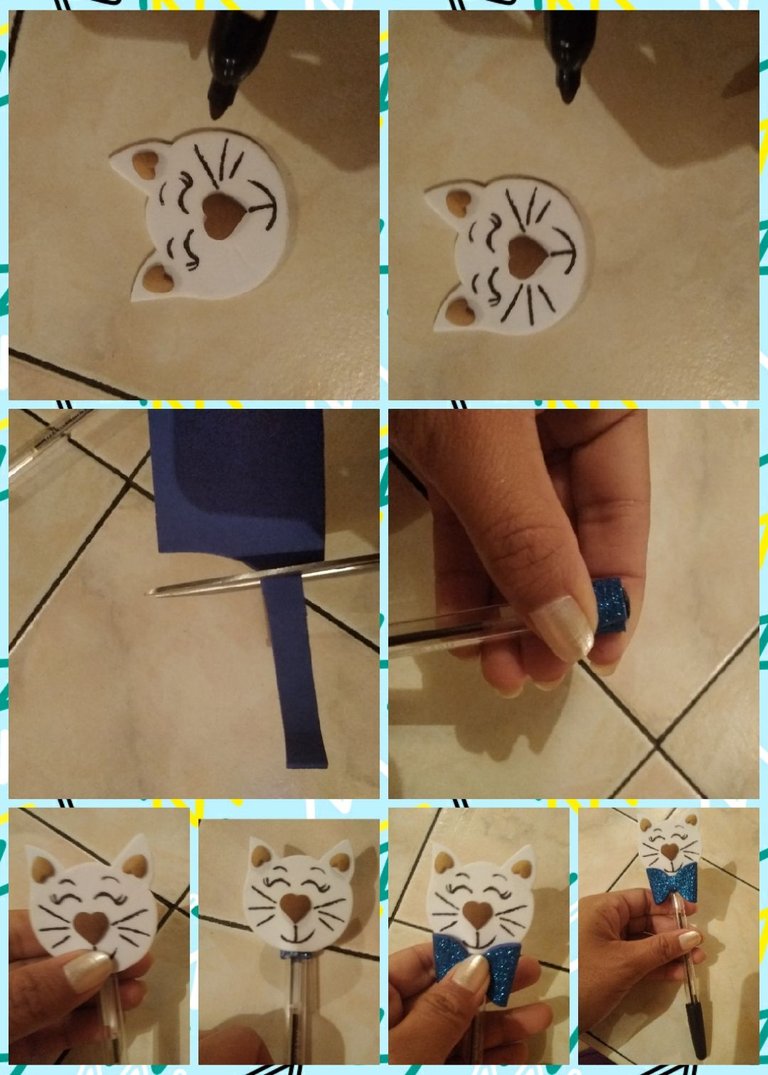
A la carita del gato para el bolígrafo le pegaremos los lóbulos en las orejitas y en el centro de la cara ubicaremos la nariz.
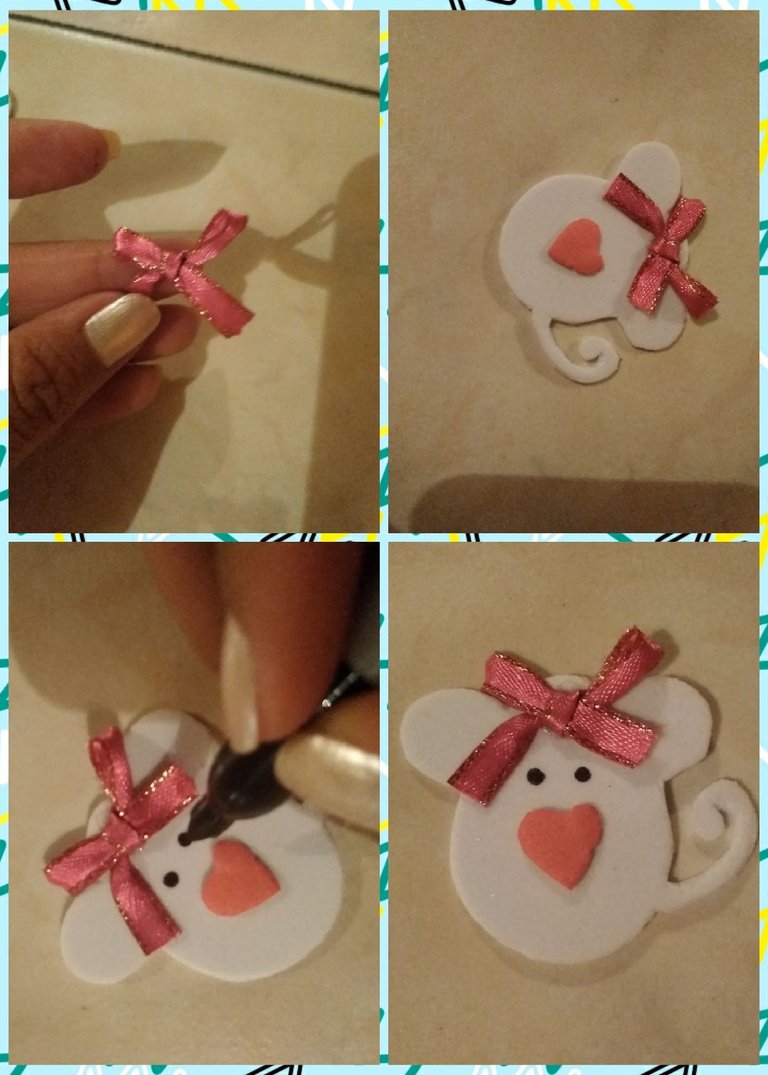
Al ratón le pegaremos el corazón justo en la barriga.
Now we take the pieces of the cat's face for the notebook, with silicone we glue the earlobes, the eye mask and below this, right in the center, we will glue the nose that we took out in black, now we will place the three on both sides spots you have on your face.
We will glue the earlobes to the cat's face for the pen and we will place the nose in the center of the face.
The mouse will hit the heart right on the belly.
Decoración del bolígrafo 🖊
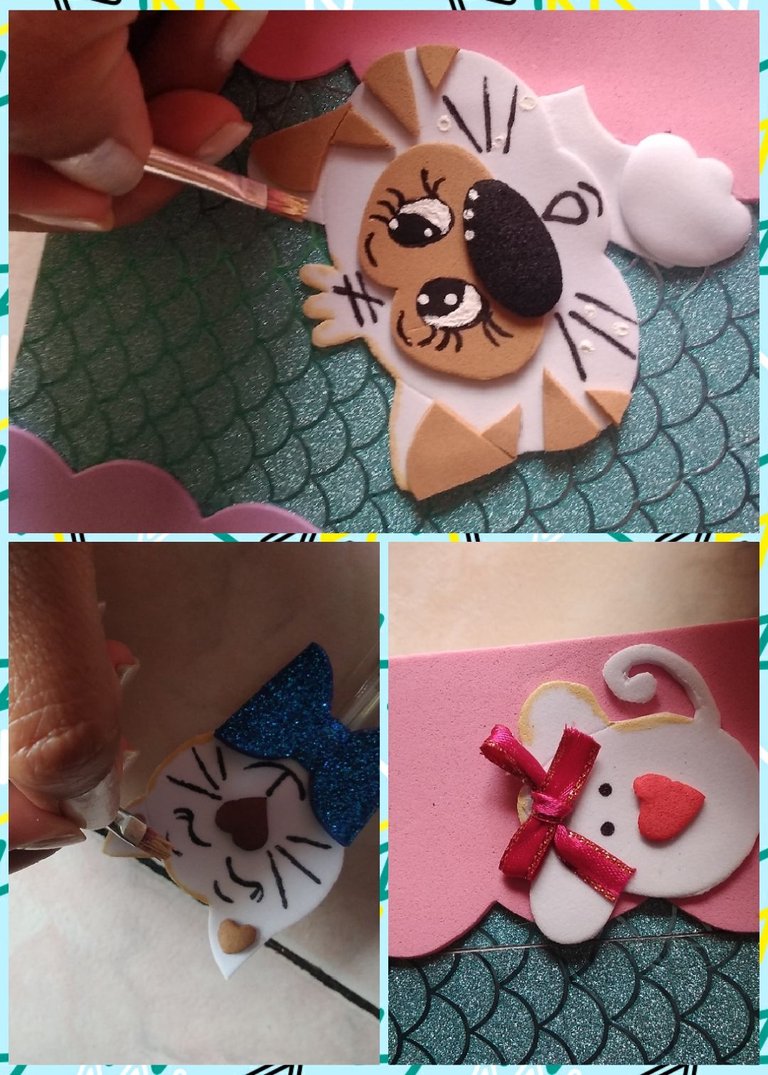
El patrón del lazo lo volteamos y doblamos unos de sus extremos este se pegara y luego el otro extremo, del foami escarchado recortaremos una pequeña tirita que pegaremos en el centro de lazo dandole una pequeña vuelta. También recortaremos una tira para pegarla en la parte de arriba del bolígrafo ya que allí se pegara la cara de gatito.
A la carita pequeña del gato le dibujaremos los ojos, cejas, los bigotes y la boca con el marcador fino negro. Esta carita la pegamos al bolígrafo con silicón presionamos unos segundos para que nos quede bien pegado, debajo de la carita del gato fijaremos el lazo que armamos este será el corbatín del minino esto lo hará ver muy elegante.
Pen decoration 🖊
Turn the bow pattern over and fold one of its ends, this will stick and then the other end, from the frosted foam, we will cut a small band-aid that we will glue in the center of the bow, giving it a small twist. We will also cut a strip to stick it on the top of the pen since the kitten's face will be stuck there.
We will draw the eyes, eyebrows, whiskers and mouth to the small face of the cat with the fine black marker. We glue this face to the pen with silicone, press for a few seconds so that it sticks well, under the cat's face we will fix the bow that we made, this will be the pussycat's bowtie, this will make it look very elegant.
El ratoncito
Con la cinta fucsia armaremos un pequeño lazo y se le pegara con silicón en la cabeza del ratón, luego se le dibujara dos puntitos que se serán los ojitos del ratón.
The little mouse
With the fuchsia ribbon we will make a small bow and it will be glued to the head of the mouse with silicone, then two little dots will be drawn that will be the eyes of the mouse.
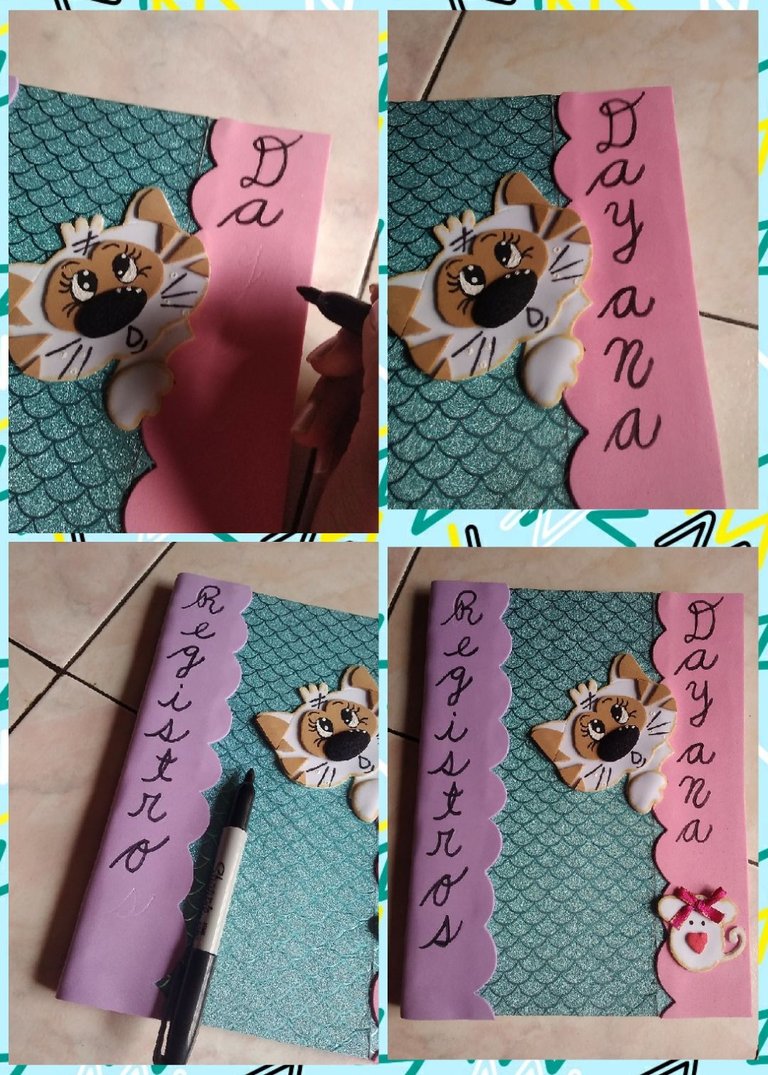
A la cara del gato se le pegara el pecho y luego la pegaremos a la libreta en la parte frontal justo en donde dan las ondas rosadas se ubicara que nos quede un poco ladeada, seguiremos con la patita cerca de su carita y nos hará parecer que esta asomadito nuestro gatito.
En las misma ondas rosadas pero abajo pegaremos el ratoncito con silicón.
Ahora tomaremos el marcador y dibujaremos los ojos, cejas, bigotes, una boca que nos quede graciosa, que parezca que nuestro gato esta sorprendido y por último debajo de sus tres pelitos unas pequeñas líneas que adornaran su cara. Con el palito de altura lo mojamos en la pintura blanca y pintaremos una parte de sus ojos, con la pintura negra pintaremos el otro circulito del ojo y dejamos secar bien, para darle luz a la mirada le haremos dos puntitos en cada ojo y tres puntitos en su nariz y en sus bigotes.
The chest will stick to the cat's face and then we will stick it to the notebook in the front part just where the pink waves give, it will be located so that it remains a little to one side, we will continue with the paw close to its face and it will make us appear that Our kitten is peeking out.
In the same pink waves but below we will glue the little mouse with silicone.
Now we will take the marker and we will draw the eyes, eyebrows, mustaches, a mouth that is funny, that seems that our cat is surprised and finally under its three little hairs some small lines that will decorate its face. With the height stick we dip it in the white paint and we will paint a part of its eyes, with the black paint we will paint the other little circle of the eye and let it dry well, to give light to the look we will make two dots in each eye and three dots on his nose and on his whiskers.
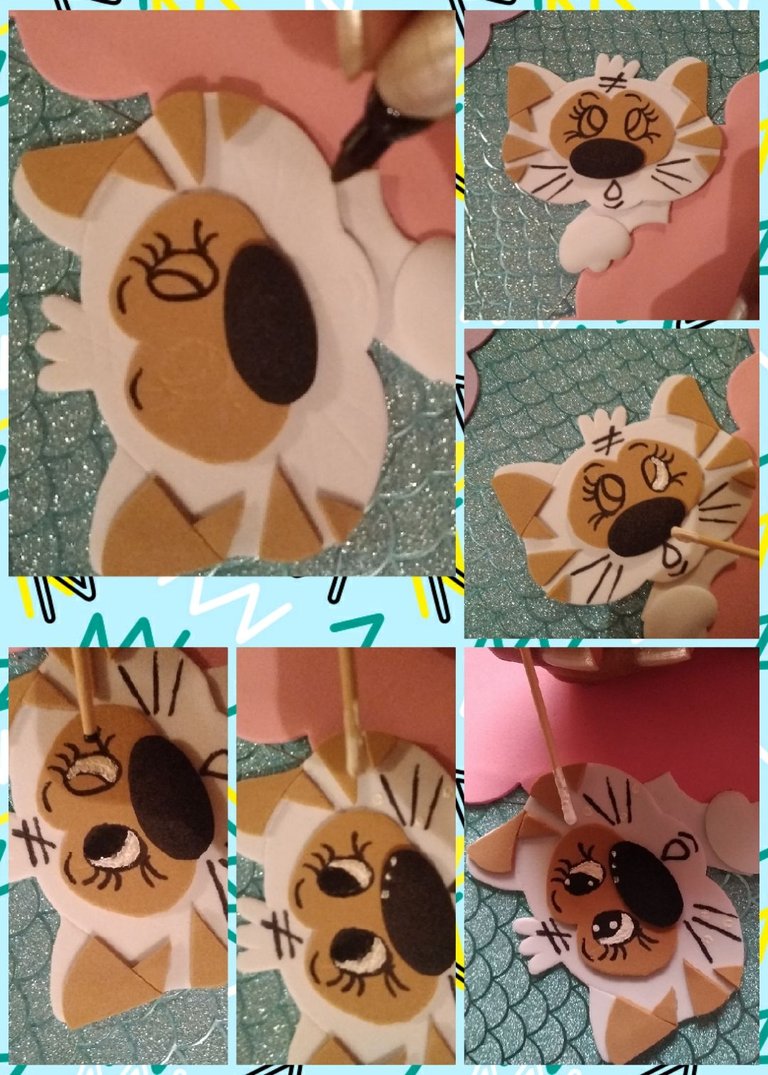
With the skin-colored cold paint, we will shade the faces of the cats and the little mouse, dipping the fine brush and we will outline each of the figures to give the figures more luminosity.
Identifica la libreta 🖊
Con el marcador negro le coloque mi nombre del lado de la onda rosada, la letra que use fue cursiva y las ubique una debajo de la otra y del otro lado coloque la palabra registros ya que es para el uso que le daré a la libreta.
Identify the notebook 🖊
With the black marker I placed my name on the side of the pink wave, the letter I used was italics and I placed them one below the other and on the other side I placed the word records since it is for the use that I will give to the notebook.
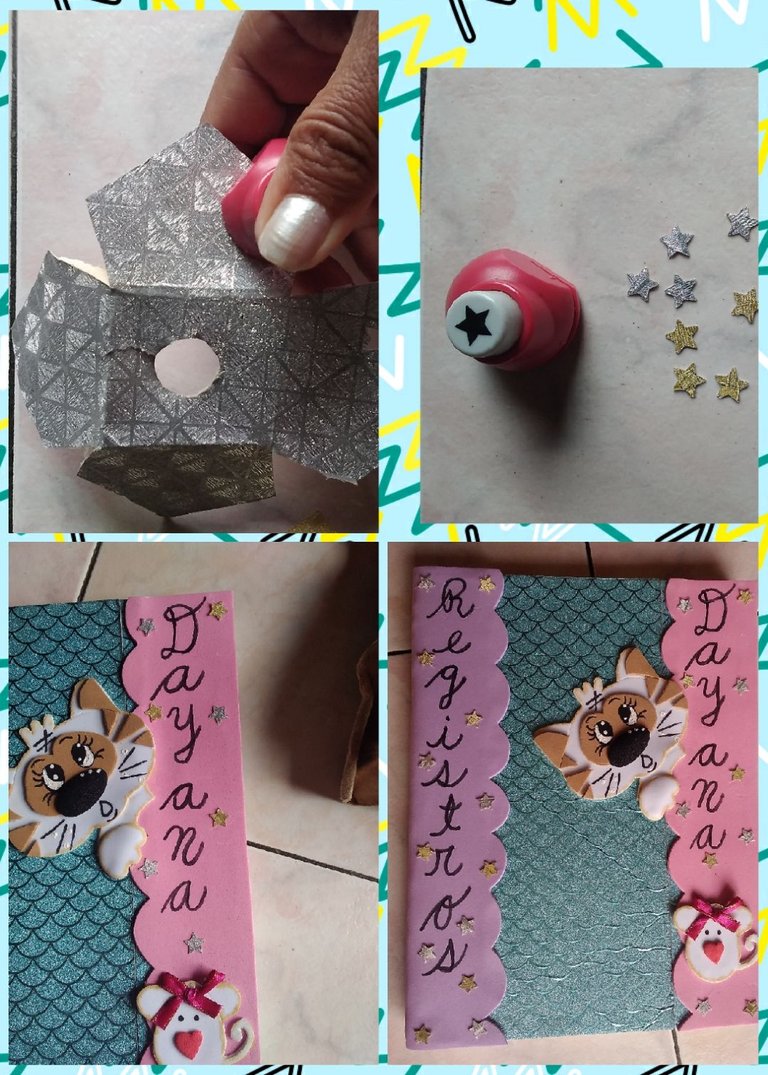
El último paso será sacar estrellitas doradas y plateadas perforando las cartulinas, para luego pegarlas de forma aleatoria en donde escribimos los nombres a la libreta, las estrellitas les dará un toque decorativo a nuestra libreta.
De esta manera terminamos este lindo proyecto de hoy, personalizando mi libreta y bolígrafo con esta tierna temática de gatito.
La invitación es a seguirse sumando a esta bella iniciativa Tributo a los Gatos🐱, la he disfrutado tanto por ser amante de estos lindos felinos ❤️.
Por acá les dejo mi resultado final espero les guste y les resulte de gran utilidad.
The last step will be to get little gold and silver stars by drilling holes in the cardboard, and then sticking them randomly where we write the names on the notebook, the little stars will give our notebook a decorative touch.
In this way we finished this beautiful project today, personalizing my notebook and pen with this cute kitty theme.
The invitation is to continue joining this beautiful initiative Tribute to Cats🐱, I have enjoyed it so much for being a lover of these beautiful cats ❤️.
Here I leave my final result I hope you like it and find it very useful.

Y bien amigos hasta aquí mi segunda entrada en esta hermosa iniciativa #Diycatcontest, les deseo que tengan un lindo día cargado de energías positivas ✨
Las fotos fueron tomadas y editadas con mi celular
use la aplicación "Foto Collage"
La traducción la realice con el traductor de google
Hasta un Próximo Encuentro!!!
🤗😘🐱
Y bien amigos hasta aquí mi segunda entrada en esta hermosa iniciativa #Diycatcontest, les deseo que tengan un lindo día cargado de energías positivas ✨
Las fotos fueron tomadas y editadas con mi celular
utiliza la aplicación "Foto Collage"
La traducción la realiza con el traductor de google
¡¡¡Hasta un Próximo Encuentro!!!
🤗😘🐱
Muy buena que está esta idea para la personalización del bolígrafo, de verdad me gusta, no sé por qué pero se vería lindo en un consultorio de alguna doctora o algo asi...
!LUV
(1/5) sent LUV. | connect | community | HiveWiki | NFT | <>< daily@dayanita2, @zonadigital21
! help(no space) to get help on Hive. InfoSaludos un abrazo 🤗Gracias @zonadigital21 , claro claro es ideal para los amantes de los gatitos.
That's a great cat-themed work. Good luck with the contest.
thank you so much @diyhub
Discord Server.This post has been manually curated by @bhattg from Indiaunited community. Join us on our
Do you know that you can earn a passive income by delegating to @indiaunited. We share more than 100 % of the curation rewards with the delegators in the form of IUC tokens. HP delegators and IUC token holders also get upto 20% additional vote weight.
Here are some handy links for delegations: 100HP, 250HP, 500HP, 1000HP.
100% of the rewards from this comment goes to the curator for their manual curation efforts. Please encourage the curator @bhattg by upvoting this comment and support the community by voting the posts made by @indiaunited.
Saludos. Te quedó muy hermosa..!
Saludos 🤗Gracias amiga @leslym
Me encantó esta segunda entrada querida @dayanita2 impecable y tierna.
Un abrazo 🤗Gracias amiga @lorennys por tú apreciación
Muy bonito trabajo, los cuadernos parecen de revista. Continúa así. Saludos
Gracias @emiliocabrera 🤗
Me encantan los ojos de gato marron con blanco quedaron preciosos!
Saludos 🤗Gracias amiga @lismarcarolina2