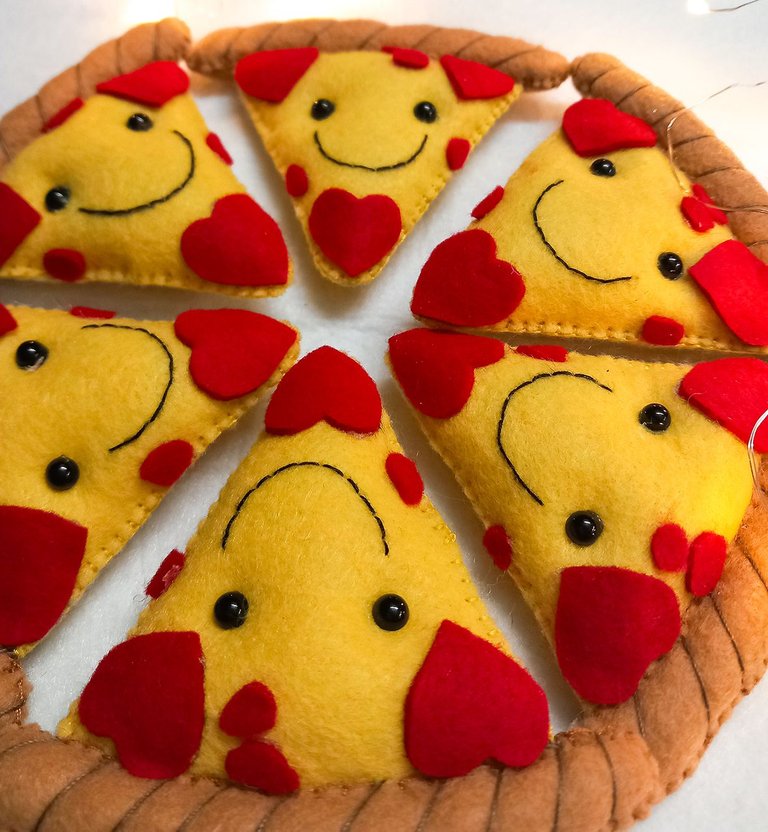
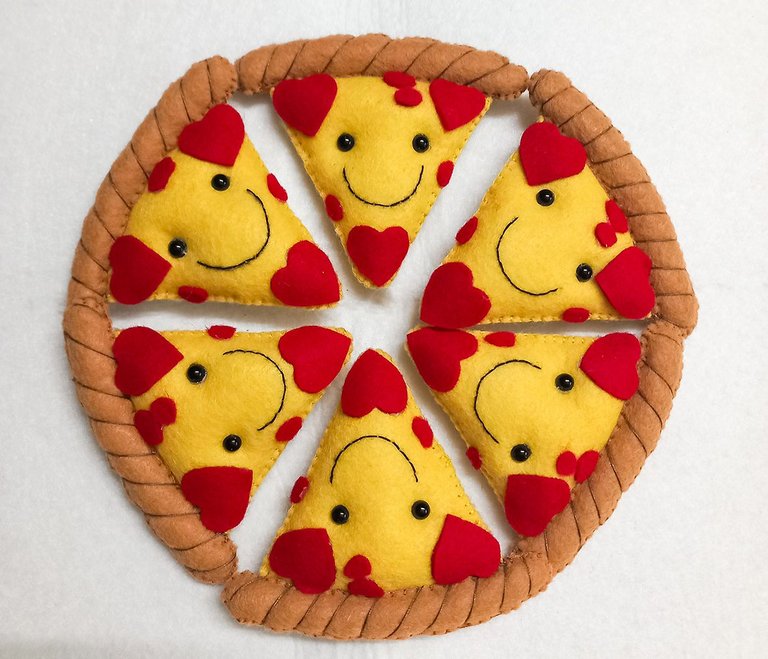
On February 14 we all strive to make unique and thoughtful gifts for our partners and friends. In this case I wanted to make an imitation pepperoni pizza. My partner is a pizza fan and I wanted to mix these two themes. We both really liked the result and enjoyed a funny moment when at dinner time I served these slices of pizza in love.
Without further ado, let's go to the tutorial.
🍕Materials:
- Felt:
-red
-yellow
-brown - Yarn of the corresponding colors.
- black half beads for the eyes.
- Synthetic cotton stuffing.
El 14 de febrero todos nos esforzamos por hacer regalos únicos y detallistas a nuestras parejas y amigos. En este caso quise hacer una imitación a una pizza de pepperoni. Mi pareja es fan de las pizzas y quise mezclar estas dos temáticas. El resultado nos gustó mucho a ambos y disfrutamos de un momento gracioso cuando a la hora de la cena serví estas porciones de pizza enamorada.
Sin más vamos al tutorial.
🍕Materiales:
- Fieltro:
-rojo
-amarillo
-marrón- Hilo de los colores correspondiente.
- Medias perlas negras para los ojos.
- Relleno de algodón sintético.
🍕Step 1:
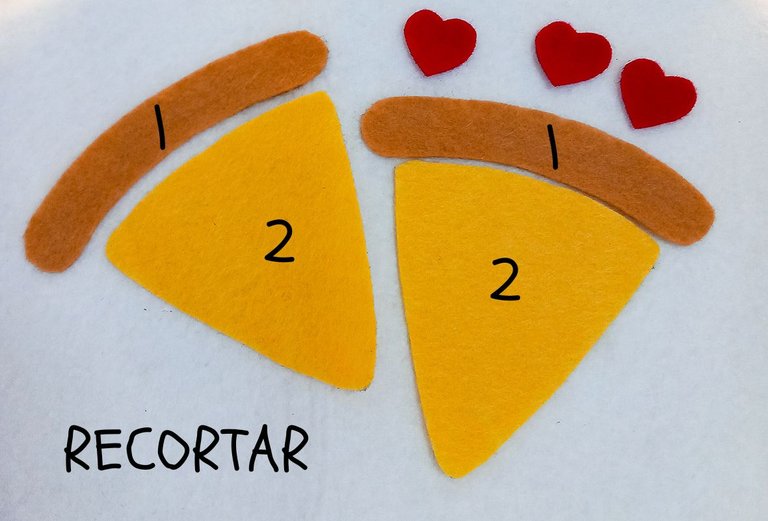
Cut the felt parts that will make up the piece. In yellow two triangles and in brown two parts that simulate the edge of the pizza. In red color three hearts to glue later.
🍕Paso 1:
Cortar las partes de fieltro que conformarán la pieza. De color amarillo dos triángulos y de color marrón dos partes que simulen el borde de la pizza. De color rojo tres corazones para pegar posteriormente.
🍕Step 2:
With the scallop stitch I go closing the two parts of the edge of the pizza involving the back of the triangles. (If you don't know how to do this leave it to me in the comments and I can make a separate tutorial).
I stuff the inside with synthetic cotton and finish closing.
🍕Paso 2:
Con la puntada festón voy cerrando las dos partes del borde de la pizza involucrando la parte trasera de los triángulos.
(si no sabe hacer esto déjamelo en los comentarios y puedo hacer un tutorial aparte).
Relleno el interior con algodón sintético y termino de cerrar.
🍕Step 3:
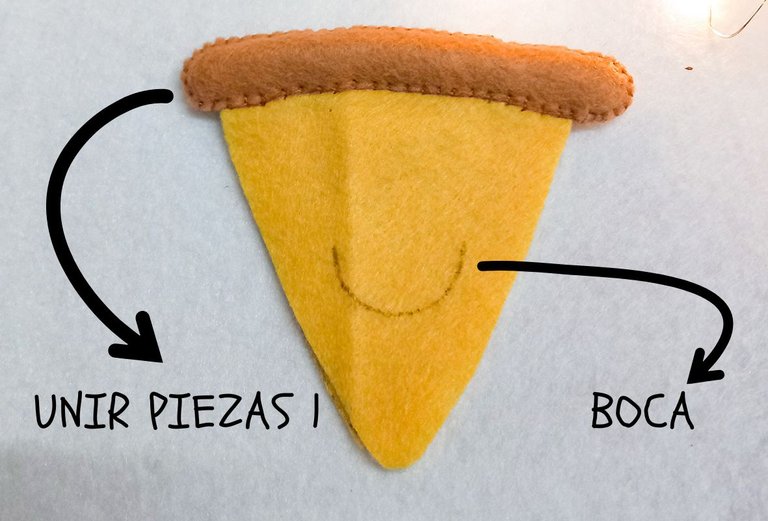
I draw and embroider on the front triangle a smiling mouth with black thread.
(remember not to involve the triangle that will form the back of our pizza slice so we can treat them independently later).
🍕Paso 3:
Dibujo y bordo sobre el triángulo delantero una boca sonriente con hilo negro.
(recuerde no involucrar el triángulo que va a conformar la parte de atrás de nuestra porción de pizza para luego poder tratarlas de manera independiente).
🍕Step 4:
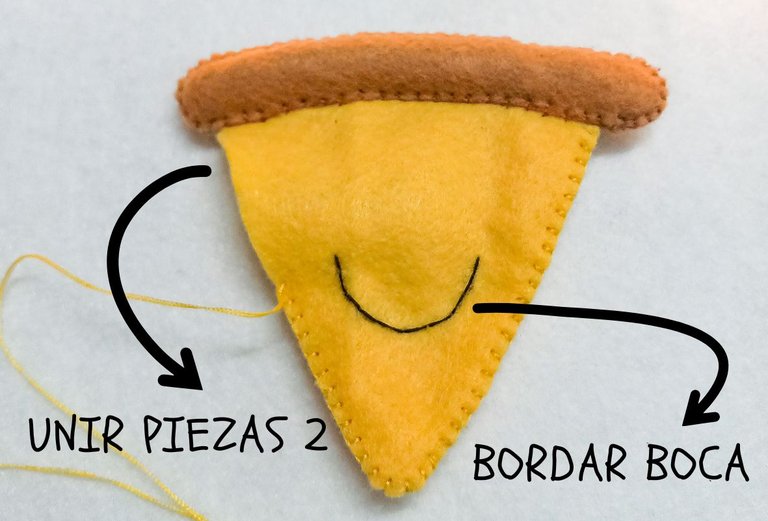
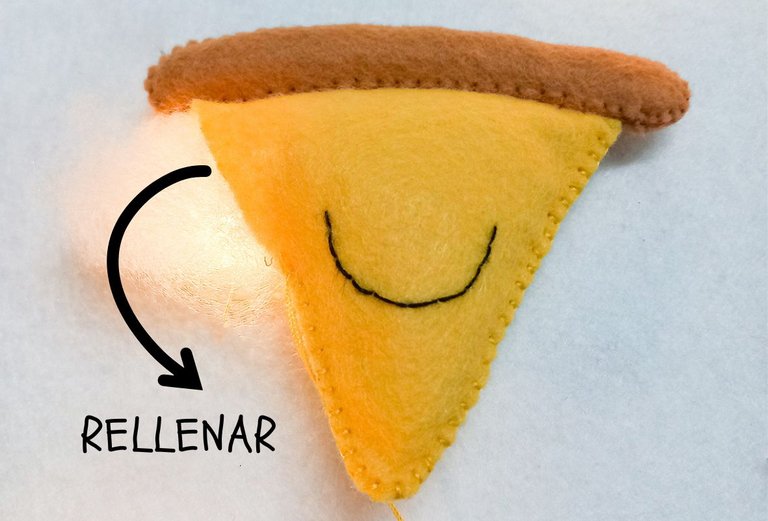
With scallop stitch I edge and join the rest of the triangle of the two pieces of pizzas leaving a space to introduce the cotton of the filling.
(it has to look like a bag, joined by all its parts with a small entrance).
🍕Paso 4:
Con puntada festón bordeo y uno el resto del triángulo de las dos piezas de pizzas dejando un espacio para introducir el algodón del relleno.
(tiene que quedar como una bolsa, unida por todas sus partes con una pequeña entrada)
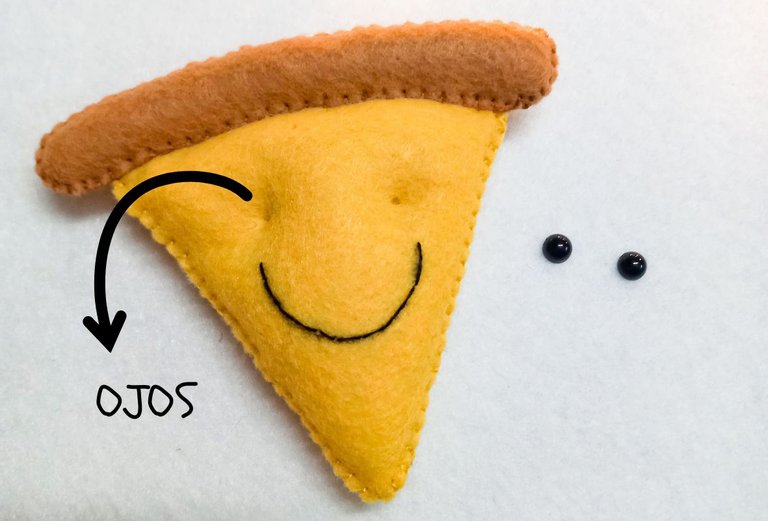
🍕Step 5:
Once the body is stuffed and all the edges are closed, I give two stitches where the eyes would go to sink the stuffing and give a more realistic finish.
(this is optional)
🍕Paso 5:
Una vez relleno el cuerpo y cerrados todos los bordes, doy dos puntadas en donde irían los ojos para hundir el relleno y de un acabado más realista.
(esto es opcional)

🍕Step 6:
I glue the black half pearls in place of the eyes and stitch a few long stitches around the edge to add more detail.
(If you don't have pearls, you can embroider the eyes, put beads or anything else that fits the purpose).
🍕Paso 6:
Pego las medias perlas negras en el lugar de los ojos y doy unas puntadas largas por el borde para añadir más detalles.
(si no tiene perlas puede bordar los ojos, poner canutillos o cualquier otra cosa que cumpla con el objetivo)
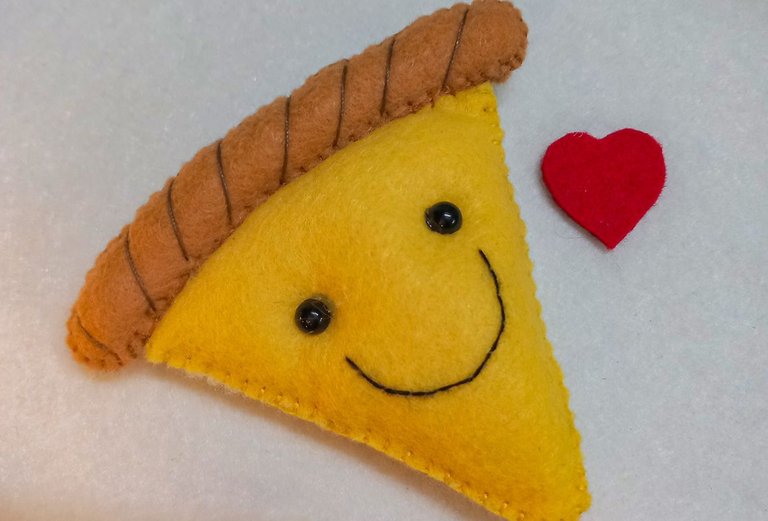
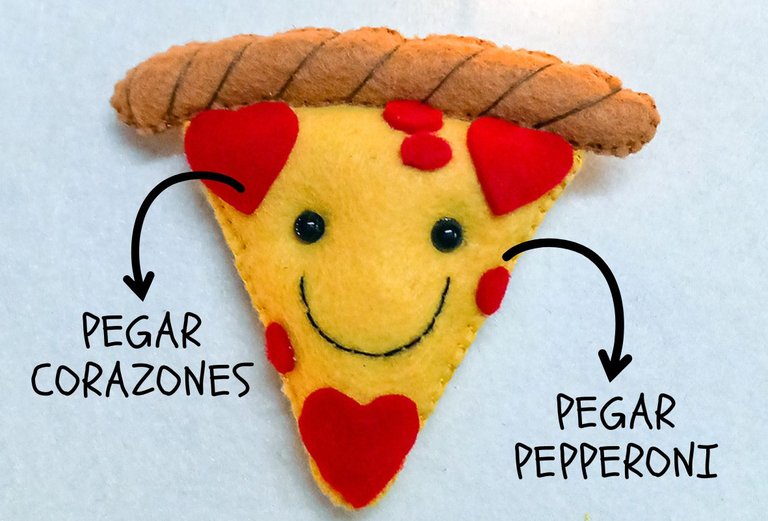
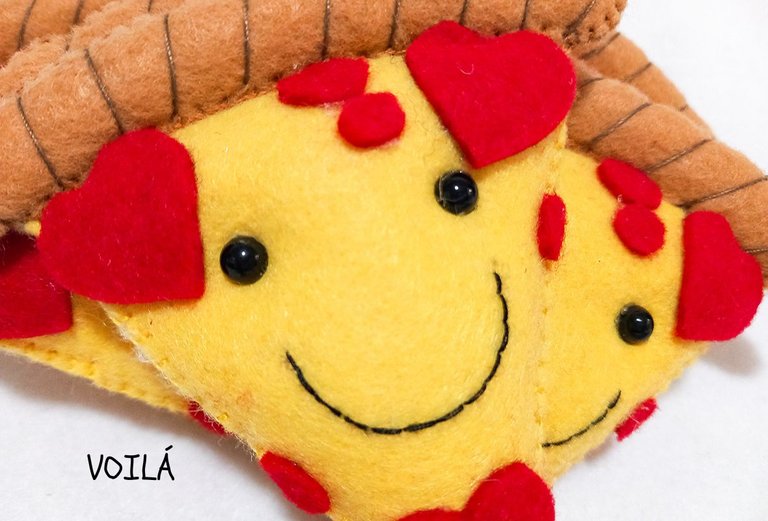
🍕Step 7:
All that's left is to glue the hearts. I placed them at the three ends of the pizza triangle because I had enough space at those ends. I added some small circles of indistinct shapes to simulate pieces of pepperoni.
🍕Paso 7:
Solo queda pegar los corazones. Yo los situé en las tres puntas del triángulo de la pizza porque me quedaba bastante espacio en esos extremos. Añadí unos pequeños círculos de formas indistintas para simular pedazos de pepperoni.
🍕Step 8:
Repeat these steps 5 more times. We would be left with six slices in total and they would make up all the slices of a full pizza.
(this is also optional, you can make as many slices as you want).
🍕Paso 8:
Repetir estos pasos 5 veces más. Nos quedarían seis porciones en total y conformarían todas las rebanadas de una pizza completa.
(esto también es opcional, puede hacer la cantidad de porciones que desee)
🍕Gracias por leer y espero que les haya gustado.Chauu.🍕
Simplemente hermosooooo
Muchas gracias.🙏❤️
Que chulo 😍 Super creativo. Dan ganas de comérselas jjjj
jijiji. te puedes imaginar a freddy. 😂😅😍
Gracias.😘
Wow, I am very impressed with the quality of your work. Thanks for sharing your best on DIYHub, we are glad to have creative people who create great quality posts like this one.
Muchas gracias. Realmente lo disfruto mucho y me alegra que les guste. ❤️🙏
This is great quality work, as well as being very beautiful and perfect for the time of year you mention. Thank you so much for choosing DIYHub Community to showcase your work.
Thanks to you for the initiative and providing community for hive artists.❤️🙏I'm glad you like it.
https://bsky.app/profile/did:plc:rag2mftdy2alo7rtmyttmpk4/post/3livyqyad5d2l
The rewards earned on this comment will go to the author of the blog post.https://bsky.app/profile/did:plc:rag2mftdy2alo7rtmyttmpk4/post/3livyqyad5d2l
thank you for your support. ❤️
Congratulations @decorarte! You have completed the following achievement on the Hive blockchain And have been rewarded with New badge(s)
Your next target is to reach 1250 upvotes.
You can view your badges on your board and compare yourself to others in the Ranking
If you no longer want to receive notifications, reply to this comment with the word
STOPYour work is very beautiful, friend. The pizza looks cute.
Thank you. they are really cute. haha
thanks for commenting, it's comforting. best regards.❤️
Le quedo bellísima esa pizza. Todo un arte.
Gracias miles. Me alegra que les haya gustado como a mi. un saludo.❤️🙏
This is a quality content, very impressive and nicely done
Oh! thank you for your admiration and support. best regards❤️
esta espectacular, gran trabajo!
this is spectacular, great job!
Muchas gracias. ❤️
Now I feel like requesting for pizza 🍕 😄
Indeed this is beautiful, nice job.
Pizza is looking so cute. Wonderful craft. Well done 👍