ESPAÑOL
Buen día amigas de DIYHub, el día de hoy les traigo una manualidad reciclada que seguro les va a encantar y les puede servir para guardar sus joyas y accesorios, espero les guste esta manualidad.
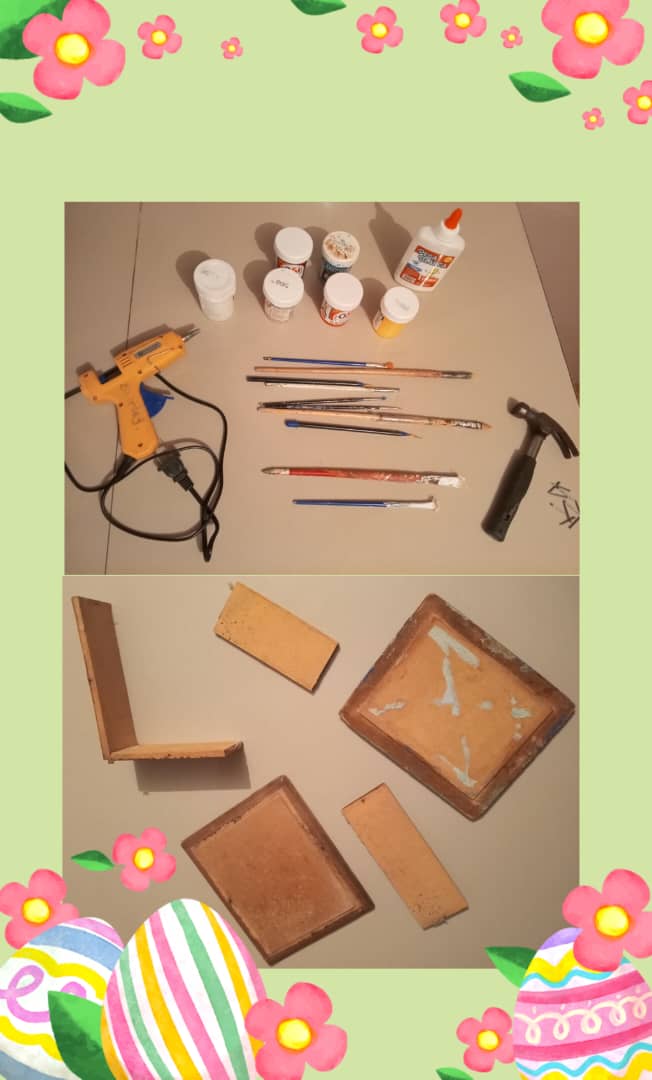
Materiales:
1 Cofre de madera usado.
Pinturas al frío de diferentes colores.
1 Barra de silicone.
1 Pistola de silicone.
Pinceles de diferentes grosor.
1 Pega blanca.
1 Martillo.
clavos pequeños.
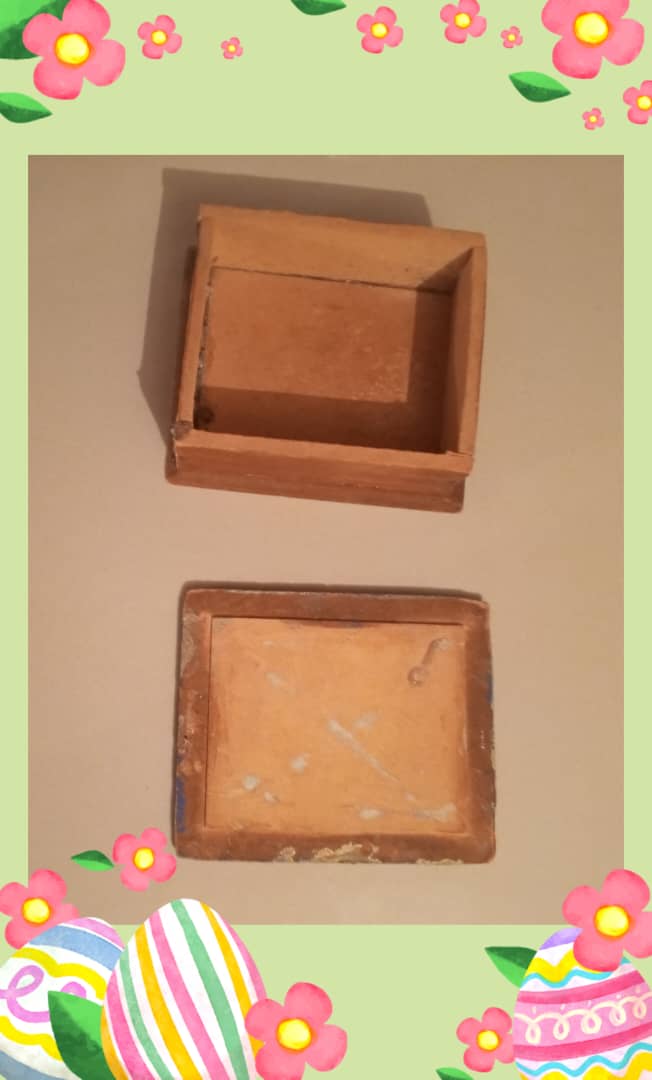
Paso 1:
Se colocan los clavos en el cofre y se martilla por los lados que está roto.
Paso 2:
Luego se pega con silicone por los lados del cofre.
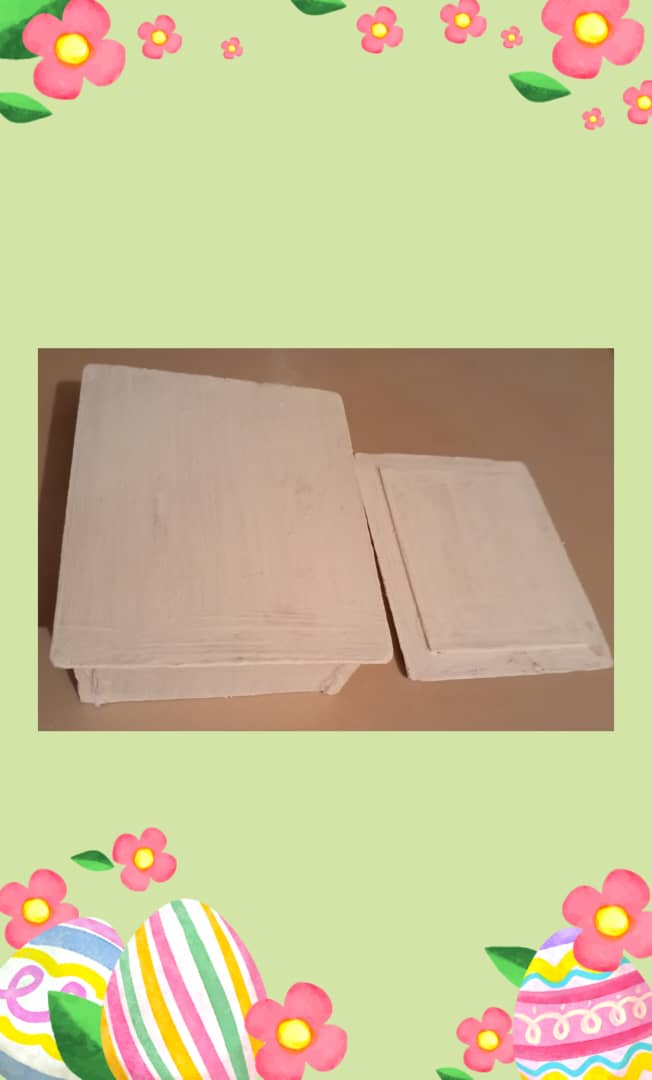
Paso 3:
Después se procede a pintar el cofre en color blanco para que la pintura pueda agarrar el color y para q pueda absorber el otro color que se le va a colocar más adelante.
Paso 4:
Luego se pinta con pintura al frío todo el cofre con el color amarillo.
Paso 5:
Después que se seca el cofre se procede a marcar la imagen que se va a colocar en la tapa del cofre.
Paso 6:
Luego, se pinta la imagen que se marcó con anticipación en el cofre.
Paso 7:
Después se termina de pintar las flores en la tapa del cofre de madera con la pintura al frío.
Paso 8:
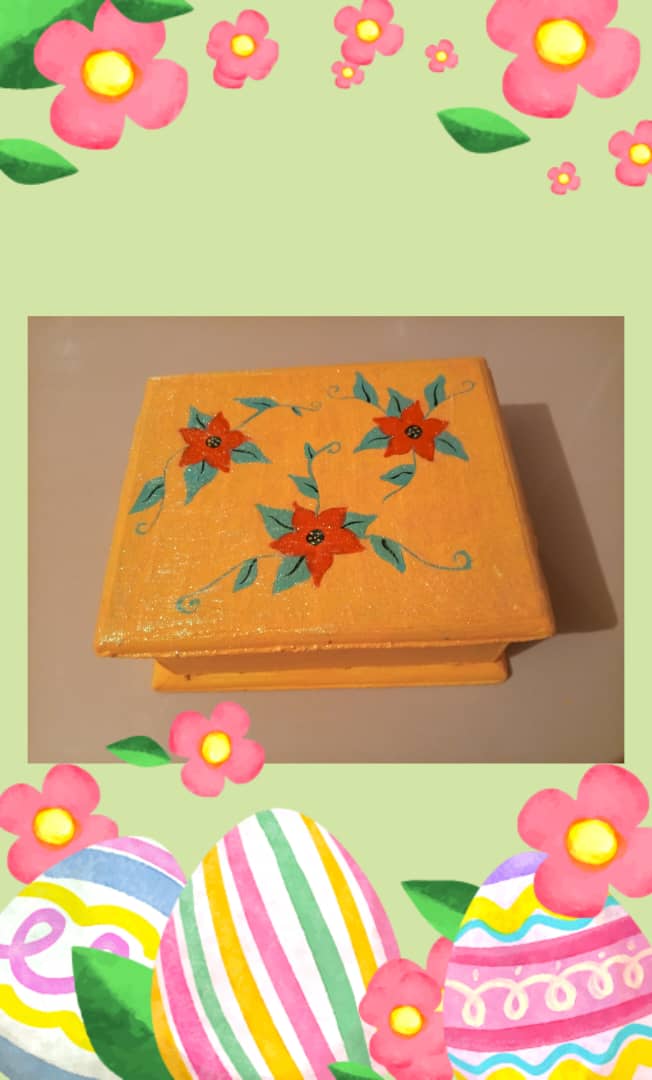
Finalmente se le dá una capa de pintura al frío de Gel de Nácar para que le dé brillo al cofre de madera y para que se vea bonito y para que se conserve la pintura y no se dañe, y vuala! ¡listo!
Nota: Fotografías tomadas de mi celular TECNO SPARK 20C y con ayuda del programa Photo collage GridArt.
Good morning DIYHub friends, today I bring you a recycled craft that you will surely love and you can use it to store your jewelry and accessories, I hope you like this craft.
Materials:
1 used wooden chest.
Cold paints of different colors.
1 Silicone stick.
1 Silicone gun.
Brushes of different thickness.
1 White glue.
1 hammer.
Small nails.
Step 1:
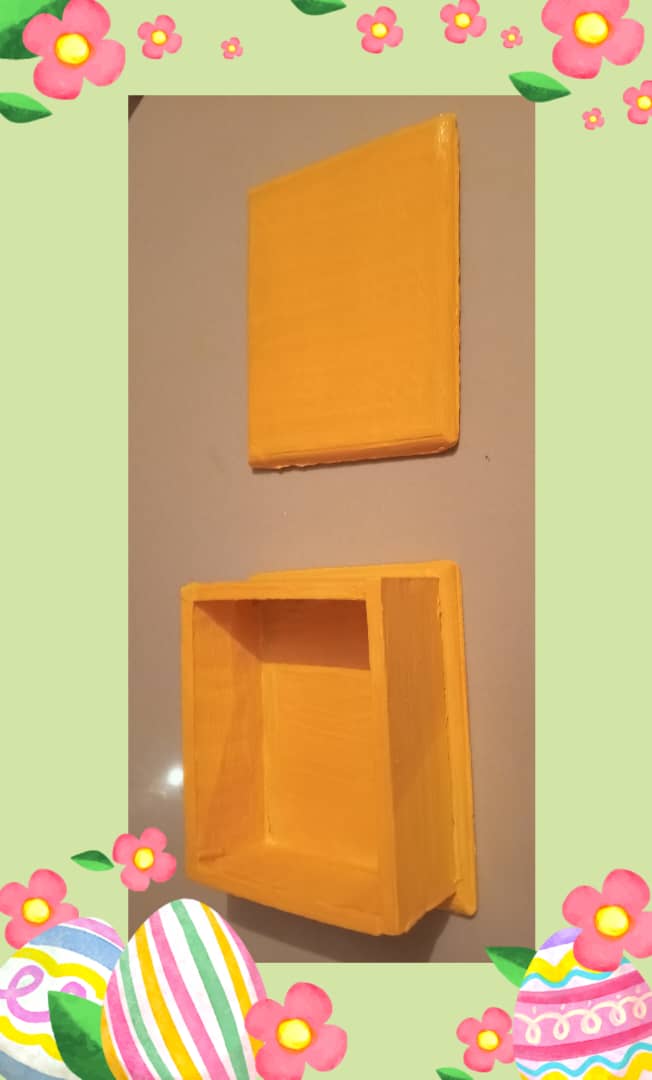
The nails are placed in the chest and hammered through the sides that is broken.
Step 2:
Then glue with silicone on the sides of the chest.
Step 3:
Then proceed to paint the chest white so that the paint can grab the color and q can absorb the other color that will be placed later.
Step 4:
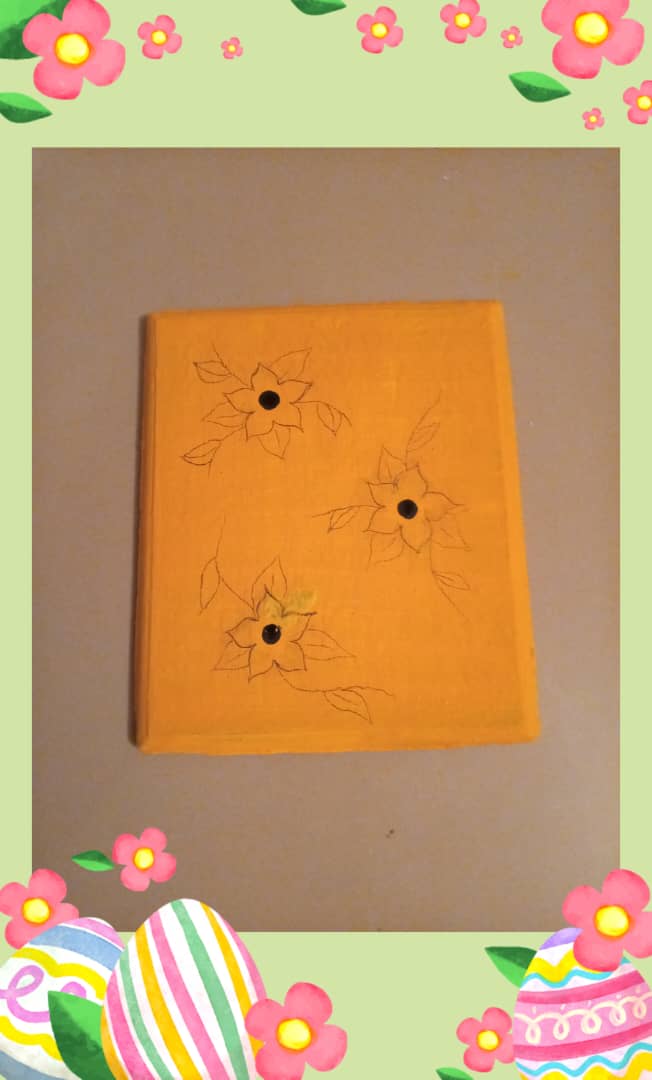
Then cold paint the entire chest with the yellow color.
Step 5:
After the box is dry proceed to mark the image to be placed on the box lid.
Step 6:
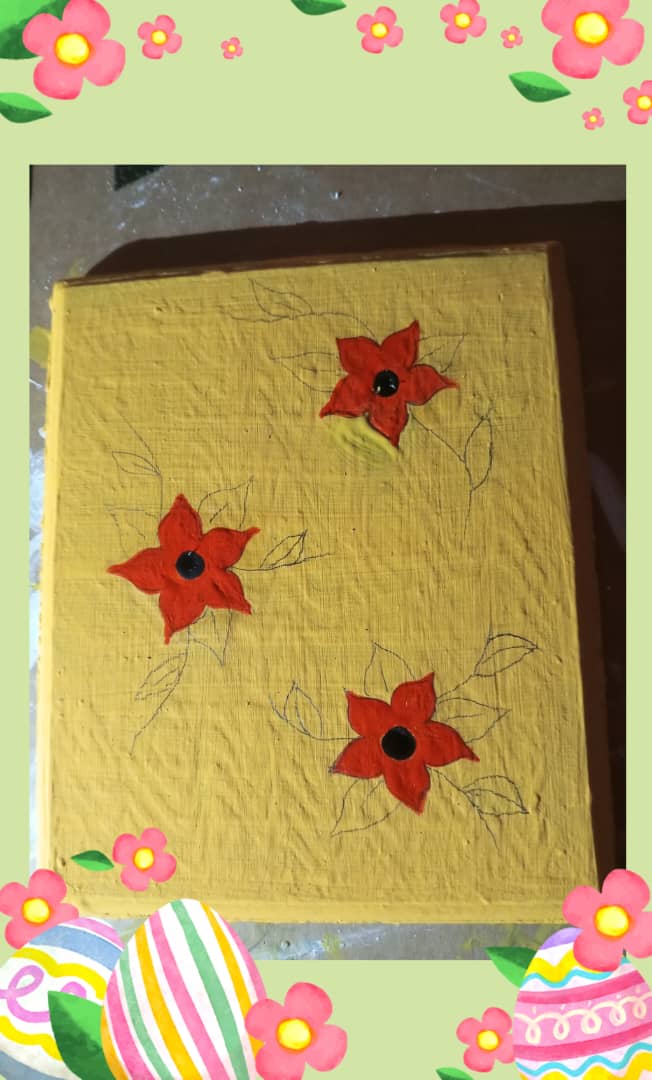
Next, the image that was marked in advance is painted on the chest.
Step 7:
Then finish painting the flowers on the wooden chest lid with the cold paint.
Step 8:
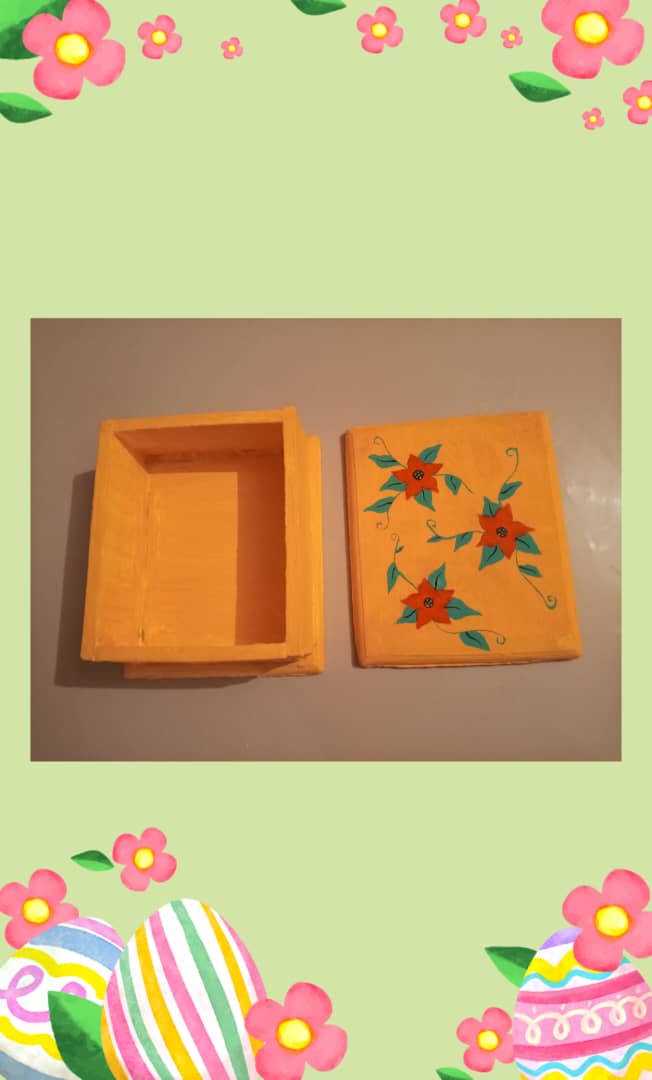
Finally give it a coat of Nacre Gel cold paint to give the wooden chest a shine and to make it look nice and to preserve the paint and not damage it, and vuala! ready!
COFRE DE MADERA RECICLADO - RECYCLED WOODEN CHEST(ESP/ENG).
Buen día amigas de DIYHub, el día de hoy les traigo una manualidad reciclada que seguro les va a encantar y les puede servir para guardar sus joyas y accesorios, espero les guste esta manualidad.
Materiales:
1 Cofre de madera usado.
Pinturas al frío de diferentes colores.
1 Barra de silicone.
1 Pistola de silicone.
Pinceles de diferentes grosor.
1 Pega blanca.
1 Martillo.
clavos pequeños.
Paso 1:
Se colocan los clavos en el cofre y se martilla por los lados que está roto.
Paso 2:
Luego se pega con silicone por los lados del cofre.
Paso 3:
Después se procede a pintar el cofre en color blanco para que la pintura pueda agarrar el color y para q pueda absorber el otro color que se le va a colocar más adelante.
Paso 4:
Luego se pinta con pintura al frío todo el cofre con el color amarillo.
Paso 5:
Después que se seca el cofre se procede a marcar la imagen que se va a colocar en la tapa del cofre.
Paso 6:
Luego, se pinta la imagen que se marcó con anticipación en el cofre.
Paso 7:
Después se termina de pintar las flores en la tapa del cofre de madera con la pintura al frío.
Paso 8:
Finalmente se le dá una capa de pintura al frío de Gel de Nácar para que le dé brillo al cofre de madera y para que se vea bonito y para que se conserve la pintura y no se dañe, y vuala! ¡listo!
Nota: Fotografías tomadas de mi celular TECNO SPARK 20C y con ayuda del programa Photo collage GridArt.
ENGLISH
SPANISHRECYCLED WOODEN CHEST - COFRE DE MADERA RECICLADO - COFRE DE MADERA RECICLADO - COFRE DE MADERA RECICLADO - COFRE DE MADERA RECICLADO - COFRE DE MADERA RECICLADO(ESP/ENG).
Good morning DIYHub friends, today I bring you a recycled craft that you will surely love and you can use it to store your jewelry and accessories, I hope you like this craft.
Materials:
1 used wooden chest.
Cold paints of different colors.
1 Silicone stick.
1 Silicone gun.
Brushes of different thickness.
1 White glue.
1 hammer.
Small nails.
Step 1:
The nails are placed in the chest and hammered through the sides that is broken.
Step 2:
Then glue with silicone on the sides of the chest.
Step 3:
Then proceed to paint the chest white so that the paint can grab the color and q can absorb the other color that will be placed later.
Step 4:
Then cold paint the entire chest with the yellow color.
Step 5:
After the box is dry proceed to mark the image to be placed on the box lid.
Step 6:
Next, the image that was marked in advance is painted on the chest.
Step 7:
Then finish painting the flowers on the wooden chest lid with the cold paint.
Step 8:
Finally give it a coat of Nacre Gel cold paint to give the wooden chest a shine and to make it look nice and to preserve the paint and not damage it, and vuala! ready!
Note: Pictures taken from my TECNO SPARK 20C cell phone and with the help of the Photo collage program GridArt.
Hola amigo Hive, esperando que se encuentre bien, es un placer para mí conocerlo por esta vía, gracias por su comentario y me encanta que le haya gustado, q pase feliz y bendito día, chao.
Hello friend Hive, hoping you are well, it is a pleasure for me to meet you in this way, thank you for your comment and I am delighted that you liked it, have a happy and blessed day, bye.
Hello there, I've seen that you have been sharing your diy crafts for a while now with little to no attention attention.
I would recommend putting on a profile photo, preferably one of you. Also try to put some signature on your crafts, e.g. your hive username and date on the photos. You could also take a selfie with them. That way your hardwork would get recognized. Just a suggestion
Cheers
Hola, he visto que has estado compartiendo tus manualidades DIY durante un tiempo con poca o ninguna atención.
Te recomendaría poner una foto de perfil, preferiblemente una tuya. También intenta poner alguna firma en tus manualidades, por ejemplo, tu nombre de usuario de Hive y la fecha en las fotos. También podrías tomarte una selfie con ellas. De esa manera, tu arduo trabajo sería reconocido. Solo una sugerencia.
Saludos
Hola buen día gracias x su comentario, lo tomaré en cuenta, saluds y bendiciones, chao.
Linda cajita cofre pintada y decorada ideal para guardar tus prendas favoritas
Gracias, espero que le haya gustado y que lo haga para meter sus accesorios y joyas, saluds, bye.
Muy linda cajita, util para organizar.
Hola, como está? gracias, espero que le haya gustado, saluds y bendiciones, chao.
Hello, how are you? thank you, I hope you liked it, greetings and blessings, bye.