(ENG)
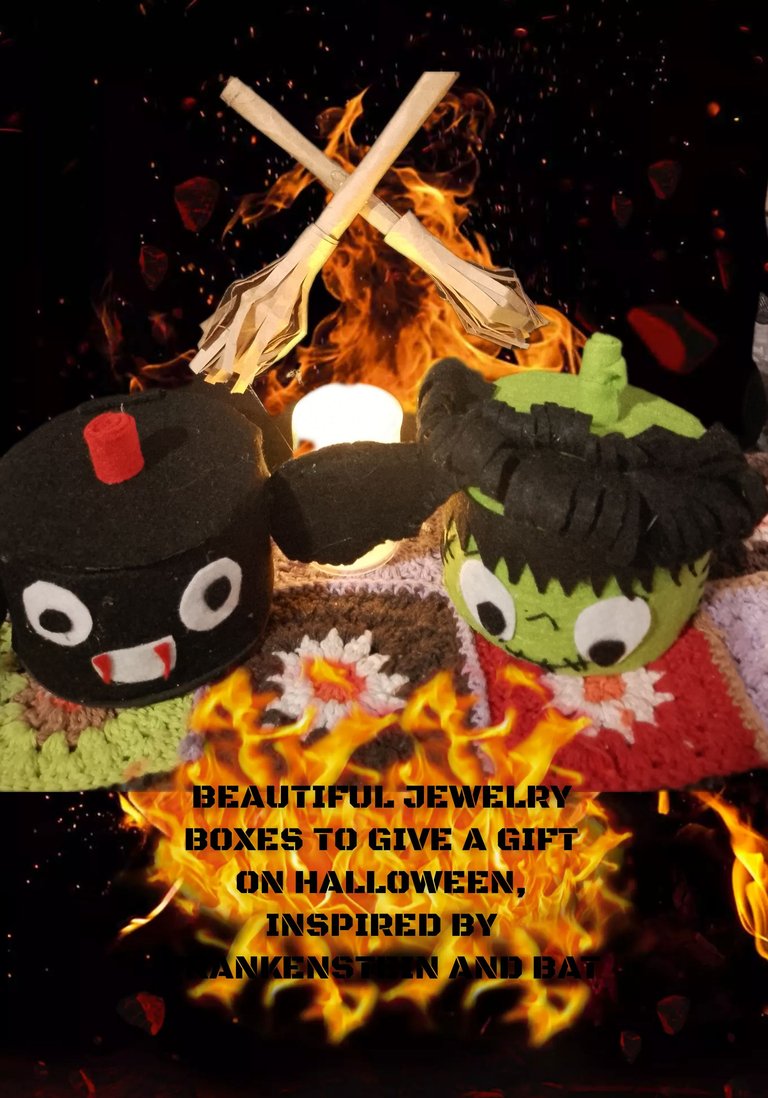
Hello everyone, I hope you are very well, enjoying good health, with your family. Today I am pleased to join the initiative of this great community of creators. For this I have made two beautiful jewelry boxes, ideal for giving a gift on Halloween, inspired by the well-known character Frankenstein, the famous character, a fictional character, who appears in the novel of Frankenstein or modern prometheus of the dawn, mary Shelley. Character created from different parts of corpses. And the second jewelry box, in one of the most pronounced, vampire bats.
Before continuing, I would like to invite my friends, @linita and @josdelmi. I hope to see your creations soon, they will surely be very good. So the next thing is to invite you to follow me and I will show you how to do them, I hope you enjoy it.
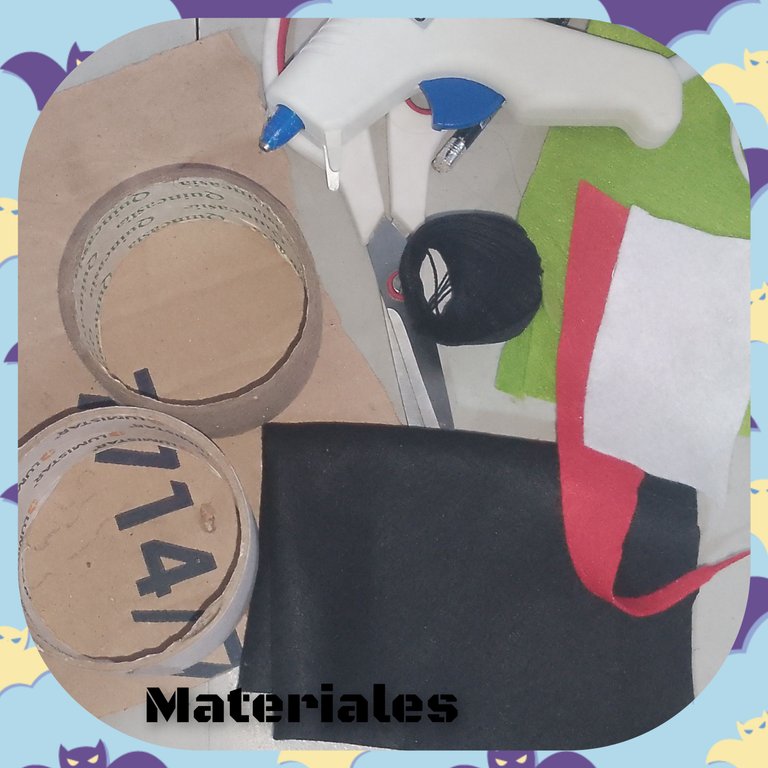
Materials:
. Cardboard tubes of packaging tape (2).
. Felt, colors (green, black, red, white).
. Hot silicone.
. Cardboard.
. Scissors.
. Pencil.
. Needle.
. Thread.
Process, creative:
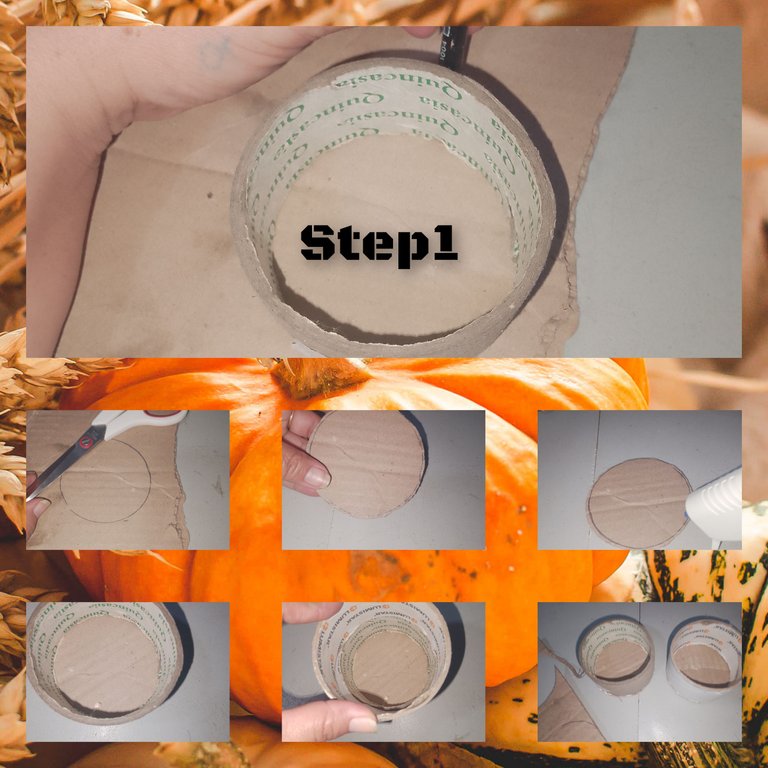
1.) I placed the small tube on the piece of cardboard, and with the pencil I marked and cut out its shape, then, I applied silicone and glued it to one of the sides of the tube. I repeat the process for the second tube. In this way, I obtain a small drawer or box, round in shape.
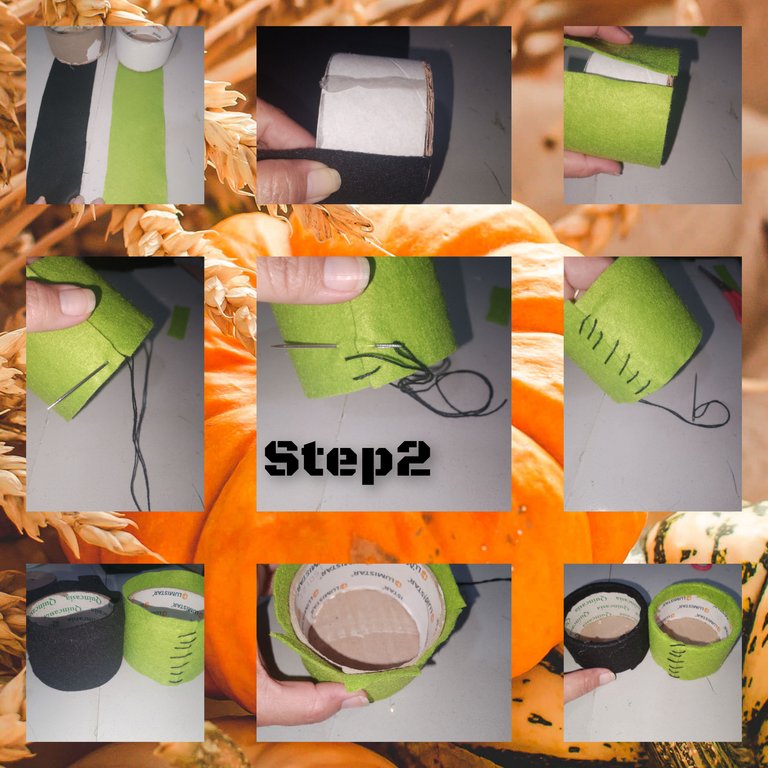
2.) Taking the height of the round boxes, I counted a black piece and a green piece to cover the outside of the box. I repeat the process for both, unlike the green one, I stitch, with needle and thread, from side to side on the edges or ends of the felt.
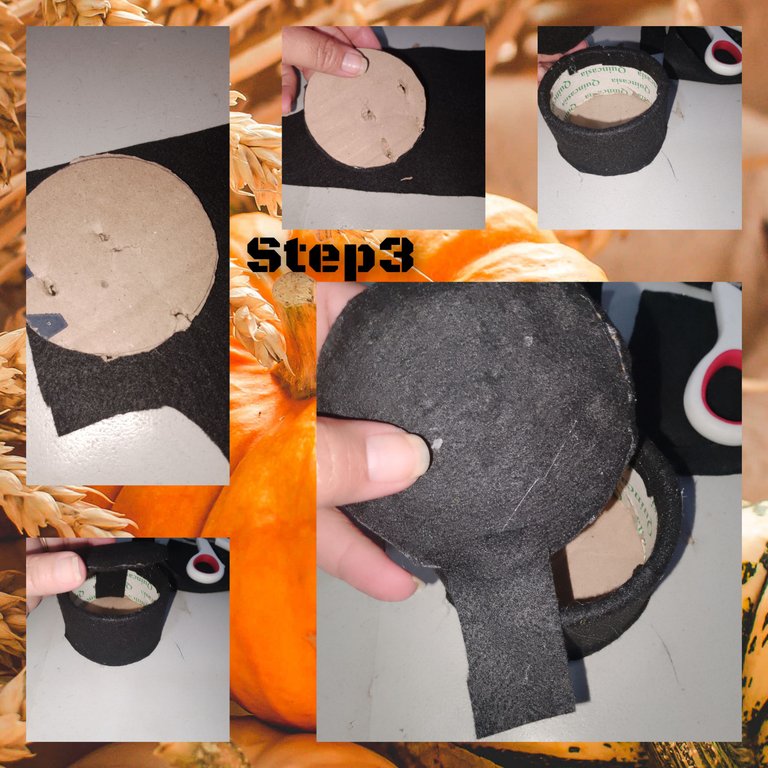
3.) Continuing, with the jewelry box, Inspired by the fabulous vampire, I marked and cut out a next circle of the same size as the previous one and covered it by applying silicone with black felt, on both sides, also leaving a piece of felt, which allows the lid of the box to be fixed at one end.
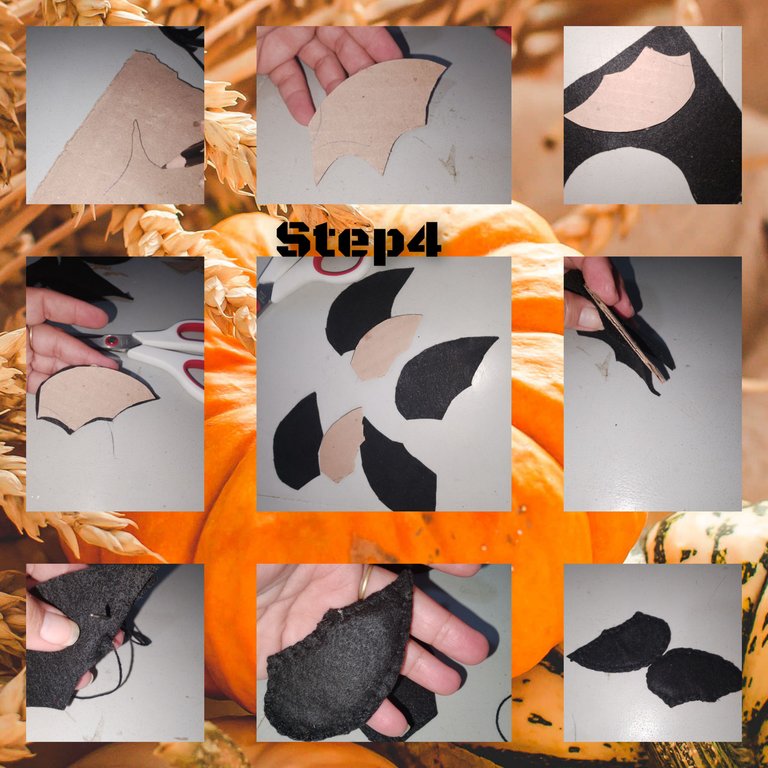
4.) Frame and cut out, on cardboard, two fins, then four pieces of black felt. Once this is done, I leave the cardboard figure in the middle, and with a needle and thread, I begin to join the felt pieces, leaving the cardboard enclosed between them.
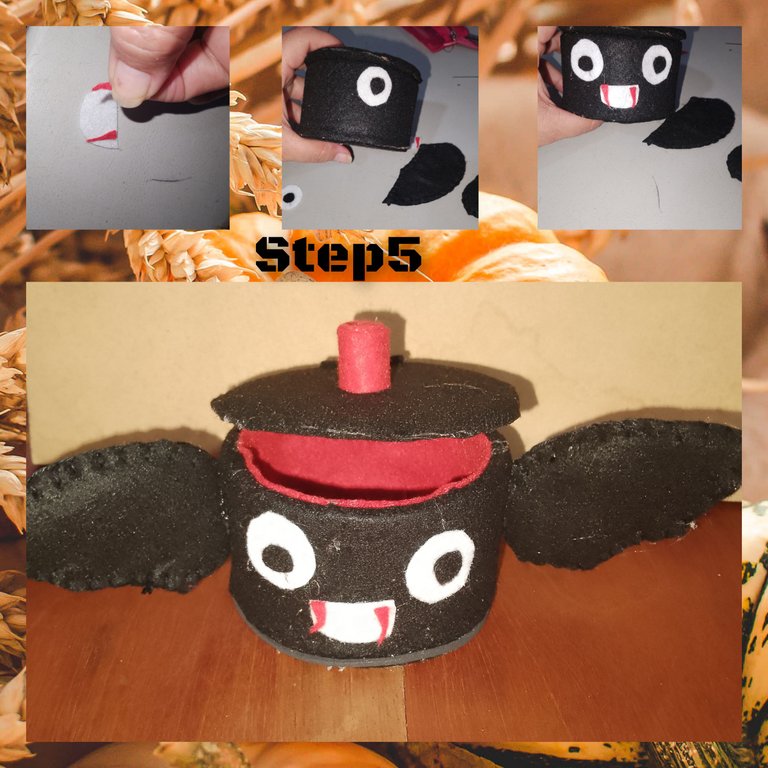
5.) frame and cut out, to place the eyes, simulate the mouth and pronounced fangs. I continue, lining the inside of the jewelry box with red felt, I cut a small strip of red felt, make a kind of tube and glue it to the top, which will allow the jewelry box to be opened and closed.
6/7) Lined the following jewelry box, framed and cut out to make eyes and part of the hair, with needle and thread, gilded on one side to simulate the seams typical of it.character
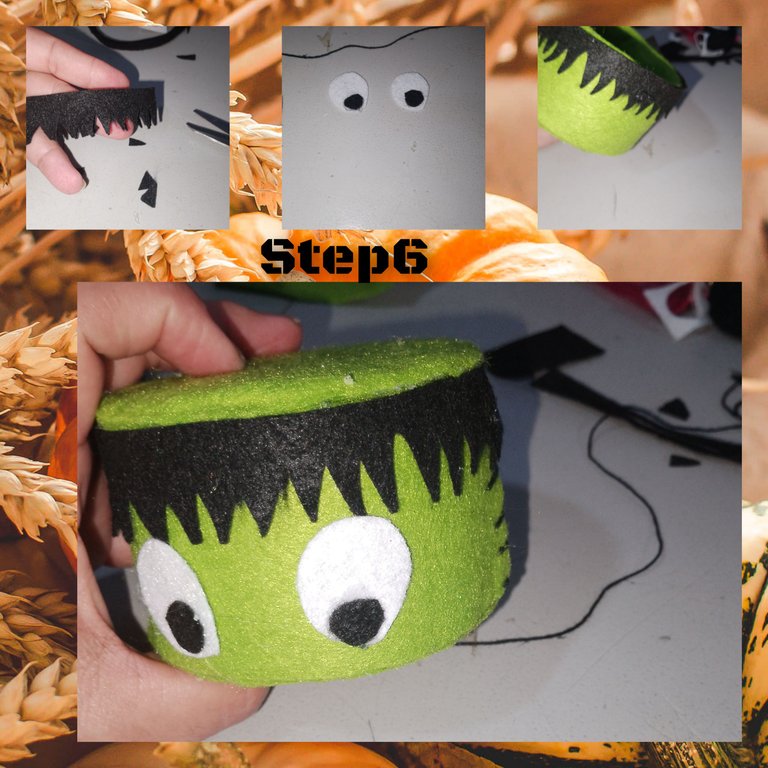
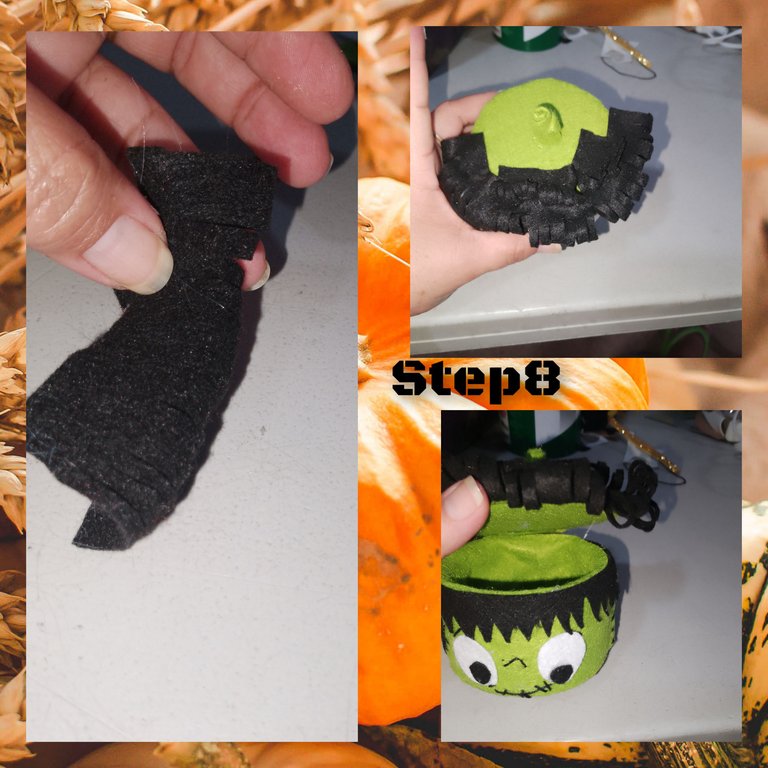
8.) I cut strips to which I make cuts, and I place some hairs on the top of the jewelry box, making it more striking.
In this way, I have concluded my participation in this inspiring @diyhub initiative. And this is what the finished jewelry boxes look like.

. All photos are my property.
. Use gifs videos.
. Use incollage.
. Use language translator.
. Sources:
https://es.wikipedia.org/wiki/Frankenstein_Monster
Grateful for having followed me to the end, it will be until the next opportunity.
(ESP)
Hola a todos, deseo se encuentren muy bien, gozando de buena salud, junto a sus familiares. Hoy me complace unirme a la iniciativa de esta gran comunidad de creadores. Para ello he realizados, dos lindos joyeros, ideales para dar un regalo, en halloween, inspirados en, conocido personaje Frankenstein, el famoso personaje,un personaje de ficción, que aparece en, la novela de Frankenstein o moderno prometeo de la aurora, mary Shelley. Personaje creado a partir de diferentes partes de cadáveres. Y el segundo joyero, en uno de los más pronunciados, murciélagos vampiros.
Antes de de continuar, deseo hacer la invitación a las amigas, @linita y @josdelmi. Espero ver pronto sus, creaciones, de seguro serán muy buenas. Así que lo siguiente es invitarlos, a seguirme y les mostraré, como hacerlos, deseo lo disfruten.

Materiales:
. Tubos de cartón de cinta para embalaje(2).
. Fieltro, colores ( verde, negro, rojo,blanco).
. Silicón caliente.
. Cartón.
. Tijeras.
. Lápiz.
. Aguja.
. Hilo.

Proceso, creativo:
1.) coloco el pequeño tubo sobre el trozo de cartón, y con el lápiz marco y recortó su forma, luego, aplicó silicón y pego en uno de los lados de el tubo. Repito el proceso para el segundo tubo. De esta manera, obtengo un pequeño cajón o caja, de forma redonda.

2.) Tomando la altura de las cajitas redondas, conto, una pieza de color negro y un de color verde, para cubrir la parte exterior de la caja. Repito proceso para ambas, a diferencia, a la de color verde, doy puntadas, con aguja e hilo, de lado y lados en los bordes o extremos de el fieltro.

3.) Continuo, con el joyero, Inspirado en el fabuloso vampiro, marco y recortó un siguiente circulo de mismo tamaño de el anterior y lo cubro aplicando, silicón con el fieltro de color negro, por ambos lados, dejo además, un trozo de fieltro, que permita, fijar en un extremo ña tapa de la caja.

4.) Marco y recortó, sobre cartón, dos aletas, seguidamente, cuatro piezas de fieltro color negro. Hecho esto, dejo la figura, de el cartón en el medio, y con aguja e hilo, comienzo a unir las piezas de el fieltro, dejando el cartón encerrado entre ellas.

5.) marco y recortó, par colocar los ojos, simular la boca y unos pronunciados colmillos. Continuo, forrando la parte interior de el joyero, con fieltro de color rojo, corto una pequeña tira de fieltro, color rojo, hago un especies de tubito y pego en la parte superior, que permitir abrir y cerrar el joyero.

6/7) Forrado el siguiente joyero, marco y recortó para armar ojos y parte de la cabellera, con aguja e hilo, dorado en uno de los lados para simular las costuras propia de el personaje

8.) corto tiras a las que les hago cortes, y coloco algo de pelos en la parte superior de el joyero, haciéndolo mas llamativo.

De esta manera, he concluido con mí participación, en esta inspiradora, iniciativa de @diyhub. Y así lucen los joyeros ya terminados.

. Todas las fotos son de mí propiedad.
. Use gifs videos.
. Use incollage.
. Use traductor lenguaje.
. Fuentes:
https://es.wikipedia.org/wiki/Monstruo_de_Frankenstein
Agradecida me hayas seguido hasta el final, será hasta un aproxima oportunidad.
You can check out this post and your own profile on the map. Be part of the Worldmappin Community and join our Discord Channel to get in touch with other travelers, ask questions or just be updated on our latest features.
Congratulations @katiuskamata! You have completed the following achievement on the Hive blockchain And have been rewarded with New badge(s)
Your next target is to reach 1500 upvotes.
You can view your badges on your board and compare yourself to others in the Ranking
If you no longer want to receive notifications, reply to this comment with the word
STOPCheck out our last posts:
Nice ones
Buen día cariño
This looks really spooky; like a voodoo spot, haha. A great work all round.
Hermoso trabajo quedaron espeluznantemente tiernas