(ENG)
Hello everyone, I am pleased to start this week, with all of you, DIY lovers. I wish this week a great Senama for everyone, at @ diyhub. Today I will show you a very cute and creative tutorial, where I use recyclable and useful material to make a beautiful Christmas ornament, inspired by the great wizard Merlin and the symbolic Christmas tree. So without further ado I invite you to follow me and you will see how beautiful the result is.

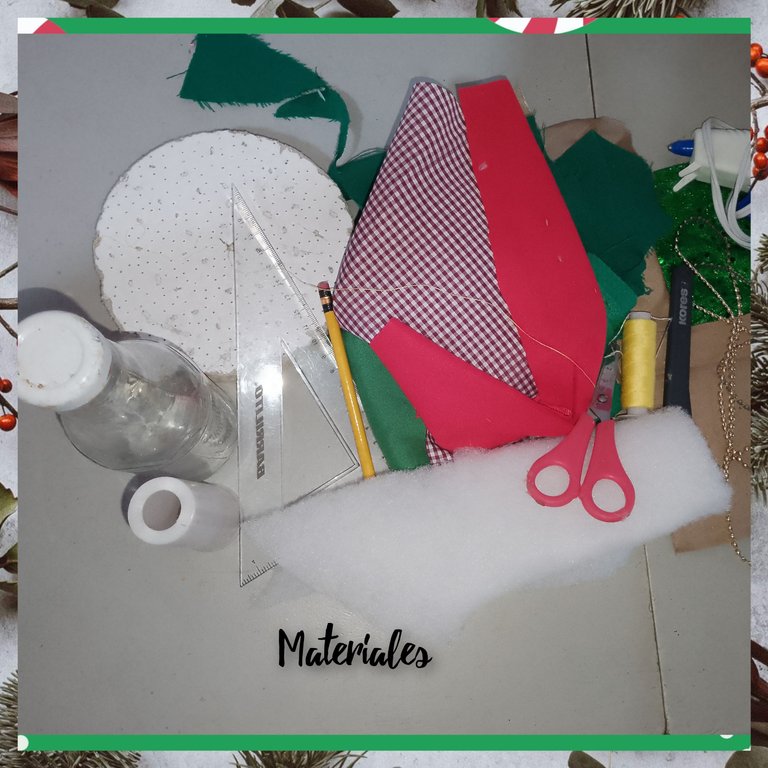
Materials used:
. Plastic cone of sewing thread.
. Fiber - cement circle.
. Glass bottle of tomato sauce, medium.
. Fabric cuts.
. Wadding.
. Hot silicone.
. Half pearls, gold plastic.
. Golden zicza ribbon.
. Marking rule.
. Marking pencil.
. Piece of cardboard.
. Scissors.
. Needle and thread for sewing.
. White stamen.
Steps to Follow.
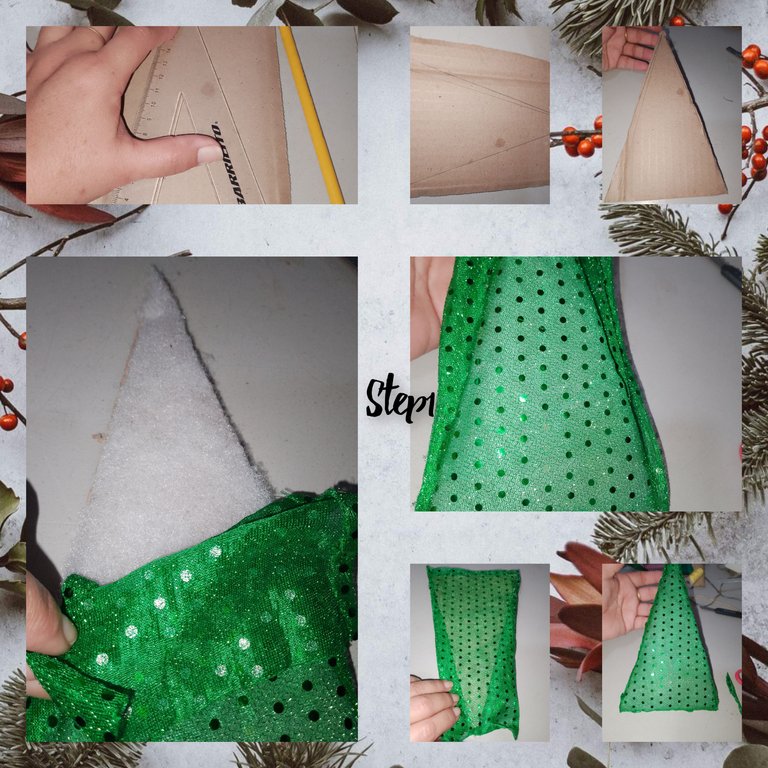
1.) Start, marking a triangle on the piece of cardboard, after marking it short with the exact one and cutting it with the scissors, to leave it very even. Then, applying glue, I glue the wadding on one of the sides of the cardboard, then I line it with one of the pieces of fabric, frosty green. Lining both sides the same, he cut out the residue of fabric, guiding its shape.
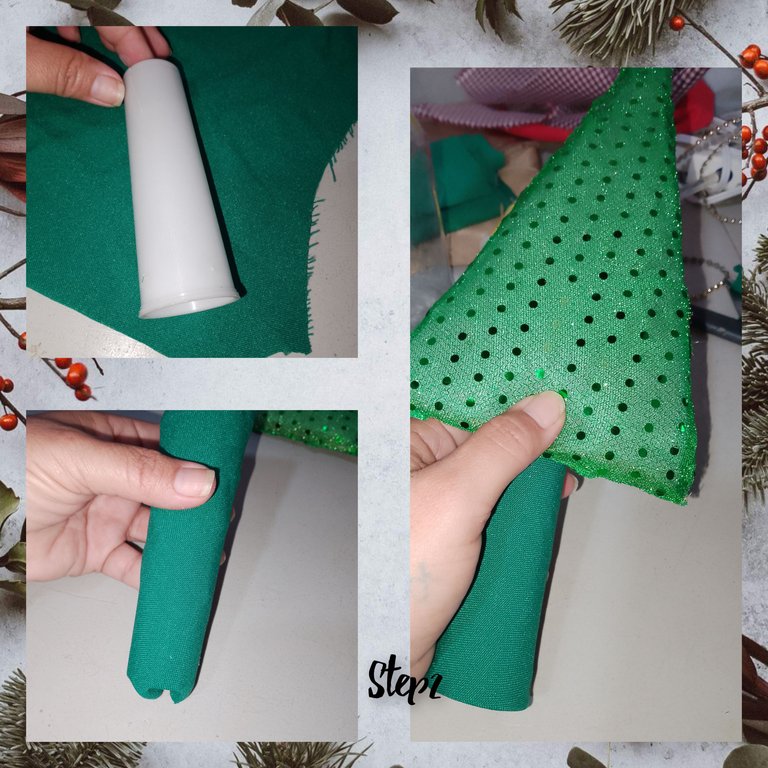
2.) the plastic cone, of sewing thread. I cover it with green fabric, this time, I line it with a piece of green fabric. I put plenty of silicone on the top of the cone and glue the triangle, lined in the previous step, thus forming a nice Christmas tree.
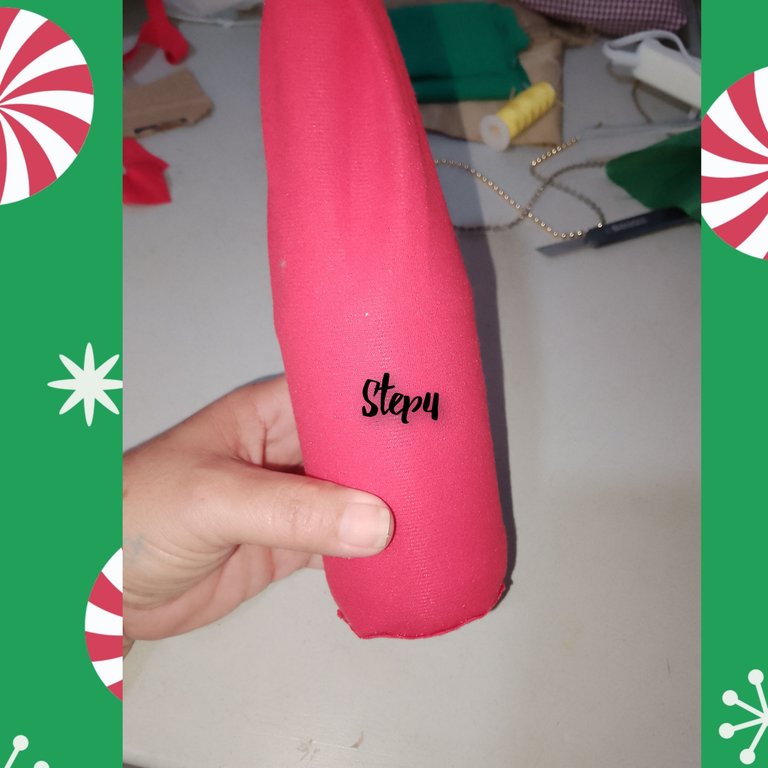
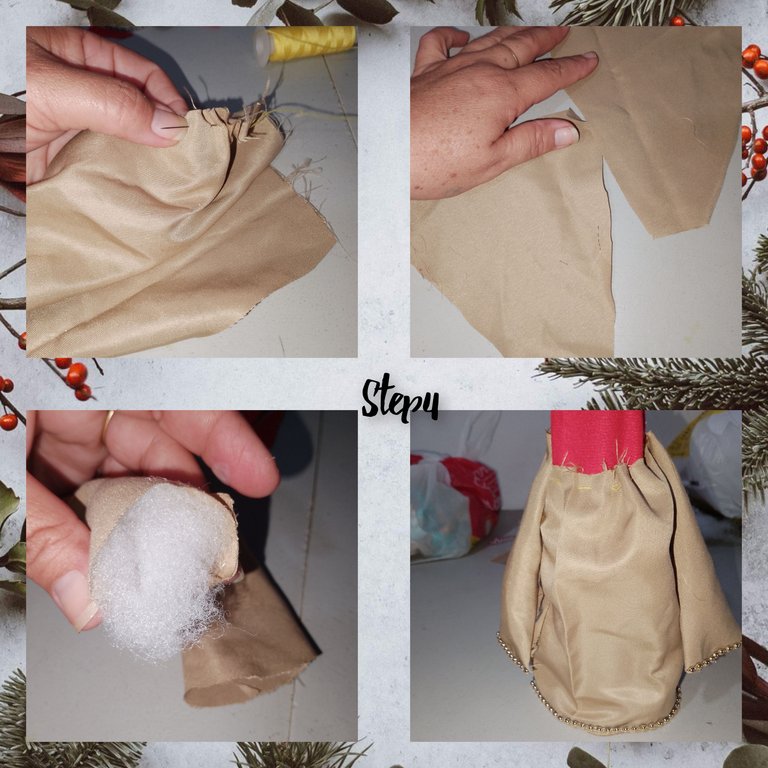
3/4.) With red fabric, I line the glass bottle. Once the bottle is lined, I cut a piece of cream-colored fabric and with a needle and thread, I put together a delicate robe. Once this is done, I place half pearls along the edge of the robe. And I glue the robe to the bottle. Likewise, I cut two small circles, sew the ends, place a little batting and glue them to the body of the bottle to simulate the arms.
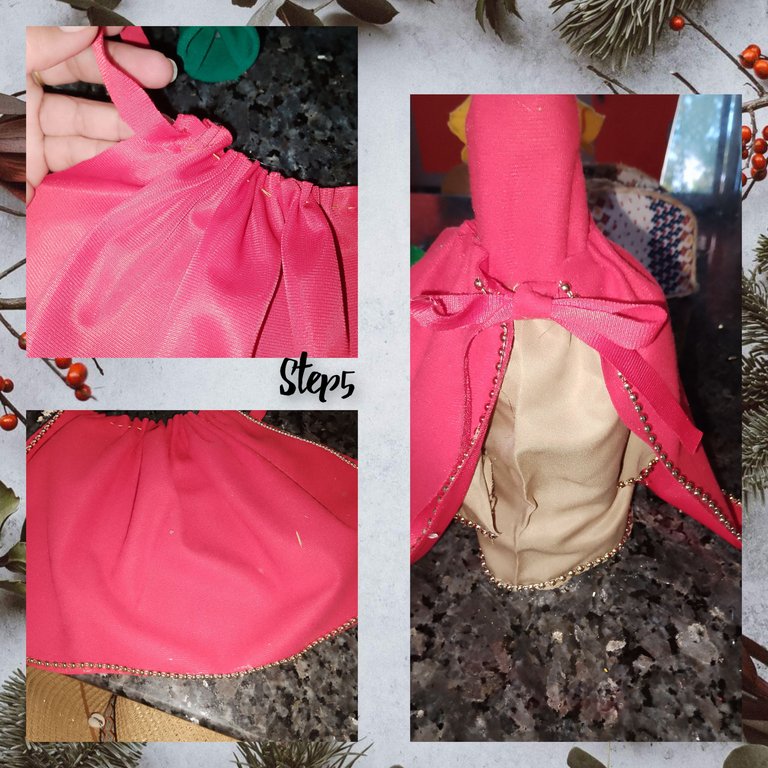
5.) I cut a piece of red fabric and sewed some of the ends and it formed a striking cape. To whom at each end, I attach a cord of the same color and fabric, which allows me to tie it to the body of the magician. To maintain harmony, I glue running half pearls on the edge of the cape.
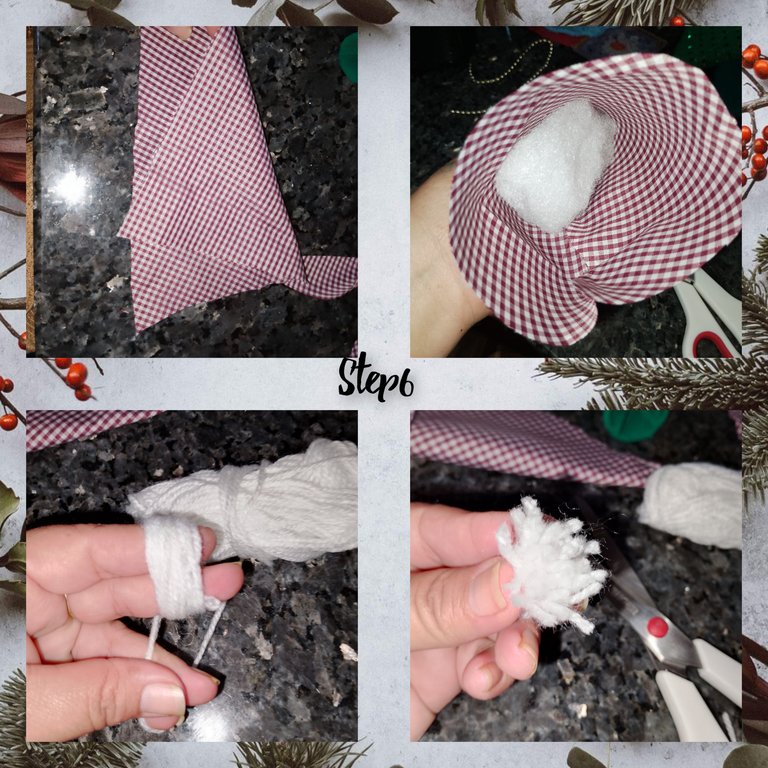
6.) With the checkered fabric, I cut and make a cone, place a little wadding as filling. To form the magician's hat, with white worsted thread, I make twenty turns between the index and middle fingers. And I form a small pompo and glue it to the top of the hat.
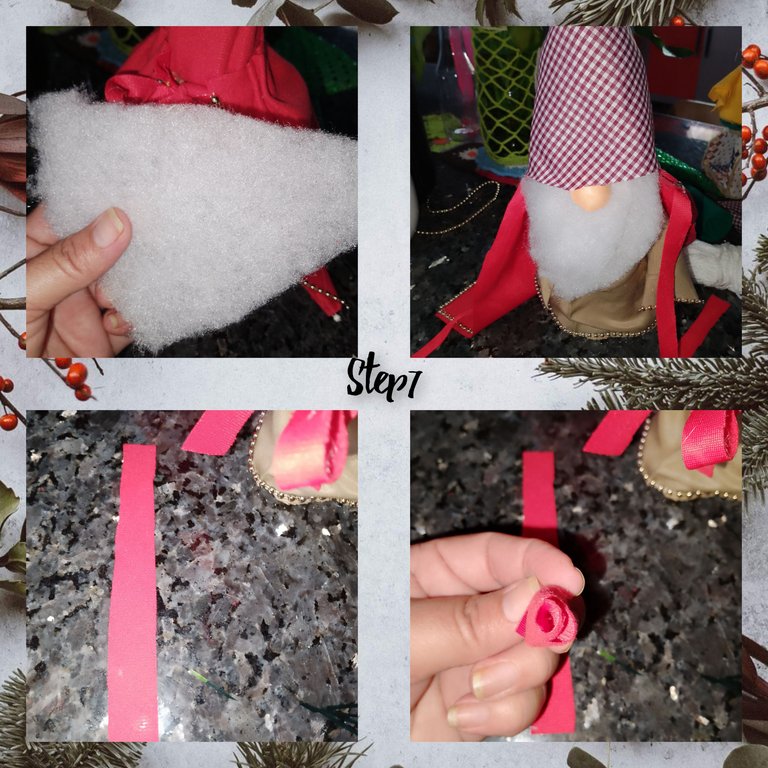
7.) I cut two pieces of batting in a triangular shape and glue them to form the magician's beards, and place the nose. Next, I placeand I glue the hat of the magician.
With thin strips of red fabric, I turn it around and form a small flower, which will make the hat show off.
8.) I apply fiber cement glue to the edge of the circle, and glue and glue a strip of green fabric. Then I'll go up, I'll stick gold tape. Ready the circle. He applied glue and glued it to the wizard and the Christmas tree.
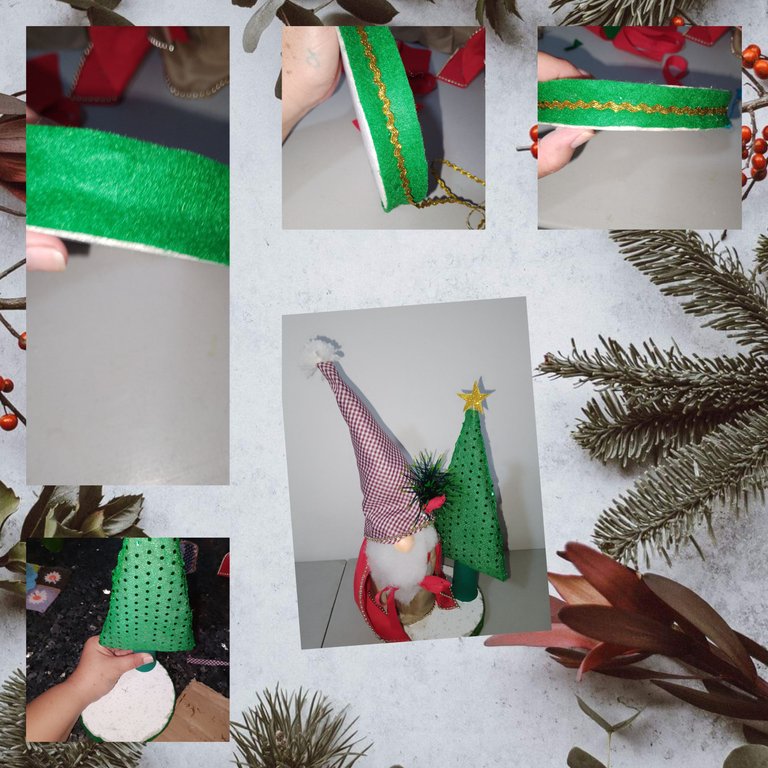
In this way, I have concluded today's el di project, hoping you like it and put it into practice, always giving your personal touch.
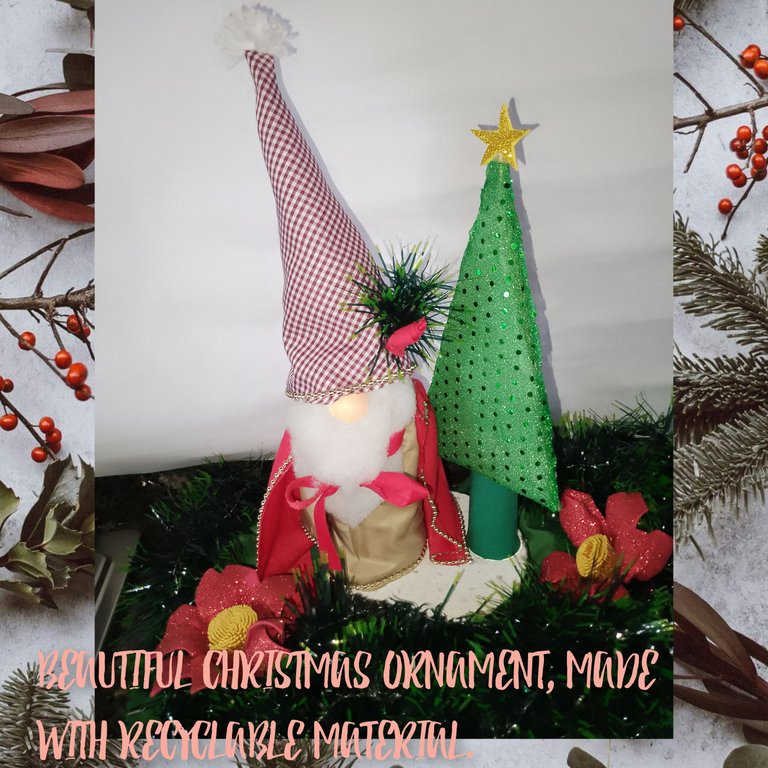
. All photos are my property, taken with my smartphone.
. Use incollage.
. Use gifs videos.
. Use language translator.
Very grateful, you followed me until the end. It will be until the next opportunity.
(ESP)
Hola a todos, me complace, iniciar esta semana, con todos ustedes, amante de el bricolage.Deseo está semana una gran Senama para todos, en @ diyhub. Hoy les mostraré un muy lindo y creativo, tutorial,dónde use material reciclable y de provecho, para realizar un hermoso adorno Navideños, inspirados en el gran mago Merlin y el simbólico árbol navideños. Así que sin más les invito a seguirme y verás lo lindo de el resultado.

Materiales utilizados:
. Cono plástico, de hilo de coser.
. Círculo de fibra - cemento.
. Botella de vidrio de salsa de tomate, mediana.
. Recortes de telas.
. Guata.
. Silicón caliente.
. Medias perlas corridas, plásticas doradas.
. Cinta dorada de zicza.
. Regla par marcar.
. Lápiz para marcar.
. Trozo de cartón.
. Tijeras.
. Aguja e hilo para coser.
. Estambre de color blanco.

Pasos a Seguir.
1.) Inicio, marcando, en el trozo de cartón un triángulo, luego de marcar corto con el exacto y con la tijeras recortó, para dejar bien parejo. Luego aplicando pegamento, pego en uno de los lados de el cartón guata, seguidamente, forro con uno de los trozos de tela,de color verde escarchado. Forro igual ambos lados, recortó el residuo de telas, guiando de me su forma.

2.) el cono plástico, de hilo de coser. Lo cubro con tela de color verde, en esta oportunidad, lo forro con un retazo, de tela de color verde. Pongo abundante silicón el la parte superior de el cono y pego el triángulo, forrado en paso anterior, formando de esta manera un lindo,.árbol de navidad.

3/4.) Con tela de color rojo, forro la botella de vidrios. Forrada la botella, corto un pedazo de tela color crema y con aguja e hilo, armo una delicada bata. Hecho esto, coloco por el borde de la bata, medias perlas. Y pego la bata a la botella. Así mismo corto dos pequeños círculos, coso los extremos , coloco un poco de guata y pego a el cuerpo de la botella para simular los brazos.


5.) Corto un trozo de tela de color rojo y coso unos de los extremos y formó una llamativa capa. A quien en cada uno de los extremos, pego un cordón de mismo color y tela, que me permitan atar, a el cuerpo de el mago. Para mantener la armonía, pego medias perlas corridas en el borde de la capa.

6.) Con la tela, de cuadros, corto y armo un cono, coloco un poco de guata, como relleno. Par formar el sombrero de el mago, con hilo estambre de color blanco, doy veinte vueltas entre los dedos, índice y medio. Y formo un pequeño pompo y pego en la parte superior de el sombrero.

7.) corto dos pedazos de guata en forma triangular y pego para formar las barbas de el mago, y coloco la nariz., seguidamente, coloco y pego el gorro o sombrero de el mago.
Con delgadas tiritas de, tela color rojo, doy vueltas y formó una pequeña flor, que hará lucir el sombrero.

8.) aplico pegamento, por el borde de el círculo, de fibro-cemento, y pego y pego una tira de, tela de color verde. Luego subiré ella, pego cinta dorada. Listo el círculo. Aplicó pegamento y pego sobre el, a el mago y el árbol de navidad.

De esta manera, concluido el proyecto de el di de hoy, deseando les guste y pongan en práctica, siempre dando su toque personal.

. Todas las fotos, son de mí propiedad, tomadas con mí teléfono inteligente.
. Use incollage.
. Use gifs videos.
. Use traductor lenguaje.
Muy agradecida, me hayas seguido hasta el final. Será hasta un próxima oportunidad.
Hola amiga, definitivamente el reciclaje nos permite crear lindos adornos, casualmente tengo un cono de hilo, me has dado una idea para reutilizarlo y hacer un lindo arbolito decorativo, me encantó el gnomo, gracias por compartir lindos e inspiradores proyectos .
Feliz inicio de semana!
!DIY
You can check out this post and your own profile on the map. Be part of the Worldmappin Community and join our Discord Channel to get in touch with other travelers, ask questions or just be updated on our latest features.
That is a nice bit of decoration. Great to see you already in the festive mood. Bravo
Gracias, es una de mis épocas preferidas...que bueno le haya gustado...
Para mí el reciclar es hacer magia, como esta que ahora estoy viendo, es totalmente ingenioso y lindo.
Hola amiga. Me encantó el resultado. Hiciste muy buen uso de esos materiales reciclados. 🙋🏽♀️
Que linda, gracias mi linda amiga...que bueno saber tu precisión... abrazos
You can query your personal balance by
@belkyscabrera just sent you a DIY token as a little appreciation for your post dear @katiuskamata! Feel free to multiply it by sending someone else !DIY in a comment :) You can do that x times a day depending on your balance so:!DIYSTATSCongratulations @katiuskamata! You have completed the following achievement on the Hive blockchain And have been rewarded with New badge(s)
Your next target is to reach 65000 upvotes.
You can view your badges on your board and compare yourself to others in the Ranking
If you no longer want to receive notifications, reply to this comment with the word
STOP