
WELCOME TO MY BLOG
Hellooooo, hellooooo! Greetings my dear creatives from DiyHub. The most emotional and beautiful time of the year is coming, where we strive to brighten up our surroundings with Christmas decorations that please the whole family and visitors. Today I want to show you my participation in this contest with some ornaments that I have always liked to decorate Christmas trees. I always remember, when I was a child, my mother decorated a cactus with multi-colored balls, lights and many snare drums that I took off to play with because I loved them. So with these memories of my childhood and with the Christmas spirit hanging around my home, I wanted to replicate those snare drums that I still keep in my mind and that we can also make with very few materials. They are really very simple and easy to make and we can use recycled material. So now I will show you the step by step.
BIENVENIDOS A MI BLOG
¡Holaaaa, holaaaaa! Saludos mis estimados creativos de DiyHub. Llega la época más emotiva y linda del año, donde nos esmeramos por alegrar nuestro entorno con decoraciones navideñas que agradan a toda la familia y visitantes. Hoy quiero mostrarles mi participación en este concurso conunos adornos que siempre me han gustado para decorar los árboles de navidad. Siempre recuerdo, cuando era niña, mi mamá decoraba un cactus con bolas multicolores, luces y muchos redoblantes que yo le quitaba para jugar porque me encantaban. Así que con estos recuerdos de mi niñez y con el espíritu de la navidad rondando por mi hogar, quise replicar esos redoblantes que aún conservo en mi mente y que además podemos realizar con muy pocos materiales. Son realmente muy sencillos y fáciles de hacer y podemos utilizar material reciclado. Así que ahora te mostraré el paso a paso.
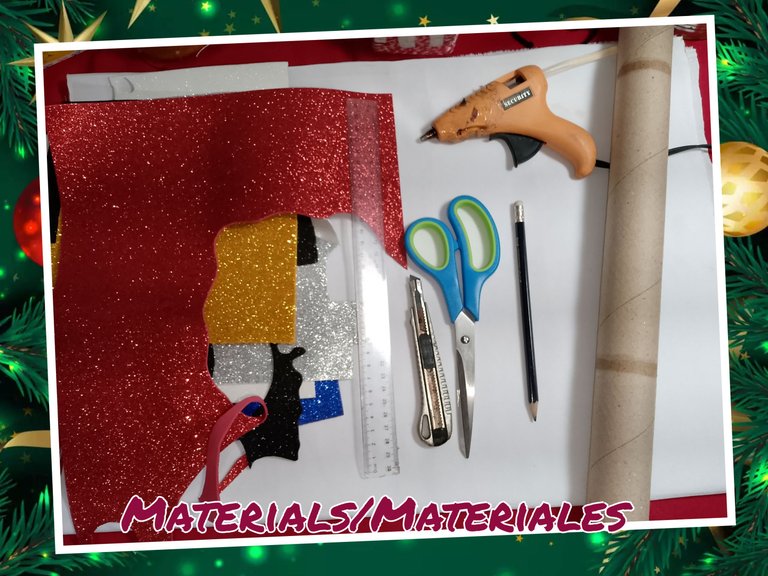
MATERIALS
- Foam, various colors.
- Rolls of absorbent paper
- Silicone gun
- Scissors
- Ruler
- Graphite pencil
- Cutter
MATERIALES
- Foami, colores variados.
- Rollos de papel absorbente
- Pistola de silicón
- Tijera
- Regla
- Lápiz de grafito
- Cortador
STEP BY STEP // PASO A PASO
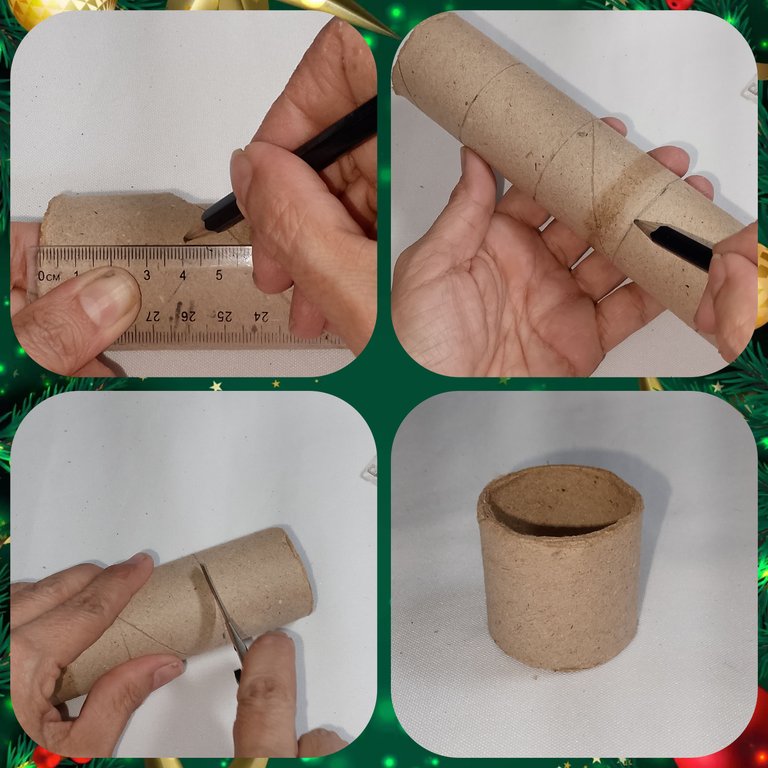
- Take the discarded roll of absorbent paper and use the ruler to make 4 cm divisions and trace the circumference. Make as many as will fit on the roll.
- Then cut it carefully so as not to damage the cardboard.
- Tomamos el rollo que desechamos del papel absorbente y con la regla vamos a hacer divisiones de 4 cm y trazamos la circunferencia. Haremos tantas como entren en el rollo.
- Luego cortamos con cuidado de no dañar el cartón.
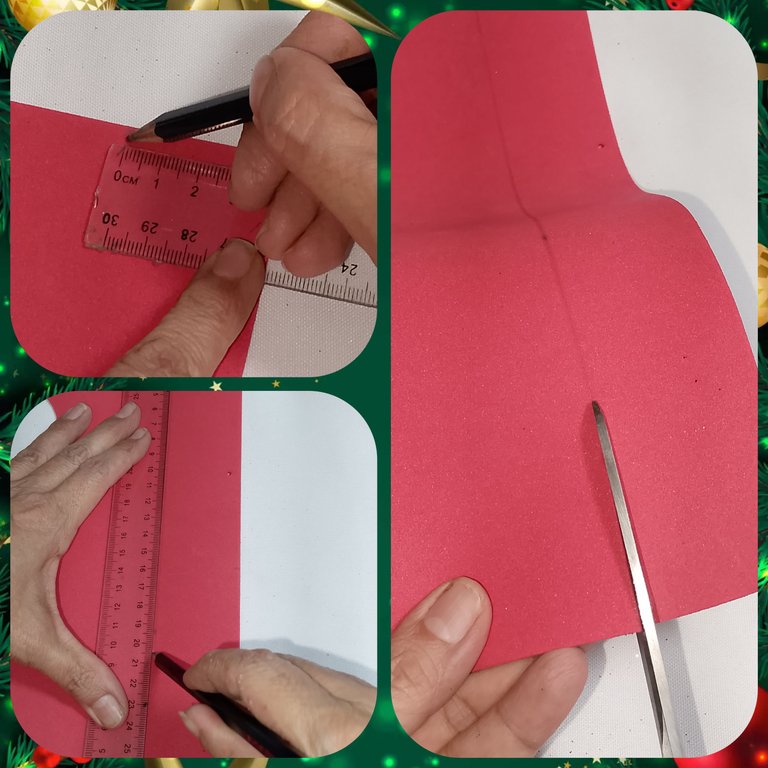
- Once our rolls have been cut, we proceed to cover them with foam. We take the color of our preference, I am going to use several colors, in this case I will start with red, and we trace 4.2 cm strips to leave a minimal blue border on the cardboard. Once the trace is done, we cut the strips.
- Ya con nuestros rollitos cortados, procedemos a forrarlos con el foami. Tomamos el color de nuestra preferencia, yo voy a realizar de varios colores, en este caso comenzaré con el color rojo, y trazamos tiras de 4,2 cm para dejat un mínimo borde sonre en cartón. Una vez realizado el trazado, cortamos las tiras.
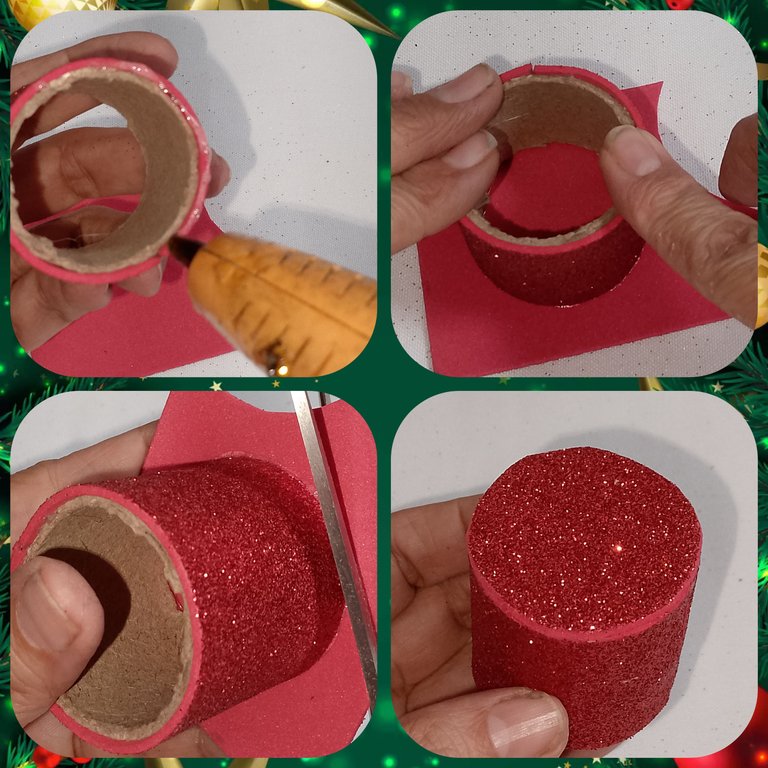
- We take the roll and wrap it with the foam making a line of silicone glue at the beginning and at the end we cut the excess foam and glue it with another line of silicone, so that they are flush.
- Tomamos el rollo y envolvemos con el foami realizando una línea de pegamento de silicón en el inicio y al finalizar cortamos el exceso de foami y pegaos con tra línea de silicón, que queden al ras.
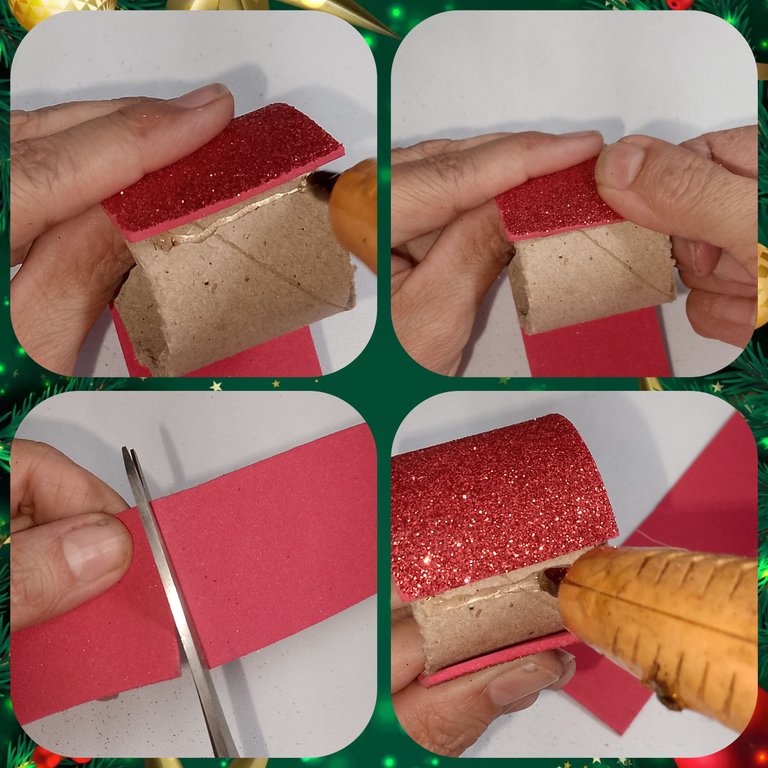
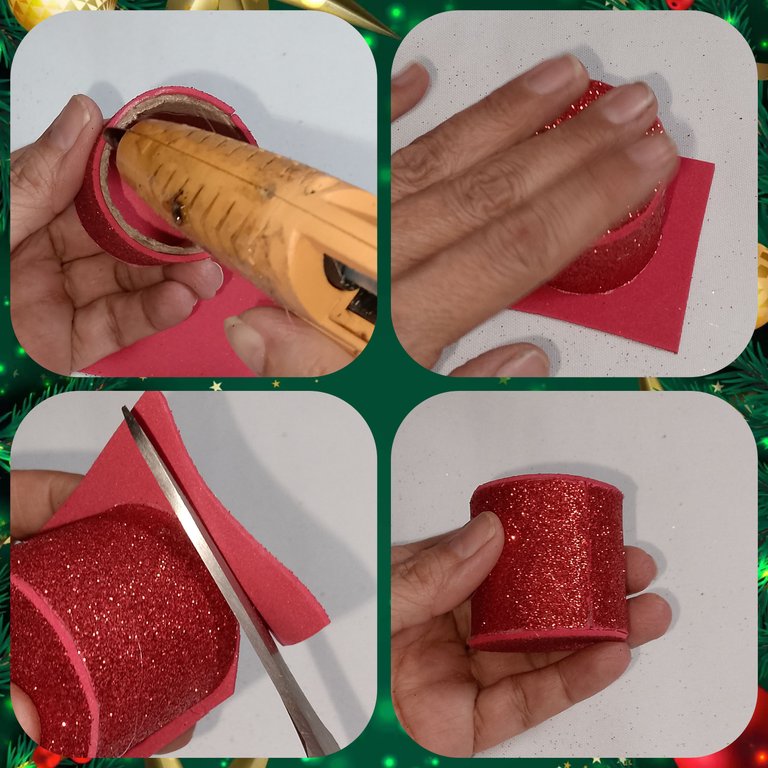
Now we are going to put silicone on one of the ends of the roll and we are going to stick a line of foam that covers the same dimension of the roll. We let it dry and very carefully we cut off the excess.
We carry out the same procedure with the other side of the roll, to cover both holes.
Ahora vamos a clocar silicón por uno de los extremos del rollo y vamos a pegar en un trazo de foami que abarque la misma dimensión del rollo. Dejamos secar y con mucho cuidado cortamos e exceso.
Realizamos el mismo procedimiento con el otro lado del rollo, para cubrir ambos agujeros.
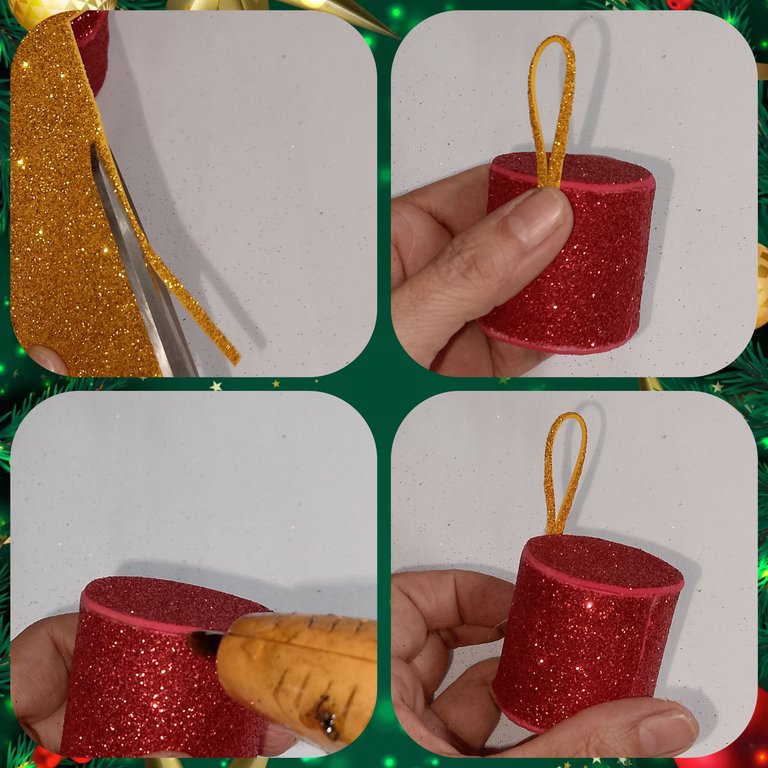
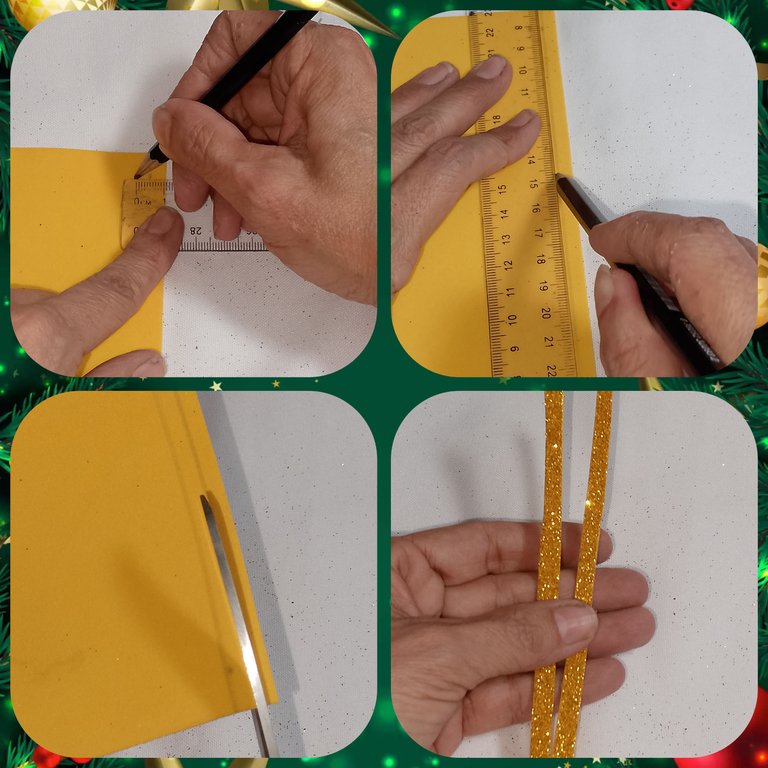
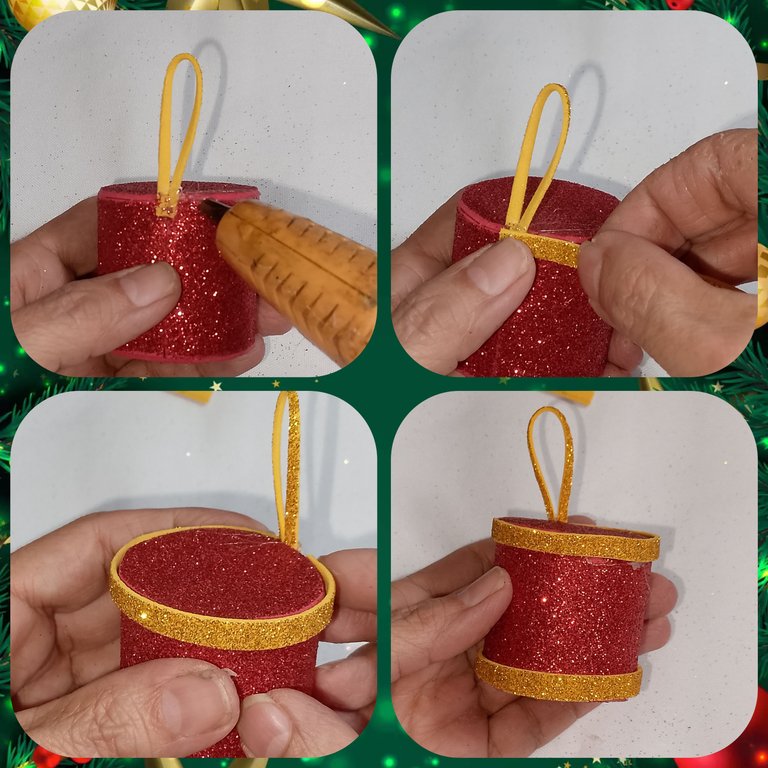
- Now we take a foam that matches or contrasts with the red, I combined it with gold foam. We make a very thin strip that we are going to use to make the pendant, it can be 10 mm wide by 8 cm long. We fold it in half and stick it where the red foam joins.
- Tomamos ahora un foami que haga juego o contraste con el rojo, yo lo combiné con foami dorado. Realizamos una tira bien delgadaque vamos a utilizar para realizar el colgante, puede ser de 10 mm de ancho por 8 cm de largo. Doblamos a la mitad y lo pegamos por donde esta la línea unión del foami rojo.
- Now we will make two strips of 0.60 cm wide. We cut and paste them on the upper and lower edges of the roll.
- Ahora realizaremos dos tiras de 0,60 cm de ancho. Cortamos y pegamos en los bordes, superior e inferior, del rollo.
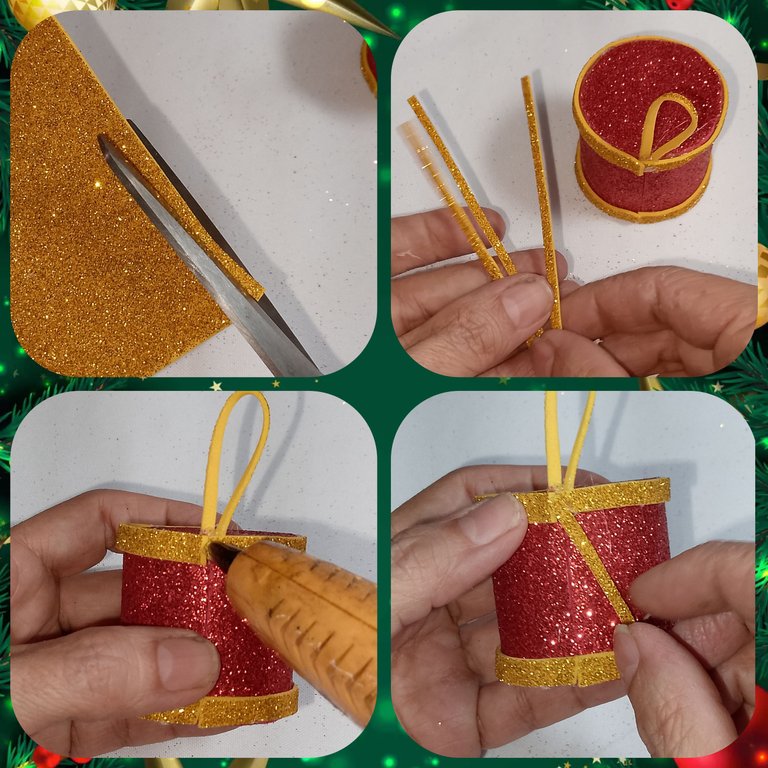
And finally, we make thinner strips, 0.20 cm, which we will place around the entire circumference of the drum in a "V" shape, starting from the top edge and going down, trying to maintain the same distance.
Y por último, realizamos tiras más delgadas, de 0,20 cm que colocaremos por toda las circunferencia del tambor en forma de "V", comenzando desde el borde superior y vamos hasta abajo, tratando de conservar la misma distancia.
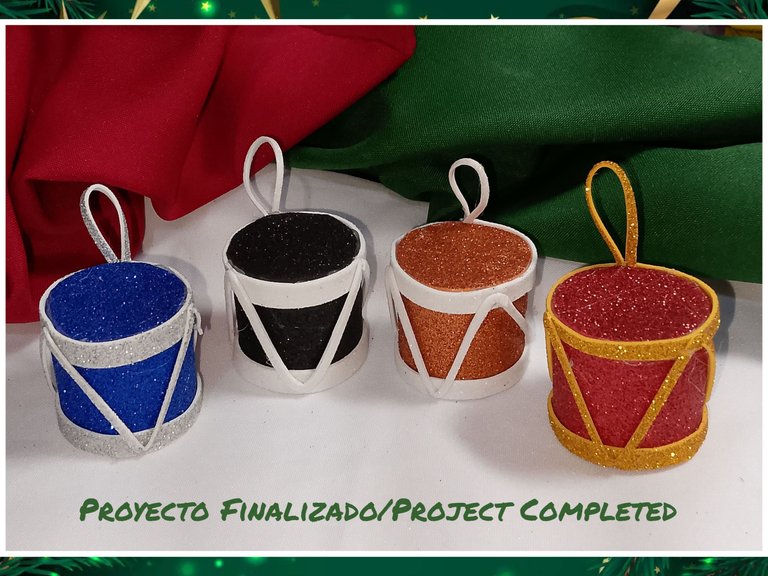
We can make as many snare drums as we want and in the colors we like the most. I always opt for a variety of colors. Although nowadays it is fashionable to decorate with a specific color, it is difficult to find multi-colored ornaments on the market, at least here in Venezuela, and if you do get them you would have to buy many packages to take one color of each one, since they come in single-color packages and the cost would be much higher when decorating. So this is another reason to save and make your own ornaments. If you are creative, these are very simple ideas to make and decorate your house for Christmas. I hope you liked it.
Podemos realizar todos los redoblantes que queramos y de los colores que más nos gusten. Yo siempre opto por la variedad de colores. Aunque hoy día está de moda decorar de un color específico, es dificil conseguir en el mercado, por lo menos aquí en Venezuela, adornos multicolores, y en caso de conseguirlos tendrías que comprar muchos empaques para tomar un color de cada uno, ya que vienen en paquetes unicolores y el costo sería mucho mayor a la hora de decorar. Así que esto es otro motivo para ahorrar y realizar tus propios adornos. Si eres creativo, estas son ideas muy sencillas para hacer y decorar de navidad tu casa. Espero te haya gustado.
Hello friend, I also remember that like you, I liked to play with these ornaments on the tree, hahahahahaha, very good anecdotes.
You have a very nice project, congratulations, I wish you success in the contest.🤗✨
Hola.
Si empezamos a almacenar los rollos desde el mes de junio tendríamos los suficientes para hacer todos los adornos para el árbol. Me gustó mucho porque se hacen rápido y se ahorra bastante dinero.
Gracias por compartir ☺️
Si, yo he acumulado una cantidad de rollitos, ya tengo cubierto todos los que necesito 😁
Me encantan los redoblantes! Quedan muy lindo en el arbolito y en los detalles de navidad! Un tutorial muy lindo y bien detallado! Gracias!!
Si, son muy lindos y con el escarchado se ven muy llamativos. Estoy encantada, y si, son súper rápido de hacer. Me alegro que te hayan gustado.
Oooh I love Christmas drums especially when we sing the christmas song with it. I so much love your work. Thanks for sharing.
Que bonitos redoblantes✨ me gusta que le da una buena utilidad a los rollos de cartón y de verdad que es un adorno muy llamativo y colorido, gracias por compartirlo☺️
It's beautiful
Thanks, I'm glad you liked it.
It's always a lovely sight when random materials are recycled and made into a useful and attractive piece of art. The drums are a delight. A great way to reminisce about your childhood memories. Thank you for sharing. Bravo.
muy buen trabajo!
very good job!