
Hello, dear community. Today I invite you to immerse yourself in a creative and ecological project that is not only fun, but also helps take care of our planet. Let's learn together how to make a beautiful flower using soda lids. Let's get to work!
Creating art from recyclable materials is a fun and creative way to contribute to the environment. In this guide, you will learn how to make a beautiful flower using soda lids. This project is great to share with friends and family, and is perfect for encouraging creativity at home.
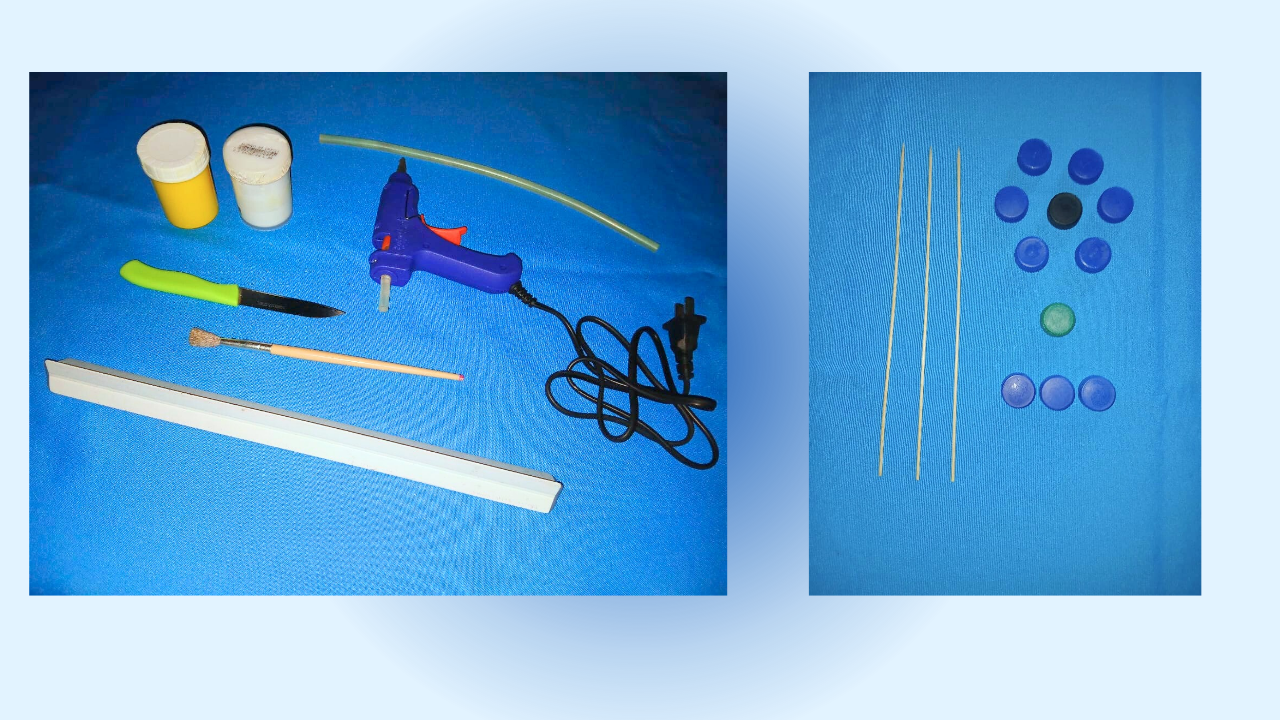
(Instrumentos:)||(Tools:)
10 tapas de refresco (preferiblemente de diferentes colores)
3 palitos de altura (de 20 a 25 cm)
Barra de silicón
Pistola de silicón
Cúter
Pinturas (colores sugeridos: blanco, amarillo y negro)
Regla
Pincel
Papel para limpiar
- 10 soda caps (preferably different colors)
- 3 sticks high (20 to 25 cm)
- Silicone bar
- Silicone gun
- Cutter
- Paints (suggested colors: white, yellow and black)
- Rule
- Painbrush
- Wipe paper
(Procedimiento:)||(Procedure:)
Before I begin the preparation process, I make sure I have all the materials ready and on hand. I organize my workspace so that it is comfortable and I don't forget to protect the surface where I am going to work. Having everything prepared will not only make the process smoother, but it will also allow me to enjoy each step without interruption. Now, let's give life to our recyclable flower!
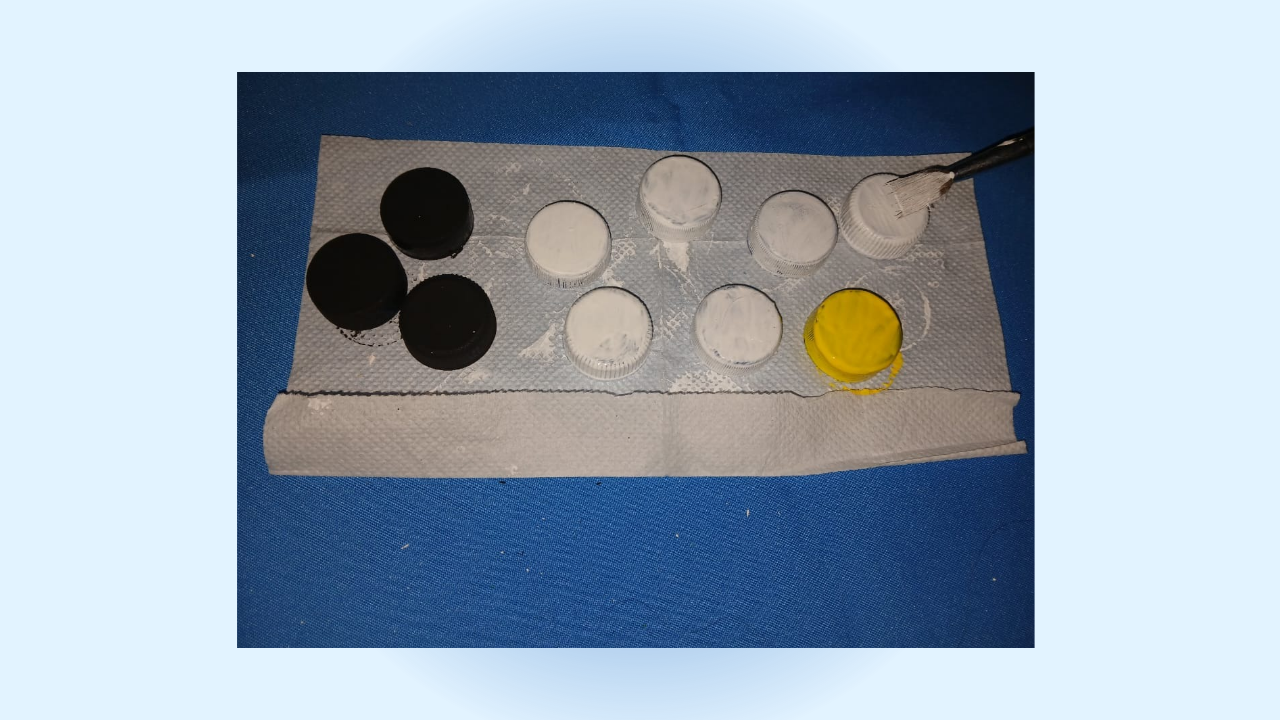
Paso nro 1
Pintar las Tapas:
Lo primero que hago es preparar el Área de Trabajo: Coloco papel periódico o una tela vieja en la superficie donde voy a trabajar para protegerla de la pintura, aseguro que tengo a mano todos los materiales: las tapas, las pinturas, el pincel y el papel para limpiar.
Luego elijo la pintura de color negro para las 3 tapas que servirán como base de la flor, con el pincel, aplico una capa uniforme de pintura en cada tapa, asegurándome de cubrir bien la superficie, dejo que las tapas se sequen completamente antes de aplicar una segunda capa de pintura ya que esto garantiza un acabado más opaco y duradero.
Al terminar con la base, procedo a pintar los petalos, selecciono 6 tapas que quiero usar como pétalos y las pinto de blanco. Al igual que antes, aplico una capa uniforme y dejo secar.
Para el centro de la flor, elijo una tapa que pintaré de amarillo. Aplico la pintura con cuidado, asegurándome de que el color sea vibrante y bien distribuido, después de aplicar la pintura, coloco todas las tapas en un lugar bien ventilado para que se sequen. Es importante no apilarlas para evitar que se peguen entre sí. En caso de ser necesario aplico 2 o 3 capas de pintura en cada tapa dejando secar completamente entre capa y capa esto ayudará a que el color sea más intenso y duradero.
Mientras espero a que las tapas se sequen, limpio el pincel y cualquier derrame de pintura con papel para mantener mi espacio ordenado.
Paso nro 1
Paint the Lids:
I do is prepare the Work Area: I place newspaper or an old cloth on the surface where I am going to work to protect it from the paint, I make sure I have all the materials on hand: the lids, the paints, the brush and the cleaning paper. Then I choose the black paint for the 3 caps that will serve as the base of the flower, with the brush, I apply an even layer of paint on each cap, making sure to cover the surface well, I let the caps dry completely before applying a second layer of paint as this guarantees a more opaque and long-lasting finish.
When I finish with the base, I proceed to paint the petals, I select 6 tops that I want to use as petals and I paint them white. As before, I apply an even coat and let dry.
For the center of the flower, I choose a cap that I will paint yellow. I apply the paint carefully, making sure the color is vibrant and well distributed, after applying the paint I place all the lids in a well-ventilated place to dry. It is important not to stack them to prevent them from sticking to each other. If necessary, I apply 2 or 3 layers of paint on each lid, letting it dry completely between layers, this will help make the color more intense and long-lasting.
While I wait for the lids to dry, I wipe up the brush and any paint spills with paper to keep my space tidy.
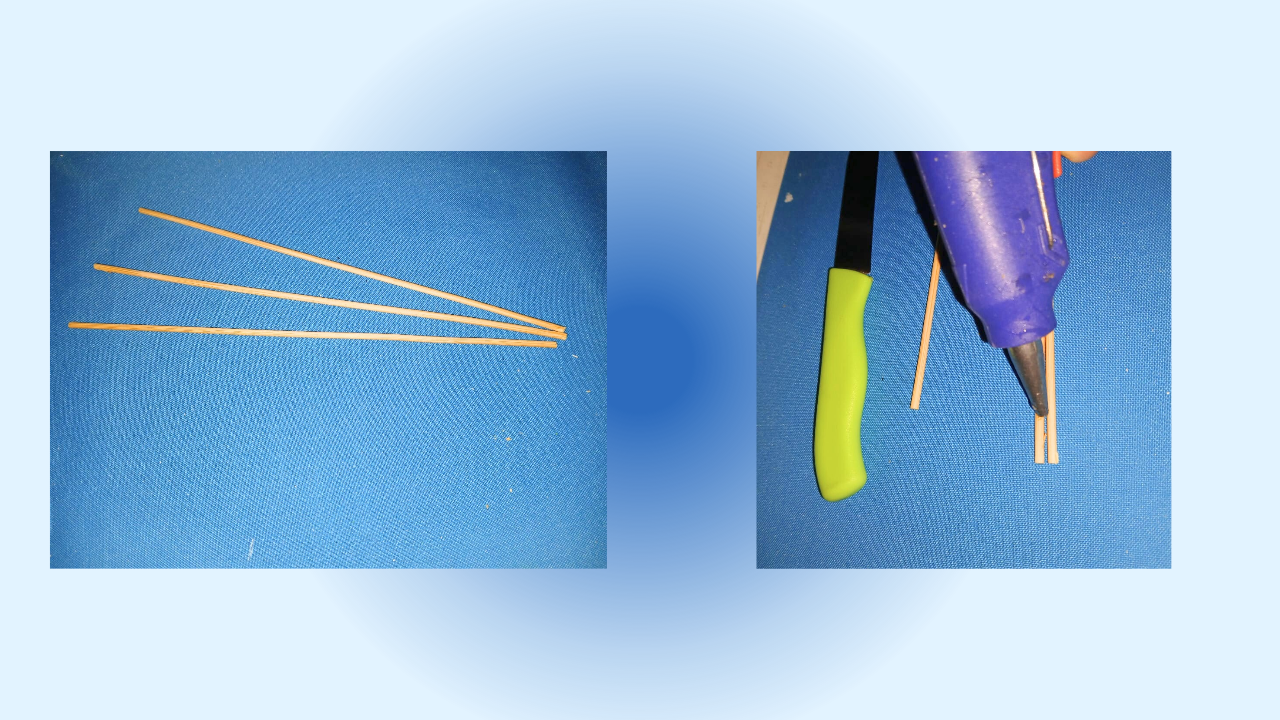
Paso nro 2
Preparar los Palitos:
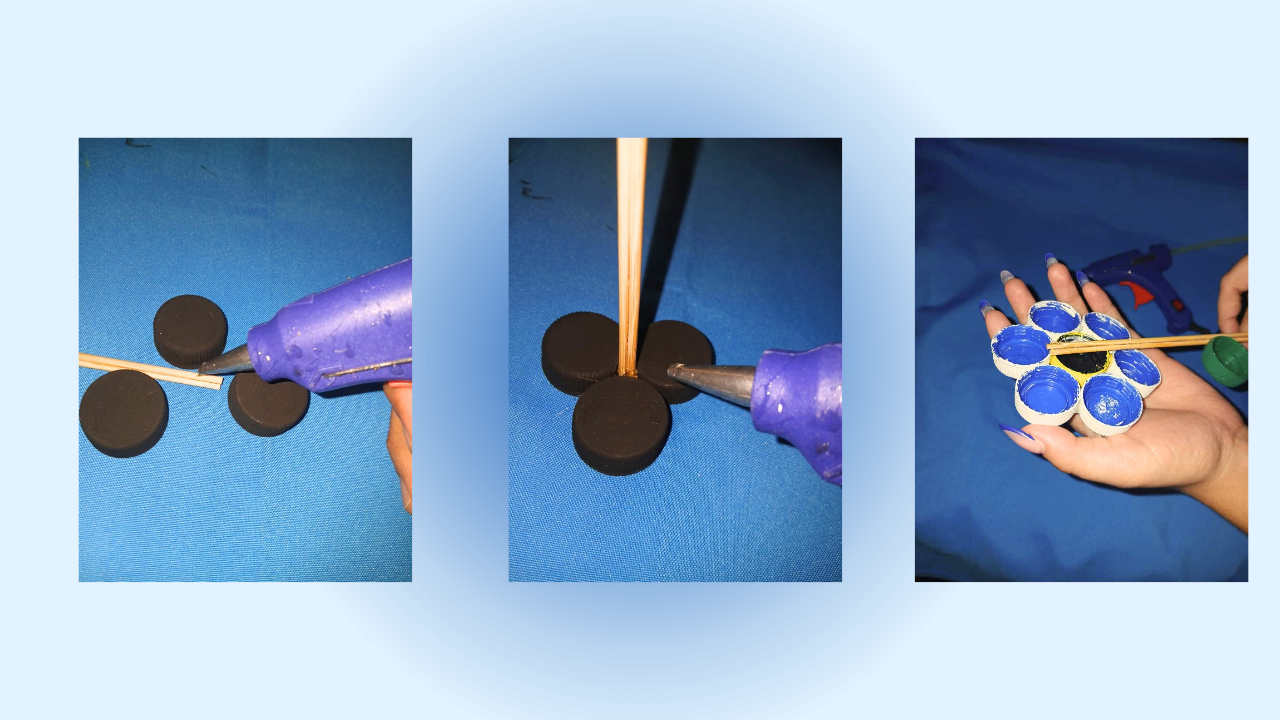
Elijo 3 palitos de altura (pueden ser de madera o de plástico) que midan entre 20 y 25 cm. Aseguro que sean lo suficientemente robustos para sostener la flor, utilice una regla para medir la longitud deseada de los palitos. Si decido que quiero que sean de 25 cm, coloco la regla sobre el palito y marco con un lápiz o un marcador en el punto de corte, von mucho cuidado utilizo un cúter o unas tijeras fuertes para cortar los palitos en la longitud deseada. Es importante hacer este paso sobre una superficie resistente y segura. Si estoy usando un cúter, me aseguro de realizar cortes suaves y precisos, aplicando la presión necesaria para no romper el palito.
Tomo los 3 palitos cortados y los alineo en forma de triángulo o en la disposición que prefiera para la flor. Aplico una generosa cantidad de silicón caliente en la parte inferior de cada palito, donde se unirán. Con cuidado, presiono los palitos juntos y los sostengo durante unos segundos para asegurarme de que se adhieran bien. Coloco la estructura de los palitos en un lugar seguro y plano para que el silicón se seque completamente. Esto puede tardar unos minutos, así que aprovecho este tiempo para limpiar cualquier exceso de silicón que pueda haber quedado en la superficie de trabajo.
Una vez que el silicón se ha secado, reviso la unión de los palitos para asegurarme de que estén firmes y estables. Si es necesario, puedo agregar más silicón en las uniones para mayor seguridad.
Paso nro 2
Prepare the sticks:
I choose 3 tall sticks (they can be made of wood or plastic) that measure between 20 and 25 cm. To ensure they are sturdy enough to hold the flower, use a ruler to measure the desired length of the sticks. If I decide that I want them to be 25 cm, I place the ruler on the stick and mark with a pencil or marker at the cutting point, very carefully I use a cutter or strong scissors to cut the sticks to the desired length. It is important to do this step on a sturdy and safe surface. If I'm using a cutter, I make sure to make smooth, precise cuts, applying enough pressure to not break the stick.
I take the 3 cut sticks and line them up in a triangle shape or whatever arrangement I prefer for the flower. I apply a generous amount of hot silicone to the bottom of each stick where they will meet. I carefully press the sticks together and hold them for a few seconds to make sure they stick well. I place the stick structure in a safe, flat place so the silicone can dry completely. This can take a few minutes, so I use this time to clean up any excess silicone that may be left on the work surface.
Once the silicone has dried, I check the joint of the sticks to make sure they are firm and stable. If necessary, I can add more silicone at the joints for added security.
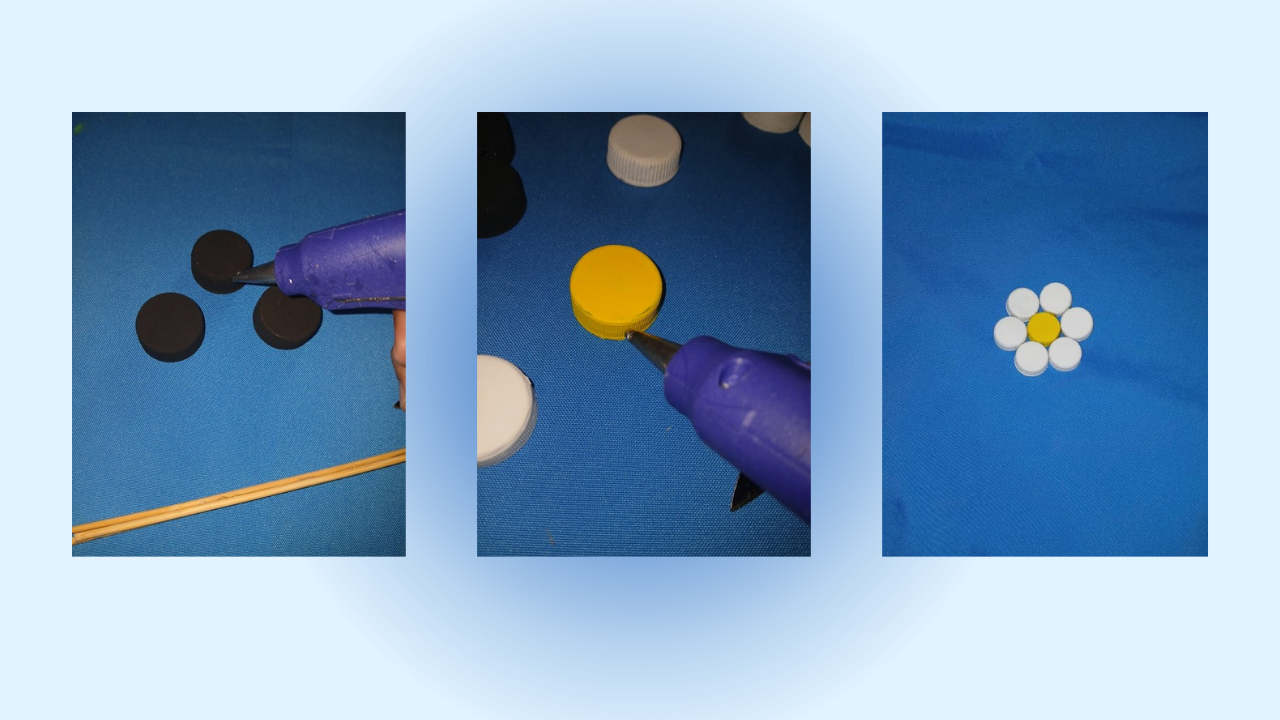
Paso nro 3
Montar la Flor:
Me aseguro que todas las tapas pintadas estén completamente secas. Esto es crucial para evitar que la pintura se dañe al manipularla. Tomo la tapa amarilla, que servirá como el centro de la flor. Aplico una generosa cantidad de silicón caliente en los bordes de la tapa amarilla y procedo a colocar las 6 tapas blancas alrededor de la tapa amarilla, formando los pétalos de la flor, verifico que estén distribuidas de manera uniforme y que se vean equilibradas, luego presiono suavemente cada tapa contra el silicón para asegurar una buena adhesión.
Coloco la flor montada en un lugar seguro y plano para que el silicón se seque completamente. Esto puede tardar entre 5 y 10 minutos. Una vez seco, reviso que todos los pétalos estén bien adheridos y que la flor tenga la forma deseada. Si alguna tapa está suelta, puedo aplicar más silicón para reforzarla.
Paso nro 3
Assemble the flower:
I make sure all painted tops are completely dry. This is crucial to prevent the paint from being damaged when handled. I take the yellow cap, which will serve as the center of the flower. I apply a generous amount of hot silicone to the edges of the yellow cap and proceed to place the 6 white caps around the yellow cap, forming the petals of the flower, checking that they are evenly distributed and looking balanced, then I gently press each cap against the silicone to ensure good adhesion.
I place the assembled flower in a safe, flat place so the silicone can dry completely. This may take 5 to 10 minutes. Once dry, I check that all the petals are well adhered and that the flower has the desired shape. If any lid is loose, I can apply more silicone to reinforce it.
Paso nro 4
Fijar la Flor al Palito:
Reviso que la base de la flor esté lista y seca también que el palito esté firme. Coloco una generosa cantidad de silicón caliente en la parte inferior de la flor (la parte que se unirá al palito). Luego coloco la base de la flor sobre el extremo superior del palito, alineando bien para que quede centrada.Presiono firmemente para asegurarme de que se adhiera bien y mantengo la presión durante unos segundos. Dejo secar por 2 minutos esto lo hago colocando la flor en posición vertical en un lugar seguro para permitir que el silicón se seque completamente. Esto es fundamental para que la flor no se caiga, después de que el silicón se haya secado, reviso la unión entre la flor y el palito para asegurarme de que esté firme. Si es necesario, puedo añadir más silicón en la unión.
Paso nro 4
Attach the Flower to the Stick:
I check that the base of the flower is ready and dry and that the stick is firm. I place a generous amount of hot silicone on the bottom of the flower (the part that will be attached to the stick). Then I place the base of the flower on the top end of the stick, lining it up well so that it is centered. I press firmly to make sure it adheres well and hold the pressure for a few seconds. I let it dry for 2 minutes. I do this by placing the flower upright in a safe place to allow the silicone to dry completely. This is essential so that the flower does not fall off, after the silicone has dried, I check the joint between the flower and the stick to make sure it is firm. If necessary, I can add more silicone at the joint.
Paso nro 5
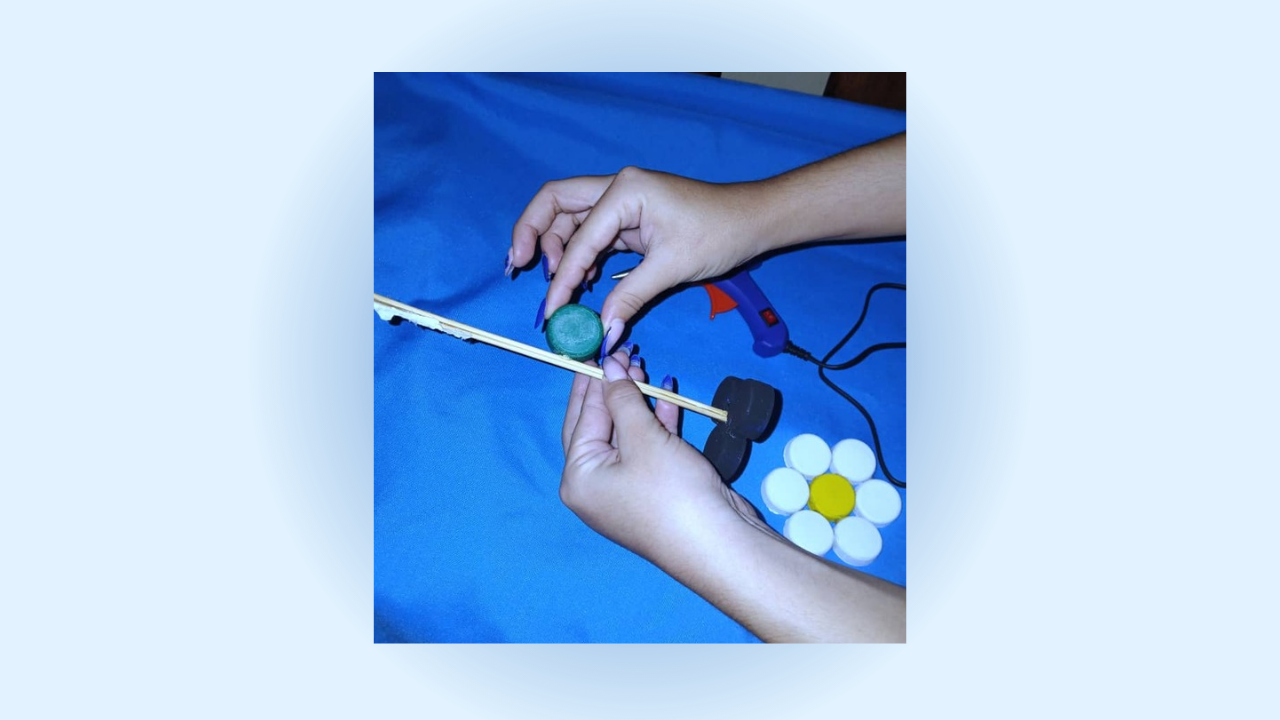
Si deseo agregar hojas, puedo cortar formas de hojas de cartulina verde o usar tapas de refresco pintadas de verde, en este caso yo le coloque como hoja una chapita verde que consegui, no tuve la necesidad de pintarla. Aplico silicón en la chapa verde y las coloco en el palito, justo debajo de la flor. Una vez que todo esté seco, reviso mi flor reciclable. Aseguro que todos los elementos estén bien adheridos y que la decoración esté a mi gusto.
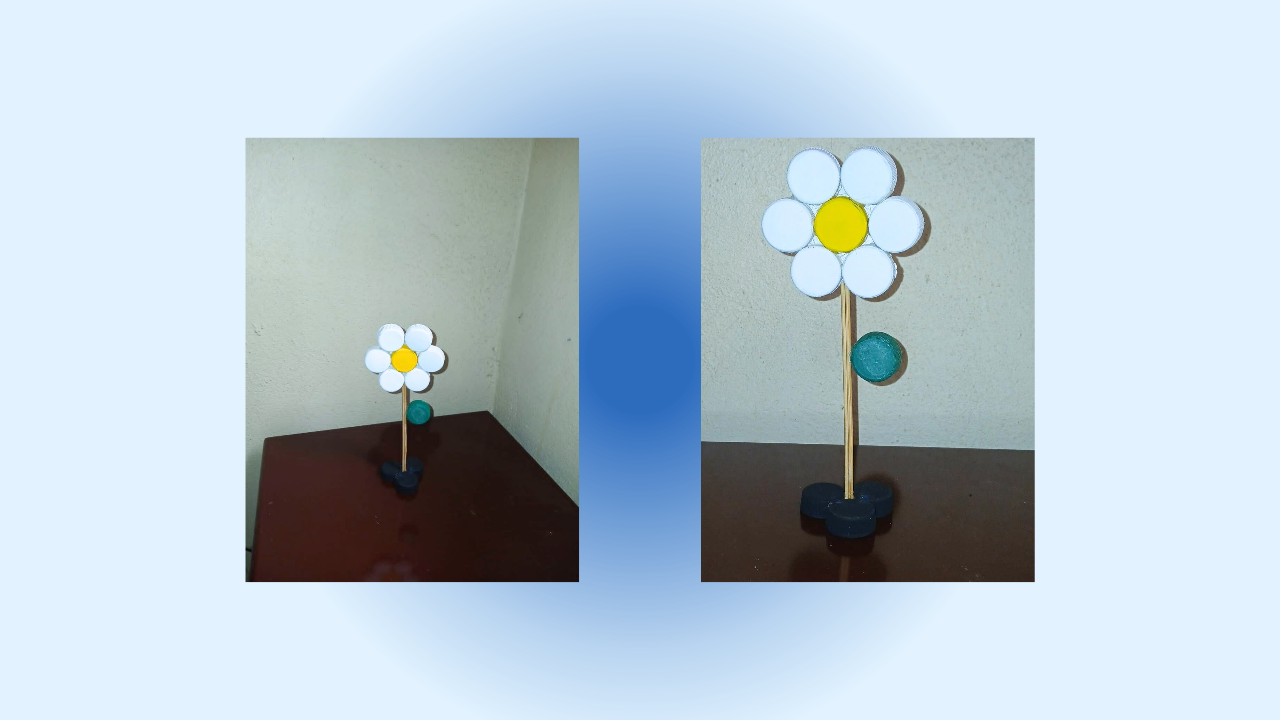
Finalmente, elijo un lugar especial para exhibir mi creación. Puede ser en una maceta, un jarrón o simplemente apoyada en una mesa como lo hice yo.
Paso nro 5
Add Details:
If I want to add leaves, I can cut leaf shapes out of green cardboard or use soda lids painted green, in this case I placed a green badge that I got as a leaf, I didn't need to paint it. I apply silicone on the green sheet and place them on the stick, just below the flower. Once everything is dry, I check my recyclable flower. I ensure that all the elements are well adhered and that the decoration is to my liking.
Finally, I choose a special place to display my creation. It can be in a pot, a vase or simply resting on a table like I did.
(Resultado final:)||(Bottom line:)
This project of creating a recyclable flower has not only allowed me to explore my creativity, but has also taught me the value of reusing materials that might otherwise have been thrown away. Through each step, from painting the lids to final assembly, I have learned to appreciate the artisanal process and the satisfaction of transforming everyday objects into a beautiful work of art. Additionally, this activity highlights the importance of sustainability and recycling in our daily lives. By using recyclable materials, I contribute to the reduction of waste and promote positive environmental awareness. The flower I have created not only beautifies my space, but also represents a commitment to a more conscious and responsible lifestyle. I invite everyone to experiment with these types of projects, as they are a great way to encourage creativity, manual skill, and appreciation for the environment. Each recyclable flower can tell a unique story and be a symbol of our connection to nature!
The photos on this blog are my property|The images are edited in canva|Photographs taken on my Samsung A15 cell phone|The content is translated in the Firefox translator.
https://bsky.app/profile/did:plc:rag2mftdy2alo7rtmyttmpk4/post/3lihzsjn2q22i
The rewards earned on this comment will go to the author of the blog post.https://bsky.app/profile/did:plc:rag2mftdy2alo7rtmyttmpk4/post/3lihzsjn2q22i
¡Maravillosa idea nos regalas para aprovechar cada detalle de casa!
¡Gracias!
Me alegra mucho que te haya gustado💕
Congratulations @linnys2004! You have completed the following achievement on the Hive blockchain And have been rewarded with New badge(s)
Your next target is to reach 500 upvotes.
Your next target is to reach 50 replies.
You can view your badges on your board and compare yourself to others in the Ranking
If you no longer want to receive notifications, reply to this comment with the word
STOP