Mi satisfaccion fue hallar este modelo de flor, la cual el material protagonista son los limpiapipas o cheniles como tambien se les conocen en algunas partes.
I greet you 🌞 friends of @diyhub wishing you first of all that your days are full of blessings, I am happy to go through this creative community about the Month of Love, to show you the elaboration of a beautiful tulip, which caught my attention in @pinterest my desire was to make a beautiful flower with an unusual material that would reflect warmth and tenderness to be part of a significant detail that would make my mom.
My satisfaction was to find this model of flower, which the main material are the pipe cleaners or cheniles as they are also known in some parts.
🌷💓🌷💓🌷💓🌷💓🌷💓🌷💓🌷💓🌷💓🌷💓
Es de resaltar, que por lo suave de este material por su caracteristica de pelusitas se prestan de maravilla para realizar esta hermosa flor como simbolo de amor y cariño. Donde este tipo de obsequio que manifiesta delicadeza son para esos seres queridos incondicionales e importantes en nuestras vidas.
Asi que, sin mas veamos los Materiales🌷 que se utilizaran:
🔸️12 Limpiapipas color rosado claro.
🔸️6 Limpiapipas color verde
🔸️Silicon caliente
🔸️Marcador color rosado
🔸️Sombra de ojos
It should be noted that the softness of this material due to its characteristic of fluffy lends itself wonderfully to make this beautiful flower as a symbol of love and affection. Where this type of gift that shows delicacy are for those unconditional and important loved ones in our lives.
So, without further ado let's see the Materials🌷 to be used:
🔸️12 Light pink pipe cleaners.
🔸️6 Green pipe cleaner
🔸️Silicon hot
🔸️Marcador pink color
🔸️Sombra for eyes
🌷💓🌷💓🌷💓🌷💓🌷💓🌷💓🌷💓🌷💓🌷💓
Elaboracion
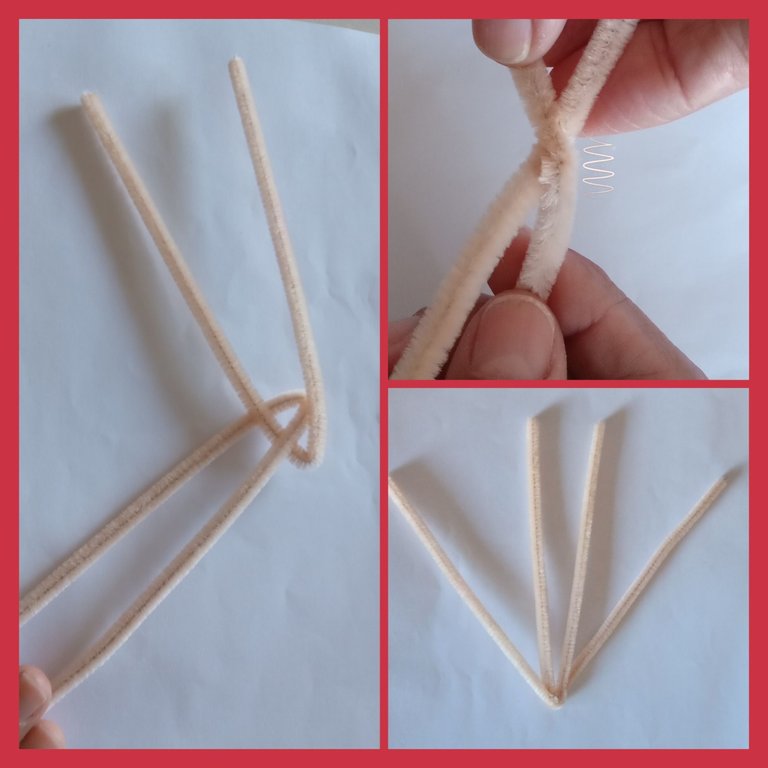
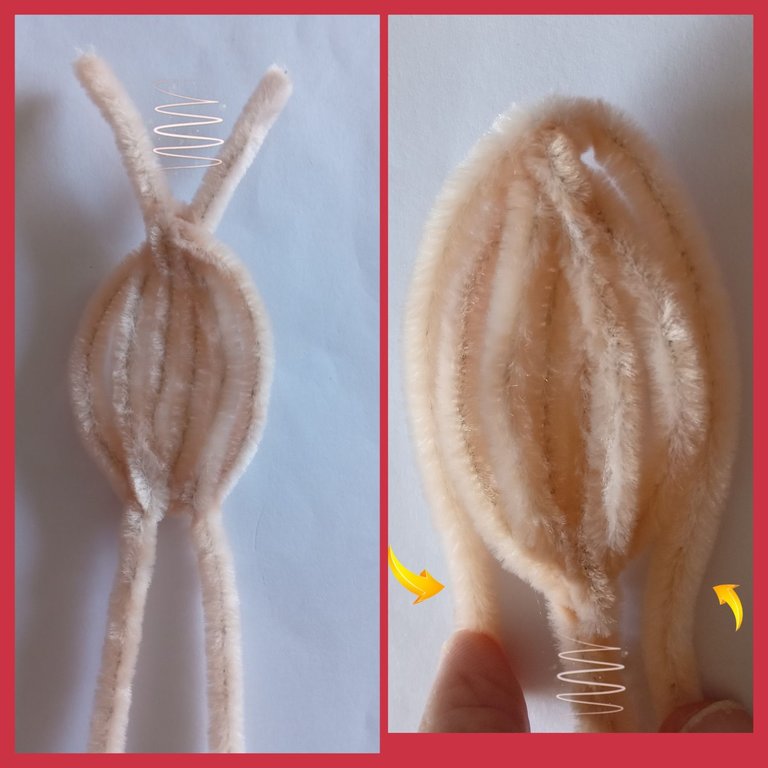
Para realizar la flor se necesitan 6 petalos, donde cada uno de ellos se elaboraran con dos limpiapipas. Veamos estos cincos sencillos pasos para realizarlos.
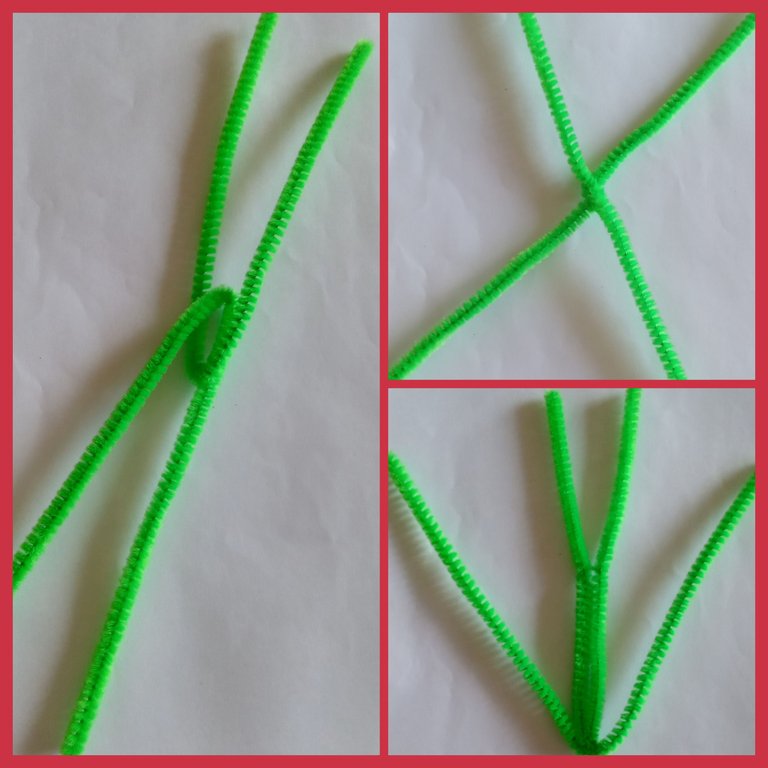
🌷1er Paso
Se doblan a la mitad los limpiapipas para que queden de igual tamaño, luego uno va dentro del otro. Se fijan los dos enrollando en el centro. Se colocan de esta forma para el siguiente paso.
Elaboration.
To make the flower you need 6 petals, where each one of them will be made with two pipe cleaners. Let's see these five simple steps to make them.
🌷1st Step
Fold the pipe cleaners in half so that they are of equal size, then one goes inside the other. Fix the two by rolling them together in the center. Place them in this way for the next step.
🌷2do Paso
Se entrelazan los del centro, luego los que estan a los lados se doblan encima de los que estan unidos arriba.
🌷2nd Step.
The ones in the center are interlocked, then the ones on the sides are folded over on top of the ones attached above.
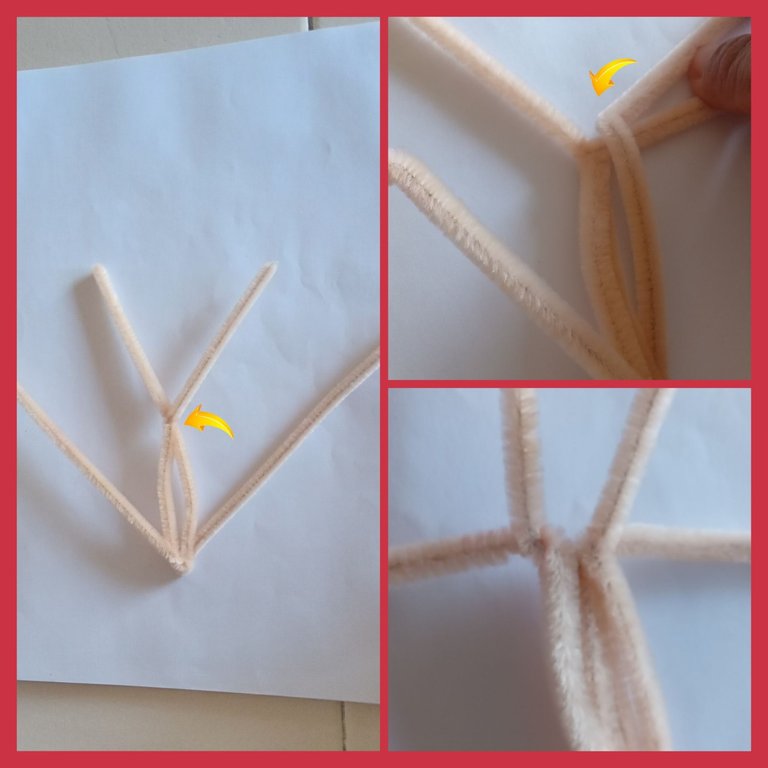
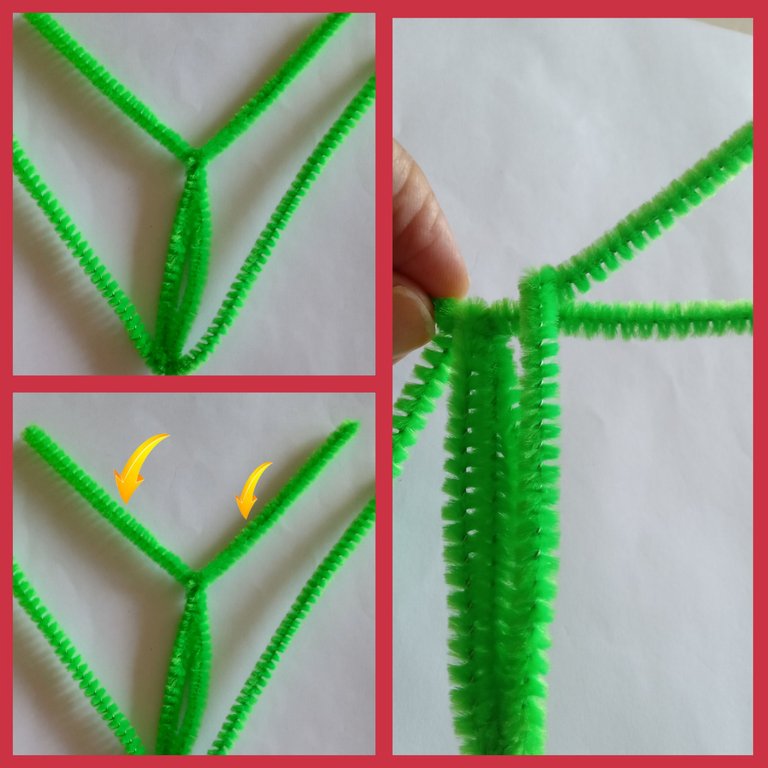
🌷3er Paso
Se coloca el petalo que se va formando hacia arriba. Cada limpiapipas que se coloco encima como indica el paso 2, se inserta en el primer espacio arriba del petalo. De cada lado en forma de x
🌷3rd Step.
The petal that is being formed is placed upwards. Each pipe cleaner that was placed on top as indicated in step 2, is inserted into the first space above the petal. On each side in the shape of an x
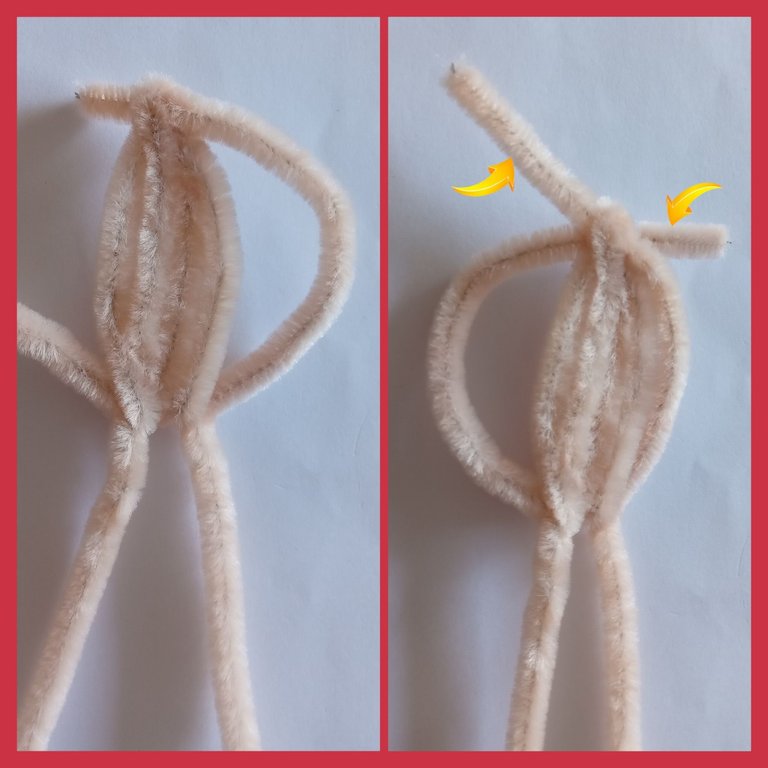
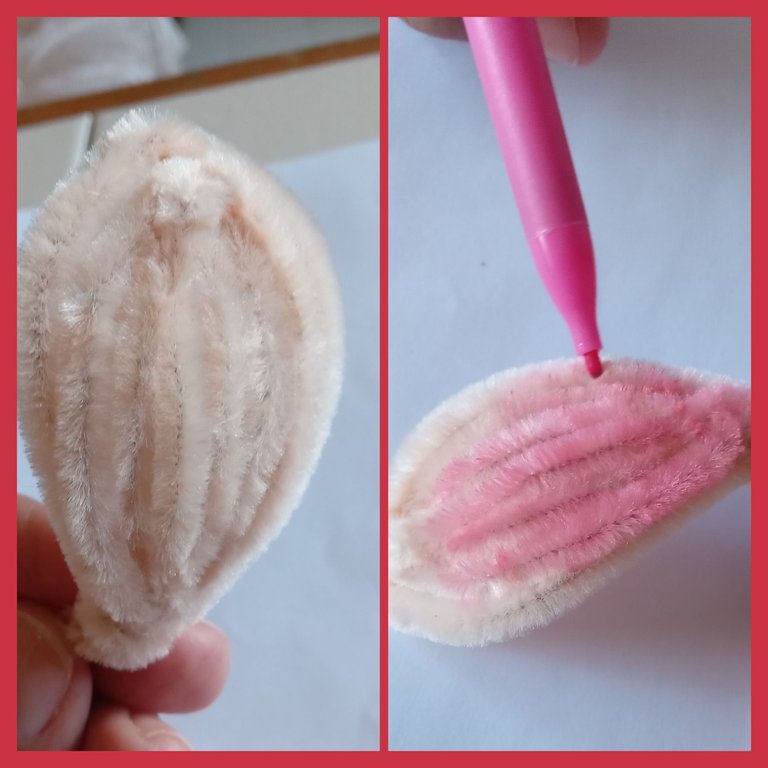
🌷4to paso
Se le da vuelta a los pedacitos mas cortos, la cual, es la base del petalo.
Las puntas mas largas se doblan cada una, hacia el lado contrario y luego hacia abajo para definir la forma de los lados, y unirse con la base del petalo.
🌷4th step.
The shorter pieces are turned over, which is the base of the petal.
The longer ends are each folded over, to the opposite side and then down to define the shape of the sides, and join with the base of the petal.
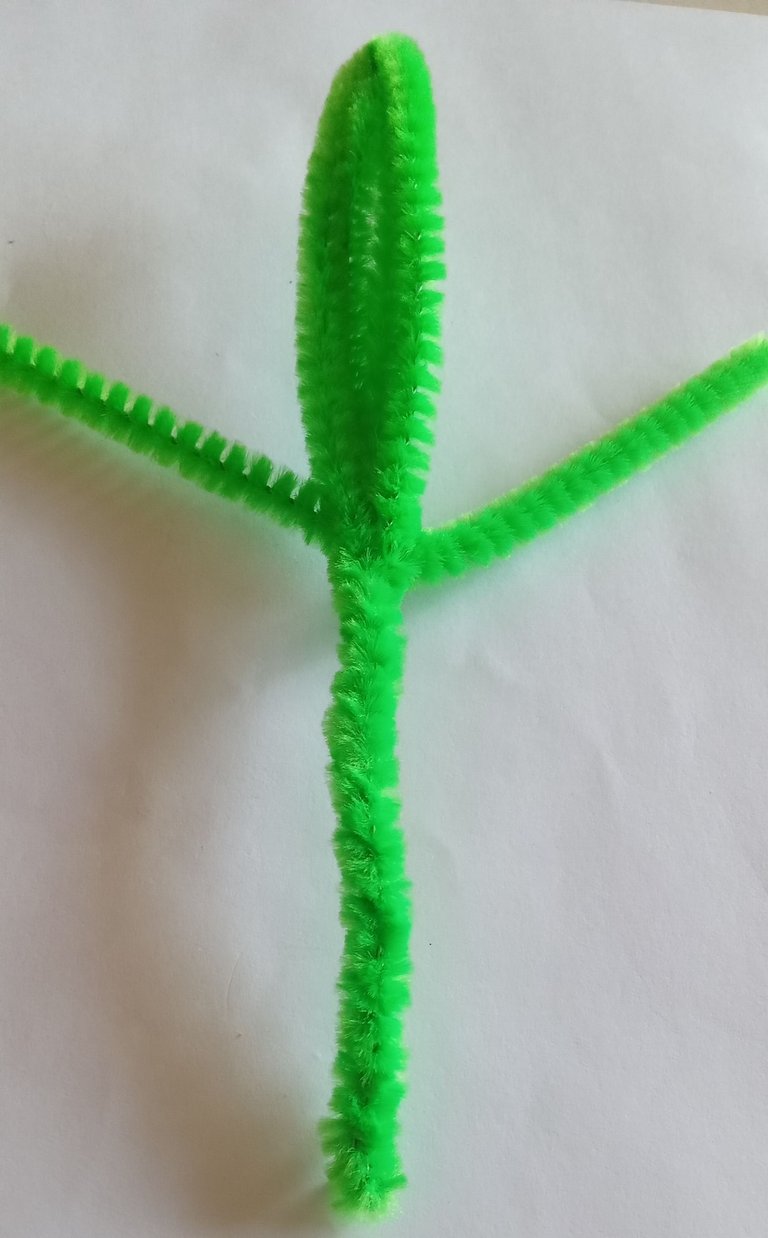
⚘️Resultado del Petalo⚘️
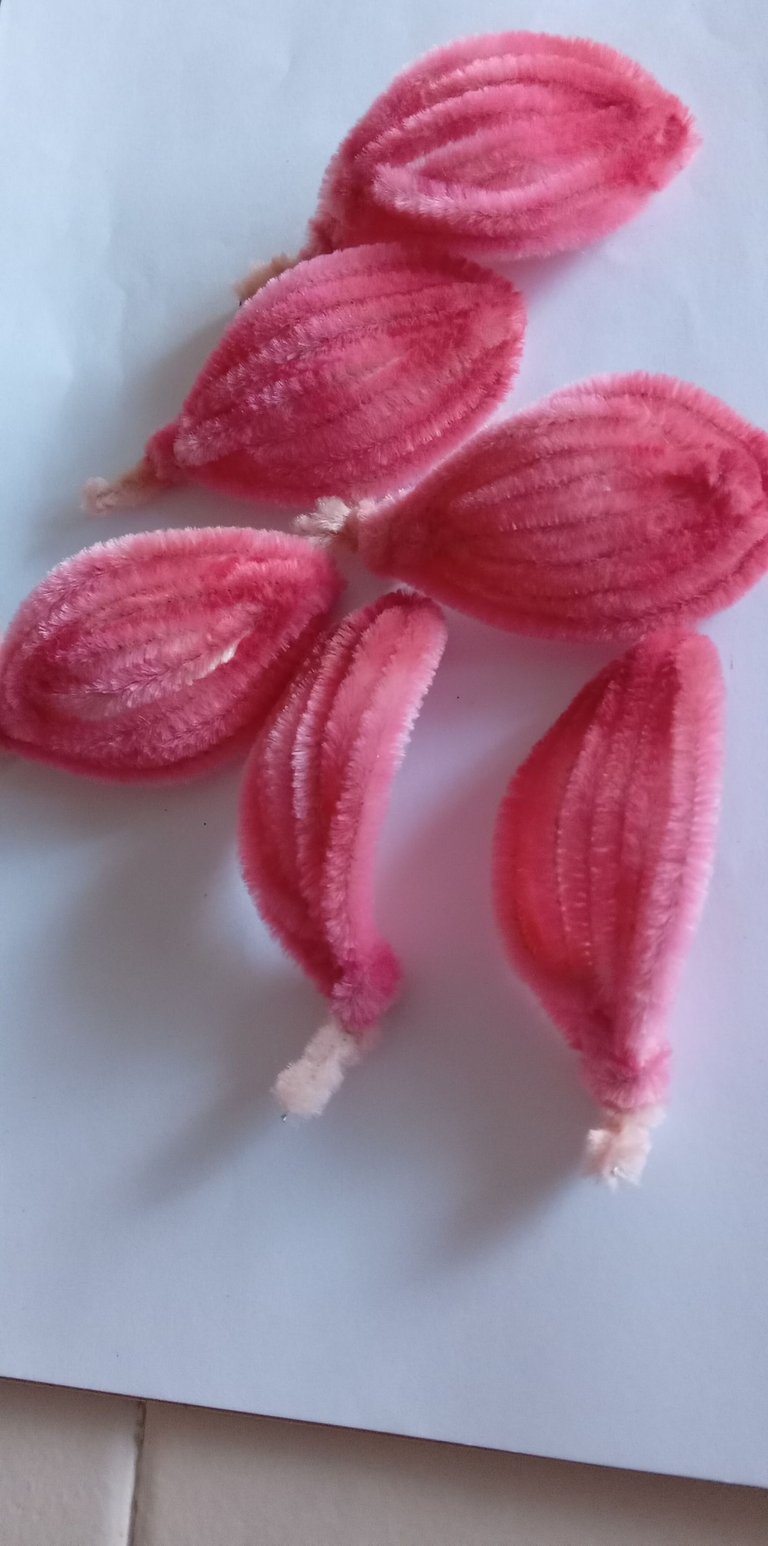
Asi queda formado el petalo, de los cuales se realizaran seis, quise pintarlos con marcador rosa, fue un plus que requirio para que quedara con diferentes contrastes de tonos y asi pueda destacarse.
⚘️Result of the Petalo⚘️
This is how the petal is formed, of which six will be made, I wanted to paint them with pink marker, it was a plus that required to be with different contrasts of tones and so it can stand out.
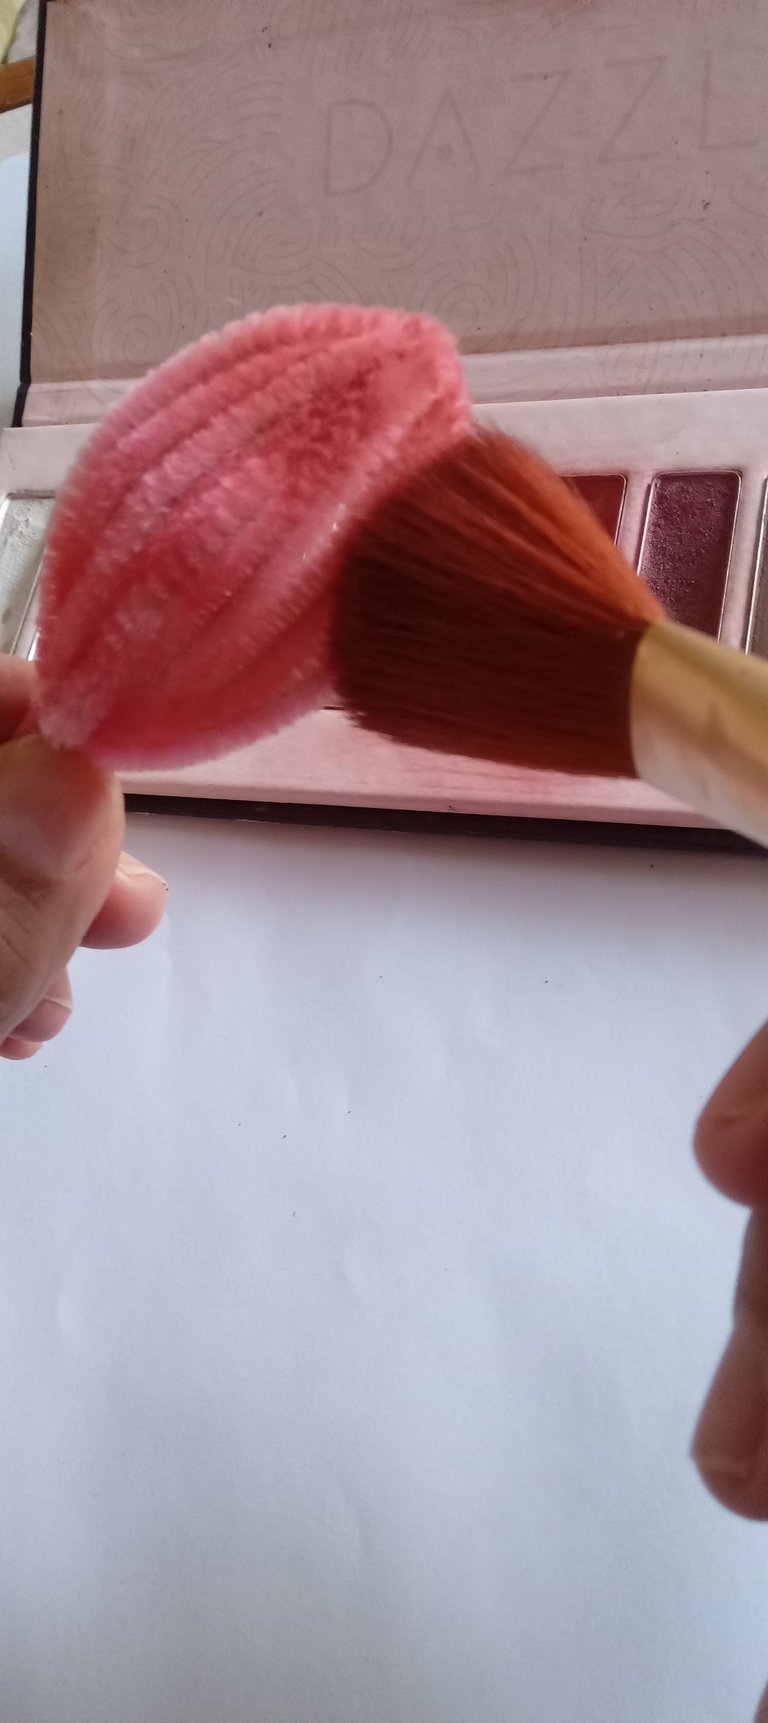
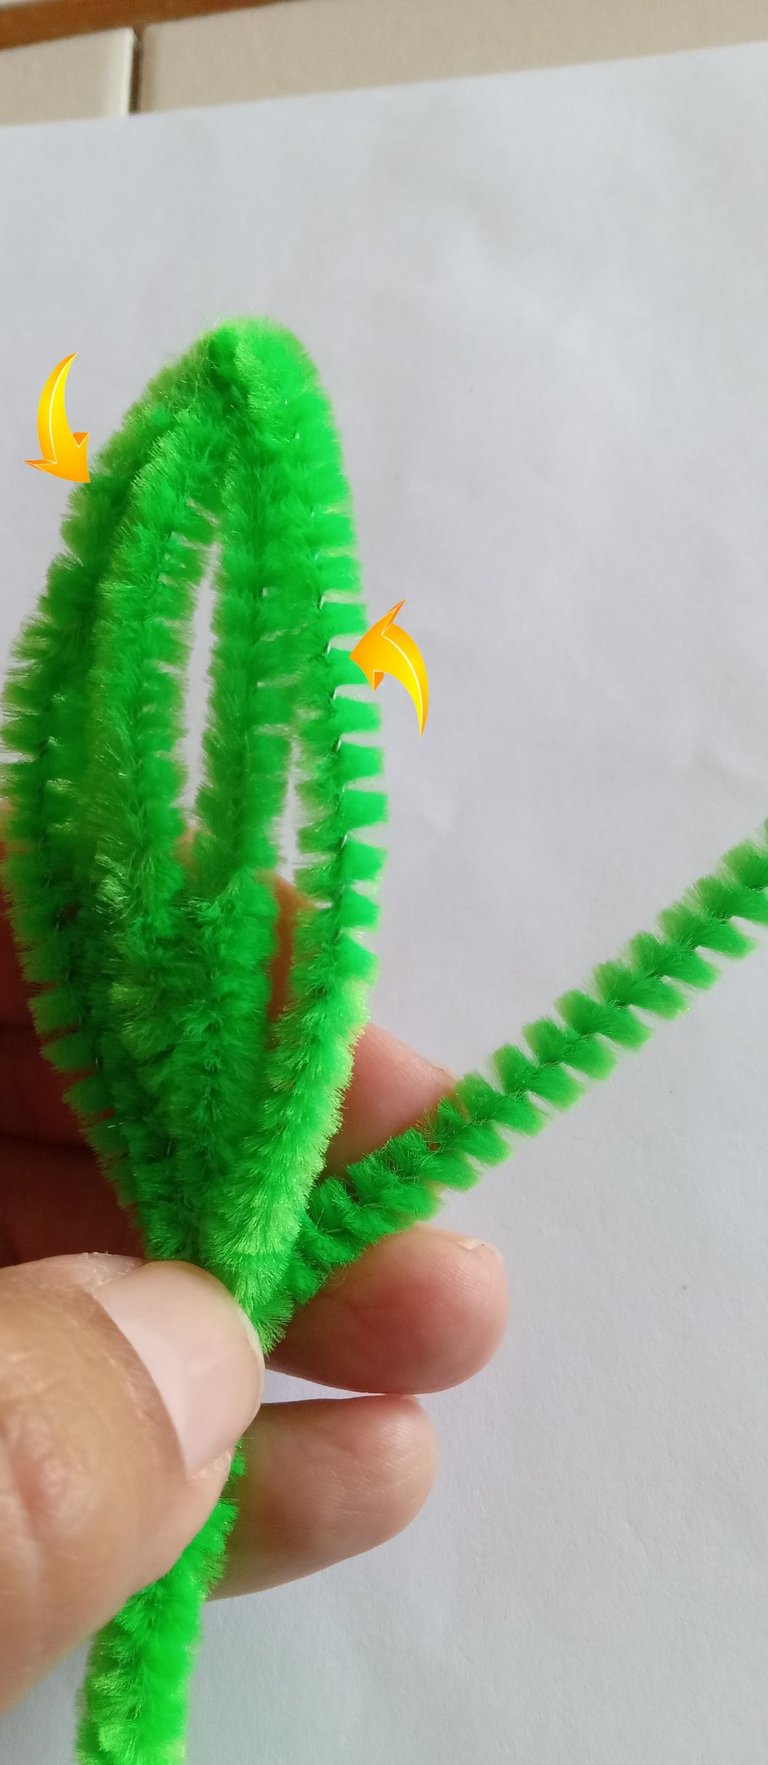
Luego en la punta de cada petalo le aplique mas tonalidad, con sombra de maquillaje, para asi lograr un bonito efecto.
Then at the tip of each petal I applied more tonality, with make-up shadow, to achieve a nice effect.
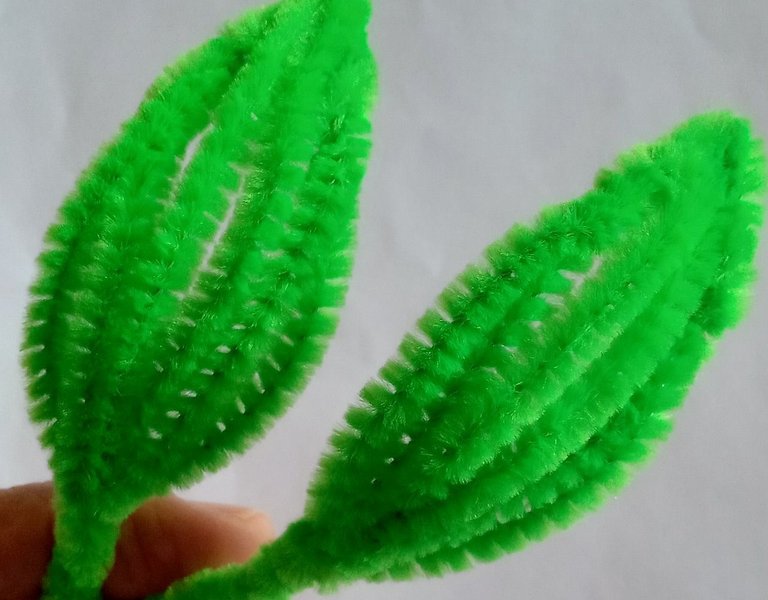
🍃Hojas🍃
Para realizar las hojas que van en el tallo de la flor se seguiran unos pasos mas sencillos, veamos:
🍃Paso 1🍃
Se doblan los limpiapipas a la mitad quedando uno dentro del otro, luego se entrelazan en el centro. Se colocan de esta forma para el siguiente paso.
🍃Leaves🍃
To make the leaves that go on the stem of the flower will follow some simpler steps, let's see:.
🍃Step 1🍃
Fold the pipe cleaners in half, one inside the other, then intertwine them in the center. Place them in this way for the next step.
🍃Paso 2🍃
Seguido se entrelazan los que estan en el centro, luego las puntas de los lados, se colocan encima de los limpiapipas que se entrelazaron en el paso anterior.
🍃Step 2🍃
Next intertwine the ones in the center, then the ends of the sides, place them on top of the pipe cleaners that were intertwined in the previous step.
🍃Paso 3🍃
Se coloca la hoja que se esta formando hacia arriba, y se enrollan entre si las puntas que se encuentran abajo formando la base de la hoja.
Y la puntas que quedan de lado a lado se llevan arriba moldeando cada lado de la hoja, sujetandola a la que esta a su lado.
🍃Step 3🍃
Place the leaf that is being formed upwards, and roll the ends that are below together forming the base of the leaf.
And the ends that are left side by side are carried upwards shaping each side of the leaf, holding it to the one next to it.
Quedando formada las hojitas, de las cuales realice dos de ellas.
The leaves are formed, of which I made two of them.
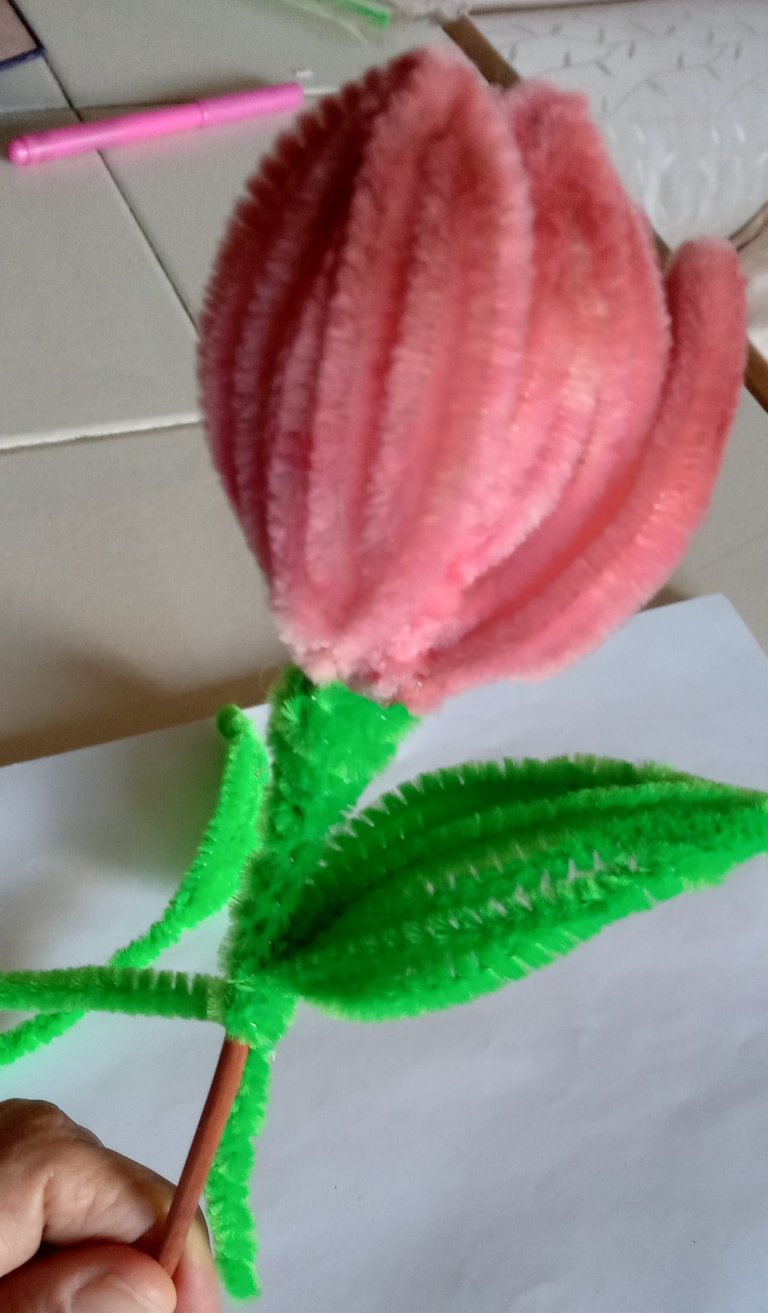
Para armar la flor🌷 se van pegando los petalos en un palito de madera, utilizando el silicon caliente.
Un petalo junto al otro, que vayan quedando en una bonita forma. Luego se cubre el tallo con un limpiapipas color verde que servira ademas, para fijar las hojas de lado a lado en el tallo.
To assemble the flower🌷 stick the petals on a wooden stick, using hot silicon.
One petal next to the other, so that they form a nice shape. Then cover the stem with a green pipe cleaner that will also serve to fix the leaves from side to side on the stem.

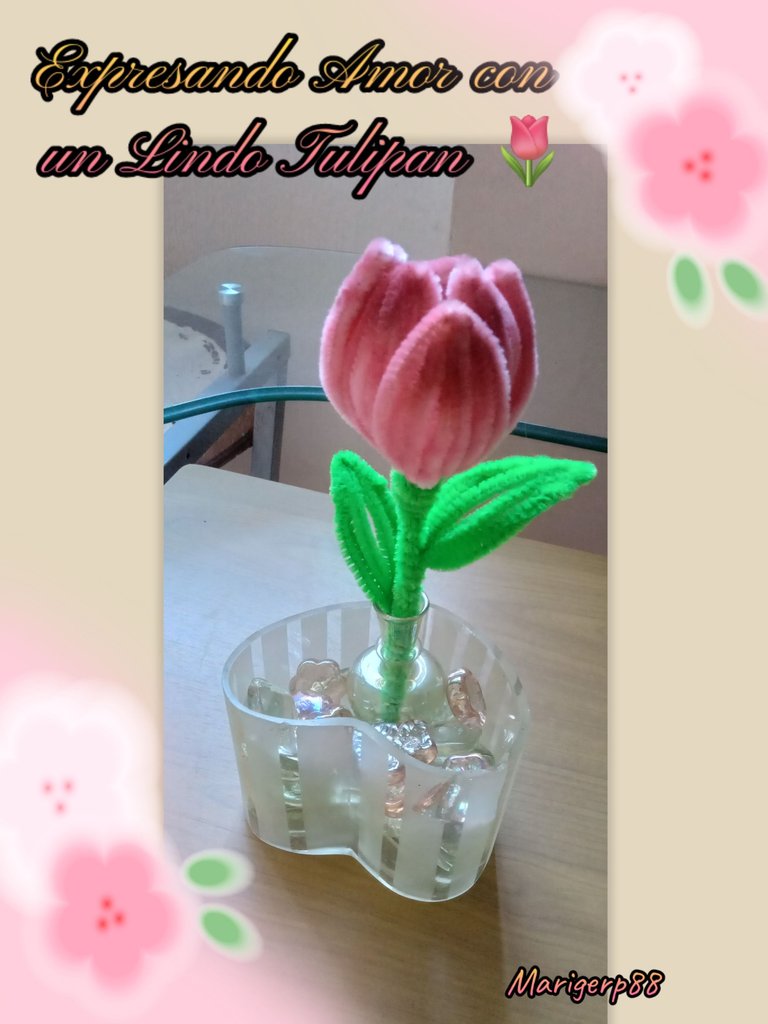
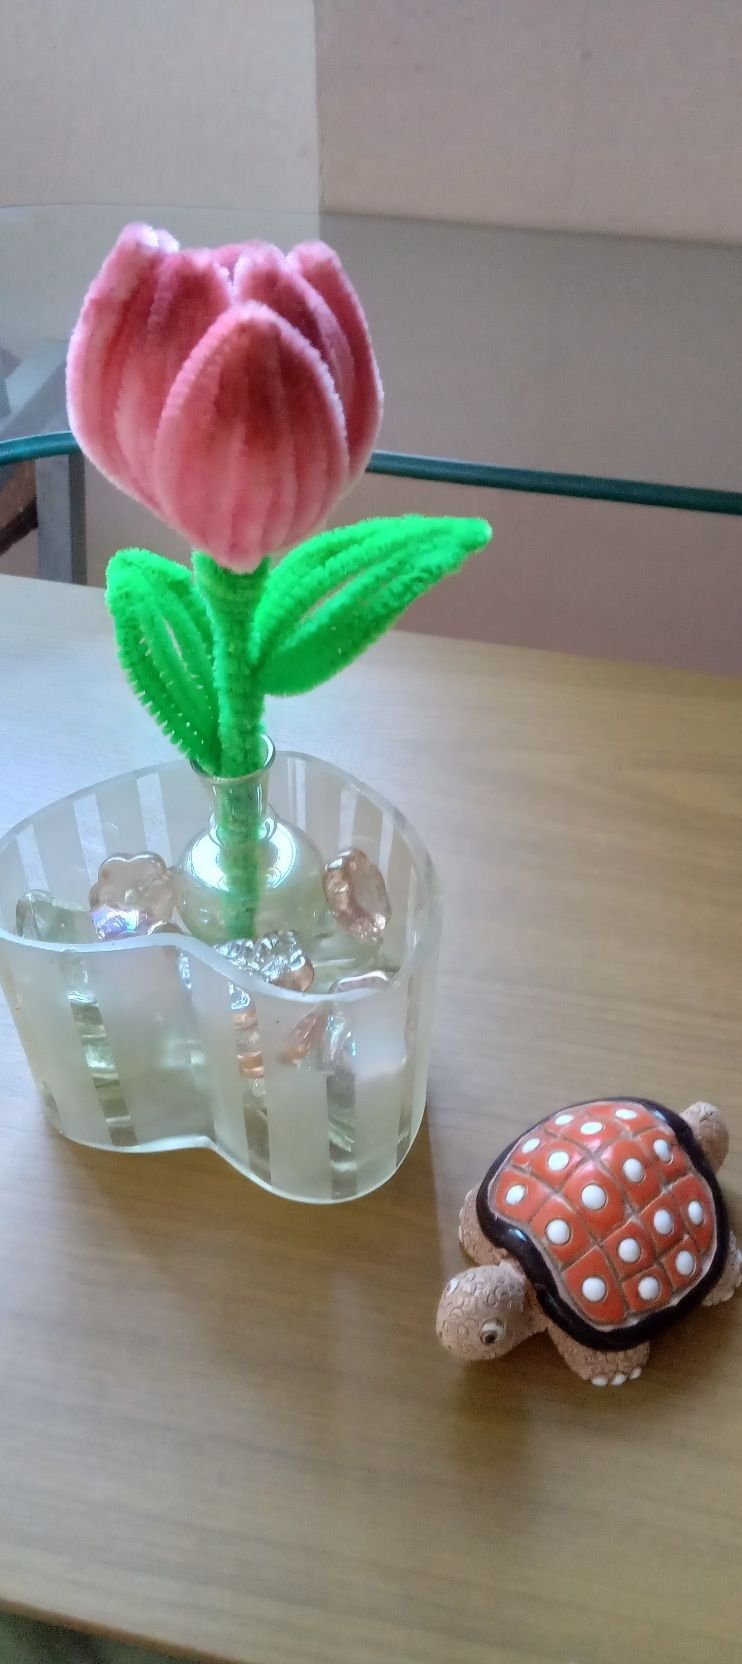
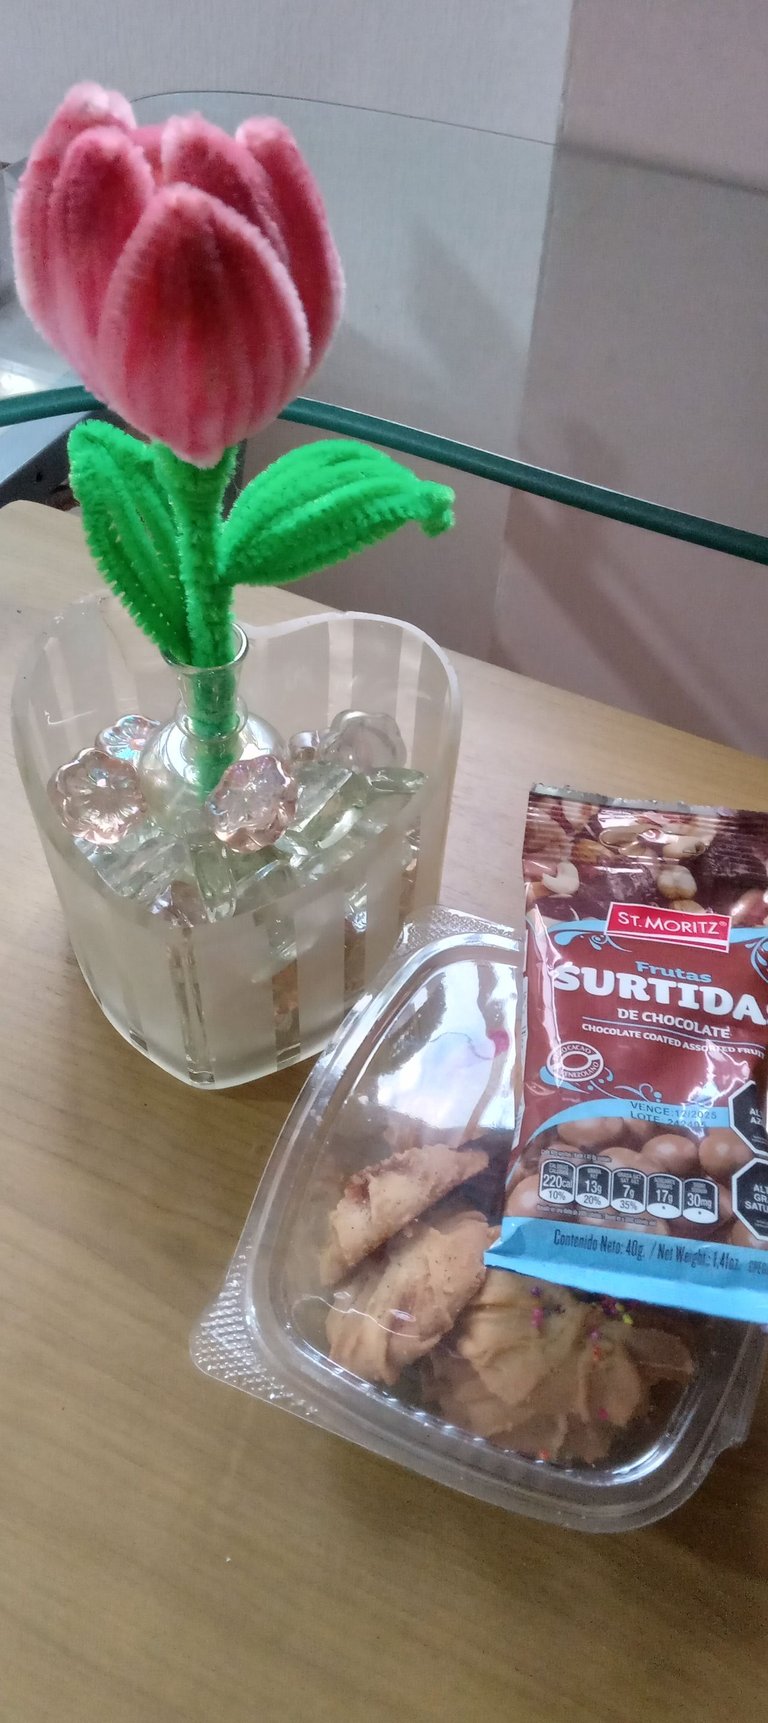
Como un lindo detalle quedo este tulipan que realice para acompañar unos deliciosos dulces, mi mama le agrado mucho el regalo, sobre todo el color y la textura aterciopelada de la flor, vale decir, que este tulipan para fechas proximas como el dia de la madre, en un lindo obsequio ya que siempre seran las flores motivo de alegria, sorpresa y felicidad. 🌷✨️🌷Hasta pronto amigos!😍
As a nice detail was this tulip that I made to accompany some delicious sweets, my mom really liked the gift, especially the color and velvety texture of the flower, it is worth saying that this tulip for upcoming dates such as Mother's Day, in a nice gift because the flowers will always be a source of joy, surprise and happiness. 🌷✨️🌷See you soon friends !
Fotos tomadas por | Photos taken by @marigerp88
Dispositivo | Device | Galaxy AO3
Fotos editadas en: |Photos edited in |Pic collage
Traducción con | Translation with| DeepL
It is so beautiful, lovely, and charming. Love its design that looks amazing. Good to see each step of making this. Nice work!
Thank you @diyhub I am glad for your comment I value it and it encourages me to keep creating! happy day!🌼
@tipu curate
Upvoted 👌 (Mana: 0/59) Liquid rewards.
I thank you 🌼
que bonito y creativo, excelente para decorar!
how beautiful and creative, great for decorating!
Ciertamente amiga, gracias ! luego de sorprender a mi mama con este tulipan, lo coloco en su cuarto para decorar ese espacio, gracias por tu visita! 😍
https://bsky.app/profile/did:plc:rag2mftdy2alo7rtmyttmpk4/post/3lil2ob7biu2f
The rewards earned on this comment will go to the author of the blog post.https://bsky.app/profile/did:plc:rag2mftdy2alo7rtmyttmpk4/post/3lil2ob7biu2f