¡Hola mis queridos amigos creativos! Siguiendo con la temática llena de amor de este mes de Febrero y participando en el concurso propuesto por la comunidad, he traído una nueva manualidad toda bonita, delicada y tierna * está emocionada * ¿recuerdan que hace ya algunos años se volvieron tendencia unos ositos cubiertos de rosas? Bueno, en ese entonces, me dije a mí misma “un día haré uno de esos” y adivinen qué, sí, ha llegado ese día muchachos, hoy vengo a compartirles el paso a paso para que puedan hacer su propio osito de rosas, a su gusto, personalizado y con materiales sencillos. Me parece ideal esta idea para el mes del amor y la amistad, ya que los osos y las rosas son regalos que nunca pasan de moda y este diseño contiene ambas. Sigue leyendo y no te pierdas esta hermosa manualidad.
Hello my dear creative friends! Continuing with the love-filled theme of this month of February and participating in the contest proposed by the community, I have brought a new craft all pretty, delicate and tender * she's excited * do you remember that a few years ago rose-covered teddy bears became a trend? Well, back then, I said to myself “one day I will make one of those” and guess what, yes, that day has come guys, today I come to share with you the step by step so you can make your own rose teddy bear, to your liking, personalized and with simple materials. I think this idea is ideal for the month of love and friendship, since bears and roses are gifts that never go out of style and this design contains both. Keep reading and don't miss this beautiful craft.
Imagen creada por mí en Canva / Image created by me in Canva
Materiales:
- Papel (colores de tu preferencia)
- Papel de reciclaje
- Cinta adhesiva
- Silicón caliente
- Pegamento blanco
- Lápiz
- Palito de altura/Palillo
- Cinta de raso o alguna decoración
- Pincel
- Tijeras
- Compás o algo circular
Proceso:
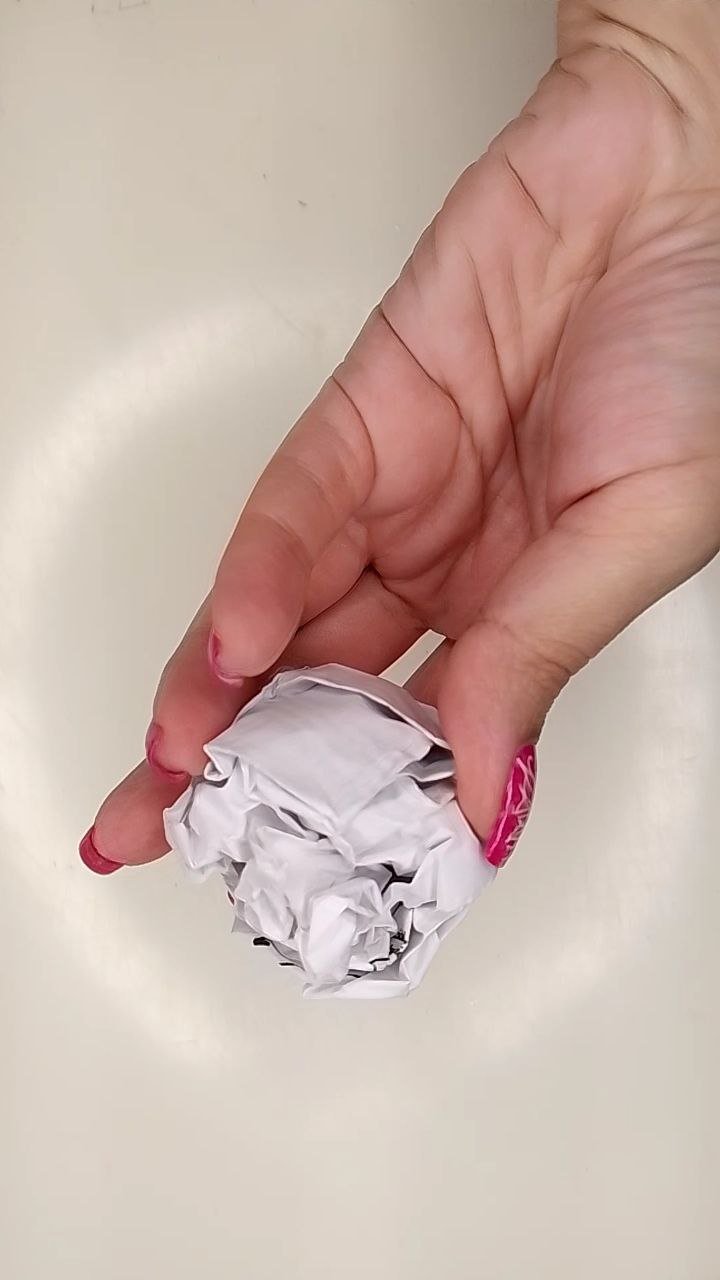
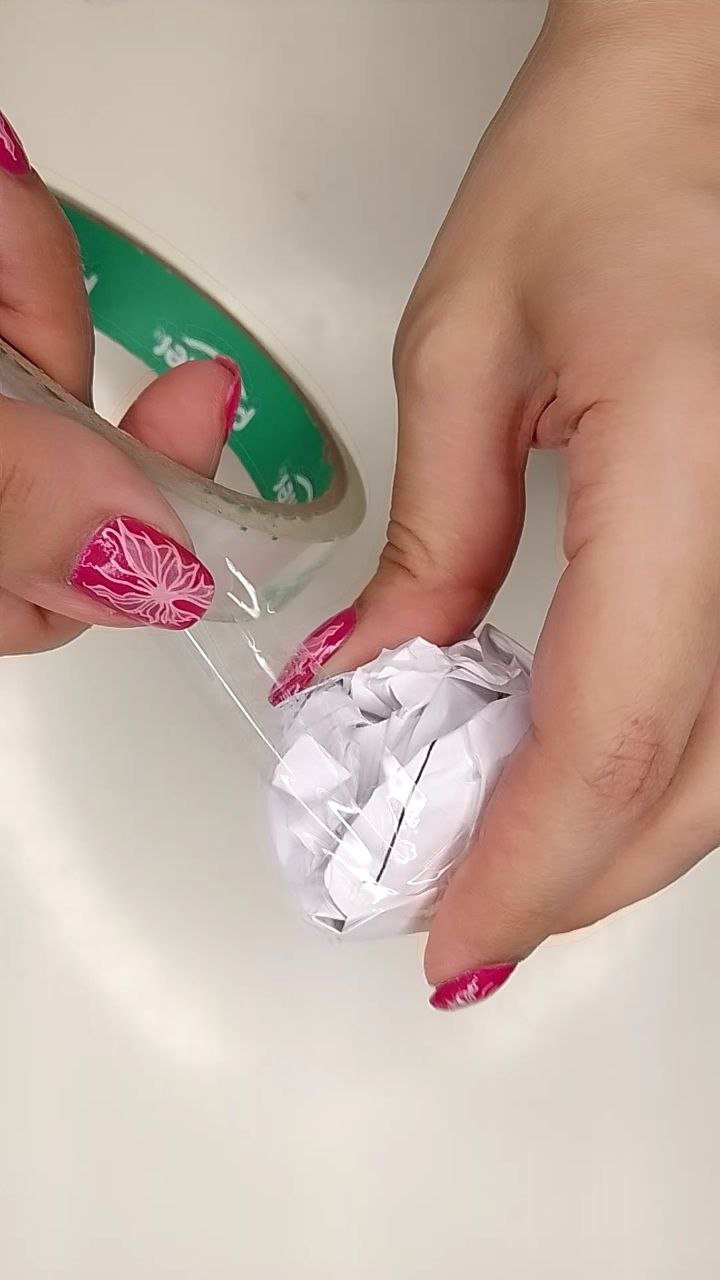
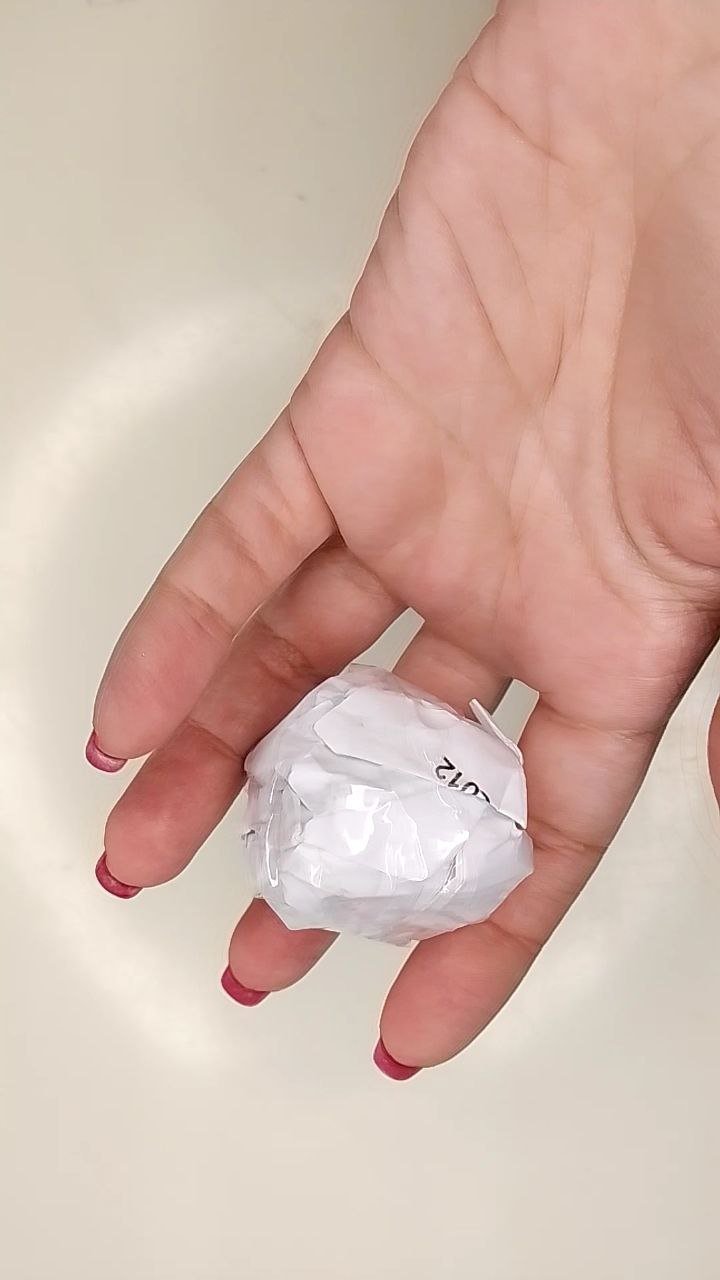
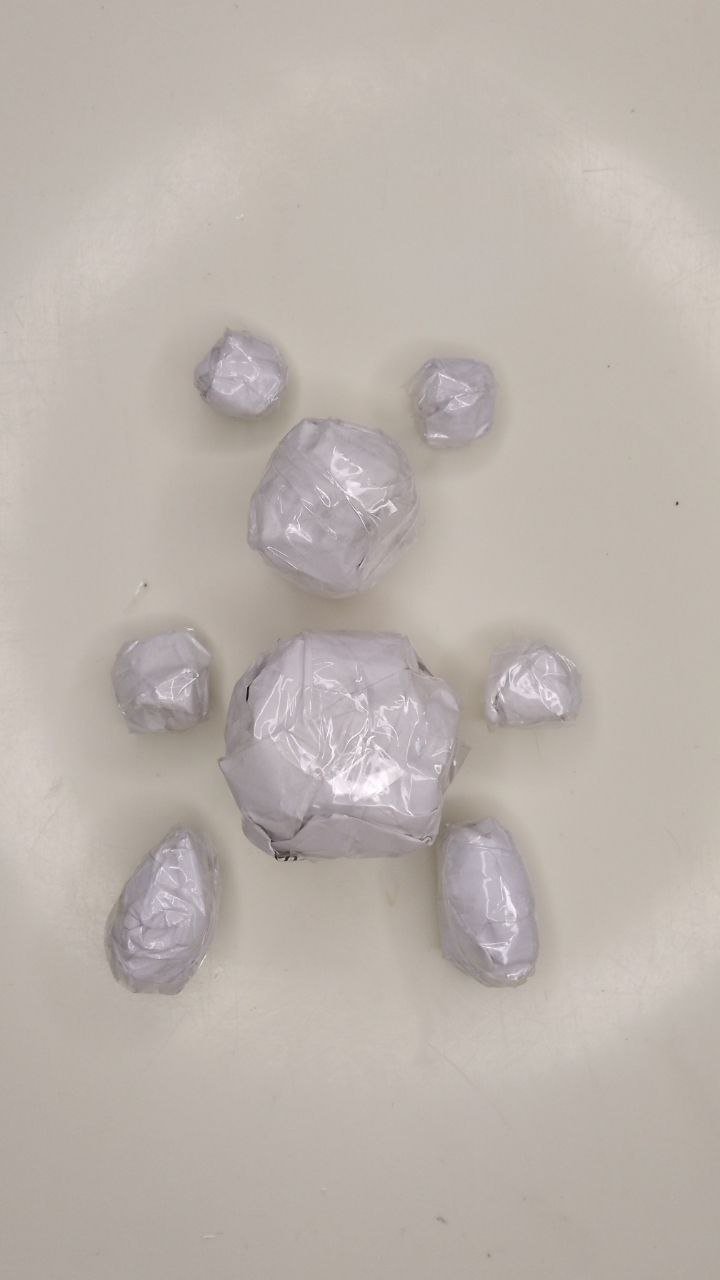
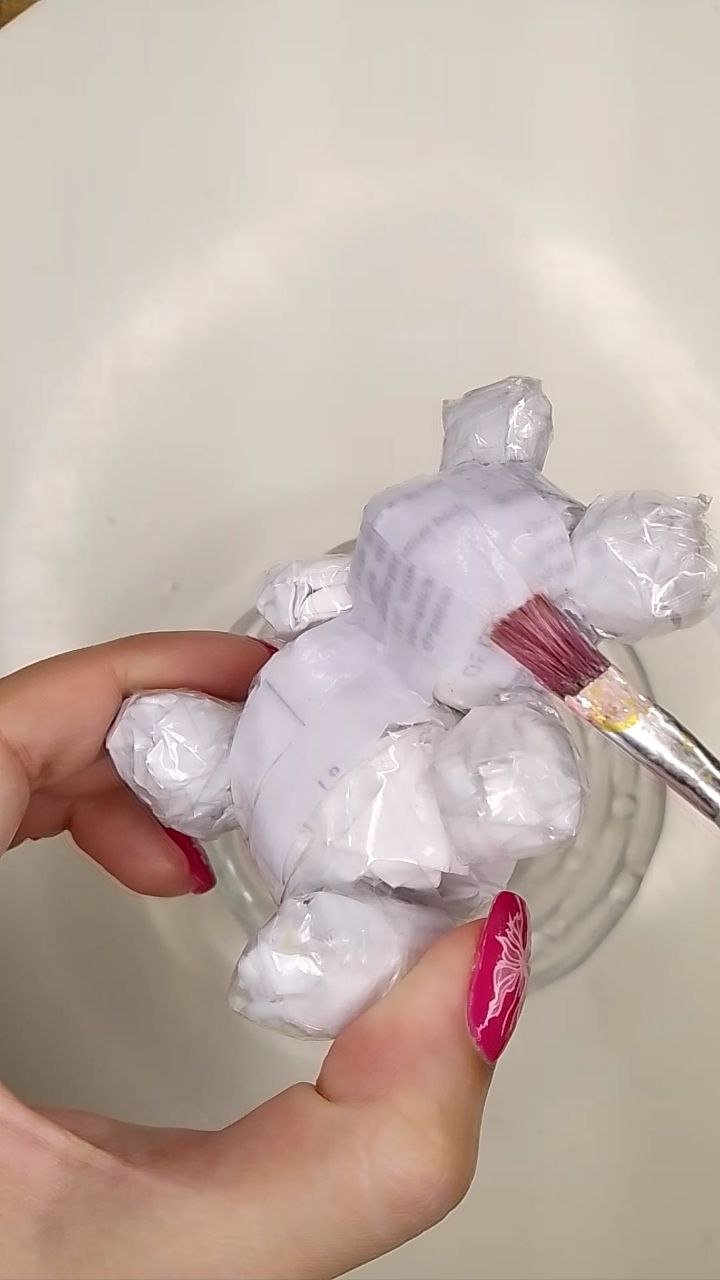
Iniciamos tomando papel de reciclaje y formando bolitas con él según el tamaño que deseamos que tenga el oso. Yo hice primero la bolita que corresponde al cuerpo, luego la de su cabeza, posteriormente sus patitas delanteras y orejas, luego, fui con las patas traseras y para estas, en lugar de bolitas, hice formas más ovaladas. Cada una de estas piezas, las aseguré con cinta adhesiva para que no perdieran su forma en el proceso.
Materials:
- Paper (colors of your choice)
- Recycling paper
- Adhesive tape
- Hot glue
- White glue
- Pencil
- Height stick / toothpick
- Satin ribbon or some decoration
- Paintbrush
- Scissors
- Compass or something circular
Process:
We start by taking recycling paper and forming little balls with it according to the size we want the bear to be. I first made the little ball that corresponds to the body, then the head, then the front paws and ears, then, I went with the back paws and for these, instead of little balls, I made more oval shapes. I secured each of these pieces with adhesive tape so that they would not lose their shape in the process.
 |  |
|---|
 |  |
|---|
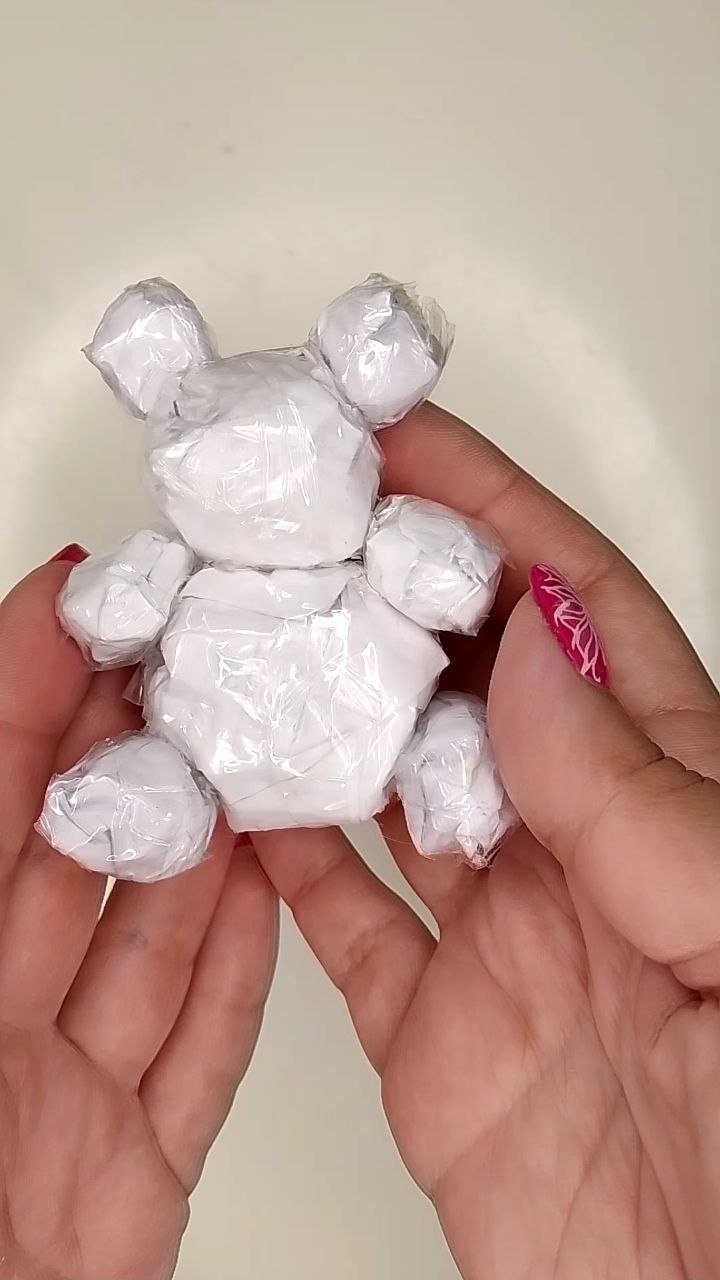
Ahora, con silicón caliente, uniremos todas las partes cuidadosamente, pues estas serán sus posiciones definitivas.
Now, with hot silicone, we will carefully join all the parts together, as these will be their final positions.
Armado / Assembly
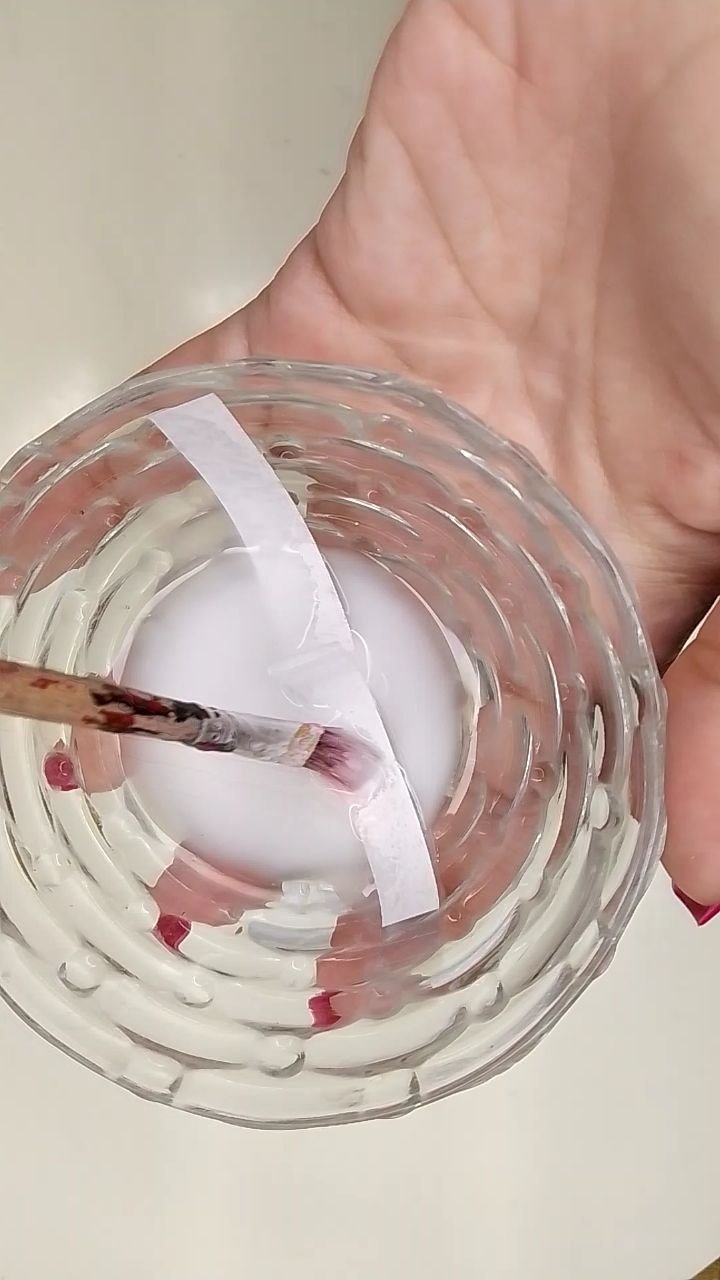
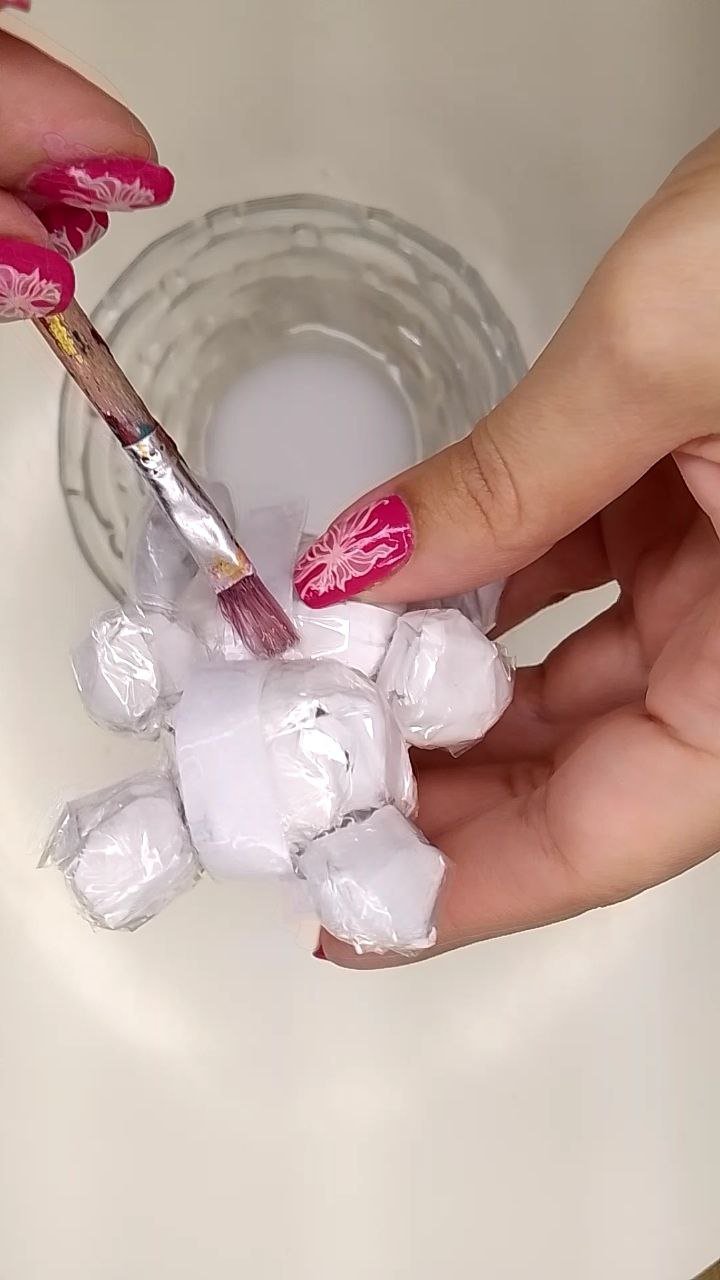
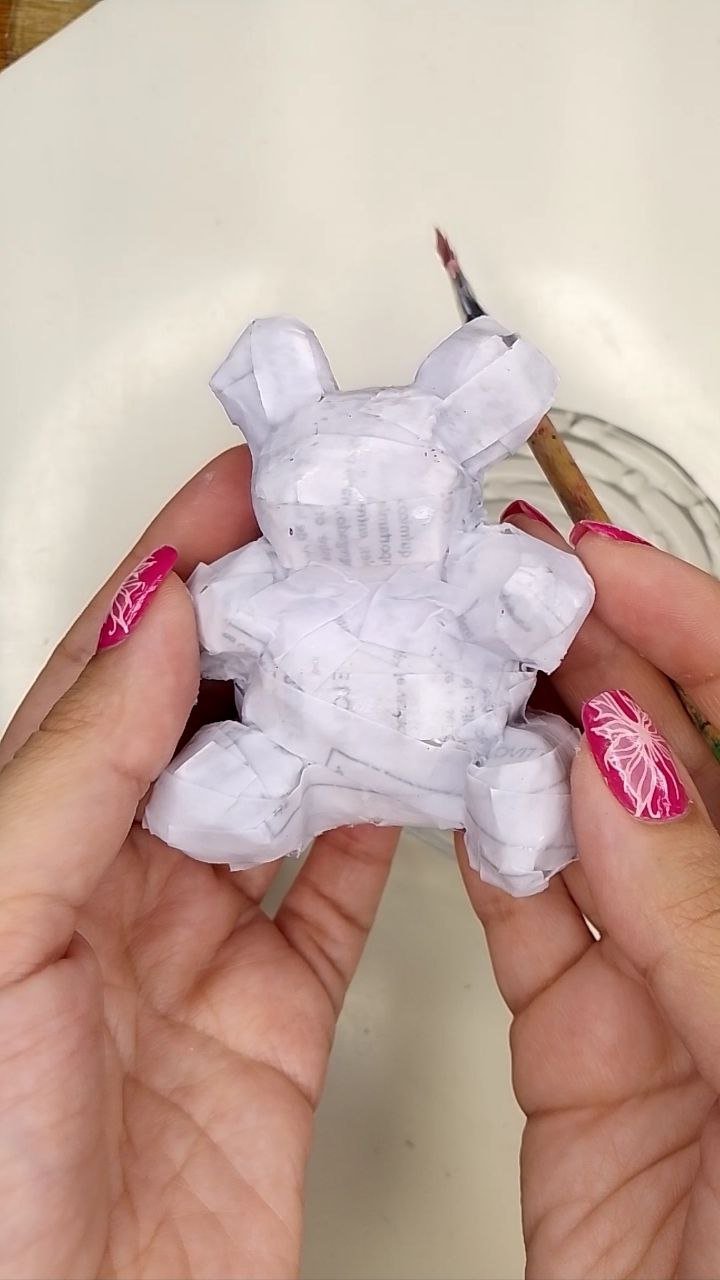
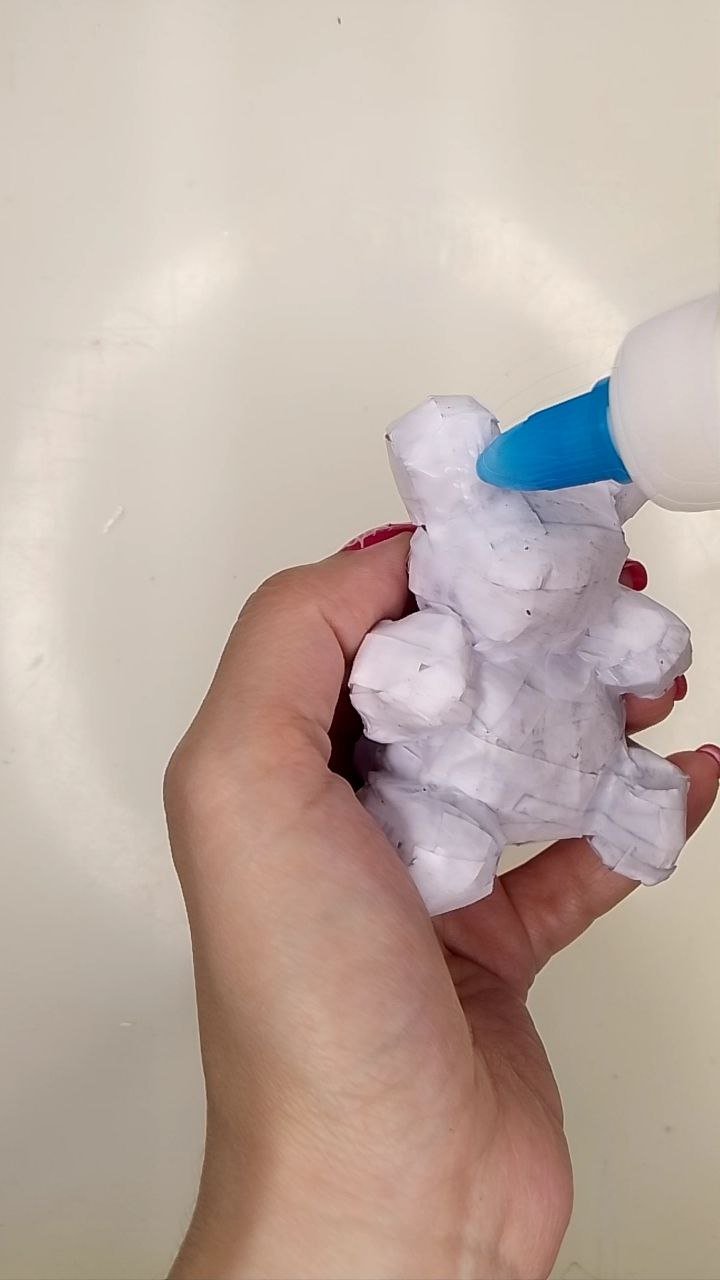
Para proporcionar dureza a la figura y también proporcionar una superficie de mayor adherencia para colocar las rosas, forraremos todo el oso con tiras de papel que previamente humedeceremos en pegamento blanco diluido en agua. Sí, ya sé que el pobre parece una momia pero confíen en el proceso (risas).
To provide hardness to the figure and also to provide a surface of greater adherence to place the roses, we will line the entire bear with strips of paper that we will previously moisten in white glue diluted in water. Yes, I know the poor thing looks like a mummy but trust the process (laughs).
 |  |
|---|
 |  |
|---|
Cuando ya nos hemos asegurado de haber cubierto todas las superficies, dejamos secar un poco y extendemos una capa de pegamento blanco con ayuda de un pincel, esta también la dejaremos secar.
When we have made sure that we have covered all the surfaces, we let it dry a little and we extend a layer of white glue with the help of a brush, we will also let it dry.
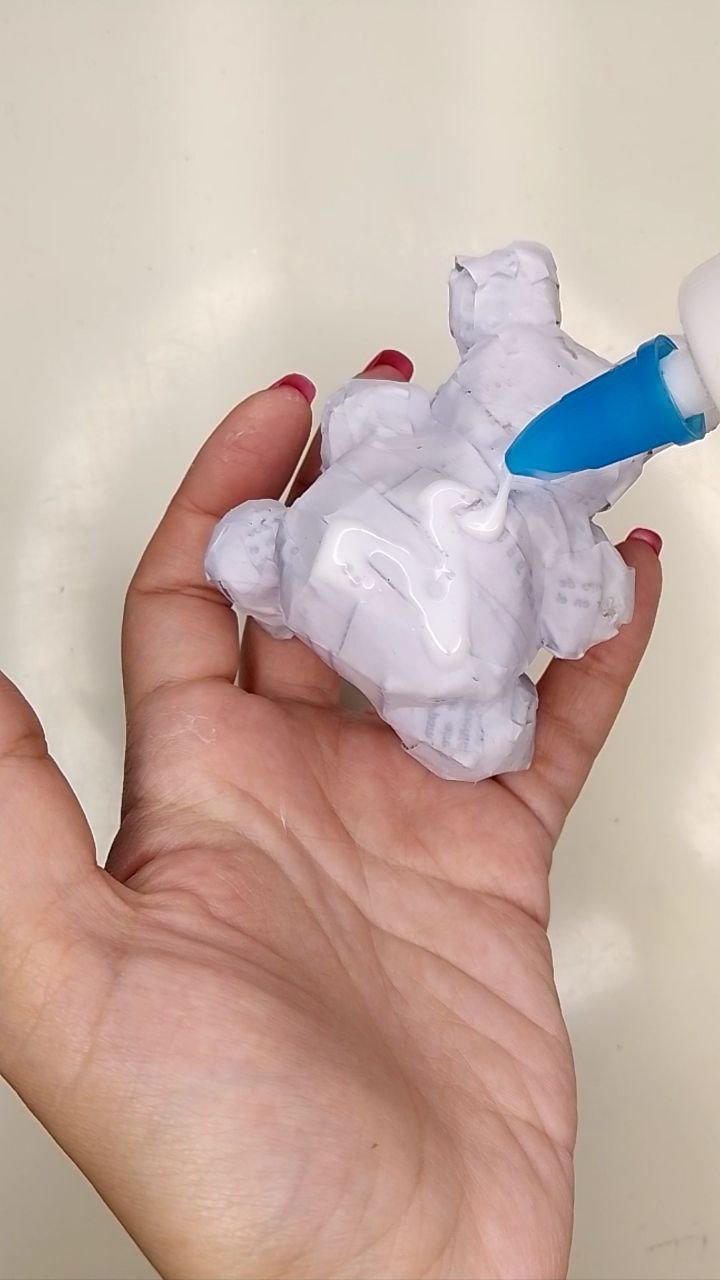
Capa de pegamento / Glue layer
Mientras todo se seca, les enseño a hacer las flores. Yo llamo a estas rosas “rosas en espiral” y ya verán por qué. Lo primero es tomar papel del color que nos guste, en mi caso, inicié con un fucsia precioso.
While everything is drying, I show you how to make the flowers. I call these roses “spiral roses” and you will see why. The first thing to do is to take paper of the color you like, in my case, I started with a beautiful fuchsia.
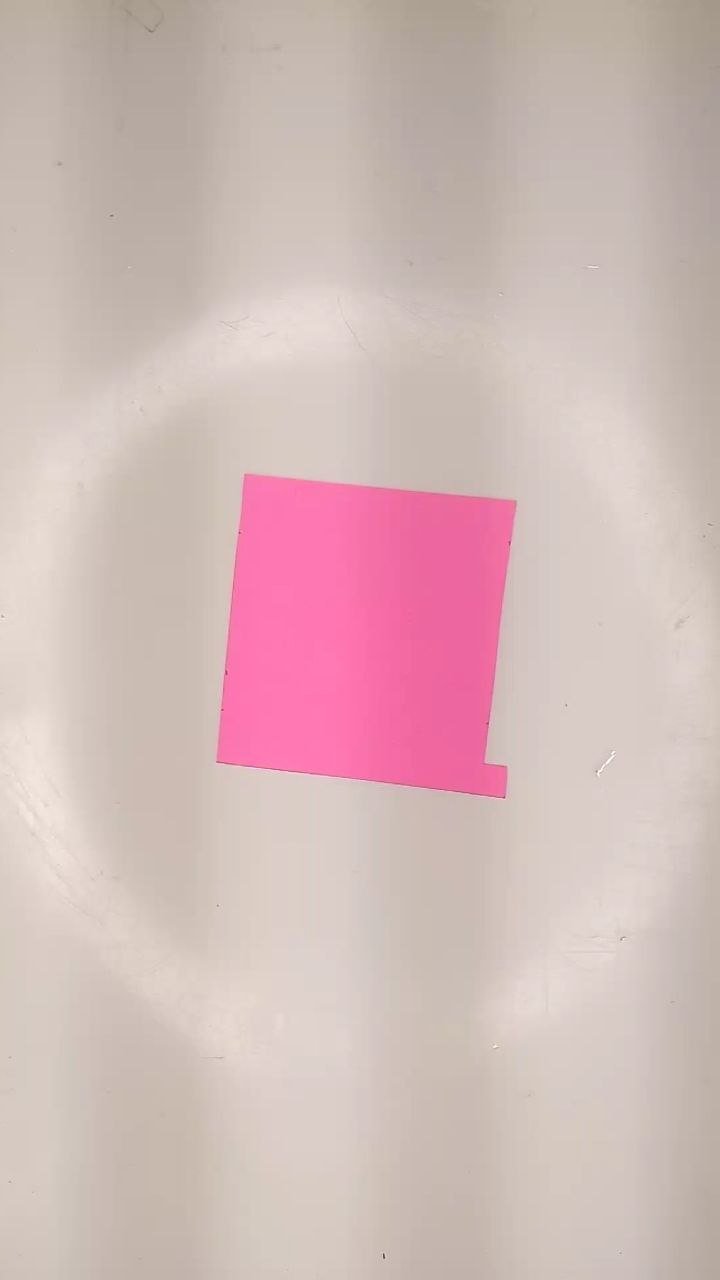
Papel fucsia / Fuchsia paper
En el mismo, dibujaremos una circunferencia cuyo diámetro dependerá del tamaño de las rosas que necesites, pero para este oso que es pequeño, he usado un diámetro de 3-3.5 centímetros. Dentro de la circunferencia, tomando como punto inicial cualquiera en el borde del círculo, dibujaremos un espiral.
On it, we will draw a circle whose diameter will depend on the size of the roses you need, but for this bear, which is small, I have used a diameter of 3-3.5 centimeters. Inside the circumference, taking as a starting point any point on the edge of the circle, we will draw a spiral.
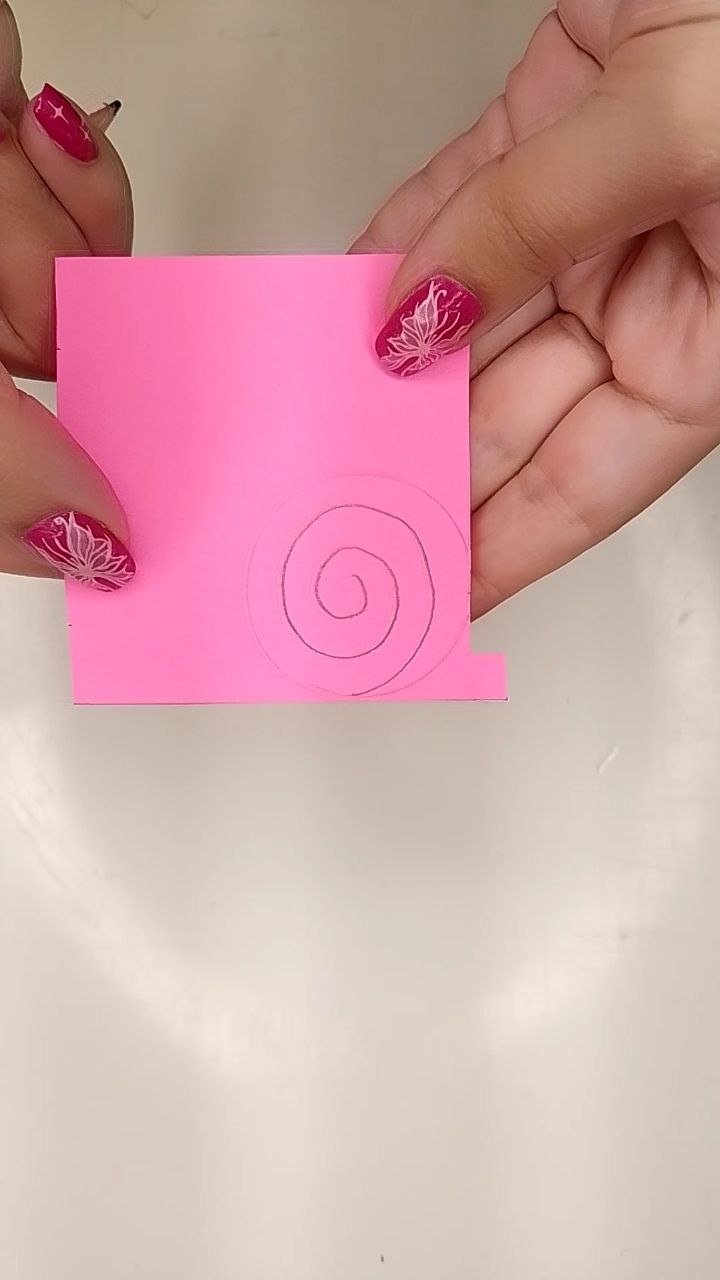
Circunferencia y espiral / Circumference and spiral
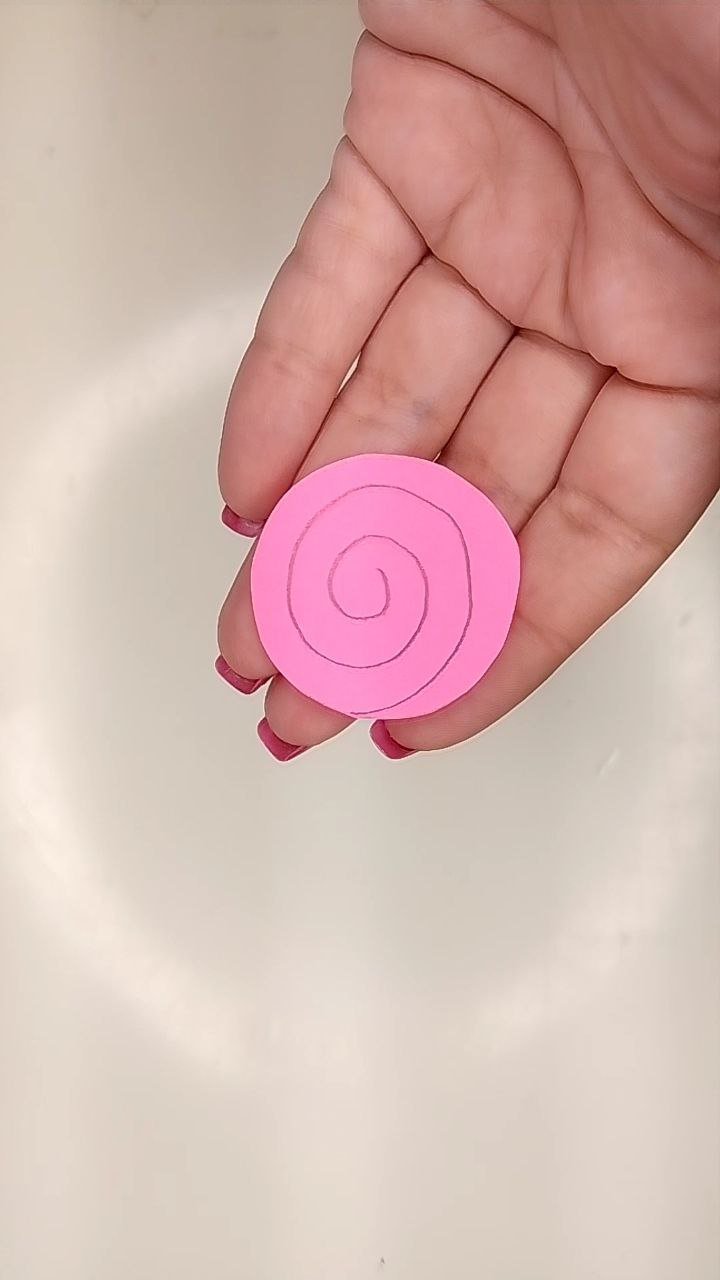
Ahora, con las tijeras recortamos el círculo y posteriormente el espiral. Notarán en este punto que en el centro queda formada una bolita.
Now, with the scissors we cut out the circle and then the spiral. You will notice at this point that a small ball is formed in the center.
 |  |
|---|
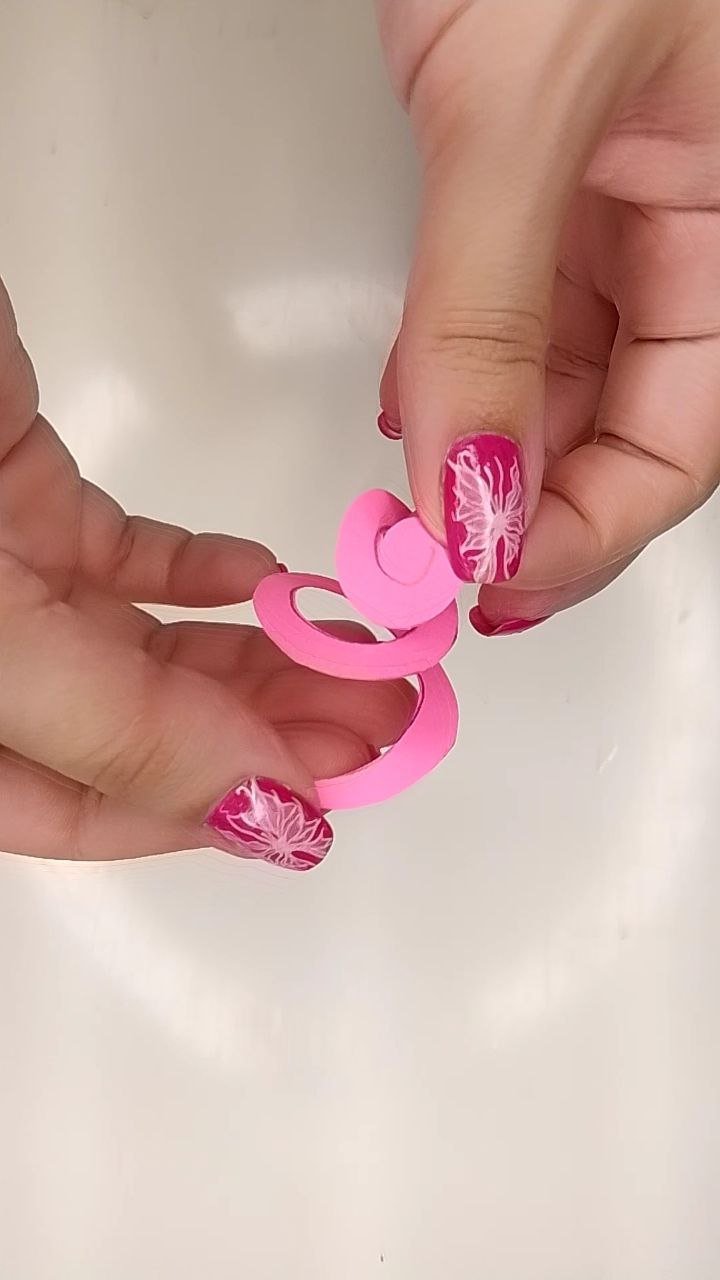
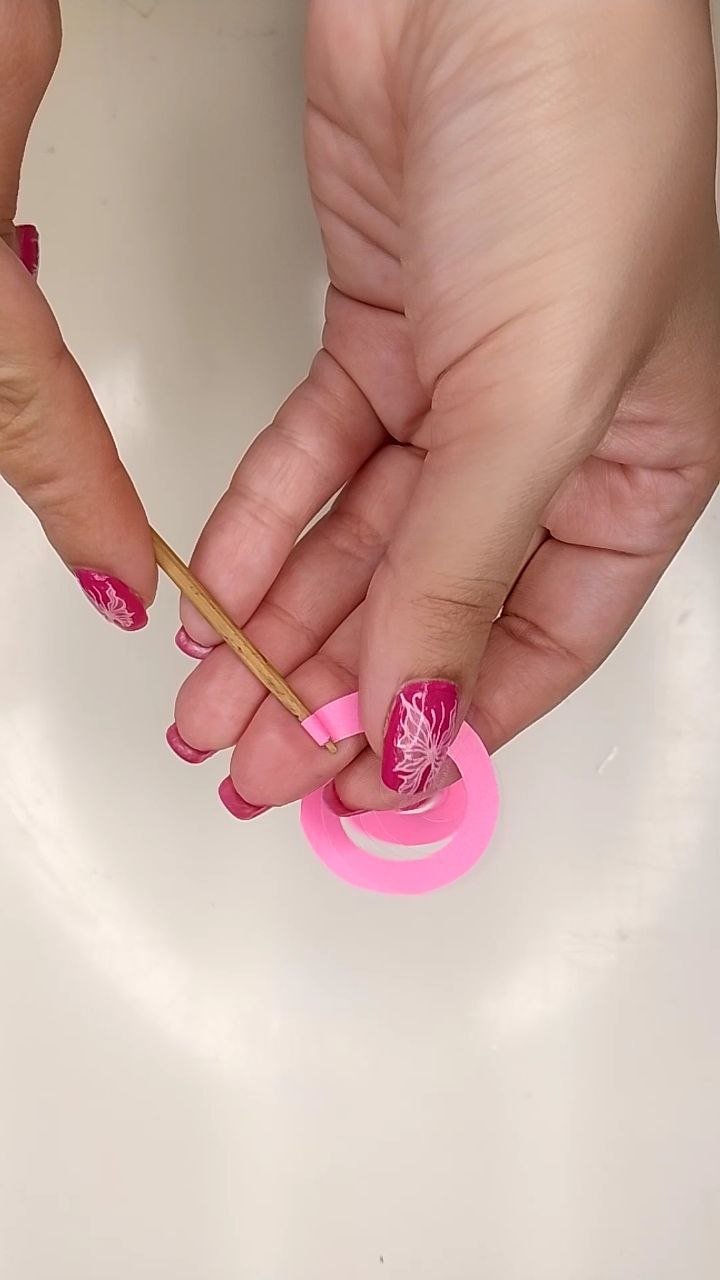
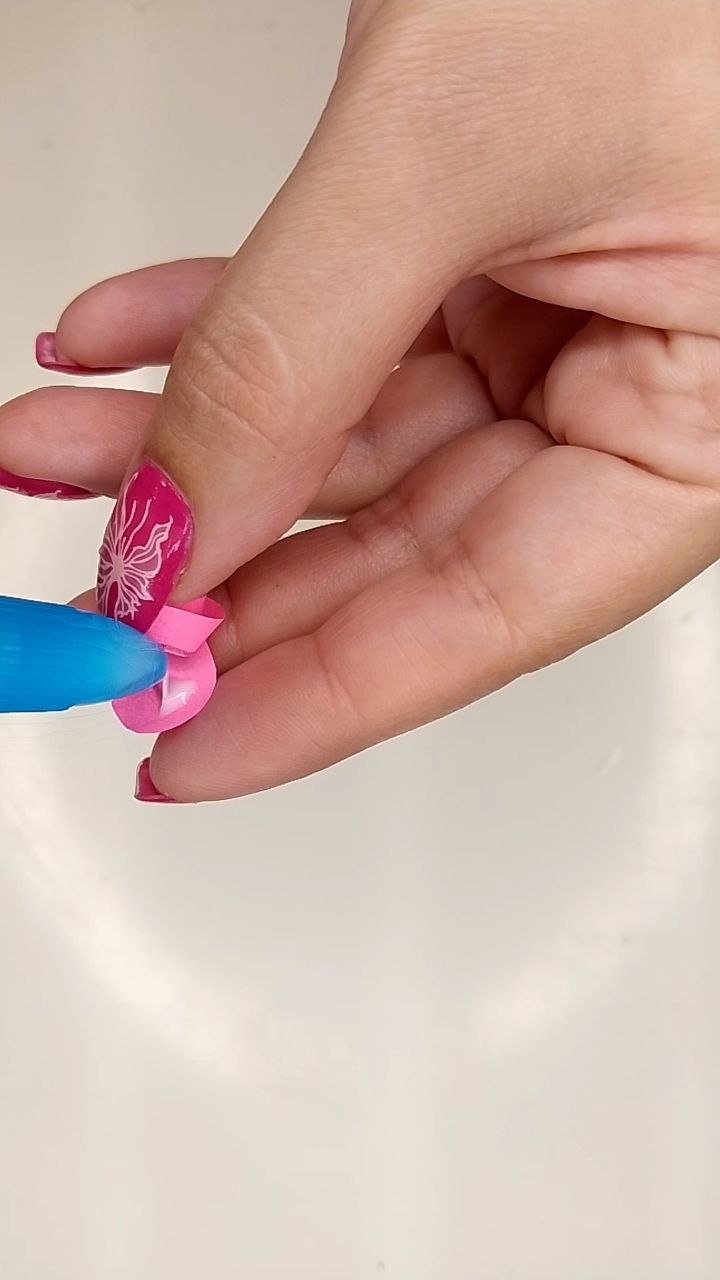
Con ayuda de un palillo o algo similar, tomamos el extremo puntiagudo del espiral y empezamos a enrollar sobre sí mismo hasta llegar al centro de bolita, esparcimos un puntito de pegamento en esa bolita y pegamos el resto de la pieza a la bolita de manera que no se deforme y así, estará lista nuestra primera rosa (sí, la primera, sigan leyendo hasta el final y les digo cuántas hice definitivamente).
With the help of a toothpick or something similar, we take the pointed end of the spiral and start to roll it over itself until we reach the center of the ball, we spread a dot of glue on that ball and glue the rest of the piece to the ball so that it does not deform and thus, our first rose will be ready (yes, the first one, keep reading until the end and I will tell you how many I definitely made).
 |  |
|---|
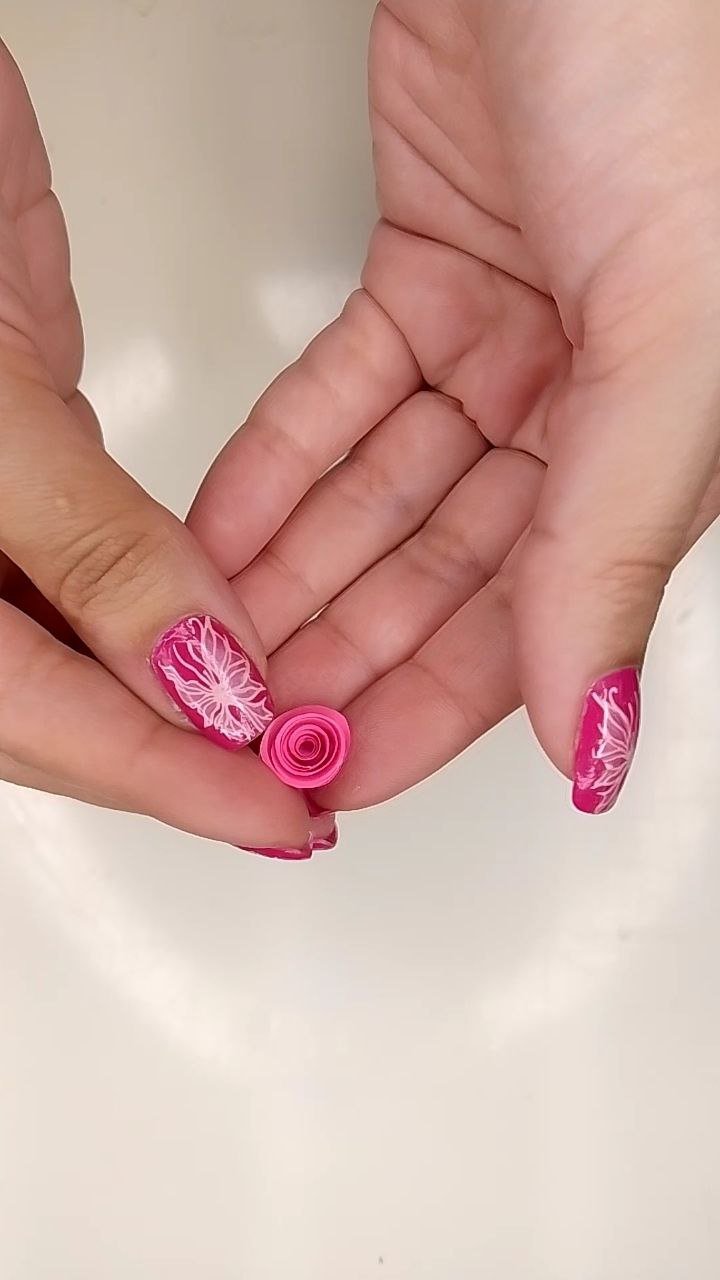
Haciendo la rosa / Making the rose
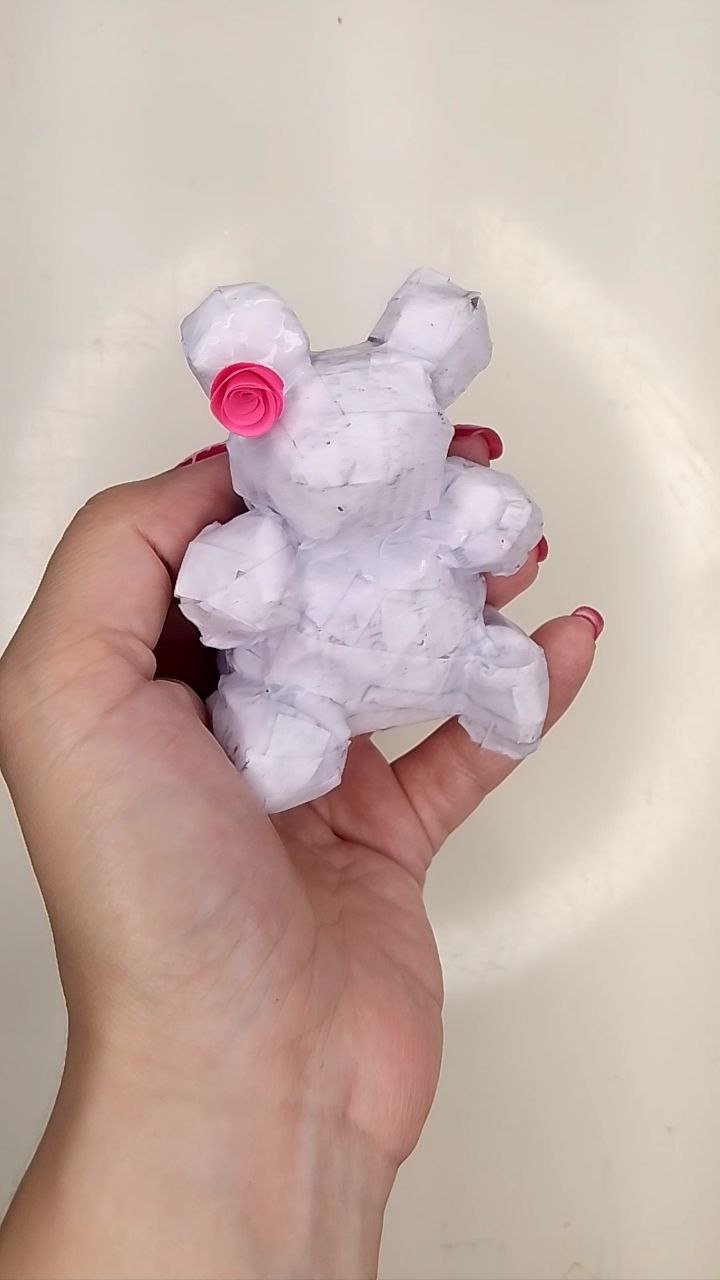
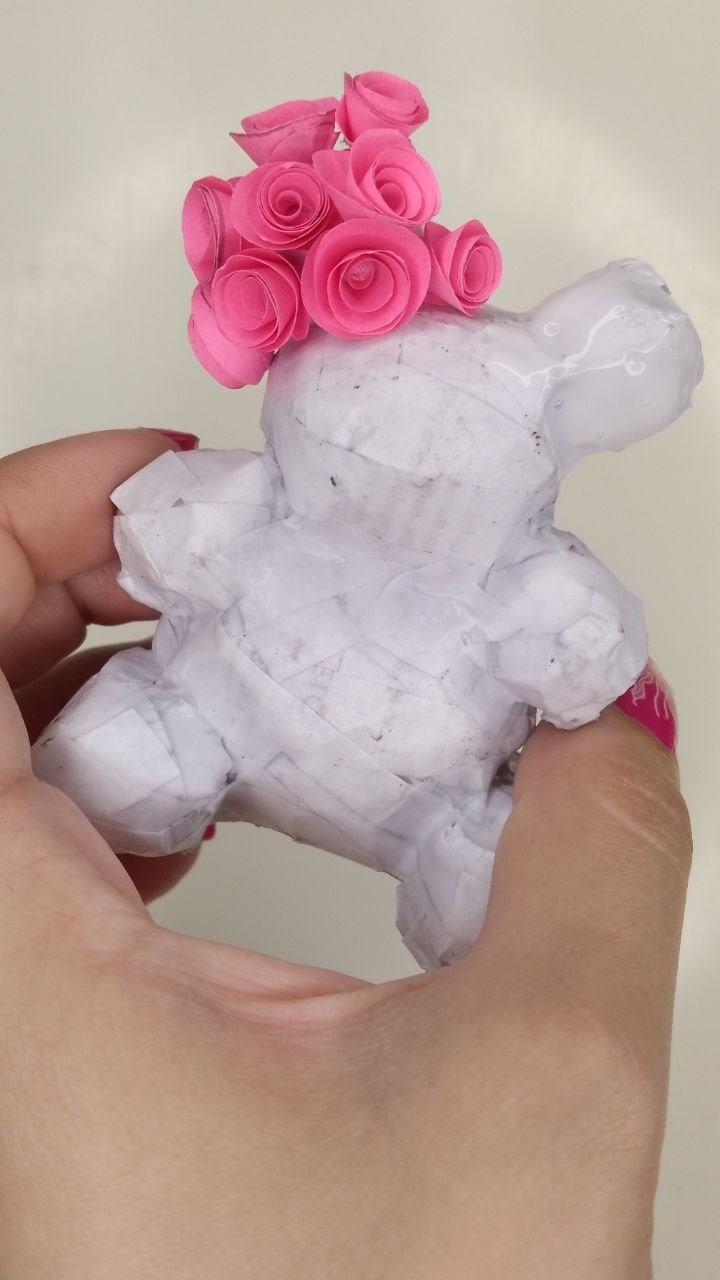
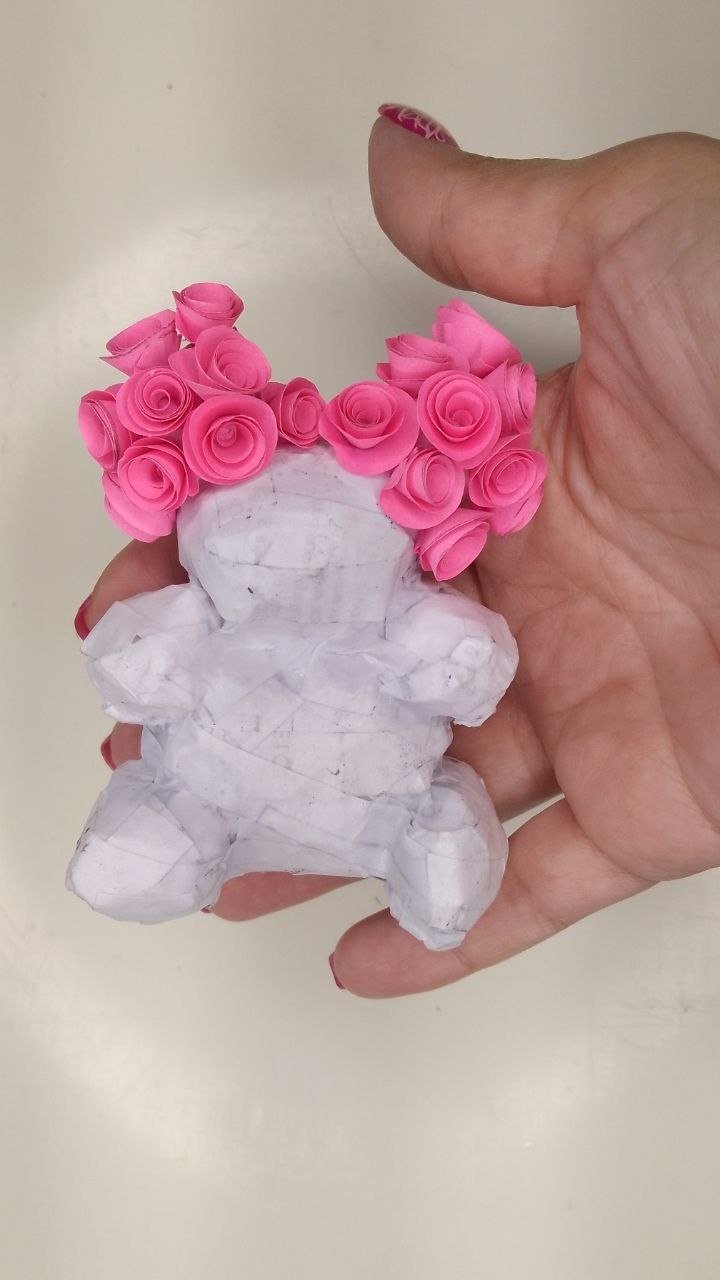
Es momento de pegar las rositas a nuestro osito bonito, para ello, iremos cubriendo la superficie con pegamento blanco y pegando rositas lo más juntas posible para que no se noten espacios vacíos. Empecé por lo más alto de su cabecita y después de un rato parecía una corona (risas).
Now it's time to glue the roses to our cute little bear. To do this, we will cover the surface with white glue and glue the roses as close together as possible so that there are no empty spaces. I started at the top of his head and after a while it looked like a crown (laughs).
 |  |
|---|
 |  |
|---|
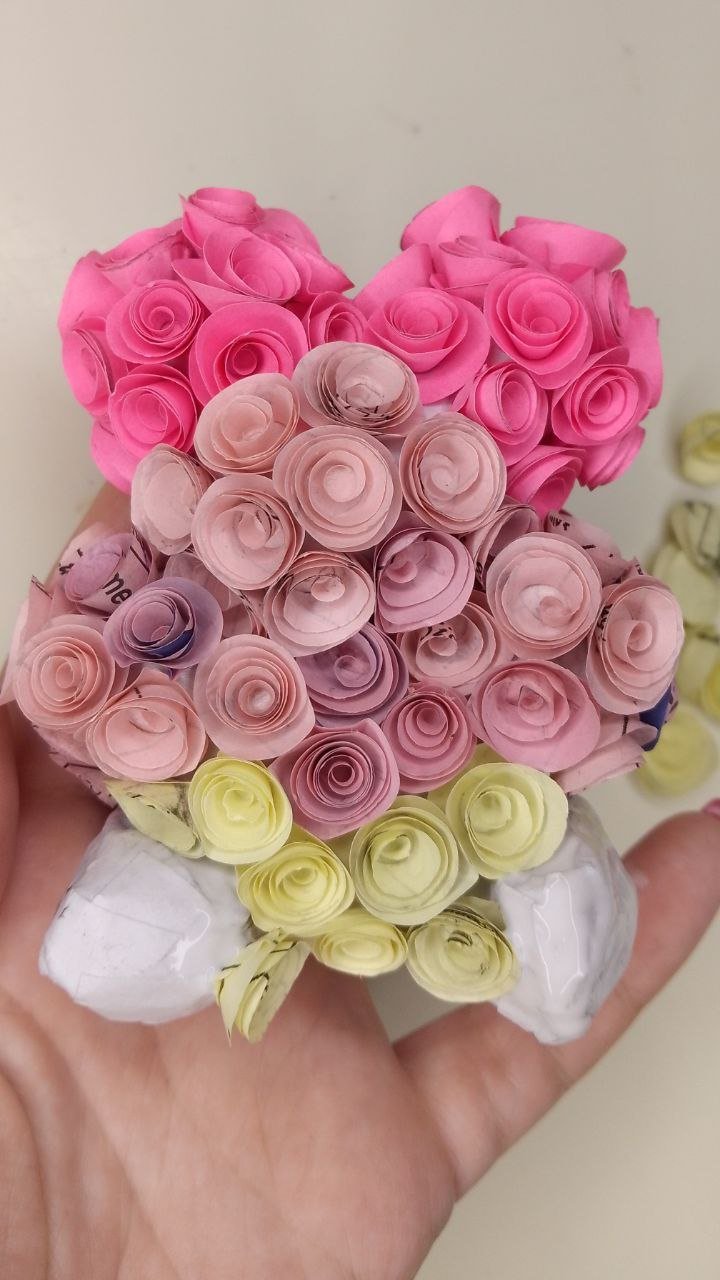
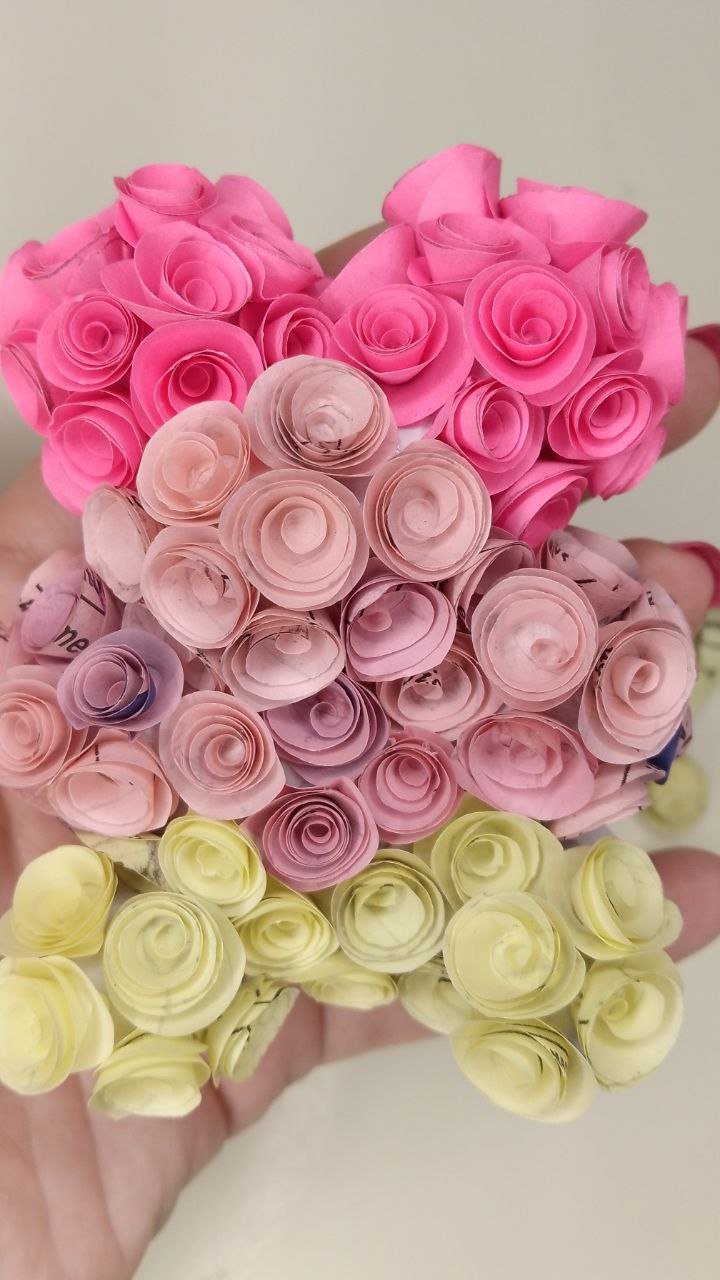
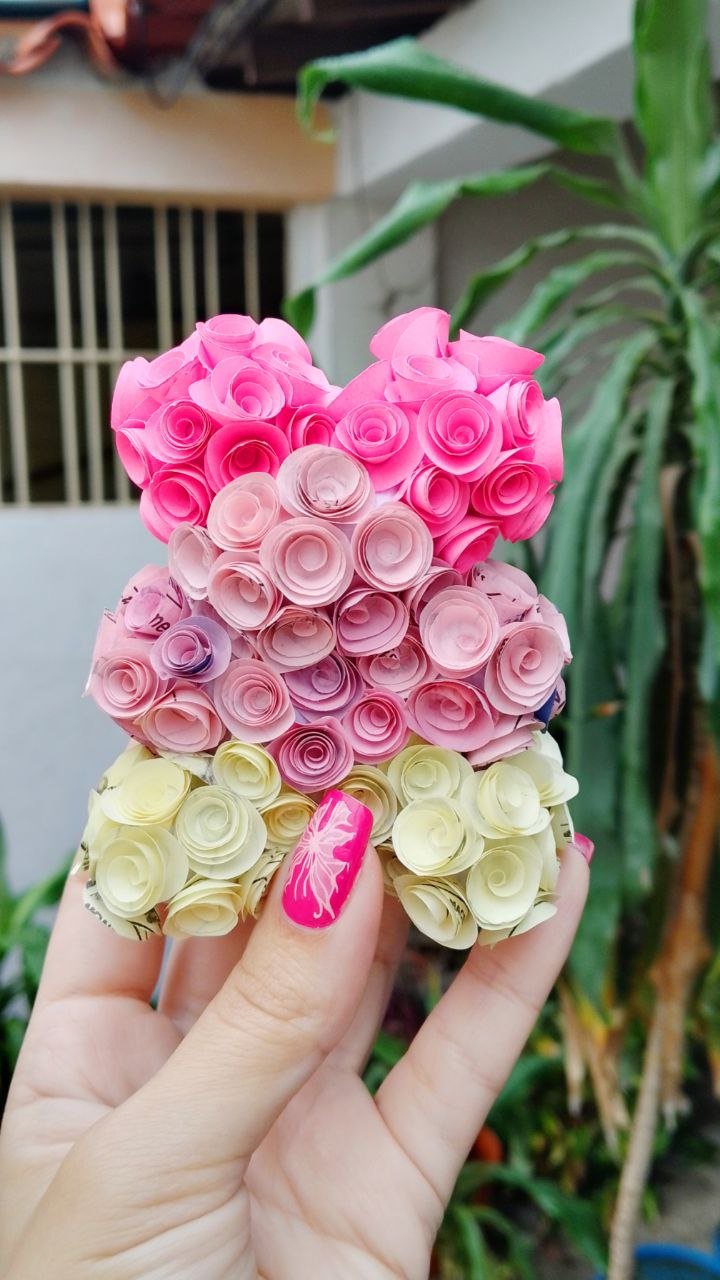
Me pareció bonito hacer una especie de degradado en los colores, así que pasé del fucsia a rosas en color rosado, estas cubrirán la mayor parte de mi osito.
I thought it was nice to make a sort of gradient in the colors, so I went from fuchsia to roses in pink, these will cover most of my teddy bear.
Rosas rosadas / Pink roses
Una vez que sentí que había suficiente rosado, agregué rosas amarillas para finalizar a mi oso precioso.
Once I felt there was enough pink, I added yellow roses to finish off my precious bear.
 |  |
|---|
Rosas amarillas / Yellow roses
Ya estando cubierto todo mi oso (138 rosas más tarde), solo me faltaba agregarle un lazo elegante con cinta de raso en color fucsia y este fue el resultado:
Having already covered all my bear (138 roses later), I only needed to add an elegant bow with satin ribbon in fuchsia color and this was the result:
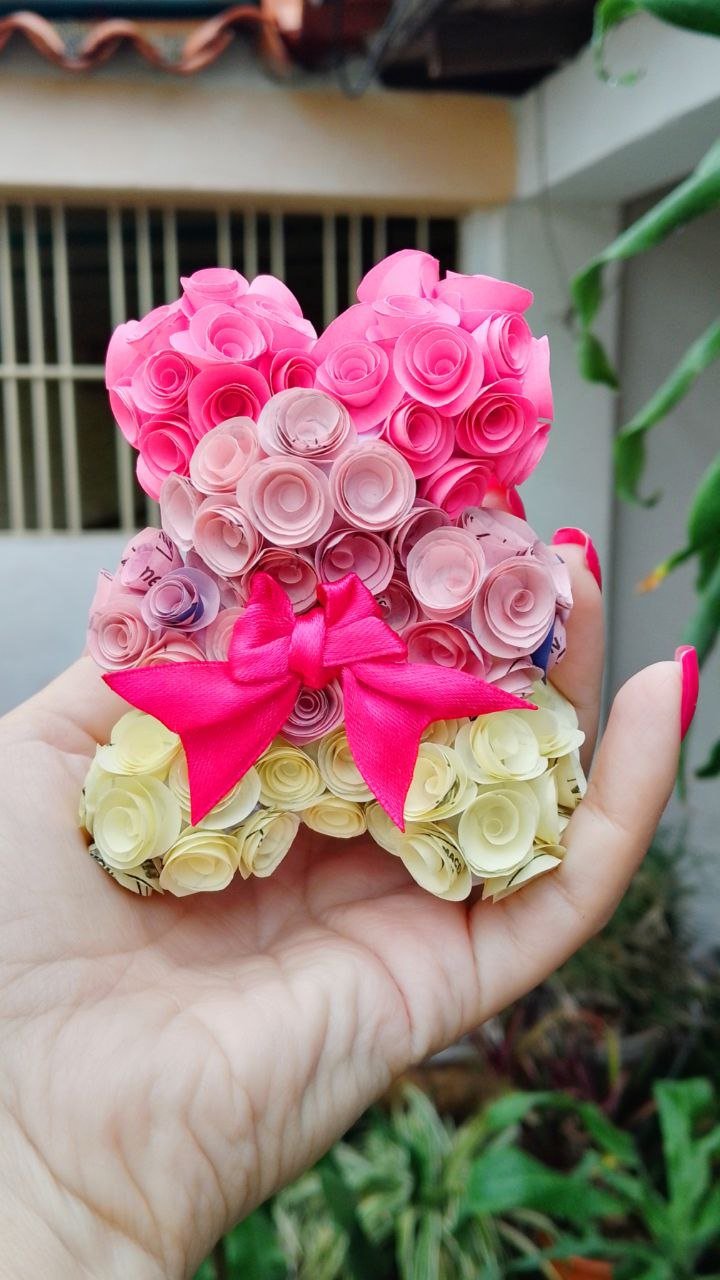
Resultado final / Final result
¡Muchas gracias por leerme!
Thank you so much for reading me!
Fotografías propias, tomadas con mi Tecno Spark 10C.
Traducido al inglés con DeepL.
Own photographs, taken with my Tecno Spark 10C.
Translated to English with DeepL.

This is such a big creativity, I love coming to see it, the rises are really outstanding with those beautiful color combos
Thank you so much!✨ I'm very glad you liked it☺️
¡¡Está hermoso!! 🥰 un espectacular trabajo para practicar la paciencia y la delicadeza, lo veo y pienso en dulzura, amor, suspiros sabor a fresa ☺️💘
Muchas gracias querida amiga✨ me alegra mucho saber que logré toda la vibra "san valentinezca" con este diseño💖
Que bello resultado, me encantó el osito es una muy linda manualidad para regalar, y qué manera más bonita de cerrar el mes del amor y la amistad❤️🫶.
Muchas gracias✨ de verdad creo que esta será mi manualidad favorita del mes🥰
This teddy bear of roses is such a charming and thoughtful creation. Perfect for a heartfelt gift. Well done
Thank you so much for the support 💖 glad you liked my teddy bear of roses🥰✨
Que excelente resultado y que rebonita y tierna manualidad. ♥️ Perfecto para cerrar el mes!!! 😍
Muchas gracias mi amor 😍 aunque necesité muchas paciencia🙈 en verdad amé hacer este osito❤️ el resultado está muy bonito🥰🥰🥰
Curator - GuestVoted through #Ecency.
Muchísimas gracias por el apoyo💖🤗✨
Feliz tarde, siempre es un placer, mis mejores deseos.
Que bello trabajo 🫶🫶🫶
Muchas gracias amiga☺️✨
Teddy 🧸 of roses, woah, it's beautiful, a perfect gift for the month of love.
It must feel really cool to finally make something you have always dreamed of making. !LUV
(2/5) sent you LUV. | tools | discord | community | HiveWiki | <>< daily@mavilan30, @funshee
Thank you so much for all the support💖 and yes, it's really satisfying to finally have it done 😍 and I feel like it turned out so beautifully! I am very happy✨
You are welcome dear 🤗
Interesting work, you are amazing.
Thank you so much ☺️✨
https://bsky.app/profile/did:plc:rag2mftdy2alo7rtmyttmpk4/post/3liuofuxfb22z
The rewards earned on this comment will go to the author of the blog post.https://bsky.app/profile/did:plc:rag2mftdy2alo7rtmyttmpk4/post/3liuofuxfb22z
Thank you so much for your support ✨
This is so lovely. The roses are amazing. Great job
Thank you so much 💖
Congratulations @mavilan30! You have completed the following achievement on the Hive blockchain And have been rewarded with New badge(s)
Your next target is to reach 600 comments.
You can view your badges on your board and compare yourself to others in the Ranking
If you no longer want to receive notifications, reply to this comment with the word
STOPCheck out our last posts: