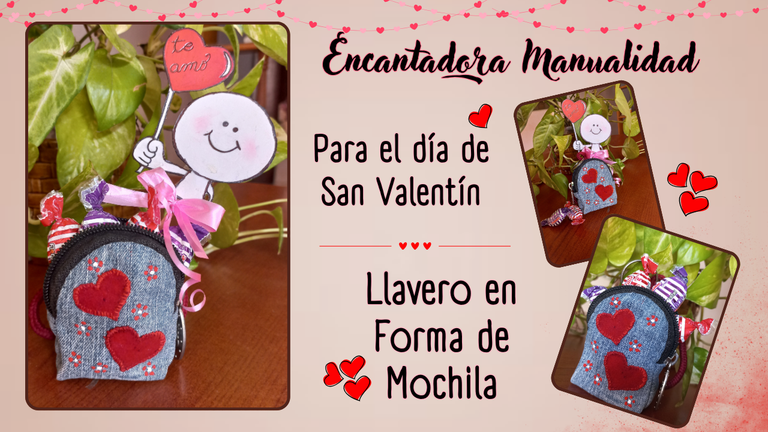
It is an honor to be able to share my first project and first participation with all of you. On this occasion, I present you a beautiful Valentine's Day inspired craft: a keychain in the shape of a backpack. What makes this project special is that approximately 70% of the materials used are recyclable, which allows me to promote sustainable creativity and care for the environment.
The backpack keychain is not only a unique and practical accessory, but it also symbolizes the love and friendship that we celebrate on this special date. In a world where it seems that no one has time to spend (quality time) anymore, this type of handmade gift has much more value than any store bought item. It is a way to tell that special person how much we care and how much love we have for them.
With this craft, I hope to inspire others to reuse materials and discover the satisfaction of creating something beautiful and functional from what we already have. I hope you enjoy the process as much as I did and that this project encourages you to explore your creativity in a sustainable way. Without further ado, let's start with the step by step.
¡Querida colonia virtual de HIVE!
Es un honor poder compartir mi primer proyecto y primera participación con todos ustedes. En esta ocasión, les presento una encantadora manualidad inspirada en el Día de San Valentín: un llavero en forma de mochila. Lo que hace especial a este proyecto es que aproximadamente el 70% de los materiales utilizados son reciclables, lo que me permite promover la creatividad sostenible y el cuidado del medio ambiente.
El llavero en forma de mochila no solo es un accesorio único y práctico, sino que también simboliza el amor y la amistad que celebramos en esta fecha tan especial. En un mundo donde parece que ya nadie tiene tiempo para dedicar (tiempo de calidad), este tipo de obsequios hechos a mano tienen mucho más valor que cualquier objeto comprado en una tienda. Es una forma de decirle a esa persona especial cuánto nos importa y cuánto amor tenemos por ella.
Con esta manualidad, espero inspirar a otros a reutilizar materiales y a descubrir la satisfacción de crear algo hermoso y funcional a partir de lo que ya tenemos. Espero que disfruten del proceso tanto como yo lo hice y que este proyecto los anime a explorar su creatividad de manera sostenible. Sin más preámbulos comencemos con el paso a paso.
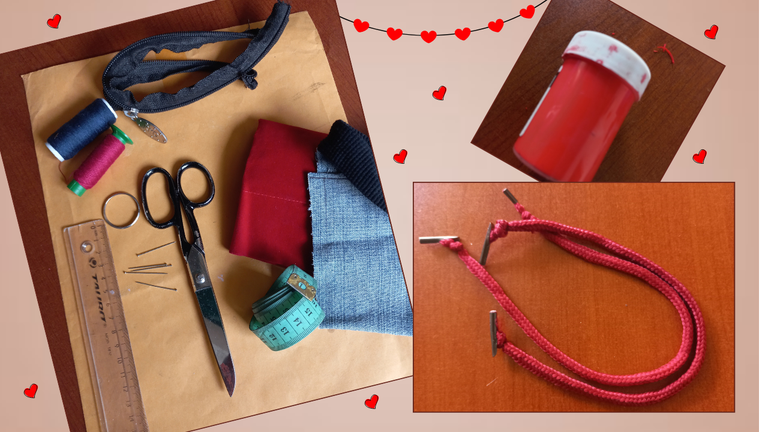
Materials/Backpack.
1)Fabric scraps (jeans type and Red)
2)Scissors
3)Pins
4)Sewing threads (blue and red)
5)Tape measure
6)Piece of paper (to design the pattern)
7)Rule
8)15 cm zipper (obtained from a disused bag)
9)Key ring (key ring no longer in use)
10)26 cm cord (taken from a used gift bag)
11)Cold paint (red)
1)Fabric scraps (jeans type and Red)
2)Scissors
3)Pins
4)Sewing threads (blue and red)
5)Tape measure
6)Piece of paper (to design the pattern)
7)Rule
8)15 cm zipper (obtained from a disused bag)
9)Key ring (key ring no longer in use)
10)26 cm cord (taken from a used gift bag)
11)Cold paint (red)
Materiales/Mochila.
1)Retazos de telas (tipo jeans y Rojo)
2)Tijeras
3)Alfileres
4)Hilos de costura (azul y rojo)
5)Cinta métrica
6)Trozo de papel (para diseñar el patrón)
7)Regla
8)Cierre de 15 cm (obtenido de un bolso en desuso)
9)Aro de llavero (llavero que ya no usemos)
10)Cordón de 26 cm (sacado de una bolsa de regalo usada)
11)Pintura al frio (roja)
Materials / Card
1)Scissors
2)Piece of white cardboard (e.g., from a medicine box)
3)Fine point markers (Black and Red)
4)Design of your choice
5) 8 cm skewer stick
6) Lattice strip 2 cm wide by 10 cm long
1)Scissors
2)Piece of white cardboard (e.g., from a medicine box)
3)Fine point markers (Black and Red)
4)Design of your choice
5) 8 cm skewer stick
6) Lattice strip 2 cm wide by 10 cm long
Materiales / Tarjeta
1)Tijera
2)Trozo de cartón blanco (como, por ejemplo, de caja donde vienen medicamento)
3)Marcadores punta fina (Negro y Rojo)
4)Diseño de tu elección
5)Palito de brocheta de 8 cm
6)Liston celoseda de 2 cm de ancho por 10 cm de largo.
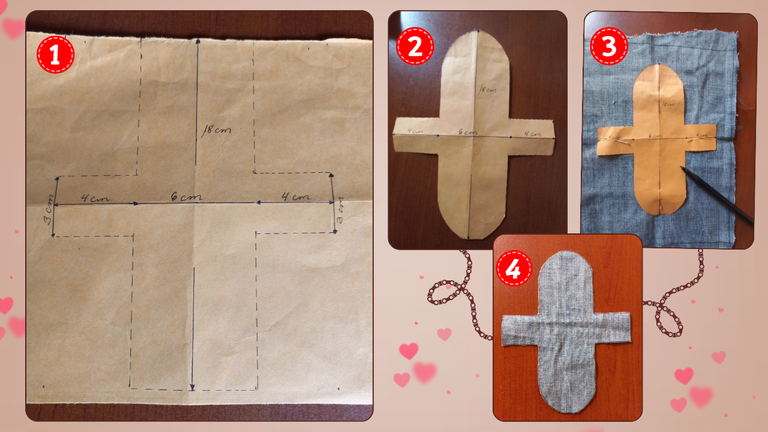
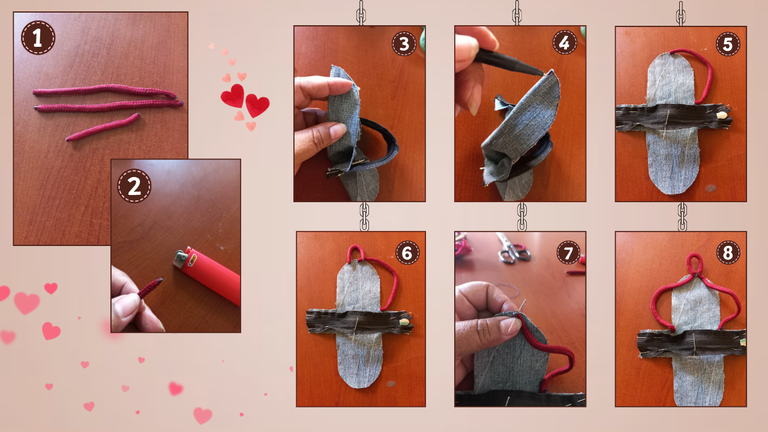
First phase: We design the pattern on the recycled paper with the following measures 18 cm long by 14 cm wide distributed as shown in image # 1. Ready the strokes proceed to round the ends only the length (image # 2) and then transfer to the fabric and cut (image # 3 and 4).
Primera fase: Diseñamos el patrón en el papel de reciclaje con las siguiente medidas 18 cm de largo por 14 cm de ancho distribuido como se muestra en la imagen # 1. Listo los trazos procedemos a redondear las puntas solo del largo (imagen # 2) y posteriormente trasferimos a la tela y recortamos (imagen # 3 y 4).
Second phase: We take the cord and divide it into 2 pieces of 10 cm and 1 of 6 cm, I recommend sealing the ends with heat to prevent fraying (image # 1 and 2). We take the design and mark the center at the top and bottom equally (image # 3 and 4). We place the 15 cm zipper vertically making it coincide with both ends across the width, we also place the laces as shown in image # 5 and 6. We proceed to fix with stitching (image # 7 and 8).
Segunda fase: Tomamos el cordón y lo dividimos en 2 piezas de 10 cm y 1 de 6 cm, recomiendo sellar las puntas con calor para evitar que se deshilache (imagen # 1 y 2). Tomamos el diseño y marcamos el centro en la parte de arriba y abajo por igual (imagen # 3 y 4). Colocamos el cierre de 15 cm de manera vertical haciéndolo coincidir con ambas puntas a lo ancho, igualmente colocamos los cordones tal cual como se aprecia en la imagen # 5 y 6 . Procedemos a fijar con costura (imagen # 7 y 8).
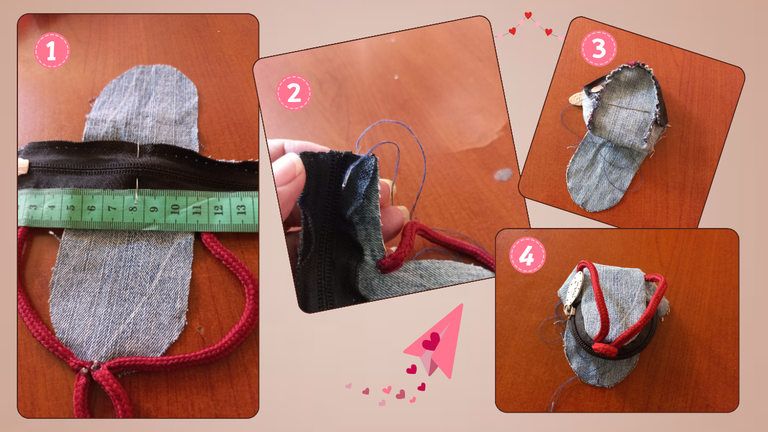
Third phase: We locate exactly the middle of the zipper, image (# 1). Once the half of the zipper is marked, we will match it with the center of our piece that has the laces (image # 2). Then we fix all that part of the piece with stitching and thus we have finished the back of our backpack, image (# 3 and 4).
Tercera fase: Ubicamos exactamente la mitad del cierre, imagen (# 1). Ya marcado la mitad del cierre lo haremos coincidir con el centro de nuestra pieza que tiene los cordones (imagen # 2). Luego fijamos toda esa parte de la pieza con costura y así nos queda ya terminada la parte trasera de nuestra mochila imagen (# 3 y 4).
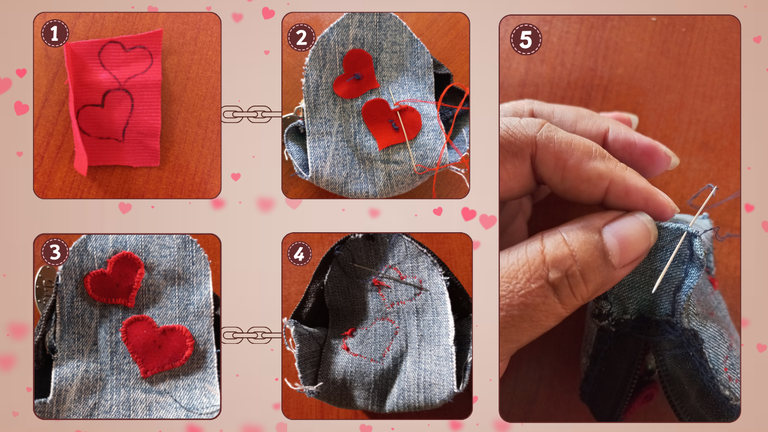
Fourth phase: The design of 2 hearts is transferred to the red fabric (image #1). They are placed on the front side. I recommend you to fix the hearts with a provisional stitch in the center, to prevent them from slipping during baking (image # 2). Sew along the edges of each heart and close with stitching the whole front of our piece (image # 3 and 4). A little trick for the backpack to take that square shape in the lower part is to sew a straight seam on the sides (image # 5).
Cuarta fase: Se procede a transferir el diseño de 2 corazones a la tela roja (imagen #1). Se colocan en la parte frontal. Les recomiendo fijar los corazones con un punto de costura provisional en el centro, así evitamos que se corran al momento de cocer, (imagen # 2). Se realiza la costura por los bordes de cada corazón y se cierra con costura toda la parte frontal de nuestra pieza (imagen # 3 y 4). Un truquito para que la mochila tome esa forma cuadrada en la parte baja, se debe realizar una costura recta a los laterales (imagen # 5).
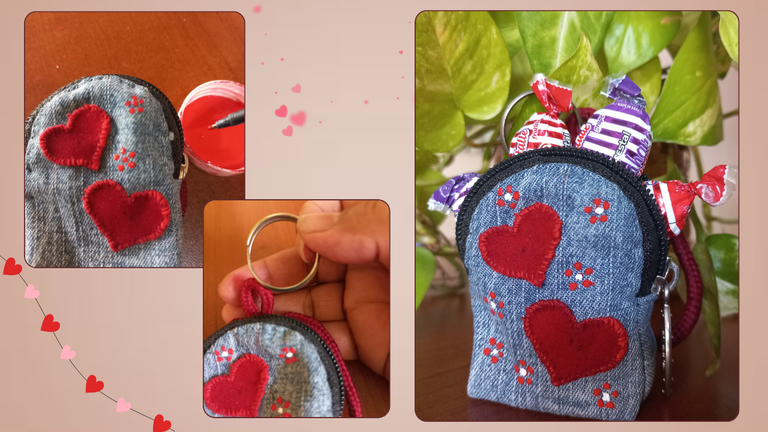
Final phase: After finishing the sewing process, I will decorate the front of the backpack. This time I will paint some small flowers to match the hearts. I will use red cold paint and the tip of a pen, I recommend you to apply as many layers of paint as you think necessary. Once the paint is dry, I will place the key ring. Finally, I will fill the backpack with some detail; in my case, I filled it with candies.
Fase final: Tras terminar el proceso de costura, decorare el frente de la mochila. En esta ocasión pintare unas pequeñas flores a juego con los corazones. Utilizaré pintura al frio roja y la punta de un bolígrafo, les recomiendo aplicar tantas capas de pintura como crean necesarias. Una vez seca la pintura, colocaré el aro de llavero. Finalmente, llenaré la mochila con algún detalle; en mi caso, la llené con caramelos.
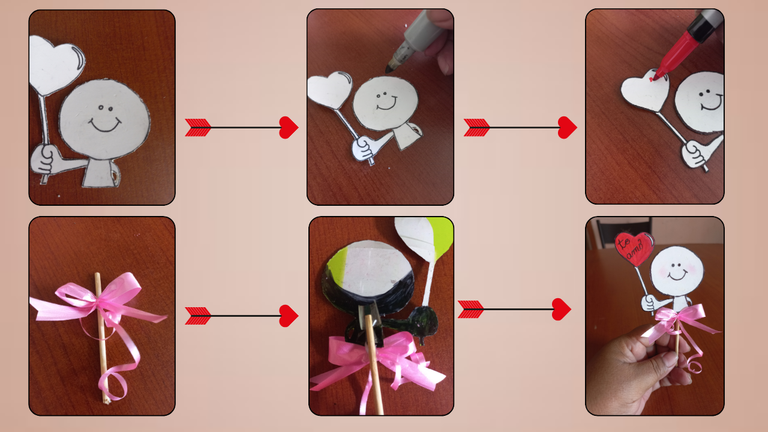
And to finish the whole project I will make a small and simple card.
Once the design is chosen, we transfer it to the white cardboard and cut it out. With the help of the black marker we outline and mark, both the design and the edges, and then use the red marker in the part of the design that corresponds in this case is a heart (as shown at the top of the following image).
Decorate the skewer stick with a ribbon, glue it to the back of the design, this time using plastic tape and finish.
Y para terminar todo el proyecto elaborare una pequeña y sencilla tarjeta.
Ya escogido el diseño lo trasferimos al cartón blanco y recortamos. Con la ayuda del marcador negro delineamos y marcamos, tanto el diseño como los bordes, para posteriormente utilizar el marcador rojo en la parte del diseño que corresponda en este caso es un corazón. (como se aprecia en la parte superior de la siguiente imagen).
Se adorna el palito de brocheta de con un lazo, de celoseda se pega al dorso del diseño en esta ocasión utilice cinta plástica y finalizamos.
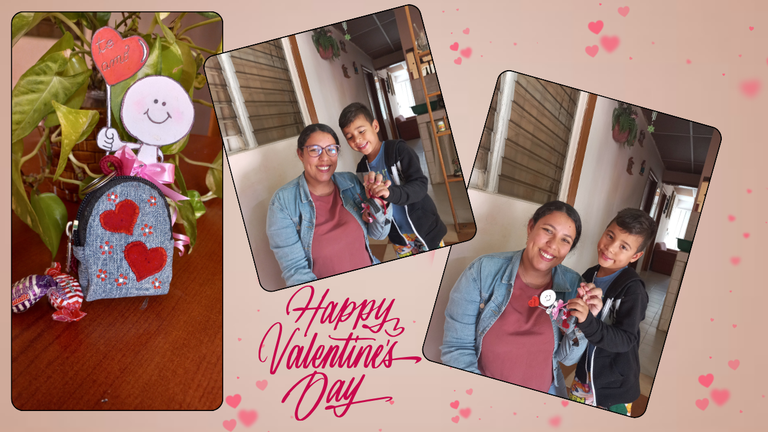
This project was made with a lot of love and dedication. I hope that every detail reflects the spirit of love and affection that Valentine's Day represents. Thank you for allowing me to be part of this celebration, Happy Valentine's Day to all of you!
The backpack was given to a person I love and admire very much, my daughter-in-law, and the person in charge of delivering it was none other than my grandson (my treasure).
The backpack was given to a person I love and admire very much, my daughter-in-law, and the person in charge of delivering it was none other than my grandson (my treasure).
Este proyecto fue elaborado con mucho cariño y dedicación. Espero que cada detalle refleje el espíritu de amor y afecto que San Valentín representa. Gracias por permitirme ser parte de esta celebración. ¡Feliz Día de San Valentín a todos!
La mochila fue obsequiada a una persona que quiero y admiro mucho, Mi yerna y el encargado de entregarla nada más y nada menos que Mi nieto (mi tesoro).
Hace poco también realicé un llavero en forma de mochila pero utilizando foami, tengo pendiente realizar otro modelo con cierre tal como lo hiciste.
Te quedó súper tierno con esos detalles que le agregaste y tu paso a paso es maravilloso, te felicito
¡Hola y gracias! 🌟 Qué genial que también te animaste a hacer un llavero en forma de mochila. ¡Debe haber quedado espectacular! Me alegra mucho que te haya gustado mi versión y los detalles que le agregué. Estoy segura de que tu próximo modelo con cierre va a quedar igual de increíble.
Es una linda idea para obsequiar en san Valentín ❤️, gracias por compartir, suerte en el concurso 🥰
Gracias por tus buenos deseos y por apoyar mi participación en el concurso. 🥰 ¡Espero que tengas un San Valentín lleno de amor y creatividad! ❤️📿
Gracias 🥰
Te quedó super bonito y tan cuchi😍😍,se nota la dedicación que le diste porque cada detalle es realmente increíble..
Muchas suerte en este concurso❤️✨
Congratulations @mily0202! You have completed the following achievement on the Hive blockchain And have been rewarded with New badge(s)
Your next target is to reach 50 replies.
You can view your badges on your board and compare yourself to others in the Ranking
If you no longer want to receive notifications, reply to this comment with the word
STOPCheck out our last posts:
Sending Love and Ecency Curation Vote!
 Follow Eceny's curation trail to earn better APR on your own HP. : )
que lindo y buena idea para ese día jeje
what a nice and good idea for that day jeje
Me encanta. Te ha quedado divina esta creacion muy unica y sobre todo muy util!