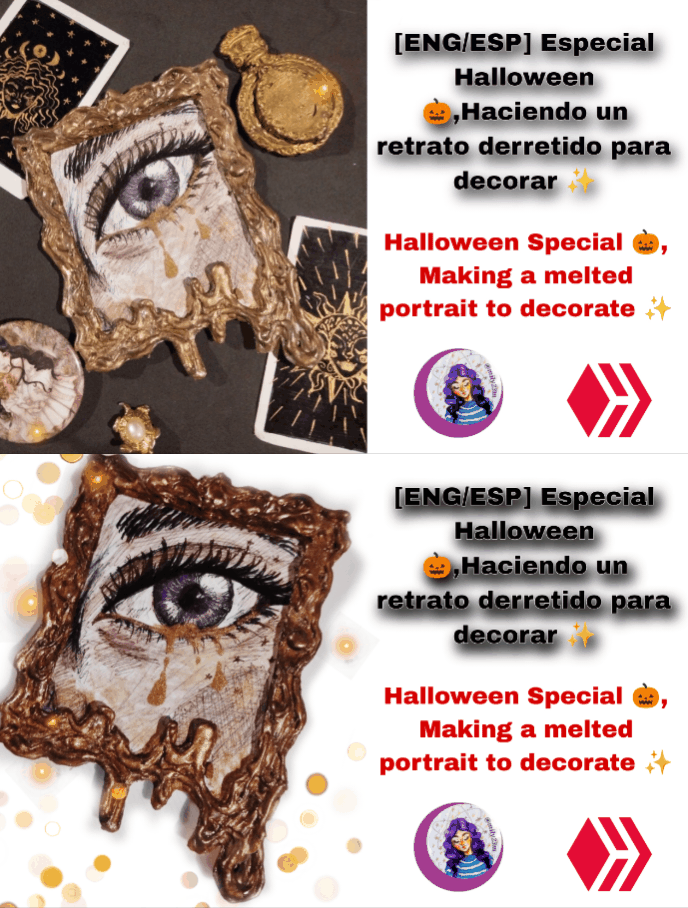

🎃✨🎃✨🎃✨🎃✨🎃✨🎃✨🎃✨
Hola artesanos! Y crafters ! Hoy les traigo un nuevo post para participar en el especial de Halloween de DiyHub #DIYHALLOWEEN y para esta entrada les traigo una manualidad que tenía mucho tiempo queriendo hacer ,y es la de estos cuadros vintage Con un aspecto como derretido 🫠 y es que este tipo de decoración medio gótica y con vibras de Dark academy está muy de moda y para estos tiempos aprovechando que Halloween (el 31) está a la vuelta de la esquina ,pues es idea para ponernos manos a la obra ✨ aquí que aquí abajo les dejo el tutorial ↘️ ⬇️.
Materiales
🎃 Barras de silicón caliente y pistola de silicona
🎃 Cartón ,o cartulina reciclada
🎃 Pintura marron o negra
🎃 Pintura dorada
🎃 Pintura blanca
🎃 Pinceles
🎃Pega blanca
🎃 Materiales para hacer dibujos ,sea lápices,marcadores punta fina o estilografos, acuarelas.
🎃 Exacto o cúter y tijeras.
Manos a la obra
English Version
🎃✨🎃✨🎃✨🎃✨🎃✨🎃✨🎃✨
Hello artisans! And crafters! Today I bring you a new post to participate in the DiyHub Halloween special #DIYHALLOWEEN and for this entry I bring you a craft that I had wanted to do for a long time, and it is these vintage paintings With a melted look 🫠 and this type of half-gothic decoration with Dark Academy vibes is very fashionable and for these times taking advantage of the fact that Halloween (the 31st) is just around the corner, it is an idea to get down to work ✨ here below I leave you the tutorial ↘️ ⬇️.
Materials
🎃 Hot glue sticks and glue gun
🎃 Cardboard or recycled cardboard
🎃 Brown or black paint
🎃 Gold paint
🎃 White paint
🎃 Paintbrushes
🎃 White glue
🎃 Materials for drawing, such as pencils, fine-tipped markers or pens, watercolors.
🎃 Exacto or cutter and scissors.
Let's get to work
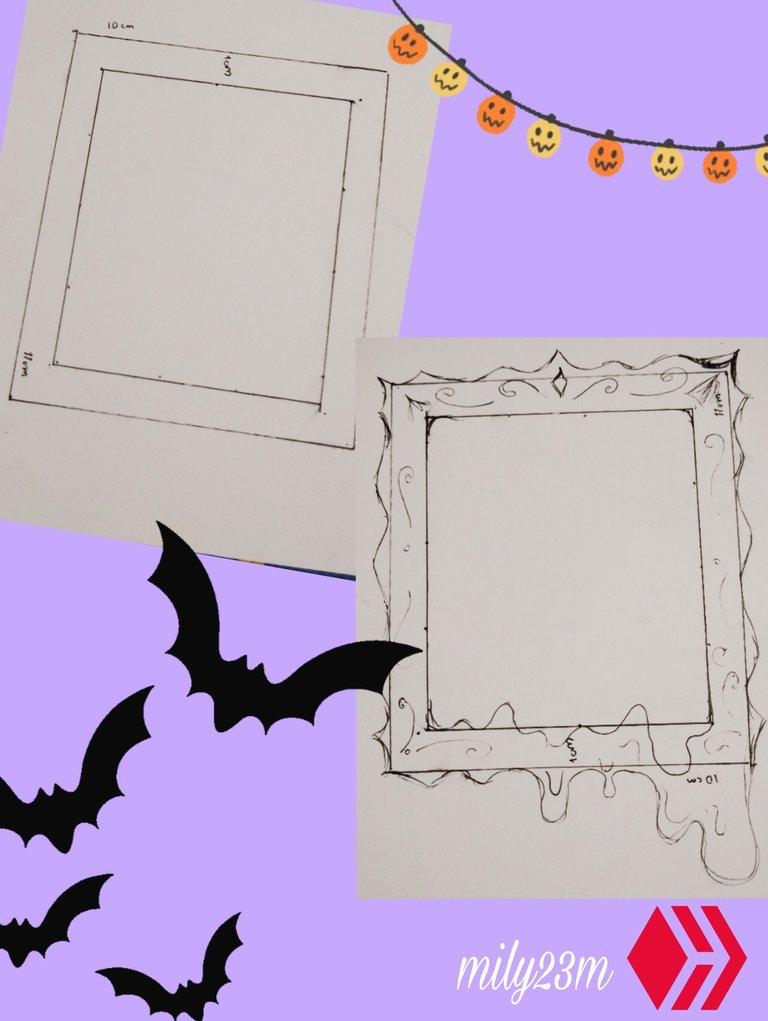
#1 para hacer este tipo de manualidades lo que he visto que se usa es porcelana fría o arcilla, y yo la verdad he tenido tiempo sin ver porcelana fría en mi ciudad , así que pensé en intentar usar silicón caliente para esta manualidad, ya qué es algo barato y que tenemos en nuestra casa, para hacer la estructura del cuadro usé una cartulina de la carátula de un block que use en una de mis últimas manualidades, lo hice de 10cmx 11 CM de largo ,con un 1 CM de grosor para la estructura, primero haciendo mi boceto de un marco cuadrado 🖼️. Luego de tener la referencia del marco empecé a diseñar como quería la forma del marco un poco más con arabescos y detalles en las esquinas para darle ese estilo vintage ,he hizo algunas ideas de como quería los detalles adentro , ya para la parte de abajo si es muy libre la idea es que el cuadro se este derritiendo entonces va goteando hacia abajo, marqué la forma de las gotas cayendo en el marco.
English Version
**#1 To make this type of crafts what I have seen that is used is cold porcelain or clay, and I have not seen cold porcelain in my city for a long time, so I thought about trying to use hot silicone for this craft, since it is something cheap and that we have in our house, to make the structure of the painting I used a cardboard from the cover of a block that I used in one of my last crafts, I made it 10cm x 11 CM long, with 1 CM thick for the structure, first making my sketch of a square frame 🖼️. After having the reference of the frame I began to design how I wanted the shape of the frame a little more with arabesques and details in the corners to give it that vintage style, I made some ideas of how I wanted the details inside, and for the bottom part if it is very free the idea is that the painting is melting then it drips down, I marked the shape of the drops falling on the frame. **
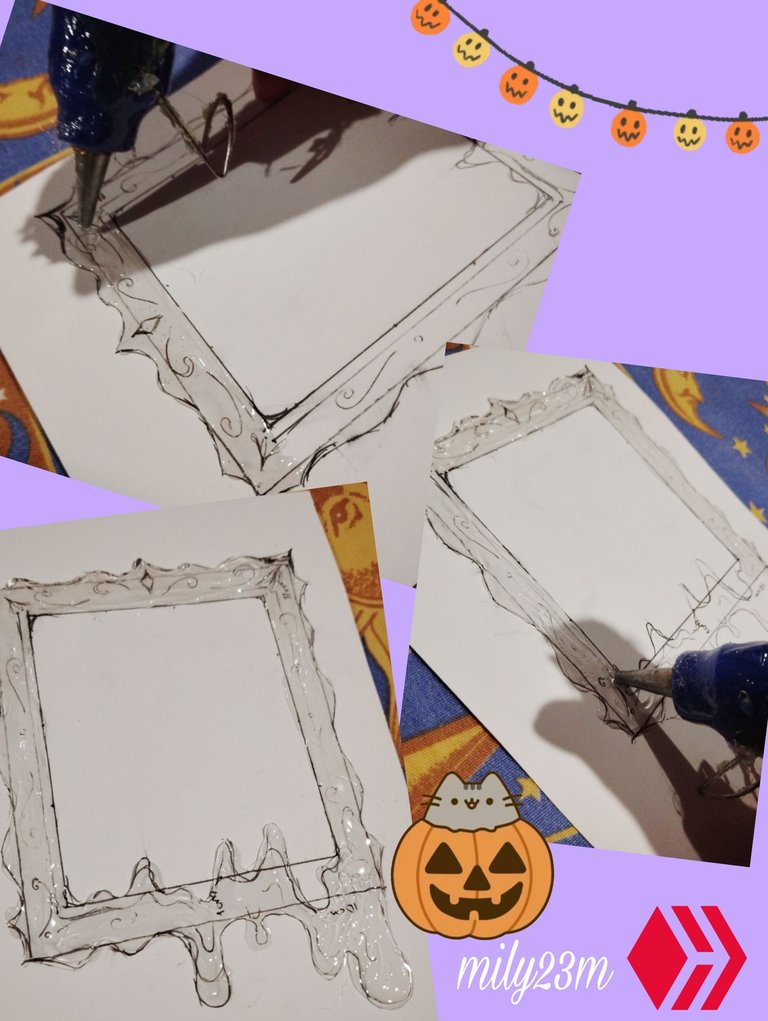
#2 Luego de tener mi forma establecida para el marco ,empecé a "rellenar " todo el grosor del cuadro con el silicón caliente la idea es hacerlo bien pegadito todo y rápido por secciones para que se vaya endureciendo de forma uniforme, yo lo hice por lados uno primero dejando que se endureciera y otro lado después, y guiandome por las líneas para hacer las formas ,mucho cuidado haciendo la parte del derretido para que no pierdas la forma que tiene .
English Version
#2 After having my shape established for the frame, I began to "fill" the entire thickness of the frame with the hot silicone. The idea is to do it very tightly and quickly in sections so that it hardens evenly. I did it by sides, one first letting it harden and the other side later, and guiding myself by the lines to make the shapes, being very careful with the melting part so that you don't lose the shape it has.
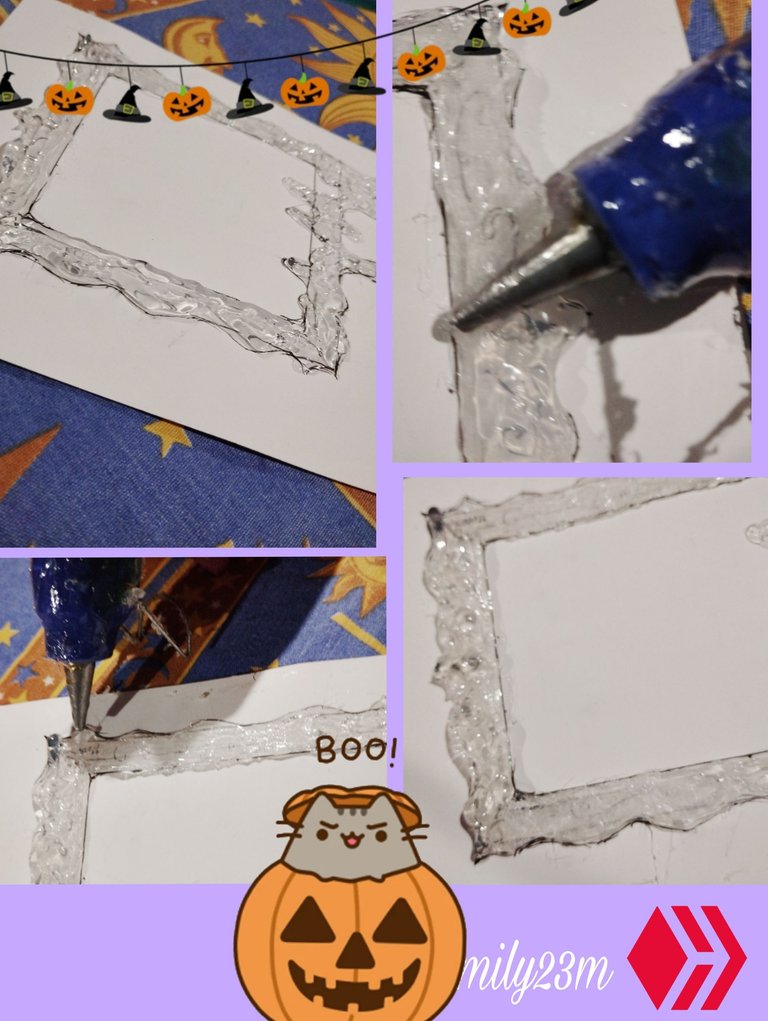
#3 Cuando ya tenía mi pieza con una capa de silicón, empecé a hacer otra capa de silicón encima para que quedara mucho más parejo está vez primero delineando con la pistola todo el contorno del marco, y cuando estaba listo rellenando la parte de adentro. Cuando estaba todo endurecido ,con la punta de la pistola de silicon de manera horizontal intenté frotarla sobre el grosor del marco para tratar que esta quedará nivelada usando la punta caliente ,no tiene que ser tan sumamente prolijo o alisar un poco el grosor ,le dí una sola pasada para quedara mejor.
English Version
#3 When I already had my piece with a layer of silicone, I began to make another layer of silicone on top so that it would be much more even. This time, first outlining the entire outline of the frame with the gun, and when it was ready, filling in the inside. When everything was hardened, with the tip of the silicone gun horizontally, I tried to rub it over the thickness of the frame to try to make it level using the hot tip. It doesn't have to be so extremely neat or smooth out the thickness a little. I gave it a single pass so it would look better.
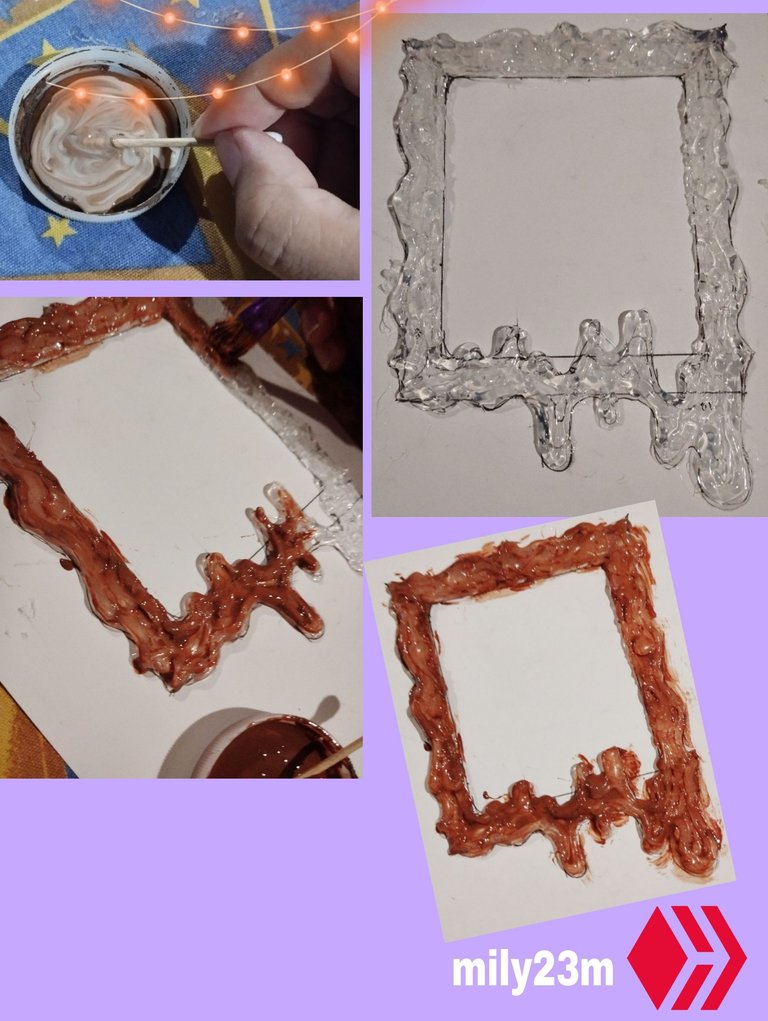
#4 Ya para la tercera capa de silicón solo le hice el borde exterior a todo el marco (haciendole por partes ) concentrándome en que se denoten los piquitos o los detalles de la forma, para algunos detalles de arabescos los hice lo más sencillo posible poniéndolos y algunos círculos ,ya que al ser tan gruesa la boquilla del silicón este no se notaria tanto en el diseño así que mejor no inventar jejeje , entonces me fui por lo seguro, tambien denote más los bordes de la parte que se está derritiendo para que se aparecieran más.Una vez listo ,hice una mezcla de pintura marrón acrílica con pega blanca escolar y con un pincel empecé a pintar todo el marco, al ser el silicón algo plástico y resbaladizo no agarra la pintura a menos que le des varias manos .
English Version
**#4 For the third layer of silicone I only did the outer edge of the entire frame (doing it in parts) concentrating on making the peaks or details of the shape stand out, for some arabesque details I made them as simple as possible by putting them and some circles, since the silicone nozzle is so thick it would not be as noticeable in the design so it is better not to invent hehehe, so I went for the safe option, I also denoted more the edges of the part that is melting so that they would appear more. Once ready, I made a mixture of brown acrylic paint with white school glue and with a brush I began to paint the entire frame, since silicone is somewhat plastic and slippery it does not grab the paint unless you give it several coats. **
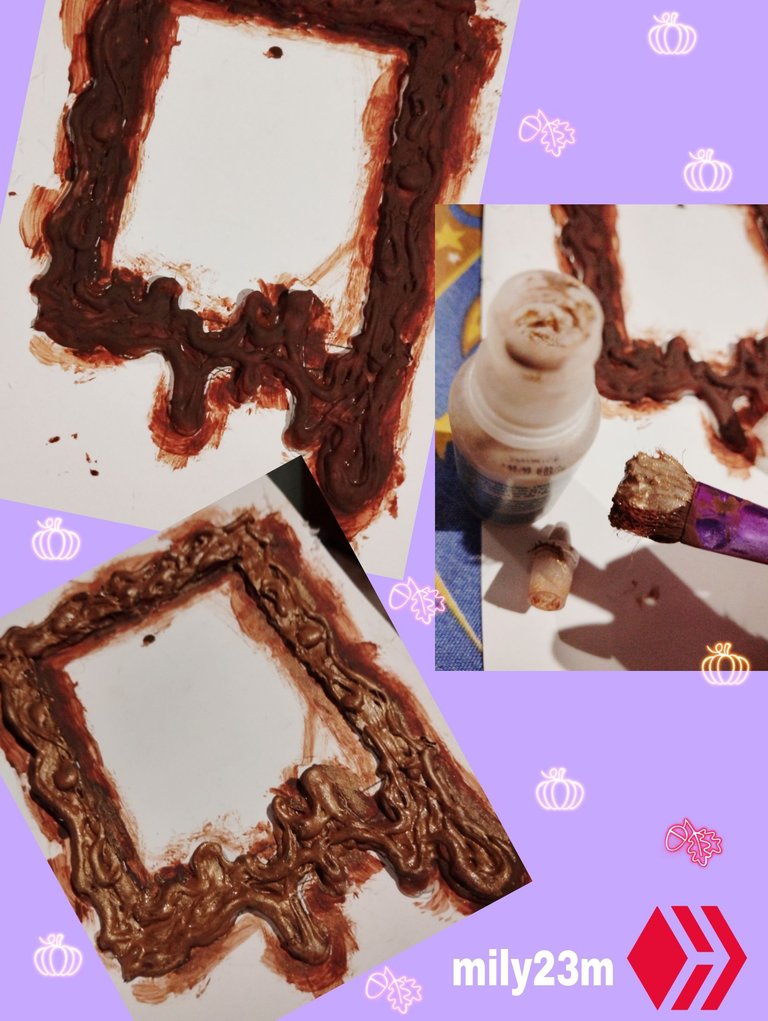
#5 Le dí aproximadamente 4 manos amiguitos así que lleva más o menos pintura 🎨, hasta lograr conseguir este todo uniforme y que se viera un bonito resultado, yo quería pintarlo de negro pero la verdad no tenía suficiente pintura, aunque en marrón quedó genial también ya que esté será nuestra base , yo use dorado para darle un toqué vintage y ornamental ,como los de antes ,para esto puedes usar pintura ,yo tengo una que hice reciclando maquillaje viejito y miren que me sirvió bastante, cubrió Muy bien con unas dos capas que le dí.
English Version
#5 I gave it about 4 coats friends so it takes more or less paint 🎨, until I managed to get this all uniform and a nice looking result, I wanted to paint it black but the truth is I didn't have enough paint, although in brown it looked great too since this will be our base, I used gold to give it a vintage and ornamental touch, like the ones before, for this you can use paint, I have one that I made by recycling old makeup and look how much it helped me a lot, it covered very well with about two coats that I gave it.
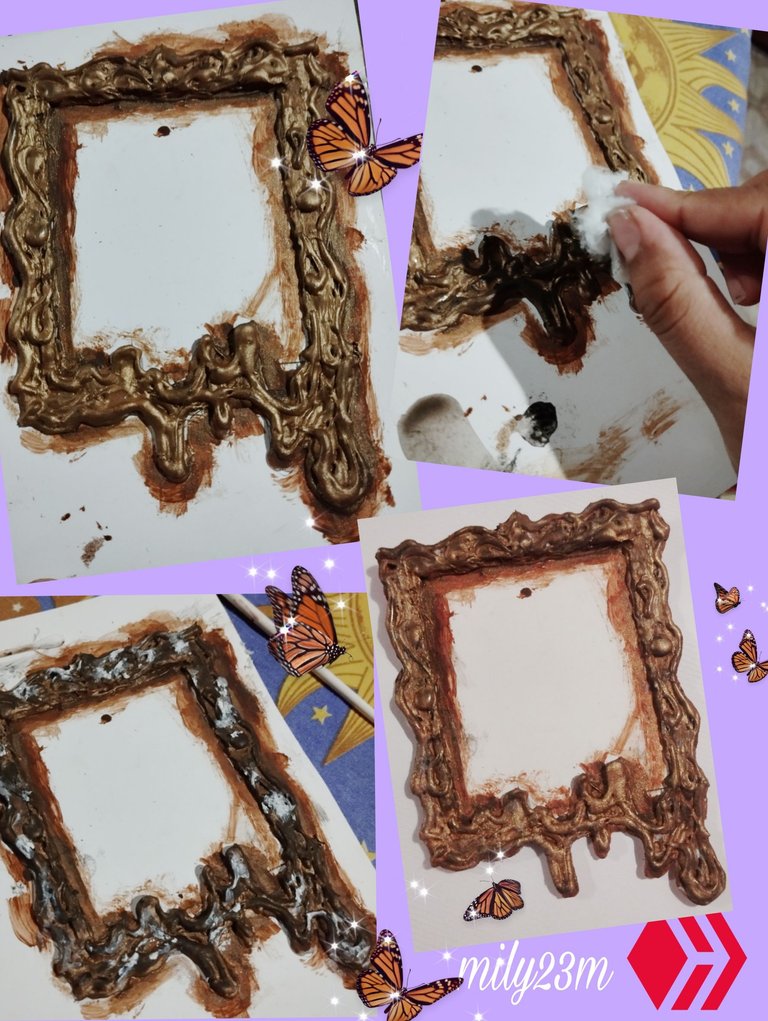
#6 Ya entonces va tomando forma la cosa 😁, para darle el aspecto envejecido y no se viera de un tono dorado uniforme, tome un poco de pintura negra con mucha cantidad de agua que sea tipo como una acuarela, y con algodón le dí toquecitos moteando el color negro por todo el cuadro, la idea es crear un poco de sombra así que no hay que tener el algodón muy cargado de pintura.Una vez secó,con pintura blanca le dí algunos toquecitos para crear luz en el marco y luego difumine con un algodón para que no quedara el manchón como tal,y cuando estuvo seca la pintura, le dí una capa mas de pintura dorada muy ligera y con muy poca pintura pero esto es para quitarle un poco los colores que agregué , quedando solo detalles en las grietas del diseño y los relieves, esto creará un efecto de marco dorado pero que se vea más antiguo.
English Version
**#6 Now the thing is taking shape 😁, to give it the aged look and not make it look a uniform golden tone, take some black paint with a lot of water that is like a watercolor, and with cotton I dabbed it speckles the black color all over the frame, the idea is to create a bit of shadow so you don't have to have the cotton very loaded with paint. Once it dried, with white paint I gave it some dabs to create light in the frame and then blurred with a cotton ball so that the stain didn't remain as such, and when the paint was dry, I gave it one more coat of very light gold paint and with very little paint but this is to remove a bit of the colors that I added, leaving only details in the cracks of the design and the reliefs, this will create a gold frame effect but make it look older. **
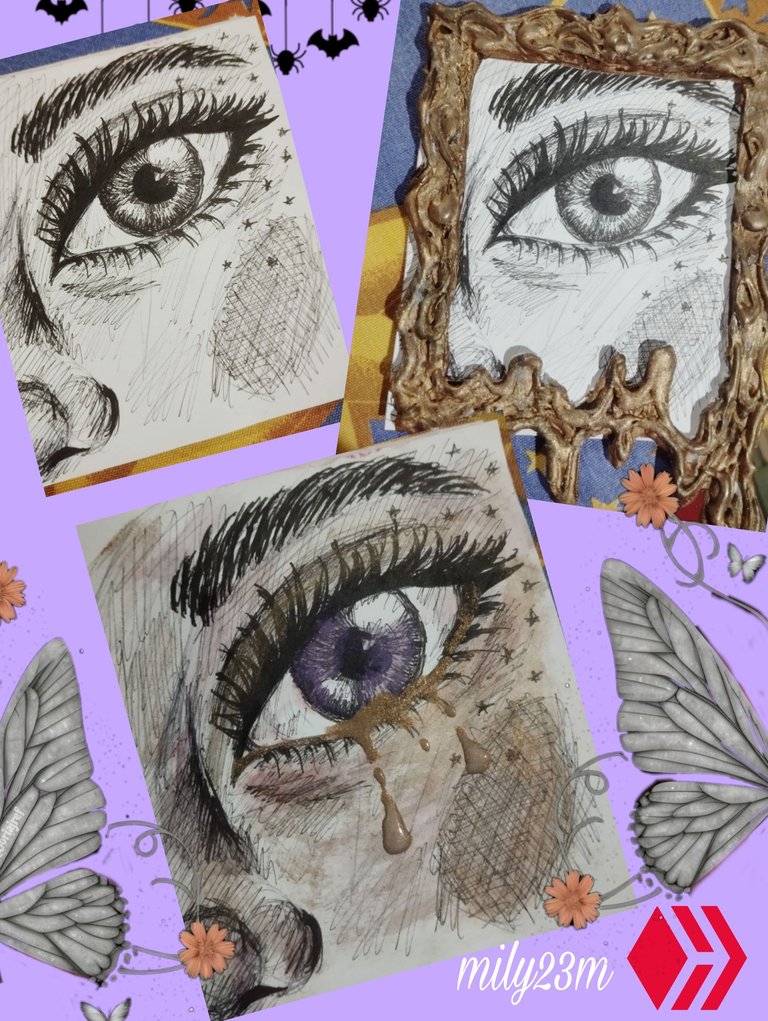
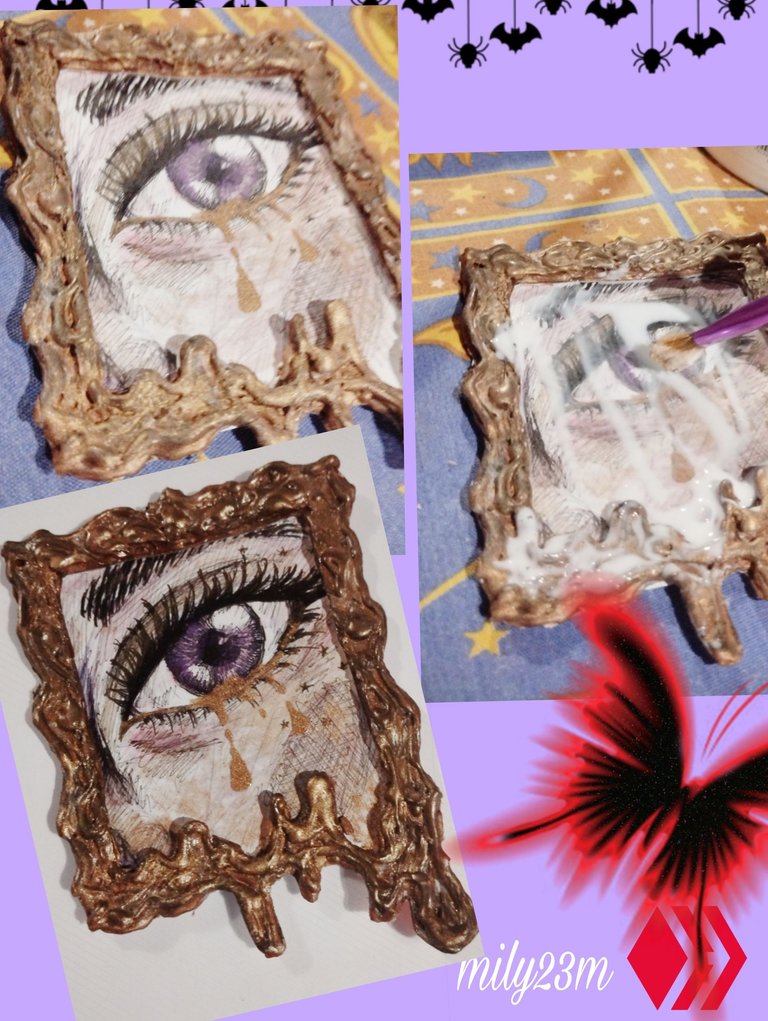
**#7 Con una tijera corté todo alrrededor del diseño del marco , y con un cúter corté la parte de adentro con mucho cuidado de seguir las líneas para no dañar el diseño. Para el dibujo que quería en el cuadro quería hacer un ojo derritiéndose pero no me salía 🥲, así que pensé mejor en un ojo llorando, corté dos piezas de aproximadamente el tamaño interno del cuadro (dejando un poco más para luego recortar) una de una cartulina de block para el dibujo y una cartulina de un blog reciclado para que tuviera dureza , los pegué ambos juntos y empecé a hacer mi boceto de mi cara haciendo cejas ,la prominencias de la nariz y el ojo, primero en boligrafo, y luego lo detallé con marcadores punta fina de diferentes grosores para agregar sombra y volumen. Para darle algo más de detalle quise pintarlo al estilo de acuarela dandole un poco de color con estas pinturas acuarelas que hice ,agregándole dorado para darle tonalidad a la piel ,y dándole algunos toques de morado , para darle volúmen y se viera un poco el aspecto de estar enrrojecido por haber llorado, también pinte la pupila, y agregué "las gotas o lágrimas saliendo del ojo " derramando la pintura dorada y dejando la caer como una gota sobre el lienzo.Una vez secó la pintura pegué con puntitos de silicón caliente ,el dibujo al marco ,y recorté lo que sobresalió, aquí luego para protegerlo le dí una capa de pega blanca escolar tanto al dibujo como al marco para que quedara con acabado brilloso, y listo asi quedó ,me parece que es un linto detalle para decorar la pared y darle esta vibra de academia oscura o gotica a tu habitación ,y por lo menos para hacer un cuadrito de este tamaño use solo dos barritas de silicón de las finitas por lo que no lleva tanto costo.
English Version
**#7 With a pair of scissors I cut all around the frame design, and with a cutter I cut the inside being very careful to follow the lines so as not to damage the design. For the drawing I wanted on the frame I wanted to make a melting eye but it didn't come out 🥲, so I thought of a crying eye instead, I cut two pieces approximately the internal size of the frame (leaving a little extra to cut out later) one from a block cardboard for the drawing and a cardboard from a recycled blog to give it hardness, I glued them both together and started making my sketch of my face doing eyebrows, the prominences of the nose and the eye, first in pen, and then I detailed it with fine tip markers of different thicknesses to add shadow and volume. To give it some more detail I wanted to paint it in a watercolor style giving it a bit of color with these watercolor paints that I made, adding gold to give it a tone to the skin, and giving it some touches of purple, to give it volume and make it look a bit red from crying, I also painted the pupil, and added "the drops or tears coming out of the eye" by spilling the gold paint and letting it fall like a drop on the canvas. Once the paint dried I glued the drawing to the frame with hot silicone dots, and cut out what stuck out, here then to protect it I gave a layer of white school glue to both the drawing and the frame so that it would have a shiny finish, and that's how it turned out, I think it's a nice detail to decorate the wall and give this dark or gothic academy vibe to your room, and at least to make a picture of this size I only used two thin silicone sticks so it doesn't take much space. so much cost.
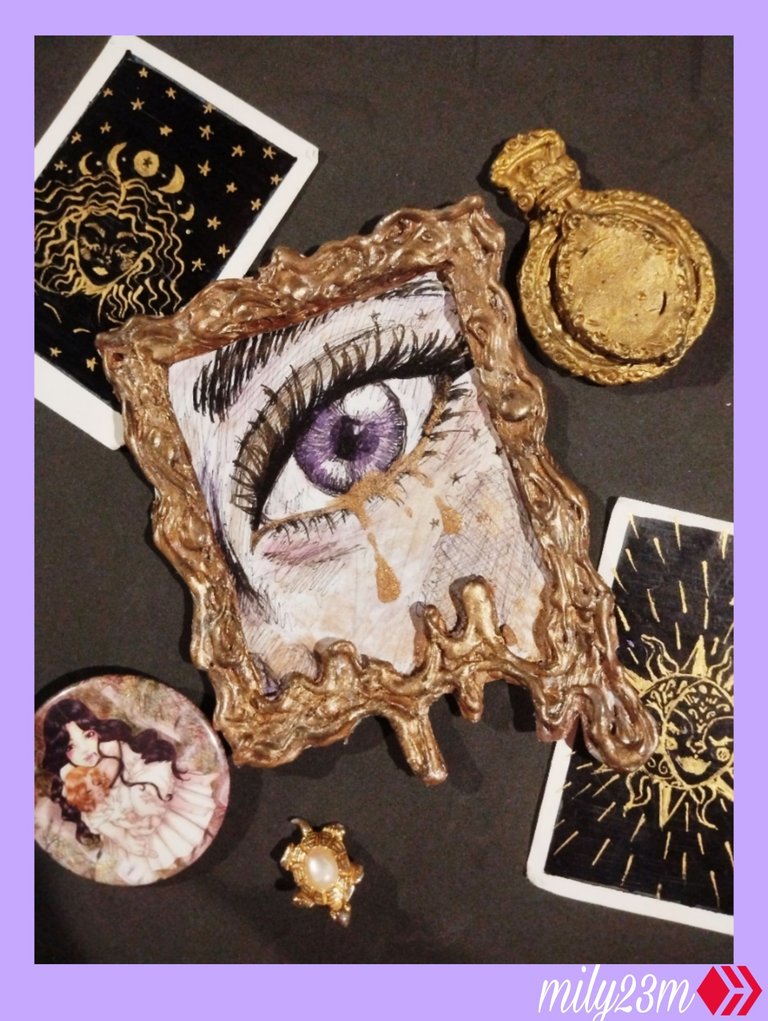
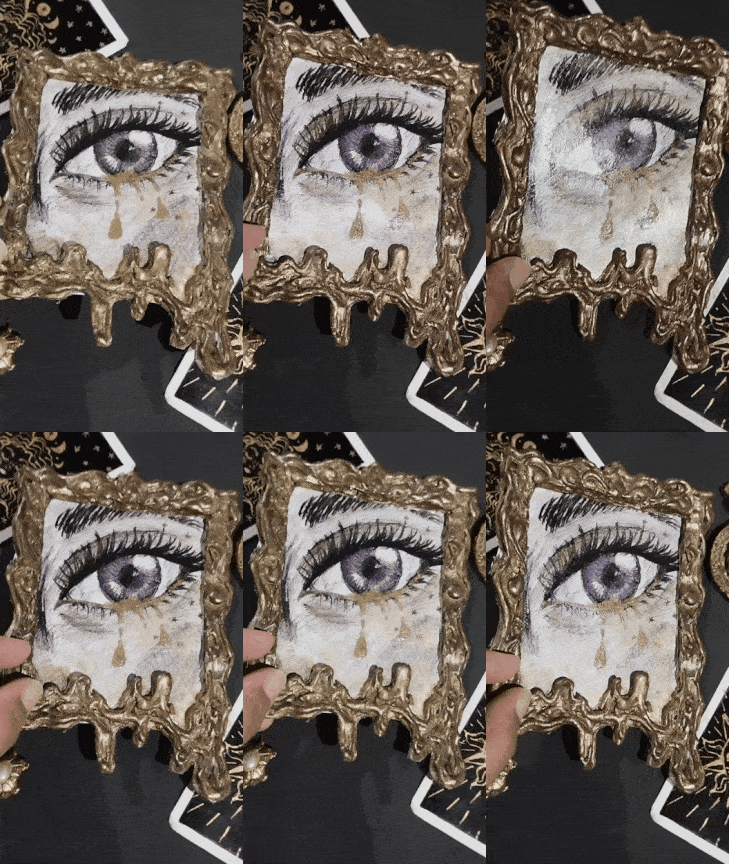
Y este es el resultado final ! Acá tenemos está hermosura, les dejo un gif para que lo aprecien bien , me encantó por qué mi idea es que es un cuadro maldito ,tal vez de un mujer que murió en pena y al llorar llora lágrimas doradas que han ido derritiendo todo el marco bien dramático todo jajaj, las posibilidades son infinitas se podrán hacer diseño bien góticos usando este tipo de marcos,espero que les haya gustado😁💜 gracias por leer mi post 🎃.✨
Fotos tomadas en mi Redmi note 12 editadas en Pics art y gif realizado en app creador de GIFs, texto traducido en Google traductor.
🎃
English Version
And this is the final result! Here we have this beauty, I leave you a gif so you can appreciate it well, I loved it because my idea is that it is a cursed painting, perhaps of a woman who died in grief and when she cries she cries golden tears that have been melting the entire frame very dramatic hahaha, the possibilities are endless, very gothic designs can be made using these types of frames, I hope you liked it 😁💜 thanks for reading my post 🎃.✨
Photos taken on my Redmi note 12 edited in Pics art and gif made in GIF creator app, text translated in Google translator.


Maravilloso trabajo. Me encantó. Se ve bonito, aunque sea maldito jejeje. Te deseo mucho éxito en el concurso. 🫂
Muchas gracias amiguita 😘✨💜
Bravo! This post is awesome and very artistic, an example for our DIYHub community, thank you very much for that.
Thank you very much, it was a pleasure to participate! ✨💜
😲Terribly, a painting to run away from.
Hahaha thanks friend 😊 , imagine if you see her half asleep 😸
I don't want to think about it, hahahaha.😆
This crafting is beautiful great idea for Halloween
Thank you very much 😊💜✨
Excelente idea para una manualidad con temática de Halloween. Este trabajo te quedó de maravilla. Te felicito.
🎃
Excellent idea for a Halloween themed craft. You did a wonderful job on this one. Congrats.
Awwww Muchas gracias , me encanta la decoración vintage y bueno Halloween es una época muy divertida para ponernos creativos
Quedé 😮😮 que gran trabajo 👏🏼 Me gustó mucho, tiene un estilo de mansión embrujada muy elegante ✨
Muchas gracias amiga ! Jejej cuadros vintage y góticos siempre son bonitos e interesantes
Congratulations @mily23m! You have completed the following achievement on the Hive blockchain And have been rewarded with New badge(s)
Your next target is to reach 9000 upvotes.
You can view your badges on your board and compare yourself to others in the Ranking
If you no longer want to receive notifications, reply to this comment with the word
STOP