ENG - English Version
ESP - Versión en Español
ITA - Versione in Italiano
In this post we will see how to create an account on the 3speak video sharing platform developed on the Hive Blockchain.
Fundamental requirements
- Owning an Hive Account
- Personal Email
If you are not yet a Hive user and are interested in creating an account, you can do so here. In this link you will find different services to open an account, some are free: HiveOnboard, Ecency, 3speak and require an email or a phone number for verification, while others such as: BlockTrades, BeeAnon, Inji and HiveWallet are paid but not require any data.
For more information on Hive, I leave here the link of this very useful collection of posts dedicated to newcomers.
https://peakd.com/ccc/newbies-guide/general-overview-of-hive-for-newbiew
When you create an account on Hive, you receive a file containing your 5 passwords.
- Master Password
- Private Owner Key
- Private Active Key
- Private Posting Key
- Private Memo Key
On Hive it is FORBIDDEN to lose your passwords!!!
NOBODY can recover your access keys!!!
So take care of your passwords, make at least one hard copy and never lose them.
In this guide, you will need the Private Active Key
Well.. that said we can get started.
1) Connect to the site https://3speak.tv
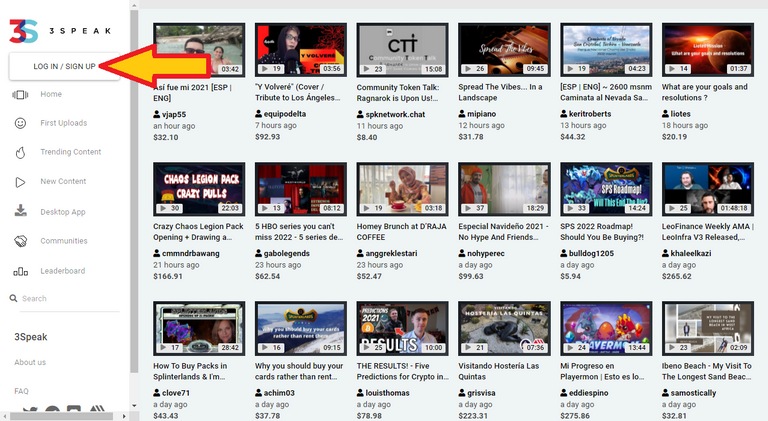
- Click at the top left on LOG IN / SIGN UP
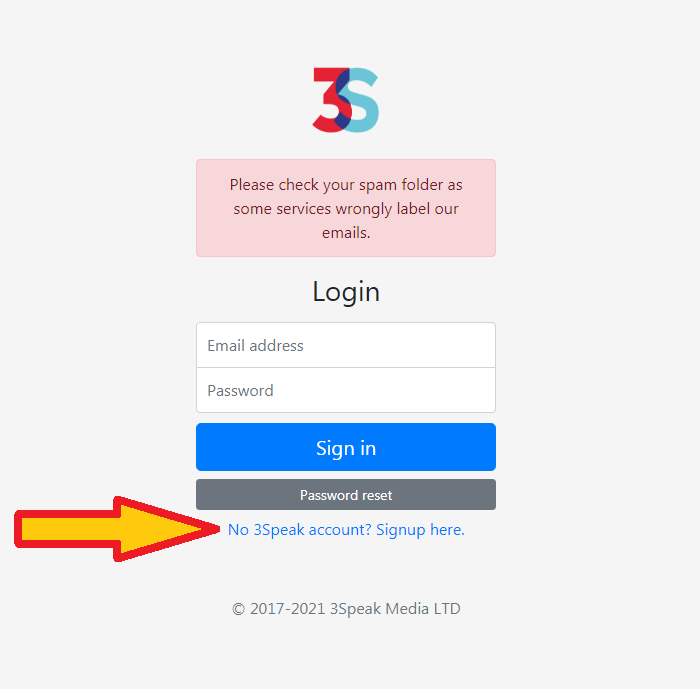
A page will open where the login credentials can be entered.
- Click below on No 3Speak account? Signup here.
A page will open where you have to enter:
- your personal email
- your username on Hive
- a password that you have to invent and use to log into 3Speak
2) Invent and Save a password for 3Speak
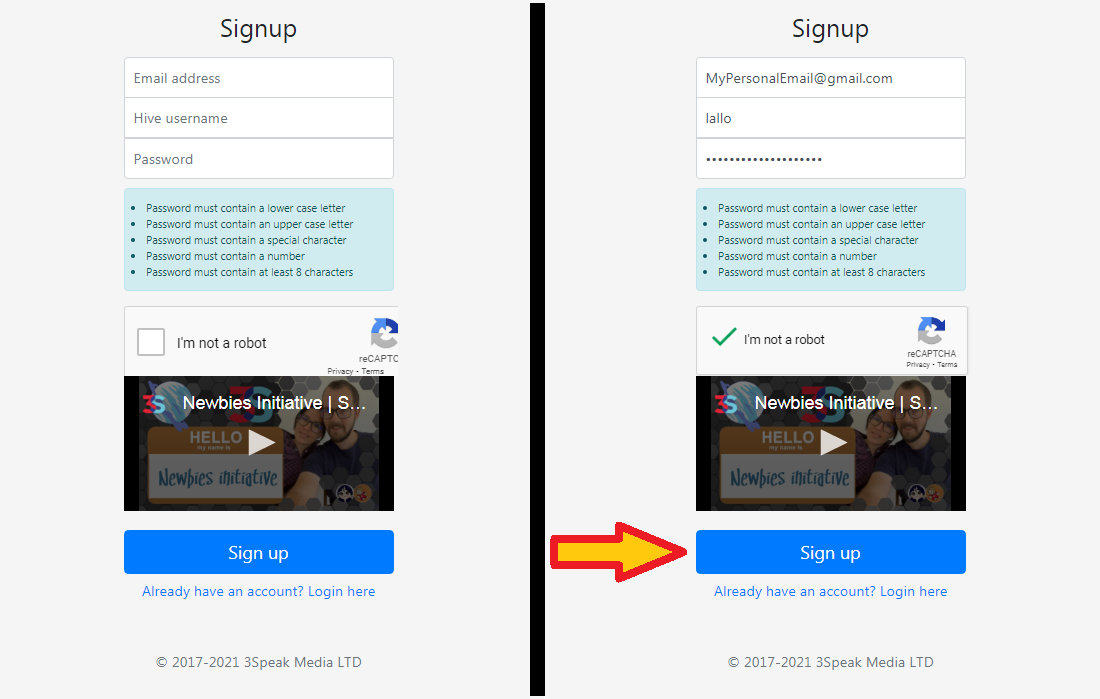
- Fill in the fields with your credentials, click on the empty box with the words I'm not a robot next to it and finally click on Sign up at the bottom
As you can see from the image, the password must contain at least one lowercase, one uppercase, one number, one special character and must be at least 8 characters long.
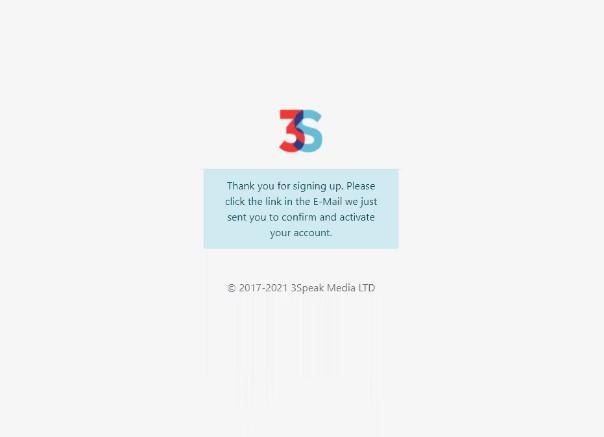
If you did everything right, you should now see this screen, and you should have received an email from 3Speak.
3) Confirm account activation
- Go to your inbox. You will find an email from 3Speak with the subject: Confirm your 3Speak Account, if you can't find it, try to see if it ended up in the spam folder.
- Open the email and click on the link to confirm the activation of your account.
You will be redirected to the 3Speak home page and have access to the platform.
4) Connect your Hive account to 3Speak
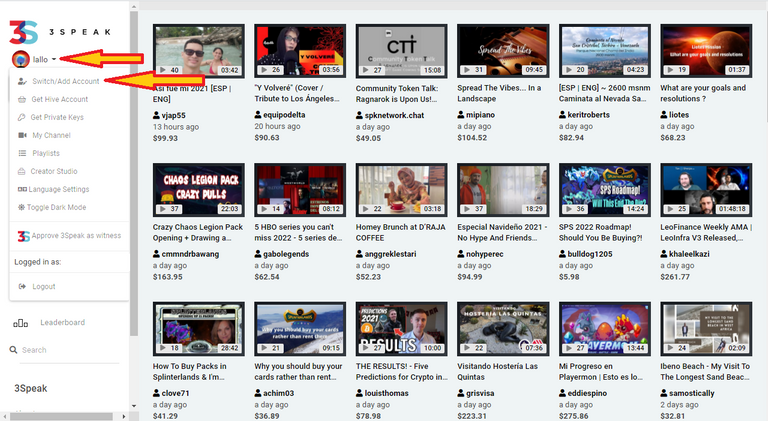
- Click on your profile picture at the top left.
- Click on Switch / Add Account
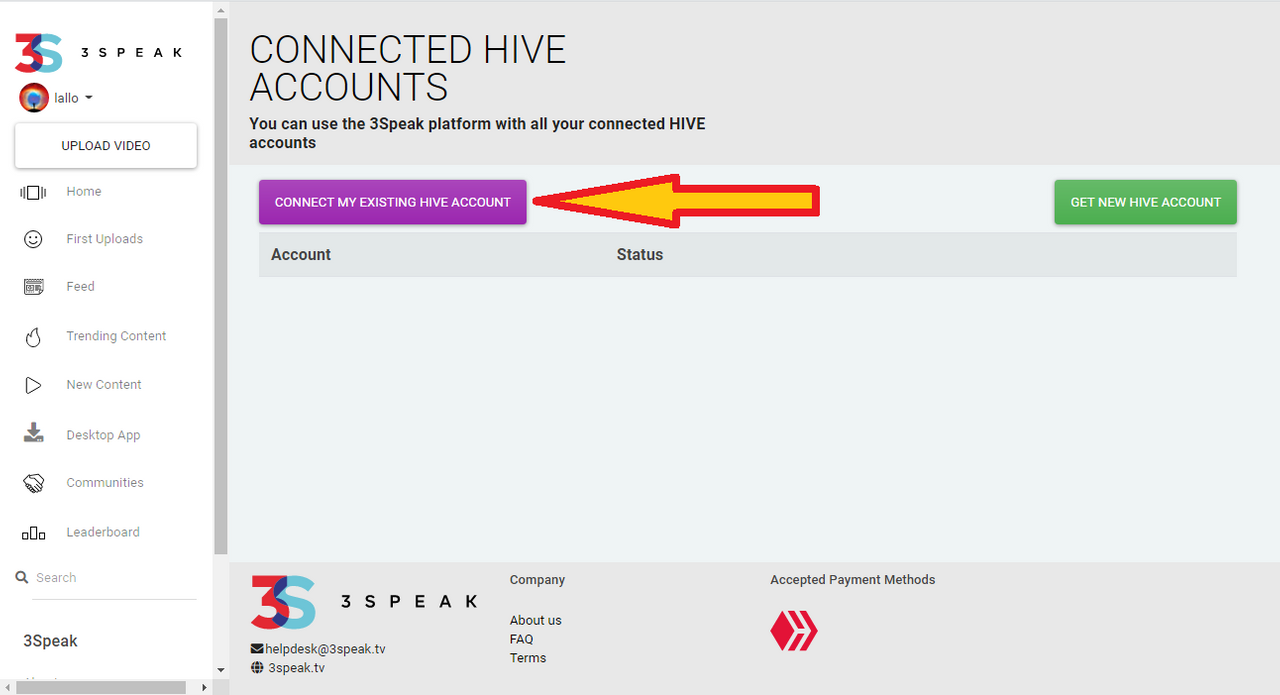
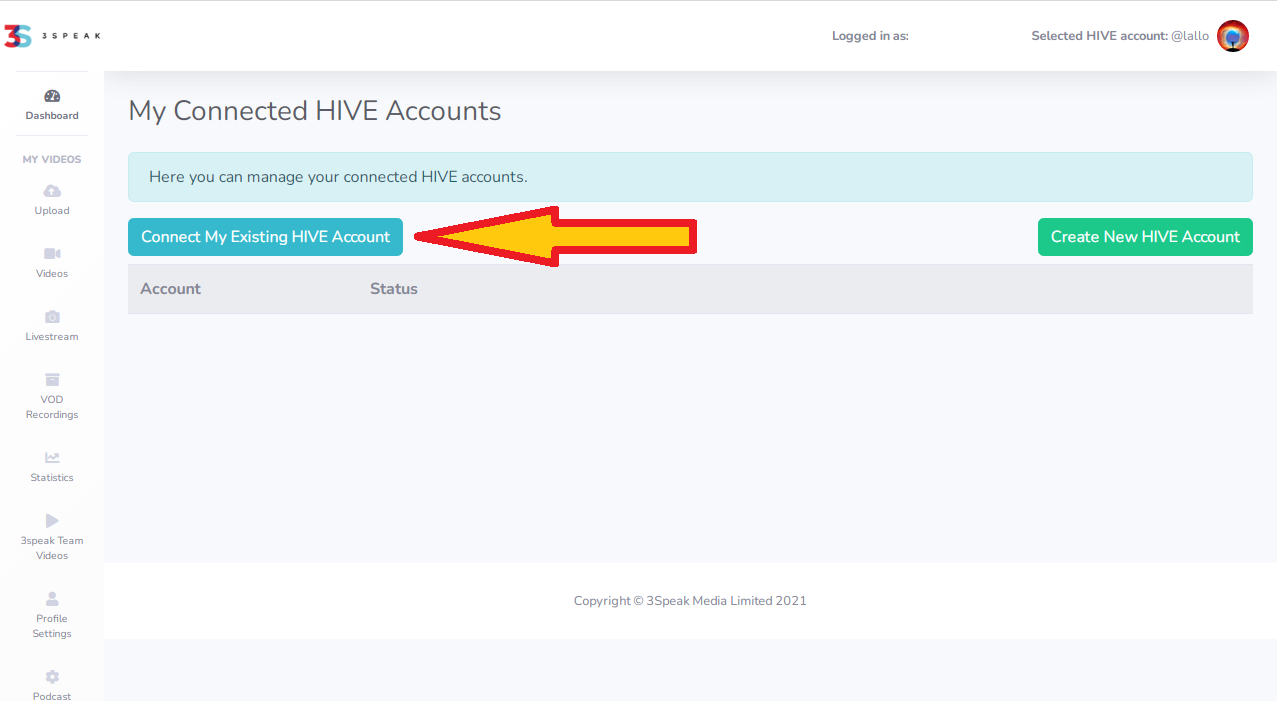
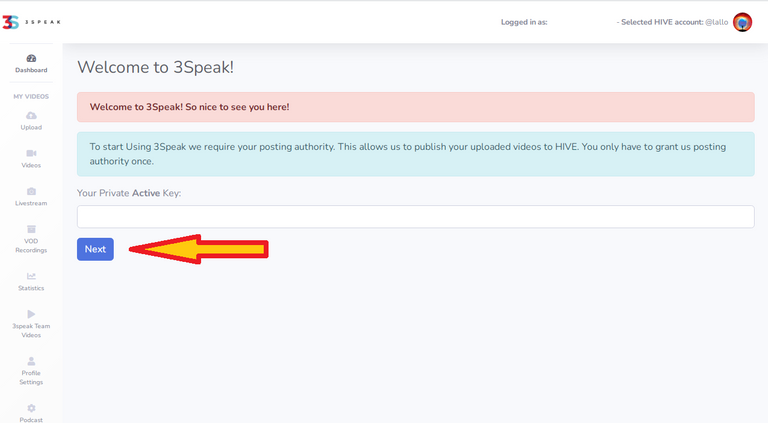
Now the following page will open where you can connect your Hive account to 3Speak. You will need to enter your Username and your Private Active Key
- Click on CONNECT MY EXISTING HIVE ACCOUNT
- Click again on Connect My Existing HIVE Account
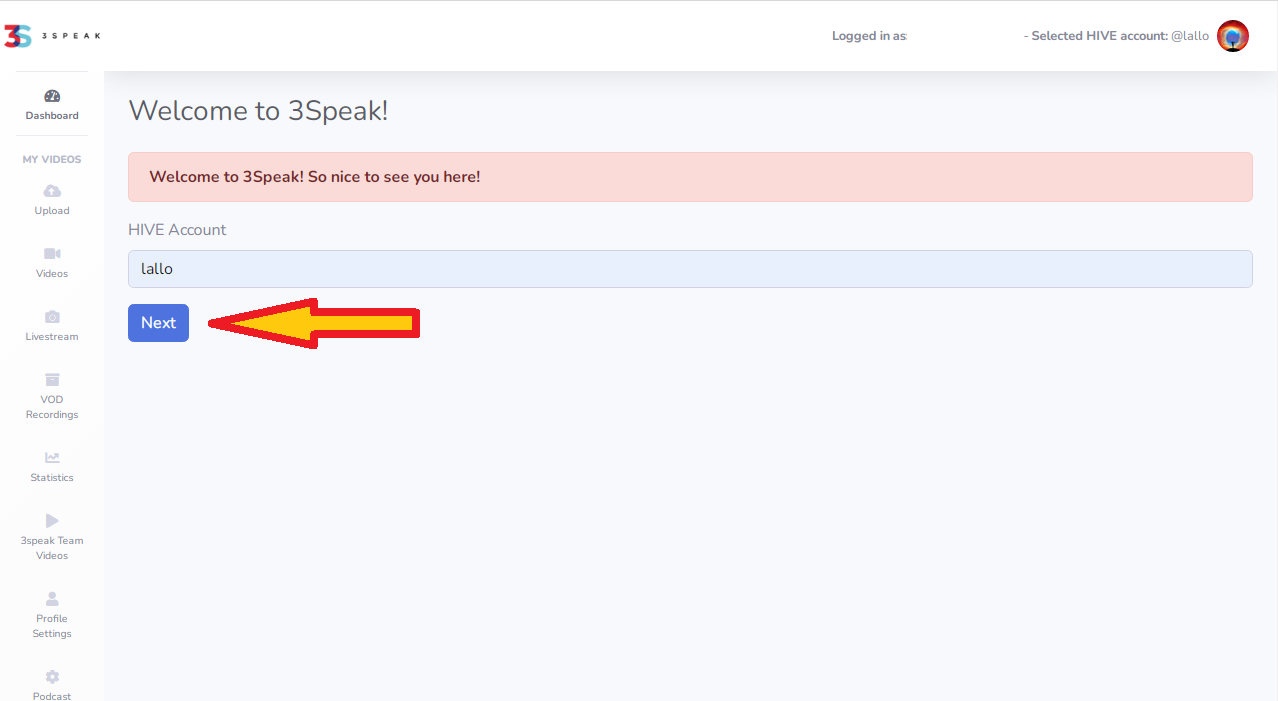
- Enter your username you use on Hive, and click Next
- Enter your Private active Key, and click Next
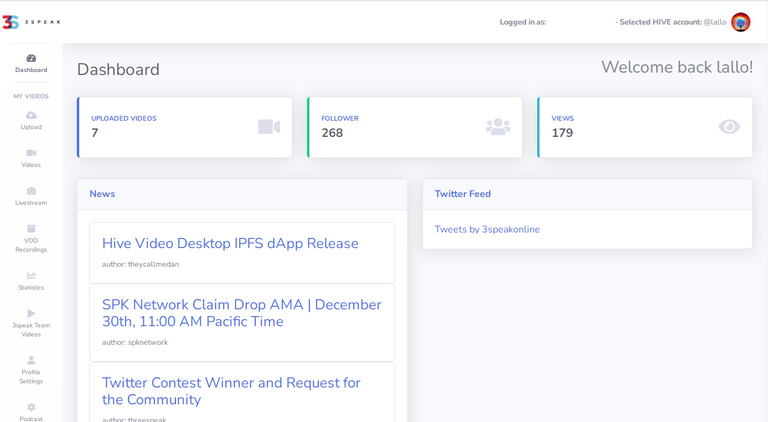
If you've done everything right now you should see your DashBoard.
It remains to authorize 3Speak to post on Hive on our behalf.
We have to do this because, we are using a service to publish on the Blockchain. In fact, for every video we upload, 3speak will publish a post on Hive for us containing the video. The post will obviously be ours, that is, created by our account, and like any post on Hive it will be able to receive votes and comments.
5) Authorize 3Speak to post on Hive
To do this, I recommend using Peakd, which like Hive.Blog and Ecency is a dApp (Decentralized Application) that allows you to browse and interact with Hive: publish posts, vote, comment and much more.
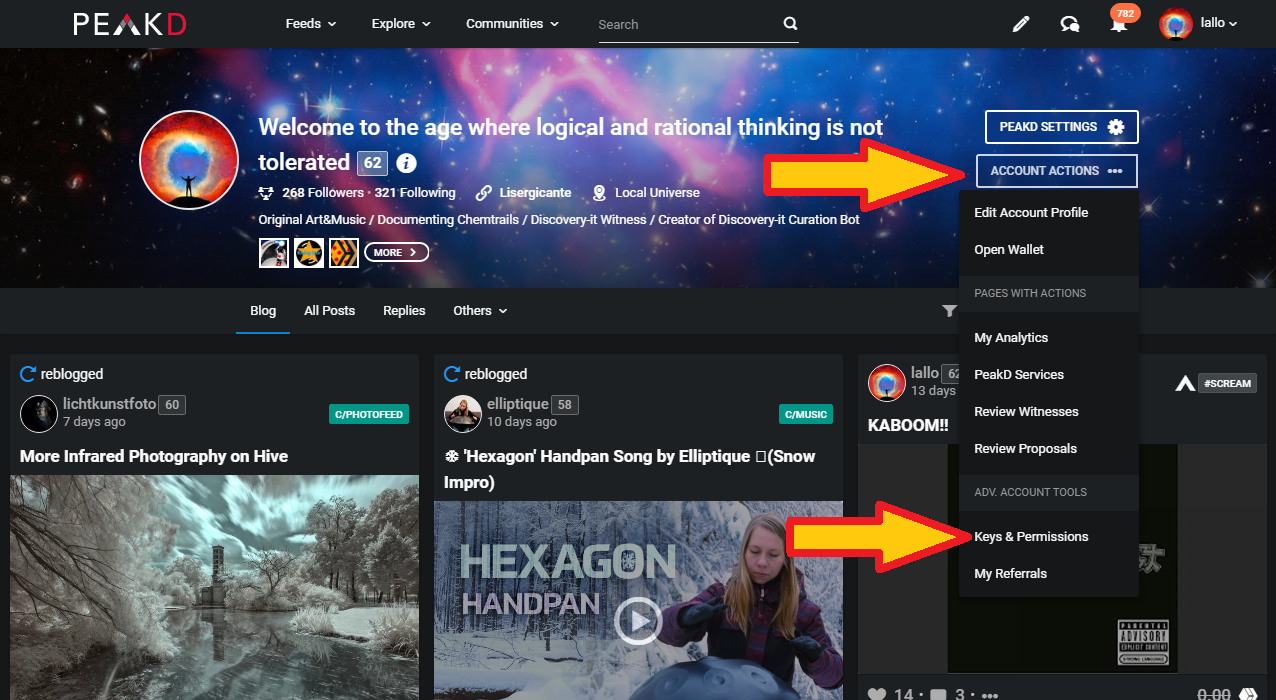
Go to your profile page and click first on ACCOUNT ACTIONS and then on Keys & PermissionsConnect to https://peakd.com and log in with your Hive credentials.
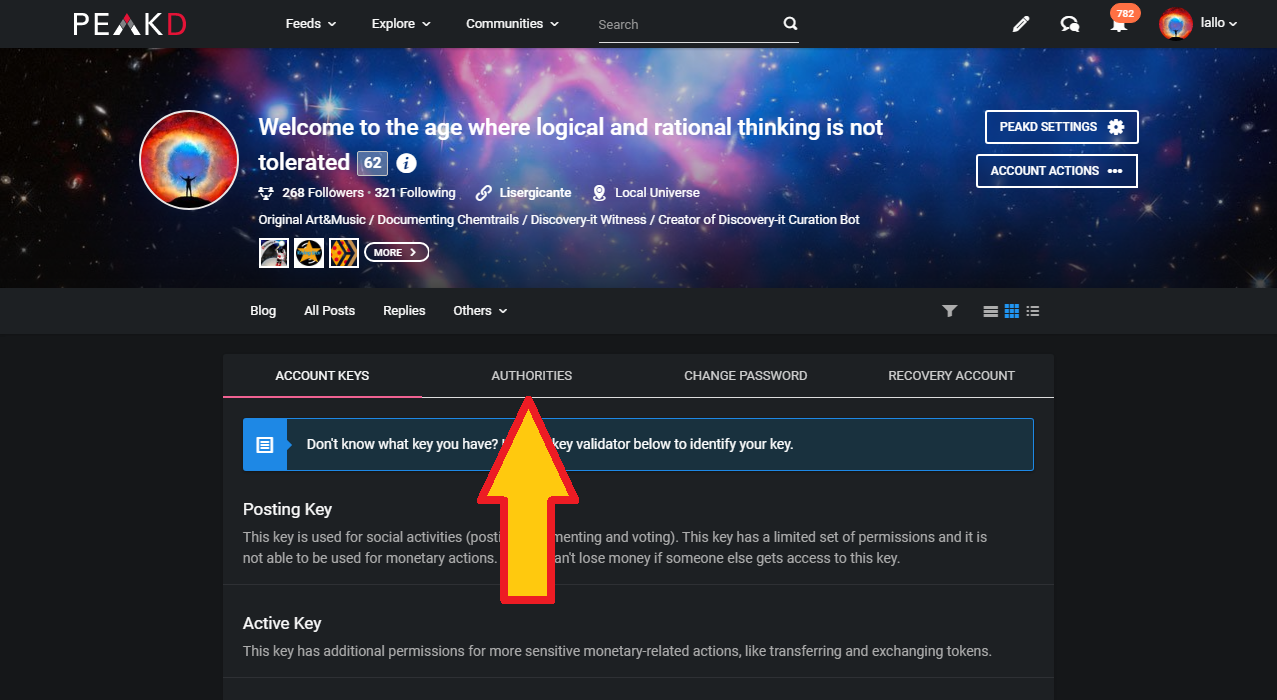
- Click on AUTHORITIES
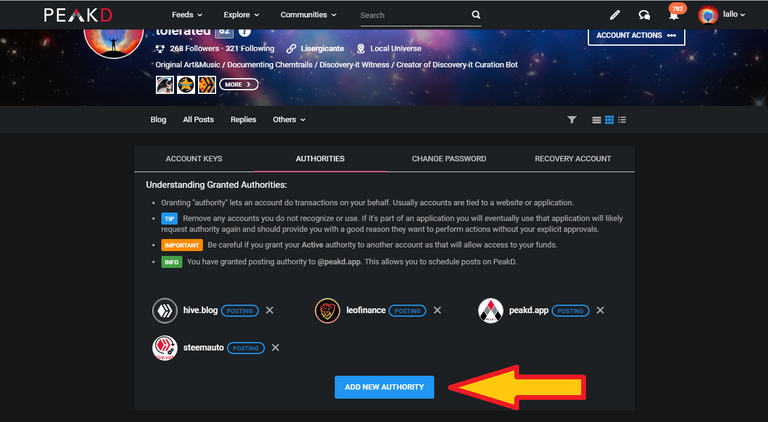
On this page you can see the dapps you have already authorized.
You can authorize an account to use your Private Posting Key or your Private Active Key.
In this case, you will need to authorize the threespeak account to use your Private POSTING Key.
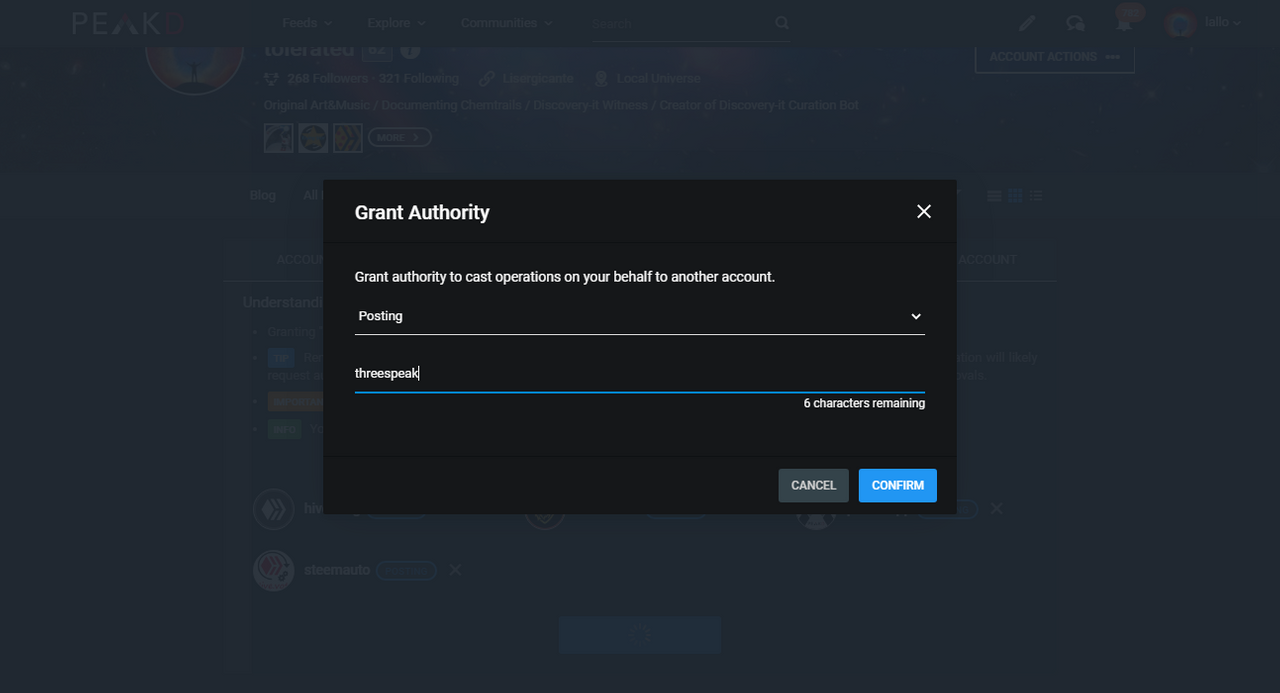
- Click on ADD NEW AUTHORITY
- Click on Role and select Posting
- Write threespeak on Recipient account
- Click on CONFIRM
If you are logged in with HiveSigner, you will be redirected to their website where you can confirm the authorization.
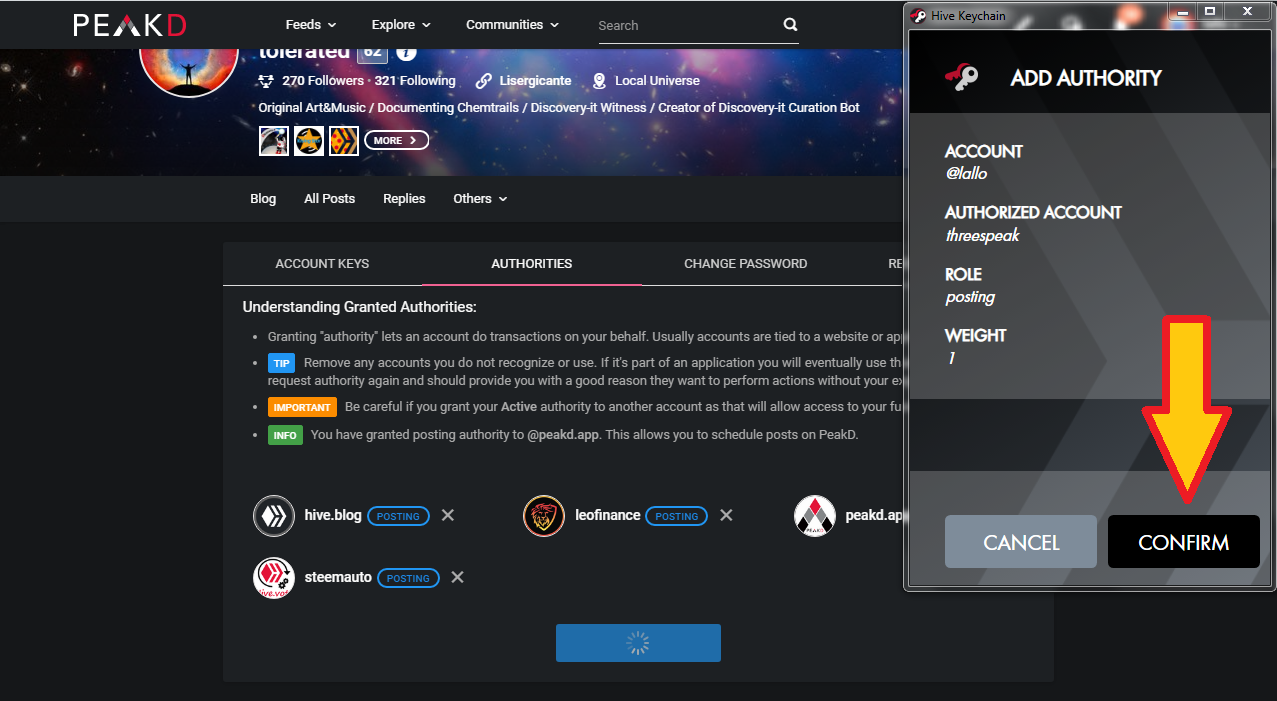
If, on the other hand, you used Hive Keychain to log in (browser extension that I recommend you download), then a small window will open where you can conveniently confirm the authorization by clicking on confirm.
You can download Hive-Keychain from the official website.
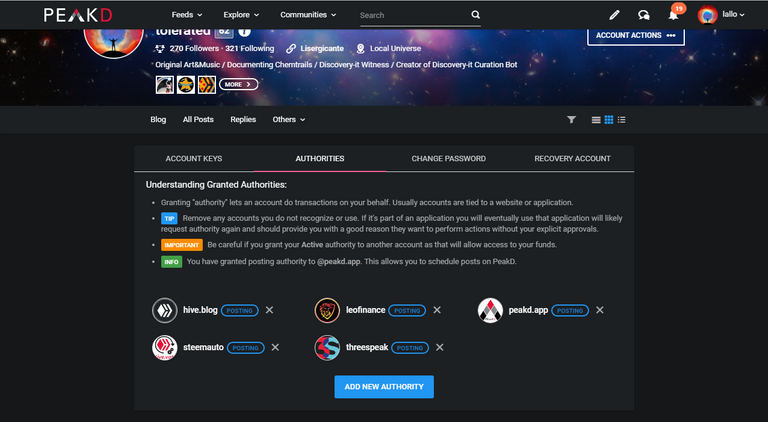
posting authorization.If you did everything right, reloading this page you should see the @threespeak account among the authorized accounts with
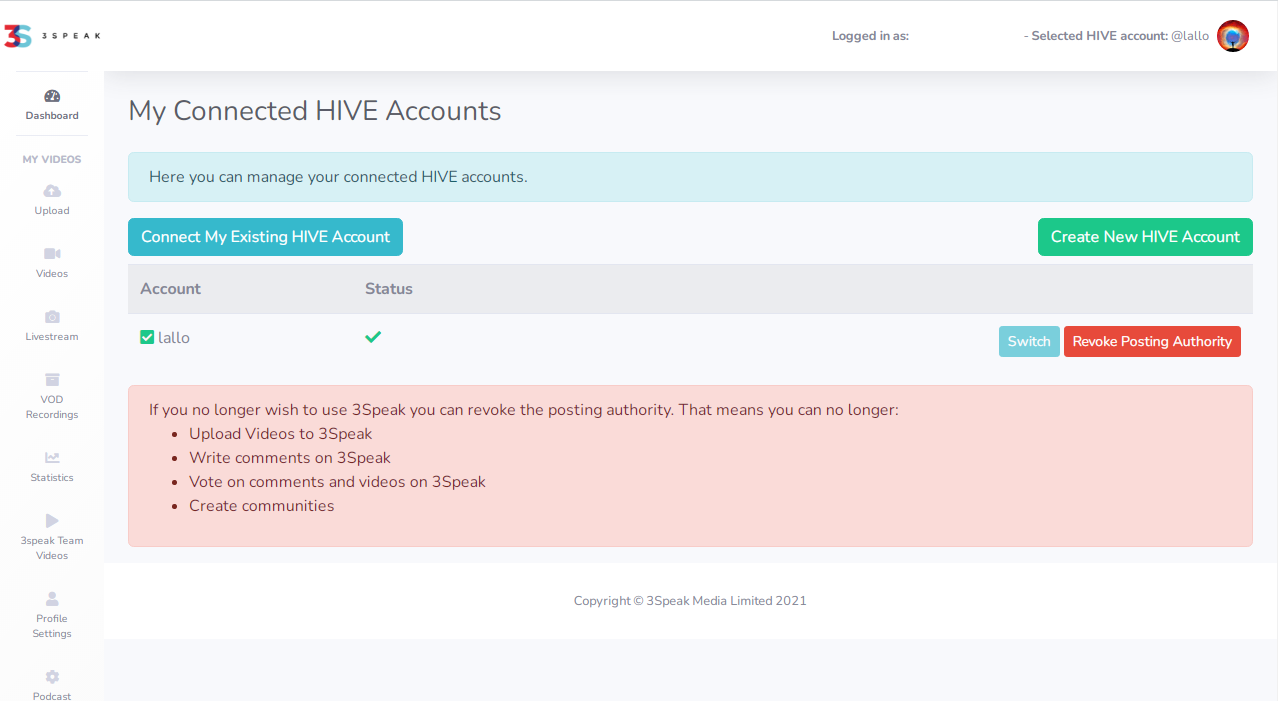
Switch / Add Account. This time you should see your account in the list of those connected to Hive, like in this image.Well, we're done. To check that everything went well, go back to https://3speak.tv and as in point 4) of this guide, click on your profile picture at the top left and then on
Now you can finally start uploading your videos!!
Congratulations on making it this far and not giving up!!
I hope this guide was helpful to you. If by any chance you have not understood something or you have doubts, I suggest you to watch this video created by @eddiespino.
Credits:
English: @lallo with the help of Google
Español: @maridmc
Italian: @lallo
En este post veremos cómo crear una cuenta en la plataforma de intercambio de vídeos 3speak, que está desarrollada en la Blockchain de Hive.
Requisitos básicos
- Tener una cuenta en Hive
- Dirección de correo electrónico personal
Si aún no es usuario de Hive y está interesado en crear una cuenta, puede hacerlo aquí. En este enlace encontrarás varios servicios para abrir una cuenta. Algunos son gratuitos como: HiveOnboard, Ecency, 3speak y requieren un correo electrónico o un número de teléfono para la verificación, mientras que otros como: BlockTrades, BeeAnon, Inji y HiveWallet son de pago pero no requieren datos.
Para más información sobre Hive, dejo aquí el enlace a esta colección de posts muy útil dedicada a los recién llegados.
https://peakd.com/ccc/newbies-guide/general-overview-of-hive-for-newbiew
Cuando creas una cuenta en Hive, recibes un archivo con tus 5 contraseñas.
- Master Password
- Private Owner Key
- Private Active Key
- Private Posting Key
- Private Memo Key
En Hive está PROHIBIDO perder las contraseñas!!!
NADIE puede recuperar sus claves de acceso!!!
Así que cuida tus contraseñas, haz al menos una copia en papel y no las pierdas nunca.
En esta guía necesitará la Private Active Key (Clave Activa Privada)
Bien, dicho esto, podemos empezar.
1) Conéctese a https://3speak.tv
- Haga clic en LOG IN / SIGN UP en la esquina superior izquierda
Se abrirá una página en la que podrás introducir tus credenciales de acceso.
- Haga clic en la parte inferior en No 3Speak account? Signup here.
Se abrirá una página en la que deberá introducir:
- Su correo electrónico personal
- Su nombre de usuario en Hive
- Una contraseña que tiene que inventar y utilizar para conectarse a 3Speak.
2) Inventa y guarda una contraseña para 3Speak
- Rellena los campos con tus credenciales, haz clic en la casilla vacía con I'm not a robot al lado y luego haz clic en Sign up en la parte inferior.
Como puede ver en la imagen, su contraseña debe contener al menos un carácter en minúscula, un carácter en mayúscula, un número, un carácter especial y debe tener al menos 8 caracteres.
Si lo has hecho todo bien, ahora deberías ver esta pantalla, y deberías haber recibido un correo electrónico de 3Speak. (Si no aparece en la bandeja de entrada, consulte la bandeja de correos spam)
3) Confirmar la activación de la cuenta
- Ve a la bandeja de entrada de tu correo electrónico. Encontrará un correo electrónico de 3Speak con el asunto: Confirm your 3Speak Account, si no lo encuentra intente ver si fue a su carpeta de spam.
- Abra el correo electrónico y haga clic en el enlace para confirmar la activación de su cuenta.
Será redirigido a la página de inicio de 3Speak y tendrá acceso a la plataforma.
4) Conecta tu cuenta de Hive a 3Speak
- Haz clic en tu foto de perfil en la esquina superior izquierda.
- Haga clic en Switch / Add Account
Ahora se abrirá la siguiente página donde podrás conectar tu cuenta de Hive con 3Speak. Deberá introducir su Nombre de Usuario y su clave activa privada.
- Haga clic en CONNECT MY EXISTING HIVE ACCOUNT
- Haga clic de nuevo en Connect My Existing HIVE Account
- Introduzca su nombre de usuario de Hive y haga clic en Next
- Introduzca su Private Active Key y haga clic en Next
Si has hecho todo bien, deberías ver tu DashBoard.
Queda por autorizar a 3Speak a publicar en Hive en nuestro nombre.
Necesitamos hacer esto porque, estamos usando un servicio para publicar en la Blockchain. De hecho, por cada vídeo que subamos, 3speak publicará para nosotros un post en Hive con el vídeo. El post será obviamente nuestro, es decir, creado por nuestra cuenta, y como cualquier post en Hive recibirá votos y comentarios.
5) Autorizar a 3Speak a publicar en Hive
Para ello, recomiendo utilizar Peakd, que al igual que Hive.Blog y Ecency es una dApp (Aplicación Descentralizada) que permite navegar e interactuar con Hive: publicar posts, votar, comentar y mucho más.
- Conéctese a https://peakd.com e inicie sesión con sus credenciales de Hive.
- Vaya a su perfil y haga clic primero en ACCOUNT ACTIONS y luego en Keys & Permissions
- Ahora haga clic en AUTHORITIES
En esta página puedes ver las aplicaciones que ya has autorizado.
Puede autorizar a una cuenta para que utilice su Private Posting key o su Private Active key
En este caso, deberá autorizar a la cuenta de threespeak a utilizar su Private POSTING Key
- Haga clic en ADD NEW AUTHORITY
- Haga clic en Role y seleccione Posting
- Escribe threespeak en Recipient account
- Haga clic en CONFIRM
Si has iniciado sesión con HiveSigner, serás redirigido a su página web donde podrás confirmar tu autorización.
Si, por el contrario, has utilizado Hive Keychain (una extensión del navegador que te recomiendo descargar) para iniciar la sesión, se abrirá una pequeña ventana en la que podrás confirmar cómodamente tu autorización haciendo clic en confirmar.
Puede descargar Hive-Keychain desde el sitio web oficial.
publicación cuando recargues esta página.Si has hecho todo bien, deberías ver la cuenta @threespeak entre las cuentas autorizadas con permiso de
Switch / Add Account. Esta vez deberías ver tu cuenta en la lista de las conectadas a Hive, como en esta imagen.Bueno, hemos terminado. Para comprobar que todo ha ido bien, vuelve a https://3speak.tv y, como en el punto 4) de esta guía, haz clic en tu foto de perfil en la parte superior izquierda y luego en
¡¡¡Por fin puedes empezar a subir tus vídeos!!!
¡Enhorabuena por haber llegado hasta aquí y por no rendirse!
Espero que esta guía le haya servido de ayuda. Si no entiendes algo o tienes dudas, te recomiendo que veas este vídeo creado por @eddiespino. (Si quieres la versión en español, miralo a partir del minuto 11)
Créditos:
Inglés: @lallo con ayuda de Google.
Español: @maridmc.
Italiano: @lallo .
In questo post vedremo come creare un account sulla piattaforma di video sharing 3speak sviluppata sulla Blockchain di Hive.
Requisiti fondamentali
- Possedere un Account su Hive
- Email personale
Se ancora non sei un utente di Hive e sei interessato a creare un account, puoi farlo qui. In questo link troverai diversi servizi per poter aprire un account, alcuni sono gratuiti: HiveOnboard, Ecency, 3speak e richiedono una email o un numero di telefono per la verifica, mentre altri come: BlockTrades, BeeAnon, Inji e HiveWallet sono a pagamento ma non richiedono alcun dato.
Per avere maggiori informazioni su Hive, lascio qui il link di questa utilissima collezione di post dedicata ai nuovi arrivati.
https://peakd.com/ccc/newbies-guide/general-overview-of-hive-for-newbiew
Quando crei un account su Hive, ricevi un file contenente le tue 5 password.
- Master Password
- Private Owner Key
- Private Active Key
- Private Posting Key
- Private Memo Key
Su Hive è VIETATO perdersi le proprie password!!!
NESSUNO può recuperare le tue chiavi di accesso!!!
Dunque prenditi cura delle tue password, crea almeno una copia cartacea e non perderle mai.
In questa guida avrai bisogno della Private Active Key
Bene.. detto questo possiamo iniziare.
1) Collegati al sito https://3speak.tv
- Clicca in alto a sinistra su LOG IN / SIGN UP
Si aprirà un pagina dove si possono introdurre le credenziali di accesso.
- Clicca in basso su No 3Speak account? Signup here.
Si aprirà una pagina dove devi introdurre:
- la tua email personale
- il tuo nome utente su Hive
- una password che devi inventare e usare per fare l'accesso a 3Speak
2) Inventa e Salva una password per 3Speak
- Riempi i campi con le tue credenziali, clicca sulla casella vuota con affianco scritto I'm not a robot e infine clicca in basso su Sign up
Come puoi vedere dall'immagine, la password deve contenere almeno un carattere minusco, uno maiuscolo, un numero, un carattere speciale e deve essere lunga almeno 8 caratteri.
Se hai fatto tutto bene, adesso dovresti vedere questa schermata, e dovresti aver ricevuto una email da 3Speak.
3) Conferma l'attivazione dell'account
- Vai sulla tua casella di posta elettronica. Troverai una email da parte di 3Speak con oggetto: Confirm your 3Speak Account, se non la trovi prova a vedere se è finita nella cartella dello spam.
- Apri l'email e clicca sul link per confermare l'attivazione del tuo account.
Verrai reindirizzato sulla pagina iniziale di 3Speak e avrai accesso alla piattaforma.
4) Connettere l'account Hive a 3Speak
- Clicca in alto a sinistra sulla tua immagine di profilo.
- Clicca su Switch / Add Account
Ora si aprirà la seguente pagina dove potrai connettere il tuo account Hive a 3Speak. Dovrai inserire il tuo Nome Utente e la tua Private Active Key
- Clicca su CONNECT MY EXISTING HIVE ACCOUNT
- Clicca di nuovo su Connect My Existing HIVE Account
- Inserisci il tuo nome utente che usi su Hive, e clicca su Next
- Inserisci la tua Private Active Key, e clicca su Next
Se hai fatto tutto bene adesso dovresti visualizzare la tua DashBoard.
Rimane da autorizzare 3Speak a pubblicare su Hive per nostro conto.
Dobbiamo fare questo perchè, stiamo usando un servizio per pubblicare sulla Blockchain. Infatti per ogni video che caricheremo, 3speak pubblicherà per noi un post su Hive contenente il video. Il post sarà ovviamente il nostro, cioè creato dal nostro account, e come ogni post su Hive potrà ricere voti e commenti.
5) Autorizzare 3Speak a pubblicare su Hive
Per fare questo ti consiglio di utilizzare Peakd, che come Hive.Blog e Ecency è una dApp (Applicazione Decentralizzata) che ti permette di navigare e interagire con Hive: pubblicare post, votare, commentare e molto altro.
- Connettiti a https://peakd.com e accedi con le tue credenziali di Hive.
- Vai sul tuo profilo e clicca prima su ACCOUNT ACTIONS e poi su Keys & Permissions
- Clicca adesso su AUTHORITIES
In questa pagina puoi vedere le dapp che hai già autorizzato.
Puoi autorizzare un account ad usare la tua Private Posting key oppure la tua Private Active Key.
In questo caso, dovrai autorizzare l'account threespeak ad usare la tua Private POSTING Key.
- Clicca su ADD NEW AUTHORITY
- Clicca su Role e seleziona Posting
- Scrivi threespeak su Recipient account
- Clicca su CONFIRM
Se hai effuato il login con HiveSigner, verrai reindirizzato sul loro sito web dove potrai confermare l'autorizzazione.
Se invece per fare il login hai utilizzato Hive Keychain (estensione per Browser che ti consiglio di scaricare) allora si aprirà una piccola finestra dove potrai comodamente confermare l'autorizzazione cliccando su conferma.
Puoi scaricare Hive-Keychain dal sito ufficiale.
posting.Se hai fatto tutto bene, ricaricando questa pagina dovresti vedere l'account @threespeak tra gli account autorizzati con autorizzazione di tipo
Switch / Add Account. Questa volta dovresti vedere il tuo account nella lista di quelli connessi ad Hive, come in questa immagine.Bene abbiamo finito. Per controllare che tutto sia andato a buon fine, torna su https://3speak.tv e come nel punto 4) di questa guida, clicca in alto a sinistra sulla tua immagine di profilo e dopo su
Adesso finalmente puoi iniziare a caricare i tuoi video!!
Complimenti per essere arrivato fin qui e non esserti arreso!!
Spero che questa guida ti sia stata d'aiuto. Se per caso non hai capito qualcosa o hai dei dubbi, ti consiglio di vedere questo video creato da @eddiespino.
Crediti:
English: @lallo con l'aiuto di Google
Español: @maridmc
Italiano: @lallo
Vote for Us as Witness!
Join our community!

















Tremendo tutoríal debió llevarte tiempo realizarlo, excelente trabajo @lallo 👏👏👏 y como dice @maridmc será de ayuda para muchos.
Sin duda! Un abrazo mi Emi! Besitos 😘❤️✨
Graciassss miliii!! :) Sip esperamos que serè de ayudo para muchos muchos buenos audores!!
Claro que así será.
Hiciste un gran gran trabajo! Excelente tu iniciativa al crear este tutorial en estos 3 idiomas... Estoy segura que Será de mucha ayuda para los nuevos hivers de ahora en adelante!
Mucho éxito para ti @lallo.
A Big Hug!
!MEV
!LUV
!discovery 45
(1/1) gave you LUV.
@maridmc
Grazie Mille traductora!! :) Trabajaste tu tambien!! Super gracias por tu ayuda!!
Mereces una !PIZZA con !LUV
This post was shared and voted inside the discord by the curators team of discovery-it
Join our community! hive-193212
Discovery-it is also a Witness, vote for us here
Delegate to us for passive income. Check our 80% fee-back Program
Your content has been voted as a part of Encouragement program. Keep up the good work!
Use Ecency daily to boost your growth on platform!
Support Ecency
Vote for new Proposal
Delegate HP and earn more
PIZZA Holders sent $PIZZA tips in this post's comments:
(3/5) @lallo tipped @luvshares (x1)
Join us in Discord!
This is the best guide I have ever seen.
So understandable, though long .
Thanks so much as I have achieved my goal. 😍😍😍😍😍
WoW I'm really happy, that was the purpose of this post. Thank you for your kind words 🤗
👍
But I still have an issue publishing videos in communities on Hive.
But I still have an issue publishing videos in communities on hive. Can you help me?