One of the things I have always liked about simulators is that they can show you the behavior of a system without having to invest in equipment or components, without the risk that these are damaged during testing and without exposure to dangerous energies such as electrical voltages (in our case).
With that for me and I guess for anyone is more than enough to make it useful, but ... ...how attractive is a simulator with interactive graphics, these interactions besides giving a visual appeal to the simulation give you a greater sense of reality in the simulation not to mention that at the same time can yield useful data in the analysis.
For that reason today I want to show you how to activate the animations in the drivers for electronic circuits simulated in Proteus.
Una de las cosas que siempre me han gustado de los simuladores es que pueden mostrarte el comportamiento de un sistema sin necesidad de tener que invertir en equipos o componentes, sin el riesgo de que estos se dañen durante las pruebas y sin la exposición a energías peligrosas como tensiones eléctricas (en nuestro caso).
Con eso para mí y supongo que para cualquiera es más que suficiente para darle utilidad, pero ¡rayos! ...que atractivo es un simulador con gráficos interactivos, estás interacciones además de darle un atractivo visual a la simulación te dan una mayor sensación de realidad en la simulación sin mencionar que al mismo tiempo pueden arrojar datos útiles en los análisis.
Por esa razón hoy quiero enseñarte a activar las animaciones en los conductores para circuitos electrónicos simulados en Proteus.
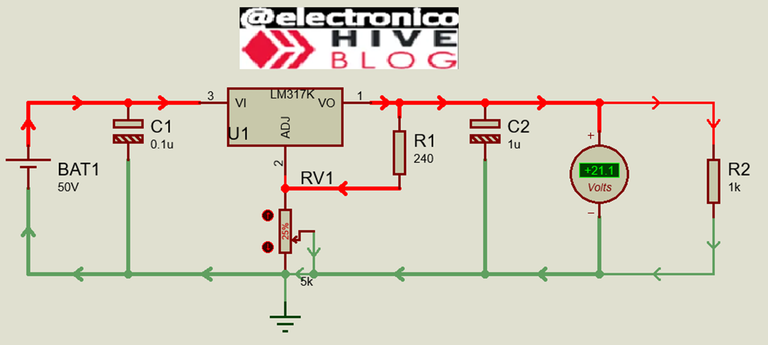
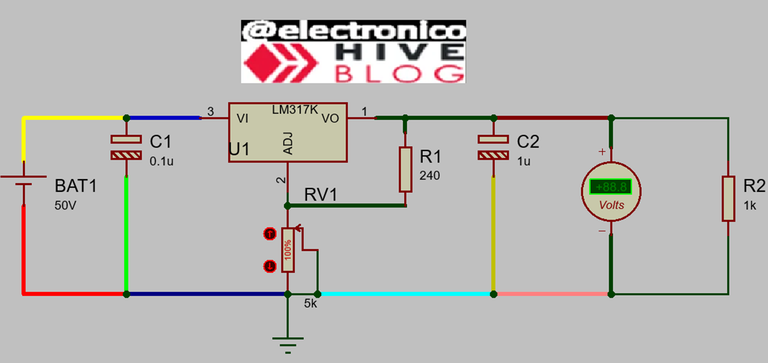
If you have been following the development of this blog, you will have noticed that in spite of using the same program (Proteus) for most of the designs some circuits had different aspect and behavior in the lines that join the components (conductors).
To make it simpler let's look at the image of the circuit designed for the article Control and monitoring: Programming Local control EN/ES
Si has estado siguiendo el desarrollo de este blog, habrás notado que a pesar de usar el mismo programa (Proteus) para la mayoría de los diseños algunos circuitos tenían aspecto y comportamiento diferente en las líneas que unen los componentes (conductores).
Para ponerlo más simple miremos la imagen del circuito diseñado para el artículo Control and monitoring: Programming Local control EN/ES
In addition to the component animations we can see small squares on the component terminals, in some cases they are red, in others blue, in others gray. These are not component animations but logic voltage levels that are very useful when determining when an input/output is active/inactive.
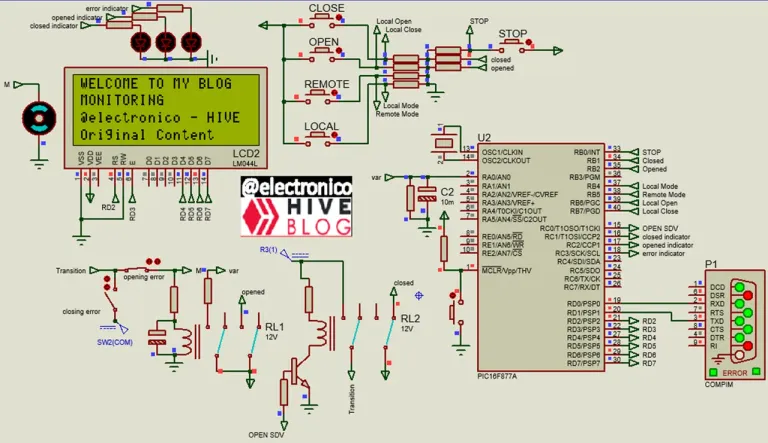
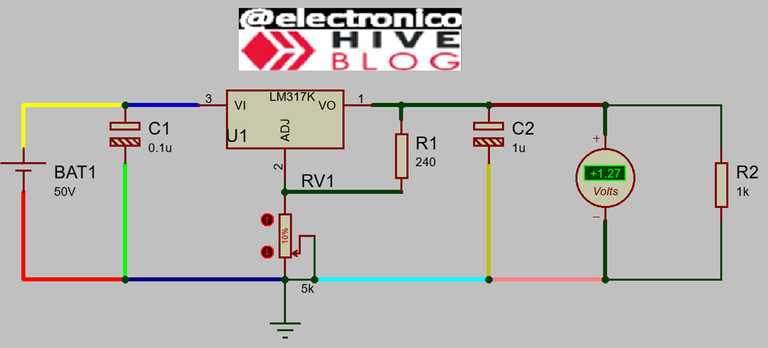
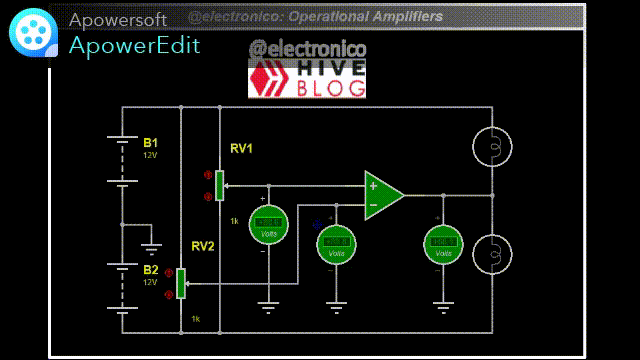
This animation is enabled by default in the program, but if we compare the above image with the image in the article Selector for voltage source EN/ES
Además de las animaciones de los componentes podremos ver unos pequeños cuadros en los terminales de los componentes, en algunos casos son rojos, en otros azules, en otros grises. Estos no son animaciones de componentes pero sí niveles lógicos de voltaje que son muy útiles a la hora de determinar cuando una entrada/salida está activa/inactiva.
Esta animación viene activada por defecto en el programa, pero si comparamos la imagen anterior con la imágen del artículo Selector for voltage source EN/ES
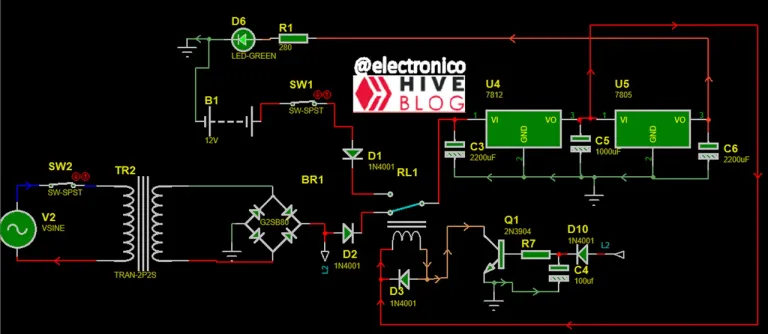
We will notice that an additional animation appears and can be seen in the conductors that in addition to presenting different colors (which are determined by the voltage level in the conductor) have arrows pointing in some direction (representing the direction of the current).
These animations are not enabled by default in Proteus, but don't worry, today we will learn how to enable/disable them.
It is important not to confuse these animations with the custom styles that can be used for the conductors, in the case of the styles allow us to select the thickness of the line, the type of line and color, this is useful when we want to differentiate between different conductors of our circuits and to do so we can right click on the conductor and then select the option “Edit wire Style”.
Vamos a notar que aparece una animación adicional y puede verse en los conductores que además de presentar distintos colores (que se determinan por el nivel de voltaje en el conductor) tienen flechas señalando alguna dirección (que representan la dirección de la corriente).
Estas animaciones no vienen activadas por defecto en Proteus, pero no te preocupes, hoy aprenderemos a activarlas/desactivarlas.
Es importante no confundir estas animaciones con los estilos personalizados que se pueden usar para los conductores, en el caso de los estilos nos permiten seleccionar el grosor de la línea, el tipo de línea y color, esto es útil cuando queremos diferenciar entre diferentes conductores de nuestros circuitos y para hacerlo se puede dar clic derecho sobre el conductor para luego seleccionar la opción "Edit wire Style"
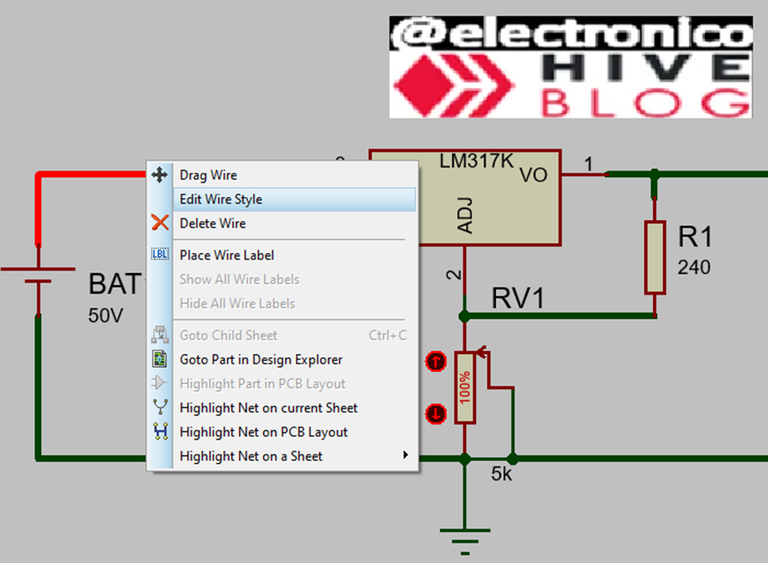
In this option you will find a setting box for the lines in which the default options are marked as “Follow Global”, which means that the style will be the one that comes by default in the program and to modify this aspect you must uncheck the box.
En esta opción encontraremos un cuadro de ajustes para las líneas en la que las opciones por defecto vienen marcadas como "Follow Global", lo que significa que el estilo será el que viene por defecto en el programa y para modificar ese aspecto se debe desmarcar la casilla.
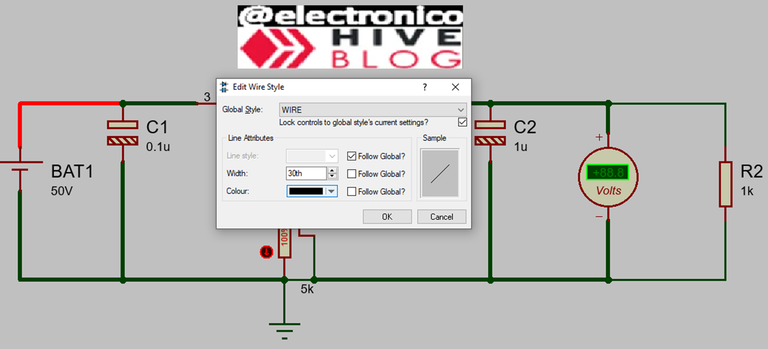
I can change all the lines in color, thickness and type to taste, but this is only a make-up that can be useful to identify or differentiate between one driver and another. There will be no variation in the driver when we activate the simulation.
Puedo cambiar todas las líneas de color, grosor y tipo a gusto, pero esto es solo un maquillaje que puede ser útil para identificar o diferenciar entre un conductor y otro. No habrán variaciones en el conductor cuando activemos la simulación.
Simulated
To activate the animations in the drivers, go to “System>>Set animation options”.
Para activar las animaciones en los conductores se debe ir a "System>>Set animation options"
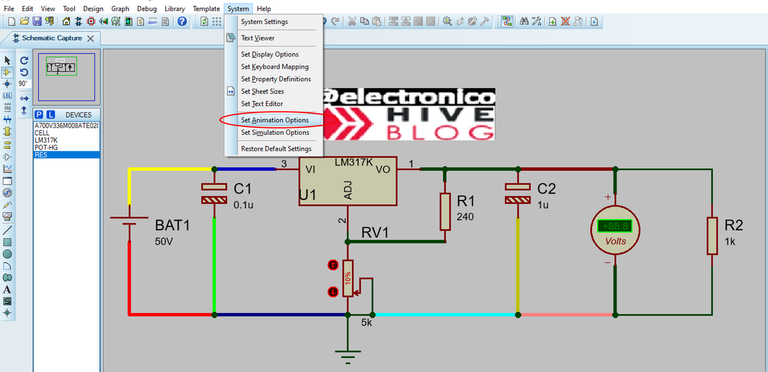
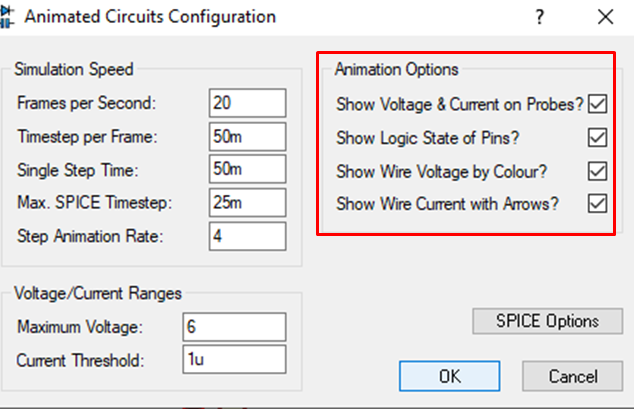
To activate or deactivate the desired animations just check or uncheck the corresponding box.
It is important to note that if we have modified lines with different colors the animation will ignore these colors during the simulation showing the colors corresponding to the voltage levels.
This is not a problem because we generally use these colors to identify conductors in an analysis that can be done with the simulation turned off in which case the conductors keep the custom colors.
Para activar o desactivar las animaciones que queramos solo hay que marcar o desmarcar la casilla correspondiente.
Es importante señalar que si tenemos líneas modificadas con colores distintos la animación va a ignorar estos colores durante la simulación mostrando los colores correspondientes a los niveles de voltaje.
Esto no es un problema porque generalmente usamos estos colores para identificar conductores en un análisis que se puede hacer con la simulación apagada en cuyo caso los conductores mantienen los colores personalizados.
If you want to give an extra boost to the blog with a donation you can send it to the addresses:
Si quieres darle un impulso extra al blog con una donación puedes enviarla a las direcciones:
BEP-20: 0x5Aee5e3e3ED3203e77eF0d8Bb3E3a420E5229Ce0
ERC-20: 0x5Aee5e3e3ED3203e77eF0d8Bb3E3a420E5229Ce0
Arbitrum One: 0x5Aee5e3e3ED3203e77eF0d8Bb3E3a420E5229Ce0
Polygon: 0x5Aee5e3e3ED3203e77eF0d8Bb3E3a420E5229Ce0
Avalanche: 0x5Aee5e3e3ED3203e77eF0d8Bb3E3a420E5229Ce0
Thanks for your contribution to the STEMsocial community. Feel free to join us on discord to get to know the rest of us!
Please consider delegating to the @stemsocial account (85% of the curation rewards are returned).
You may also include @stemsocial as a beneficiary of the rewards of this post to get a stronger support.
Sending Love and Ecency Curation Vote!
 Follow Eceny's curation trail to earn better APR on your own HP. : )
Thank you!!!!