Whether for recreation or survival, knowing how to build a small fire for cooking is a valuable skill. There are many good commercial woodgas stoves available for various prices, but knowing how they work is always a good idea, even if you never build your own.
Basically, a woodgas stove improves on an ordinary open-air fire by getting the most usable heat out of a given amount of wood. The wood is typically only the diameter of small sticks, about the width and length of a pencil. This is easily gathered from the ground and thus requires little if any chopping, and small diameter sticks are usually easy to break into shorter pieces. Wood pellets are very efficient for this purpose, which is why they are often preferred for wood-burning furnaces.

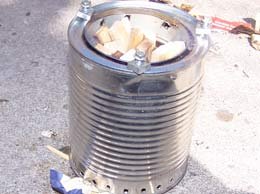
As you can see in the image, woodgas stoves are simply two metal cans, one inside the other, with holes for air flow. The wood is loaded into the inner can, and some substance/material such as lighter fluid or even Vaseline-soaked cotton is placed on top for a quick start. Once the top layer is burnt, there will be no smoke and jets of flame will appear coming from the inner can's top row of holes. The stove is ready for cooking at that point. A stand of some kind is put on top of the stove so the pot of food or liquid will not smother the flames.
There are many videos on how to make these, and I personally recommend the ones in this playlist by Heath Putnam. But the problem is that most of us don't have the exact same sizes of cans as the instructor's, so we need a way to adopt whatever we have available. Several years ago I set out to make some guidelines for this, though by no means do I consider myself an expert, just an experimenter.
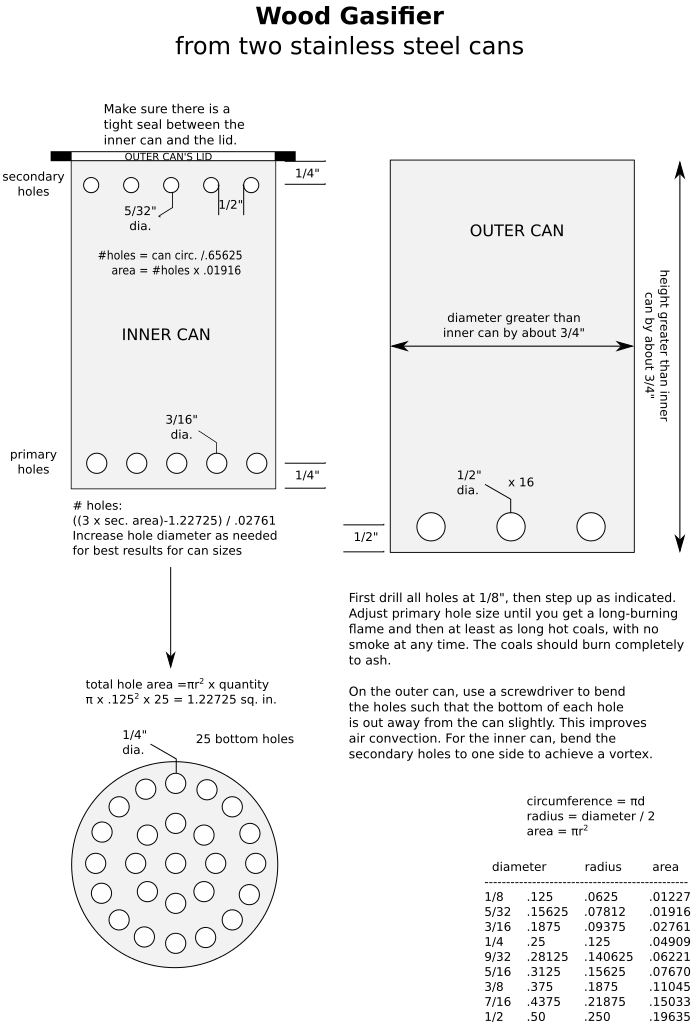
Below is a drawing I made to help reduce the trial-and-error time of designing a woodgas stove made from two stainless steel cans. Without being stainless, the cans quickly rust, but stainless steel of a good thickness will also require drill bits desined for such material. Always use caution in cutting and drilling metal, as the edges will be extremely sharp. You can also see my DIY playlist, which includes some of my own woodgas stove tests, at this link. All measurements/calculations are in inches.

The outer and inner cans should be within the limits specified, so as to optimize efficiency. Too much or too little space between them may choke out the fire and leave unburned or poorly-burned wood, or it will produce smoke.
The outer can is the simplest. It should have a tight-fitting lid from which the inner can will hang, and it only needs 16 holes around the base of the can as shown. Cut a hole in the center of the lid so that the inner can just barely fits into it. All the rest of the work and calculation is for the inner can.
The bottom of the inner can should have holes drilled into it as shown, and this is not likely to need any adjustment regardless of can diameter. Because of this, we know the total area of the holes, so this is already calculated (1.22725 square inches). These bottom holes help with air flow as well as allowing ashes to drop out as the wood burns. Of course, after use and the metal has cooled, the inner can will have to be pulled out so the ashes can be dumped from the outer can.
Next, drill the secondary holes around the top of the inner can. Measure the circumference and then divide that number by .65625 (the area of each 5/32" hole) to get the number of holes to drill. Then calculate the total hole area by multiplying the number of holes by .01916. This will be used to calculate the number of primary holes to drill.
We can now calculate the number of primary holes to drill around the base of the inner can. Multiply the total secondary hole area by 3, subtract 1.22725 (the area of the bottom holes), then divide that result by .02761 (the area of a 3/16" hole). Be sure to also bend the holes as specified in the drawing, to optimize air flow and better focus the flame jets.
After smoothing the sharp edges, fit the two cans together by pushing the inner can through the lid of the outer can. A stand can be made by simply placing screws around the edge of the lid, or other designs as shown in various videos. Now fill the inner can with wood till it is just below the top jet holes, light the wood, and wait till it burns across the top layer and the jets of flame appear. Place the pot of food or liquid on top.
Woodgas stove design means finding an airflow balance between the two cans, and this can be as much art as science. A good balance is when the fire burns for about an hour, and the coals still produce usable heat for perhaps another hour. Of course, there should never be any smoke once the top layer has burned and the flames are seen coming from the secondary holes. A blue flame is ideal and will produce the least soot on the cooking pot, but it can also mean there is too little air flow. I have gotten two good hours of cooking heat from one cup of wood pellets.
I hope this has been helpful to anyone who might be interested in using or making a portable wood stove.

Congratulations! This post has been added to our growing directory of Steemit "how to" posts for the Homesteading/Survival/Foraging/Prepper communities. If you haven't done so already, you can claim your badge along with the code to add to your posts to let the world know you have chosen to help others Survive, Thrive and be Prepared! Click here to get the code