Official Blog: https://altlash.com
YouTube channel: https://www.youtube.com/channel/UCz01y1iZGnSbk7RvTb6Lz6A (These episodes are all on there!)
In the previous blog/video we created a fresh AWS account. Now, lets start to use that account by setting up some security, as well as getting a repository and development environment set up for us to start coding!
When you create a new account, the email/password you used to create the account is your “Root” account. This is a very special account, and something we want to keep secure. The root account has absolute control over every service, setting, configuration, etc. So, if your root account is compromised, then a hacker can completely wreck everything you have on AWS. You cannot reduce the permissions to the root account, and there is limited support that AWS can give if your account is compromised. So, the first order of business is to take steps that will ensure this doesn’t happen.
Go ahead and log into the AWS Console with the root account. This should be the only time you’ll log in as root, as long as you follow the steps outlined below.
From the Console dashboard, search for IAM in the search bar to go to the IAM service. One of the first things you’ll notice is a Security Status section that calls out a number of things we can do to make our account more secure.
The idea with security in AWS is that you have Groups, Users, Roles, and Policies. Policies are configurations that specify access to specific functions and services within AWS. For instance, you can have a policy that allows EC2 instances to communicate with an Oracle database. Or, you can have policies that allow users to read from S3 buckets, but not create or write to those buckets. There are a number of policies that AWS has already created and manages that you can pick from, or you can create your own policies for more defined access. You may also create a policy that contains multiple accesses in a single policy, such as having an admin policy that allow admin actions across a number of services.
Users, as the name suggests, are, well, users. These accounts can be individual, physical users that can sign into AWS to do different things, such as admins. Or, it can be functional users that can be set up to perform different actions. You can attach policies directly to the user, but that is not recommended.
A better approach is to use Groups. Groups are a set of users that are bundled together, and have policies attached to the group as a whole. This is a much better approach to giving permissions to services, because if you need to change permissions you will not have to go to each user, but rather just update the policy attached to the group and have that change be applied to all users in the group.
Roles is another mechanism that can be used to give permission and access to different actions within AWS. A role is more temporary and is used on a when-needed basis. You are also able to attach policies to roles as well. A good use of roles is for communications between services. For instance, an admin can delegate a role to a build pipeline that will give the pipeline access to build and deploy our code to different servers.
So, lets actually do something with that knowledge! First, we will create a couple of groups. From the IAM Dashboard, go to the Groups section from the left hand navigation and select Create New Group button.
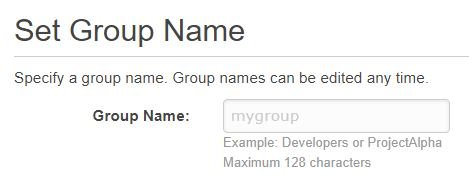
The first group we will create is for Admins. So, for Group Name, input Admin:
The next step is to attach policies for the group. The Admin group will need the following policy: AdministratorAccess
The last step needed for creating a group is to Review your settings. After you are satisfied that everything looks good, hit Create Group!
A good rule-of-thumb when thinking through security is to separate out accounts. We have an admin account, which is good for admin functions. But, we can create a second group that will have only access to Developer functions, such as to read and write to the AWS repository service CodeCommit.
Let’s go ahead and create that second group with the following information:
Group Name: Developers
Policy: AWSCodeCommitFullAccess
Now that we have a couple of groups, let’s create new Users for those groups. The first User we will create will be the admin user. Navigate to the Users section of IAM following the link on the left-hand navigation, and choose “Add User” from the top.
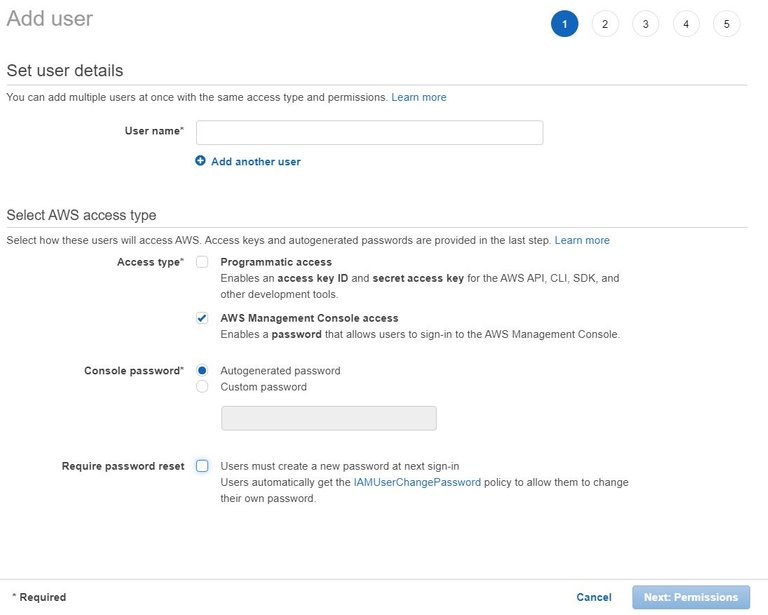
From here, we will need to start with supplying a user name and access type. For User name we will use “admin”, and access type we will go with is “AWS Management Console access”. Select that options will allow further fields to be filled in for the new user’s password. You can either supply a password, or have AWS generate a password for you. Further, you can force the user to reset their password the first time they log into the console if you wish. For us, we’ll have AWS generate a password for us, and not force a password reset after logging in. I’ll keep the password secure myself, and the auto generated password would be much more random than what I would come up with.
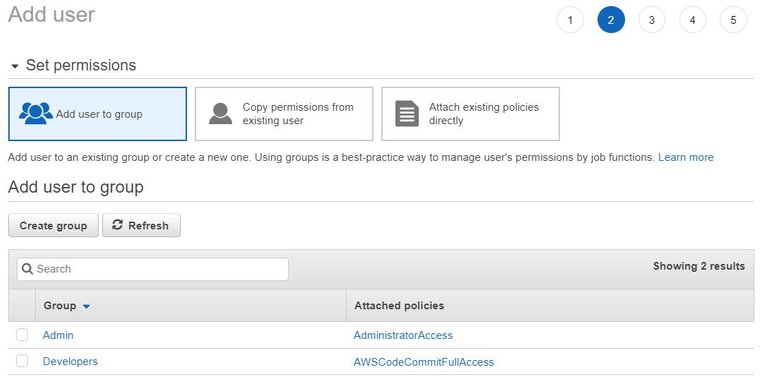
The next section is to add permissions for the user that you are creating. This is where we can select the group we have created for Admins. There are also options to select policies to attach to the user directly, or copy all of the permissions from an existing user.
The next section is Tags, which we could use to define different things in AWS. Pretty much every service allows you to add tags in key/value pairs. Tags are optional, but could be used to find, filter, or generate reports. For instance, you can create a ‘role’ tag, and then search for all users where the role is ‘admin’ to find all of your admin users. We won’t use tags, so you can skip this step.
Finally, there is a review step that will show all of the options you’ve gone with in creating the user. After looking it over, go ahead and create your first user. The next screen that comes up after your user is created is their password. You can also email login instructions to the user if you want, but we don’t need to do that. Go ahead and copy the password over to somewhere secure for when you need to log in as an admin.
Now that we have our first user created, let’s go ahead and create a second user. Follow the same steps as above, but for the User name I use “coder”, and for the Permissions page, use the group “Developers”. After reviewing and creating your second user, go ahead and copy this password over to a secure area as well.
The final thing we need in order to log into AWS with these users is our account id number. When you don’t log into AWS as the root user, you will need the account id number, username, and password. You can get this information by go to the top right corner where you have your name, and selecting “My Account”. This should redirect you to a new page that contains your account id. Go ahead and copy this last bit of data over to a secure location.
Before moving on from the IAM service, there are 2 more recommendations that you are given. The first is to activate MFA on your root account. MFA is Multi Factor Authentication. It is pretty simple to set up, but I don’t show how to do it on screen. You can download an app, such as Google Authenticator, to your smart phone. Then, you can go through the steps in the AWS IAM service page to link your root account to your authenticator app. The authenticator app will display a random set of numbers that will time out and refresh every min. Now, if you need to log in as root again, you will need to use your email/password as before, and also open the authenticator app to put in the random number that shows. This will make it much harder for hackers to compromise our AWS account, even if they have your email and password!!
The second task left that IAM wants us to do is to create a password policy. I also did this off screen, but it is pretty simple to set up. Just select that missing piece from the IAM dashboard, and there should be a button for “Manage Password Policy” that you can follow.
Since this was a much longer video, I’m going to split it up into a couple of blog posts. For this post, you should have all of the IAM steps complete with a couple of new groups and users, as well as a password policy and MFA set up for the root account. In the next blog post we will start to set up our development environment. We’ll create a new SSH key and associate that to our “coder” user. We’ll create a new repository in AWS and clone that into a new IntelliJ project with our SSH keys. Finally, we’ll get an initial framework that IntelliJ generated for us pushed to CodeCommit.
I hope you guys were able to follow along in getting our AWS account more secure with Groups, Users, and Policies. Let me know in the comments below what you think, and if you run into any issues!


Congratulations @altlash! You have completed the following achievement on the Steem blockchain and have been rewarded with new badge(s) :
You can view your badges on your Steem Board and compare to others on the Steem Ranking
If you no longer want to receive notifications, reply to this comment with the word
STOPDo not miss the last post from @steemitboard:
Vote for @Steemitboard as a witness to get one more award and increased upvotes!