이번에는 이더리움 출금 화면을 만들어 봅니다. 하지만 이더리움을 출금하기 위해서는 지갑에 이더(Ether)가 있어야 합니다.
구현하기 전에 Ropsten Testnet Faucet 사이트에 접속합니다. 그리고 이더(Ether) 요청을 하여 받아보겠습니다.
테스트넷 이더 받기
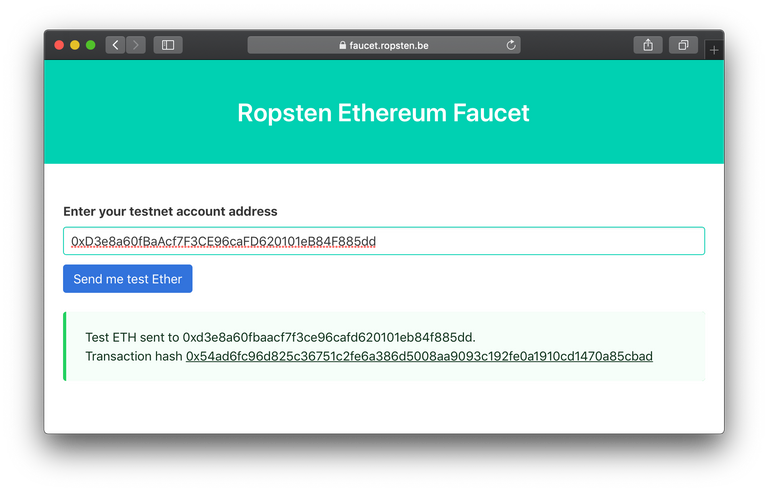
아래 사이트를 이용하면 테스트넷의 이더(Ether)을 받을 수 있습니다. 이더리움 주소를 입력하고 Send me test Ether 버튼을 클릭하면 수십 초 내에 이더(Ether)가 입금됩니다. 참고로, 우리는 Ropsten Testnet 에서 지갑앱을 구현합니다.

또는, 메타마스크에서 제공하는 https://faucet.metamask.io를 이용할 수도 있습니다. faucet.metamask.io를 이용하려면 크롬브라우저에 메타마스크(metamask)가 설치되어 있어야 합니다. 메타마스크 설치를 하려면 여기를 클릭하세요.
이더리움 잔액 조회하기
이제 지갑 목록에 이더리움 잔액을 보여줄 것입니다. components/WalletScreen.js 파일을 수정합니다.
./src/components/WalletScreen.js
import // (...)
import { ethers } from 'ethers'; // 추가된 코드

export default class WalletsScreen extends Component {

  static navigationOptions = { // (…) }
  constructor(props) { // (…) }
    _onWillFocus = payload => { // (…) }
    render() { // (…) }

    componentWillMount() {

    // 1. provider 생성
    let provider = ethers.getDefaultProvider('ropsten');

    const pollingInterval = 20 * 1000; //20초
    this.poller = setInterval(() => {
      const wallets = [...this.state.wallets];

      // 2. 지갑 잔액 조회 시작
      wallets.forEach(wallet => {
        provider.getBalance(wallet.address).then((balance) => {
          // 이더리움 잔액 wei를 ehter로 변환
          const etherString = ethers.utils.formatEther(balance);
          wallet.balance = etherString;
        });
      });

      // 3. 지갑 목록 화면 갱신 및 Storage 업데이트
      this.setState({ wallets }, () => {
        AsyncStorage.setItem('WALLETS', JSON.stringify(wallets));
      });

    }, pollingInterval); // 20초 마다 수행

  } // componentWillMount

}
- WalletsScreen 클래스에
componentWillMount()함수가 추가되었습니다.ethers를 사용하여 Ropsten 테스트넷의 provider를 생성합니다.ethers의 사용 방법은 ether API 문서를 참고합니다.- 지갑 잔액 조회는
setInterval()함수를 사용하여 폴링하도록 구현하였습니다. 그리고 20초마다 폴링하도록pollingInterval에 20000을 입력하였습니다.참고로, Events 방식으로 구현하여 잔액을 표시할 수도 있습니다. 일단은 구현을 간단하게 하기위헤서 폴링으로 구현하였습니다.
- 그리고 잔액 조회가 완료되면, 화면을 갱신하고 Storage을 업데이트 합니다.
앱을 실행해보면, 이더리움 첫번째 지갑에 1.0 ETH가 보입니다.

출금 화면 만들기
아래 이미지는 이번에 만들 출금 화면입니다. 이체 금액, 받는 주소, 가스 수수료를 입력할 수 있습니다.

components/SendScreen.js 파일을 생성합니다. 코드 내용이 너무 많아서 일부만 가져와서 설명합니다. SendScreen.js 파일의 전체 코드 내용은 여기에 업로드 되어 있습니다.
./src/components/SendScreen.js
import // (...)

export default class ReceiveScreen extends Component {

    static navigationOptions = // (...)
    constructor(props) { // (...) }

  // 이더리움 주소 체크 함수
  checkAddress = (address) => {
    if (!/^(0x)?[0-9a-f]{40}$/i.test(address)) {
      return false;
    }
    return true;
  };

    // 다음 버튼을 눌렀을때
  next = () => {
    let ehter = 0;
    try {
      // 이더(Ehter) 단위 금액을 Wei로 변환
      ehter = ethers.utils.parseEther(String(this.state.value || 0));
      if(ehter.lte(0)) { // 0보다 작으면
        return Alert.alert('이체 금액을 확인해주세요.');
      }

      // 가스비(수수료) 계산
      let estimateFee = ethers.utils.parseUnits(this.state.gasPrice, 'gwei').mul(String(this.state.gasLimit));

      // 이체하는데 필요한 총 금액 계산(이체 금액 + 가스비)
      let totalRequiredAmount = ehter.add(estimateFee);

      // 잔액이 이체에 필요한 금액보다 작으면...
      let balance = ethers.utils.parseEther(wallet.balance);
      if(balance.lt(totalRequiredAmount)) {
        let totalRequiredEther = ethers.utils.formatEther(totalRequiredAmount);
        return Alert.alert('잔액이 부족합니다.', `수수료 포함하여 필요한 금액\n${totalRequiredEther} ETH`);
      }
    } catch(e) {
      return Alert.alert('이체 금액을 확인해주세요.');
    }

    // 받는 주소 검증
    try {
      if(!this.checkAddress(this.state.toAddress)) {
        return Alert.alert('받는 주소를 확인해주세요.');
      }
    } catch(e) {
      return Alert.alert('받는 주소를 확인해주세요.');
    }
    Alert.alert('ok');
  }

  render() { // (...) }
}
- 다음 버튼을 누르면
next()함수가 호출 될 것입니다.render()구현부가 위의 코드에는 생략되어 있습니다. 전체 코드를 참고하시기 바랍니다.next()함수에서는 이더리움 주소 유효성 검사와 수수료 계산, 잔액 체크를 하고 있습니다. 모든 유효성 검사가 완료되면 알럿 메세지로 OK가 출력될 것입니다. 그리고 필요한 가스비와 이더리움 주소 유효성 검사는 아래에서 더 설명합니다.
마지막으로 App.js와 components/WalletInfoScreen.js 파일을 수정합니다. 다음은 수정한 부분의 일부 코드만 가져왔습니다.
./src/App.js
const AppStackNavigator = createStackNavigator({
  Wallets: { screen: WalletsScreen }, // 지갑 목록
    CreateWallet: { screen: CreateWalletScreen }, // 지갑 생성
  WalletInfo: { screen: WalletInfoScreen }, // 지갑 정보
  ReceiveScreen: { screen: ReceiveScreen }, // 지갑 입금

  SendScreen: { screen: SendScreen }, // 지금 출금 (추가된 코드)
// (...)
- App 네이게이터에
SendScreen: { screen: SendScreen }가 추가되었습니다.
./components/WalletInfoScreen.js
export default class WalletInfoScreen extends Component {
  render() {
    return (
      <Container style={styles.container}>
        <Header>(...)</Header>
        <Content padder>
          <Card transparent>
            <CardItem>(...)</CardItem>
            <CardItem>(...)</CardItem>
            <CardItem>(...)</CardItem>
            <CardItem>
              <Body style={{ flexDirection: 'row', justifyContent: 'space-around'}}>
                <Button (...)><Text>입금</Text></Button>
                <Button
                  bordered
                  warning
                  style={{flex:1, justifyContent:'center', marginLeft: 10}}
                  onPress={() => this.props.navigation.navigate('SendScreen', wallet)}>
                  <Text>출금</Text>
                </Button>
              </Body>
            </CardItem>
          </Card>
        </Content>
      </Container>
    );
  }
}
- 출금 버튼에
onPress={() => this.props.navigation.navigate('SendScreen', wallet)}를 추가합니다. 이제 출금 버튼을 누르면 SendScreen 화면으로 이동할 것입니다.
여기까지 이더리움 지갑 잔액 조회와 입금 화면을 개발하였습니다.
아래에는 이더리움 주소 유효성 체크 방법과 이더리움 가스비에 대해서 더 설명합니다.
* * *
이더리움 주소 유효성 검사 방법
이더리움 주소는 0x로 시작합니다. 그리고 40바이트의 영문자+숫자로 구성됩니다. 사실 EIP-55 체크섬(checksum)이 포함된 이더리움 주소도 검사해야 합니다. 하지만 이번 구현 코드에서는 포함하지 않았습니다.
이더리움 체크섬 주소의 유효성 검사를 포함한 코드는 아래를 참고하세요.
const Hash = require('eth-lib/lib/hash');

function checkAddressChecksum(address) {

  // #1. 40바이트의 영문자+숫자로 구성되어 있는지 검사합니다.
  if (!/^(0x)?[0-9a-f]{40}$/i.test(address)) {
    return false;
  }

  // #2. EIP-55 체크섬이 포함되어 있지 않은 주소의 경우에는 true를 반환합니다.
  else if (/^(0x|0X)?[0-9a-f]{40}$/.test(address) || /^(0x|0X)?[0-9A-F]{40}$/.test(address)) {
    return true;
  }

  // #3. EIp-55 체크섬이 포함된 주소의 유효성을 검사합니다.
  else {
    // 이더리움 주소를 keccak256 해시하여,
    // 주소와 매칭되는 해시의 16진수가 0x8 이상인 경우에 대문자인지 비교합니다.
    address = address.replace(/^0x/i, '');
        const addressHash = Hash.keccak256(address.toLowerCase()).replace(/^0x/i, '');
    for (let i = 0; i < 40; i++) {
        if (
        (parseInt(addressHash[i], 16) > 7 && address[i].toUpperCase() !==
address[i]) ||
        (parseInt(addressHash[i], 16) <= 7 && address[i].toLowerCase() !==
address[i])
            ){
                return false;
            } // if
    } // for
  }
  return true;
}
- 이더리움 주소를 keccak256 해시하기 위해서, eth-lib 모듈의
keccak256()함수를 사용하였습니다.
이더리움 가스비 알아내기
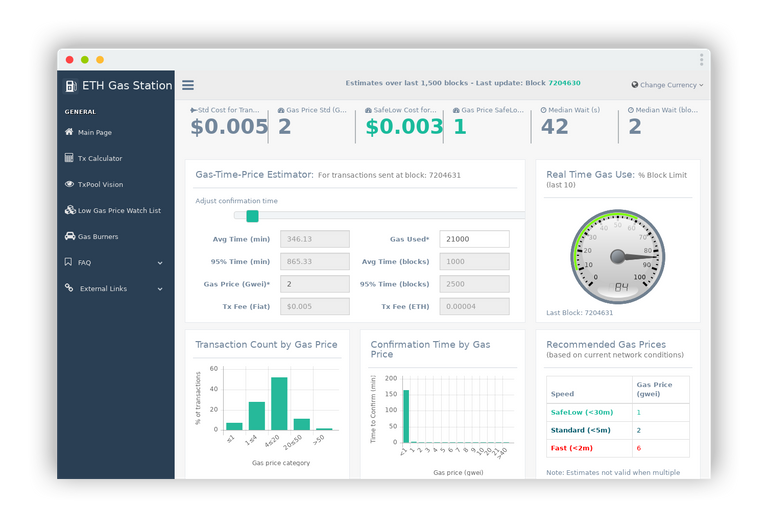
이더리움으로 거래(Transatcion)를 하기 위해서는 수수료(가스비)가 필요합니다. 그리고 가스 스테이션 서비스(https://ethgasstation.info)를 이용하면, 현재 메인넷의 가스비를 알 수 있습니다.

확인해보면, 현재 지출되고 있는 가스비가 1.1 ~ 7 사이 라는 것을 알 수 있습니다.

그리고 다음은 가스비를 조회할 수 있는 API 정보입니다.
- https://github.com/ethgasstation/ethgasstation-api
- https://www.etherchain.org/api/gasPriceOracle
- https://ethgasstation.info/json/ethgasAPI.json
지금 구현한 지갑앱에서는 가스비를 코드상에 값을 하드 코딩하였습니다. 나중에서는 API 서비스에서 조회하여 가스비를 유동적으로 보여줄 필요가 있을 것 같습니다.
추가로 ethers에서 제공하는
provider.getGasPrice()함수를 사용하면, 평균 가스비를 가져올 수 있습니다.
여기까지 구현한 전체 코드는 모두 깃허브에 업로드 되어있습니다.
여기까지 읽어주셔서 감사합니다.
blockchainstudio님의 [security] Misuse of Steemconnect login (shouldn't ask active key for every login)
Hi @anpigon!
Your post was upvoted by @steem-ua, new Steem dApp, using UserAuthority for algorithmic post curation!
Your UA account score is currently 2.916 which ranks you at #11543 across all Steem accounts.
Your rank has not changed in the last three days.
In our last Algorithmic Curation Round, consisting of 208 contributions, your post is ranked at #140.
Evaluation of your UA score:
Feel free to join our @steem-ua Discord server
Apologies in advance for the spam. This is an automated comment to reduce the voting power of @fulltimegeek, a flat earth retard who is flagging reputable users like @themadcurator, @themarkymark and myself because he's a whiny little bitch who is throwing a hissy fit.
Please support these users and follow @themadcurator and @themarkymark.
Thank you for your attention.
짱짱맨 호출에 응답하였습니다.
괜찮네요
감사합니다. 만들다 보니 욕심이 생기네요.
앱이 완성되면 구글 마켓에도 올려볼 생각입니다. ㅋ