Hi!!
In this opportunity I share the step by step elaboration of a piece of pizza disguise that I made for my son of 22 months, for the carnival season and as a homework for the school (paper carnival). It is very simple, and I invested little time in its preparation. However, this may vary according to your creativity and preferences.
Materials:
(The amount of paper I will indicate below is based on my child's measurements)
- Kraft paper or dark beige floor paper (1 sheet of 60 cm wide * 90 cm long)
- White bond paper (40 cm wide * 40 cm long)
- Color art craft paper:beige, yellow, pink and red colors (10 cm wide * 20 cm long)
- Scissor
- Glue stick or cold silicone
- Tape measure
- Rule
- Pencil
- Wick thread
- One hole puncher
Take the measurements:
The following lengths are measured: shoulder-knee, shoulder-waist, head width, shoulder-shoulder, waist and head length. As a reference, I present the measures taken to make my son's disguise.

[Own Elaboration] Elaborate the piece of pizza:
First step: Draw on the kraft paper or dark beige floor paper the measures taken previously, using pencil and ruler, as shown below:
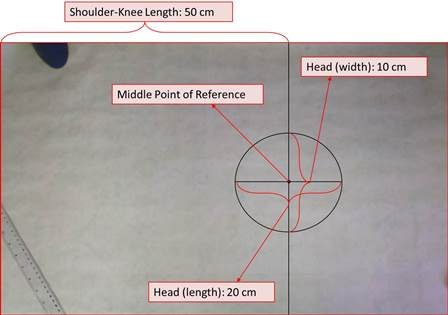
[Own Elaboration] Using the ruler and pencil, measure the shoulder-knee length (in the longest part of the paper) and draw a vertical line above the dark beige floor paper or kraft paper. On the vertical line determine a middle point as a reference, from which the measurements of the head (length and width) are drawn, which will serve as a guide to elaborate a circumference.
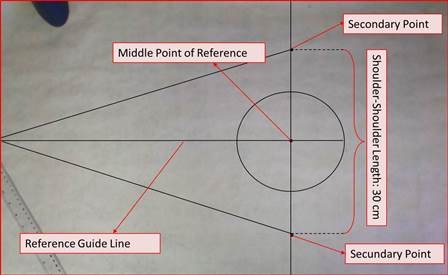
From the circumference and taking the middle point as reference, divide equally the shoulder-shoulder length (width of the pizza), to obtain two new points that we will call secondary. Additionally, from the midpoint of reference, draw a horizontal line to the end of the kraft paper that will represent a reference guide line. By joining the secondary points with the end of the reference guide line, we will obtain a figure in the shape of a triangle (piece of pizza).
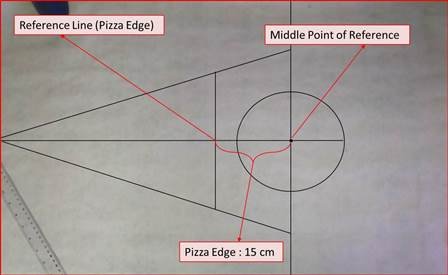
From the mid-point of reference measure approximately 15 cm and draw the vertical line inside the triangle to delimit the edge of the pizza (reference line (pizza edge)).
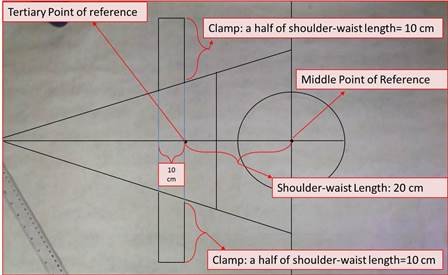
To hold the disguise on the child's body, it is necessary to tie it around his waist. For this, from the midpoint of reference the shoulder-waist length is measured and a tertiary point of reference is established. This point serves as a guide for drawing the 10 cm thick clamps on both sides of the pizza triangle. The length of these clamps corresponds to half the measured shoulder-to-waist length.
Second step: Fill the pizza with your favorite ingredients. For this, use white bond paper (cheese), color art craft papers: pink and red (tomato (with its seeds)), yellow (corn) and beige paper (mushrooms), as indicated below:

Using ruler, white bond paper, pencil and scissor, measure, draw and cut out the triangle of pizza obtained on kraft paper.
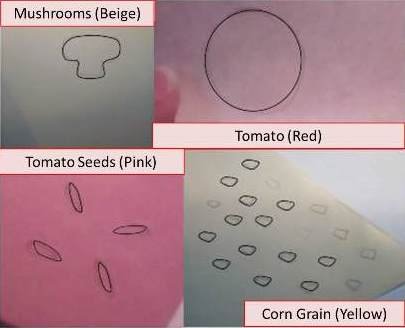
The selected additional ingredients (tomato (with its seeds), mushrooms and corn), are drawn freehand by the back of color art craft paper.

The additional ingredients are trimmed and glued onto the white bond paper in a triangle shape, to complete the pizza filling.

Proceed to cut the piece of pizza drawn on the kraft paper and paste the additional ingredients.

Finally, using an one hole puncher, pierce the ends of the clamps and cut a piece of wick thread to link both clamps around the child's body.
Next, I present the disguise and its protagonist!

Funny note:I tried to take a better picture, but it was a bit difficult since my son is very restless, which is normal for his age!!!
Thanks for reading the post!!! Until a next step by step!!!