Playing AAA gaming titles inside a virtual machine isn't possible? I'll prove you wrong and show you, how you can connect your graphics card to a gaming VM.
This guide uses Linux' KVM (kernel-based virtual machine).
Basic requirements:
- Linux (kernel version > 4.1)
- Two graphics cards (integrated graphics adapter do count)
- For Intel processors: VT-d and VT-x features
- For AMD processors: AMD-V feature
- An UEFI

Graphics cards
As mentioned above you'll need two graphics cards. It's fine to use your on-board / integrated graphics unit for Linux.
Generally speaking it is easier to follow this guide, when you have two cards from different vendors. But two cards from the same vendor is fine too.
Make sure the graphics card for Linux is configured as the primary card in the UEFI. If you can't change the order in your UEFI: put the graphics card for Linux in the first PCIe slot.
Preparing Linux
Before you touch anything: make sure your Linux is booted via UEFI, all virtualization features are enabled in the UEFI, and switch to a root shell.
AppArmor
If your system is using AppArmor; deactivated it. Otherwise you have to define rules in order for hardware access on KVM to work properly. AppArmor is actived under Ubuntu by default.
systemctl disable apparmor
systemctl stop apparmor
Installing qemu
Ubuntu 18.04 and Debian Stretch:
apt-get install qemu-kvm virt-manager ovmf
Ubuntu 16.04:
add-apt-repository ppa:jacob/virtualisation
apt-get update
apt-get install qemu-kvm virt-manager ovmf
Hugepages
Managing page-tables for a VM using 8 or 16 GiB of RAM needs a lot of additional RAM. To cut the overhead we are using hugepages.
First of you'll need to decide how big one hugepage is. For that run
cat /proc/meminfo | grep Huge
and write down the 'Hugepagesize'. It should be 2048 kB or 4096 kB.
Now you take the amount of RAM for the VM in kiB and devide it with the hugepagesize.
Example:
8 GiB of RAM for the VM and a hugepagesize of 2048 kb
8 GiB = 8192 MiB = 8388608 kiB
8388608 / 2048 = 4096

16 GiB of RAM for the VM and a hugepagesize of 2048 kb
16 GiB = 16384 MiB = 16777216 kiB
16777216 / 2048 = 8192
Now you add a little reserve of 100 to 200 pages and you have the number of hugepages you'll need.
Put that number in the file /etc/sysctl.conf like so vm.nr_hugepages=NRHUGEPAGES
vm.nr_hugepages=4300
To manually adjust the number of hugepages on operation simply hit echo NRHUGEPAGES > /proc/sys/vm/nr_hugepages
Enter 0 to use the assigned RAM back in your Linux system.
Autostart libvirt
Make sure libvirt is started automatically on system's boot.
systemctl enable libvirtd
systemctl enable virtlogd.socket
Check your priveleges
Make sure your user is inside the libvirt Group
Restart your computer
Creating the VM
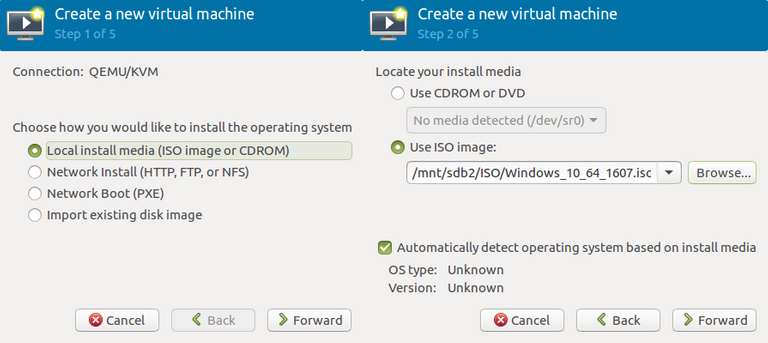
Download a fresh ISO Image of Windows 10 and create the VM using Virt-Manager.


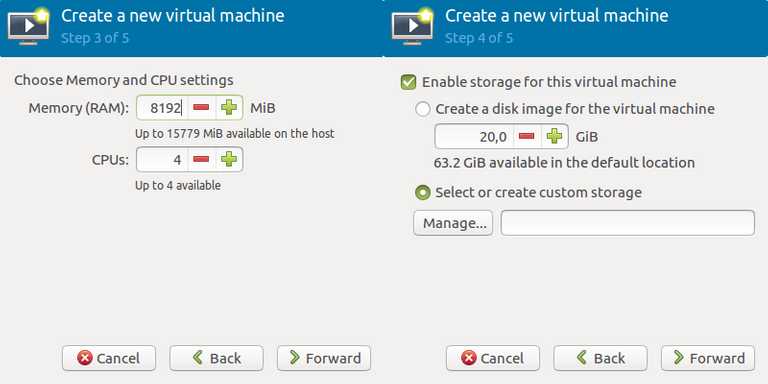
A standard approach for storage is to store the VM inside a qcow2 image-file.
If you want to give the VM a block-device instead, remove the checkbox on step four and add the block-device later as a VirtIO disk.

Remember to give it a memorable name and chose your network card in macvtap mode.

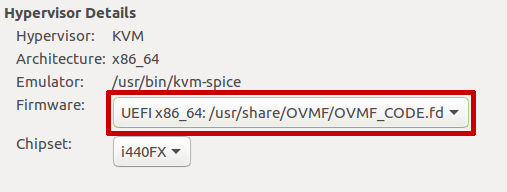
On the next page choose UEFI!

Finish the creation by clicking Begin Installation your VM will start automatically - stop it immediately. If you run into a not enough memory problem - lower the system memory for now.
Exit virt-manager, open up a root shell and enter virsh edit NAME_OF_THE_VM

<memoryBacking>
    <hugepages/>
</memoryBacking>

Search for devices -> emulator and replace the contents with /usr/bin/qemu-system-x86_64

Replace the cpu tag with <cpu mode='host-passthrough'>.
Make sure that the numbers of cores is defined in cores and not it sockets.
Nvidia Graphics for Windows?
The Nvidia driver checks on the installation whether you are running inside a VM. Let's hide the VM.

Search for features -> hyperv and add <vendor_id state='on' value='WHATEVER_AMD_OR_INTEL'/>.
Below hyperv add <kvm><hidden state='on'/></kvm>.
Save and exit your editor. Open up virt-manager again, open your VM, check if the Windows Installation Disk is still inserted. Start the VM and install Windows.
Any drives connected via VirtIO? Download the VirtIO drivers here

Add a second CD-Drive (Virt Manager -> Your VM -> Storage -> CD - SATA) and point it to the VirtIO ISO file.
During the drive selection on Windows Setup choose load additional drivers and choose E:\viostor\w10\amd64
Now you should have a usable Windows inside a window. Shut it down, because now comes the difficult part: Passing through the graphics card.
Do you have two cards from the same vendor? Install the Nvidia drivers on Linux (for Nvidia cards instead of nouveau) or the AMD drivers (for AMD cards) in the system settings (under Settings -> Hardware -> Additional Drivers | for Ubuntu).

The official drivers load way slower than there open source pendants, which is important.
Open up a root shell and list up the installed graphics cards.
lspci | grep VGA
Write down the Bus-ID of the card you want to pass through. (Mine is 01:00)
Now we need the Vendor- and Product ID of the card. Enter
lspci -nn | grep Bus-ID.
e.g.: lspci -nn | grep 01:00.
and write down the Vendor and Product ID of all listed devices (e.g. audio adapter of the graphics adapter).

The red boxes show the Vendor and Product IDs. Mine are 10de:100a and 10de:0e1a.
Open up /etc/modprobe.d/local.conf and add the following line:
options vfio-pci ids=COMMA_SEPARATED_LIST_OF_PRODUCT_IDS
(e. g.) options vfio-pci ids=10de:100a,10de:0e1a
Open up /etc/initramfs-tools/modules and add the following lines:
vfio
vfio_iommu_type1
vfio_pci
vfio_virqfd
vhost-net
After that run update-initramfs -u.
Open up /etc/default/grub and take a look at the GRUB_CMDLINE_LINUX_DEFAULT line.
First off: remove the nomodeset attribute and add values acording to the following list:
Intel Processor
add intel_iommu=on
AMD Processor
add amd_iommu=on
Cards have different vendors, card for Windows is Nvidia
add modprobe.blacklist=nouveau
Cards have different vendors, card for Windows is AMD
add modprobe.blacklist=radeon or
add modprobe.blacklist=amdgpu
You can try to blacklist both with modprobe.blacklist=radeon,amdgpu
Example
GRUB_CMDLINE_LINUX_DEFAULT="modprobe.blacklist=nouveau quiet splash intel_iommu=on"
Now run update-grub and restart your computer.
Your primary graphics card should work fine under Linux. You can check if vfio took control of your secondary card with lspci -nnk -d PRODUCTID. Kernel-Driver in use should be vfio-pci.
Open up your VM in virt-manager and remove the following devices:
- Tablet
- Display Spice
- Sound
- Channel Spice
- Video QXL
Now go to Add Hardware -> PCI Host Devices and add the graphics card + the sound chip on the graphics card to the VM.
Add your mouse and keyboard via USB Host Devices to the VM and hit play.
You can now switch to your second monitor (input) and hopefully see a booting Windows using your graphics card. Install the drivers of the card in Windows and enjoy your personal gaming VM.
Sound
There are several options to get sound from your VM. If your on-board sound card is a PCI or USB device - simply add it.
Another good option is to get a second sound card (USB sound card for example) and use that. A USB headset should work fine. Since you have to pass through the sound-related part of the graphics card - you can use that one too.
Thumbnail
The KVM Logo is licensed unter CC SA 3.0 derived work
The Card is a product shot of a Nvidia GeForce 780ti - copyright holder is the EVGA corp.
The Windows Logo is copyright of the Microsoft Corp.
Nice guide! I still prefer playing windows-only games under wine, i don't have a spare graphics card for vm)
That works okay for older titles. But since it is only an API redirector - having the real Direct X is more valuable to me.
But I see more and more titles being released with native Linux support - which is a great thing.
I also use my VM for editing Videos and creating tax-reports.
Sehr informativer Text!
Ich als Linux Nutzer spiele einfach nur Spiele mit nativer Linux Unterstützung, so unterstütze ich Spiele Entwickler die für Linux entwickeln und spare mir ärger mit VM's. =)
Your post was upvoted by the @archdruid gaming curation team in partnership with @curie to support spreading the rewards to great content. Join the Archdruid Gaming Community at https://discord.gg/nAUkxws. Good Game, Well Played!(edited)