A Tutorial on Setting up a HELIX Master Node for Fun and Profit!
Hello,
Today I am going to outline the process of setting up a Helix Masternode to help you start to earn some passive income, and have fun in the process while getting mildly stressed.
First, if you’ve not heard of this token I recommend checking out their webpage:
https://helix-crypto.com/
What is the Helix token? Well, its a privacy coin that is posed to take off Q1 2021. As of today, it is growing steadily and In my opinion, looking good. With a solid team behind it, I for one see a sound future for it.
It is for this reason and a few other compelling insights into the future of this project I decided to set up 6 master nodes.
Tutorial Update: 6/5/2020
- Changed the way to add the private key
Let’s dive into the process and get started.
Step 1: You need to get some Helix tokens.
To set up a master node you will need to have 10,000 tokens.
I recommend getting 10,001 however as there are a few transaction costs to get things set up.
You can get the tokens from :
- https://crex24.com/exchange/HLIX-BTC
- https://btc-alpha.com/en/coin/HLIX
- https://app.stex.com/en/trade/pair/BTC/HLIX
- https://www.southxchange.com/Market/Book/HLIX/BTC
After you have acquired your tokens on the exchange of your choice, next we have to send the tokens to your desktop wallet.
This will require you to have a desktop wallet.
Step 2: Get your wallet up and running.
I did the windows installer version.Go to https://helix-crypto.com/ > the download section and download a wallet of your choice.
After you download your wallet, open it. You need some time to let the wallet synchronize with the network. This may take about 60 - 30 minutes to get up to speed depending on the speed of your network.
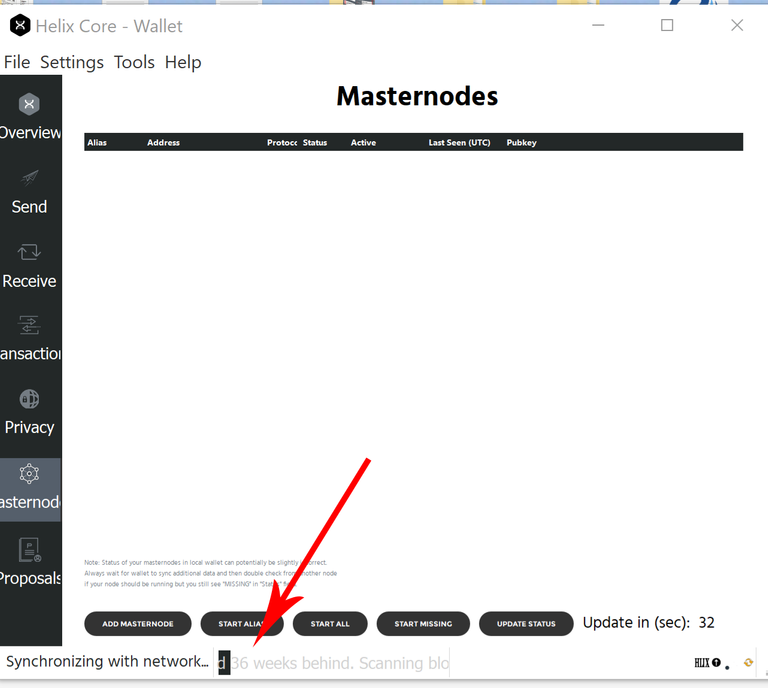
Step 3: Send yourself 10,000 Tokes (EXACTLY!!!)
- Go to your wallet > Receive and make a request for 10,000 (* exactly)
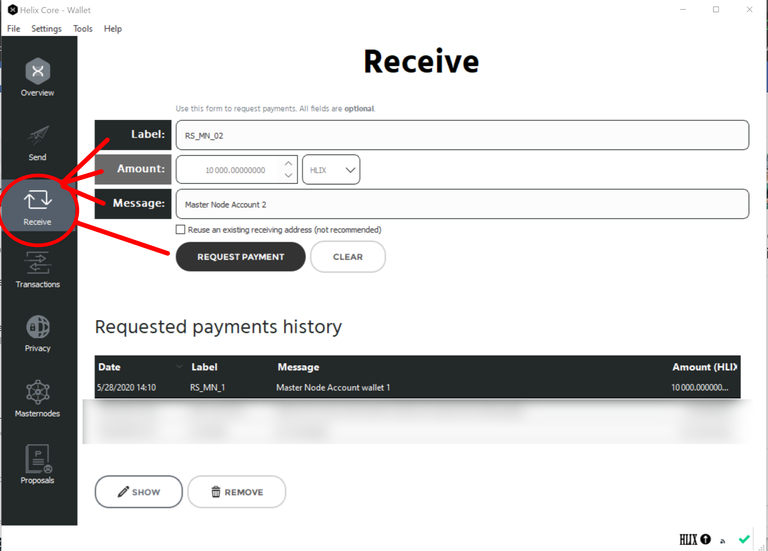
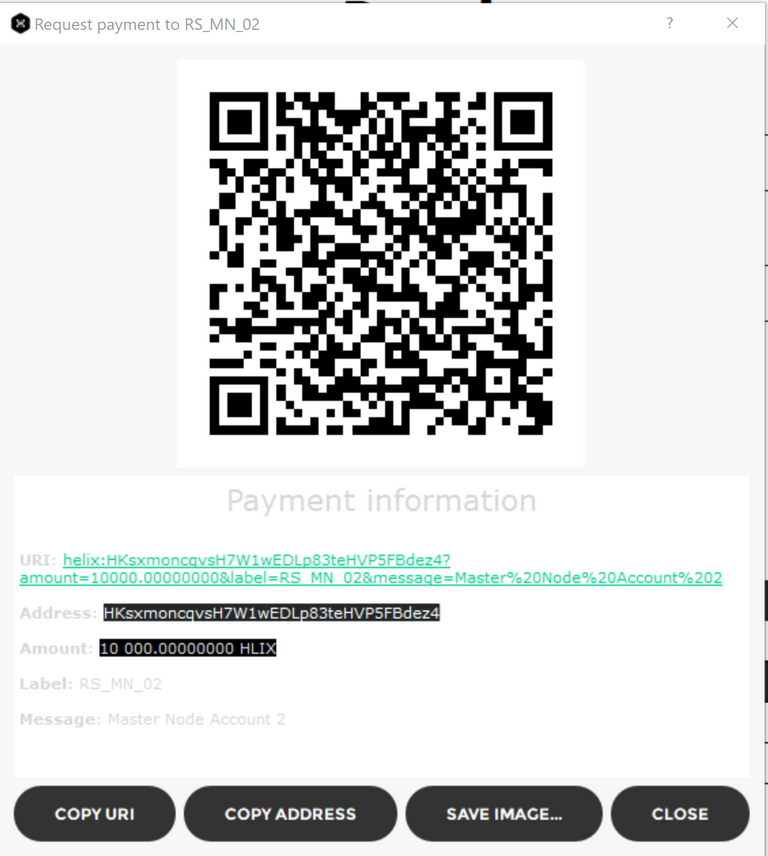
Copy that address receive address
In this image below it is listed as an "Address: HKsx..."
Go to your send and send yourself, to your previously copied address exactly 10,000
The below example is from sending yourself 10,000 coins from your own wallet, if you're doing this from an Exchange things may look different. However, I think the process is generally the same.
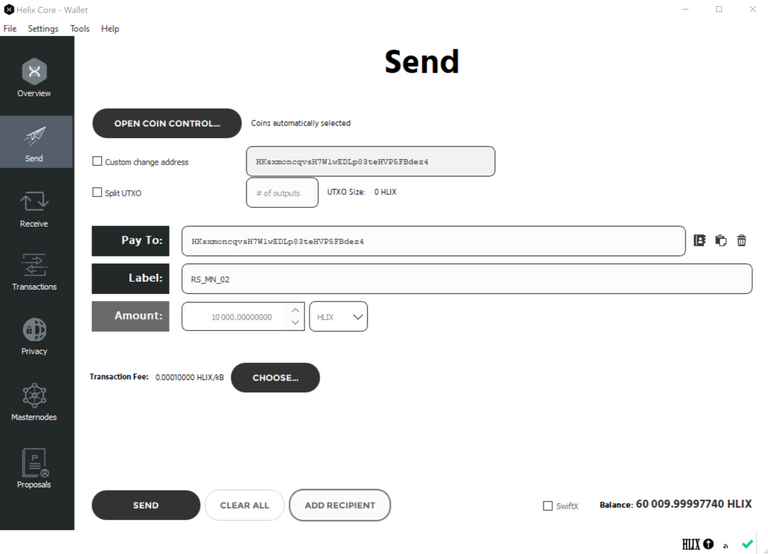
- Click send when it's all good.
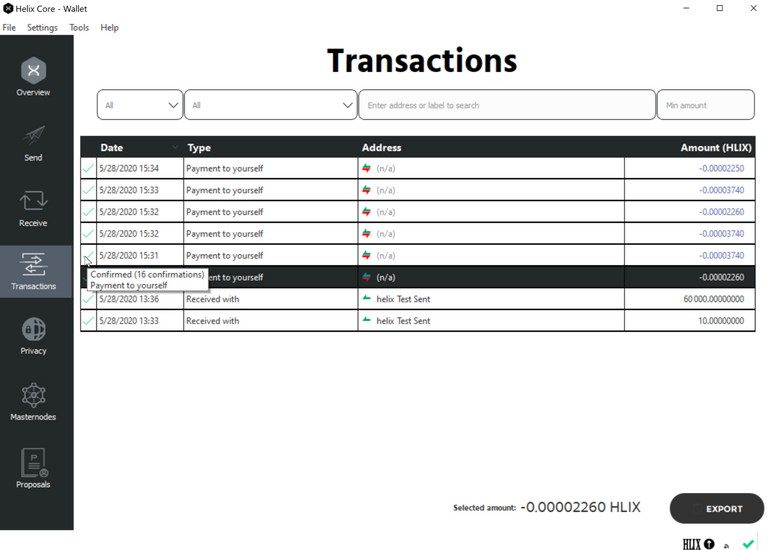
- You’ll need to wait for 15 confirmations (on your desktop wallet) after you send it before you move on to the next step, go to your transactions and use your mouse to hover over the checkmark, you will see how many confirmations happened.
Step 4: Getting your master node set up.
You could set up your own VPS however that's outside my knowledge, will be doing a much simpler way. We will use My Master Nodes. Hosting a master node here is cheap and for as little as .07 a day, a cost you should be able to make back with your master node operating.
Go to https://mymasternodes.host/
- If you don’t have an account you have to make an account.
- Go to deploy and deploy a new HLIX master node

On the screen that pops up you have two pieces of information you'll need to enter, first is your master node name and the second is the transaction were linking to it.
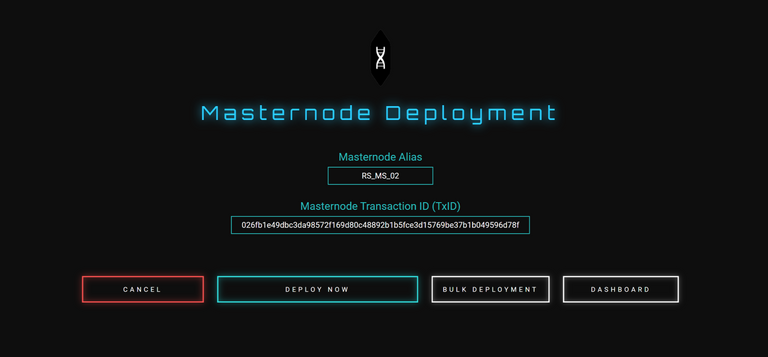
- You will want to name this master note something you remember such as for example “masternode1”, or in the example above "RS_MS_02".
- The previous step you set yourself a transaction for exactly 10,000
- On your desktop wallet go to Transactions > The transaction that you sent you 10,000
- You should see a long transaction ID number like this :
- 85bd0149cce23db1612c8c0742b230aeeeecce270bc5a058b224d631cfdd233
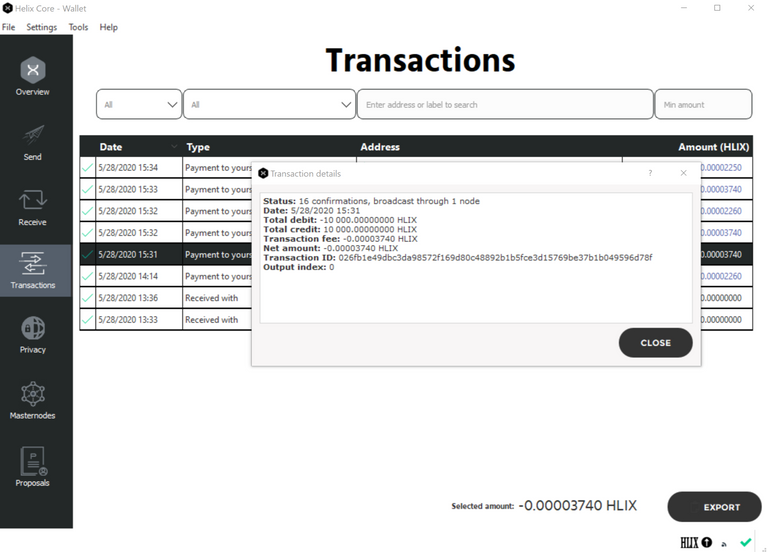
- Copy this number
- Back on MMN, paste this in as the transaction ID underneath the master node name
Note : Furter steps will not work unless you have the 15 confirmations adn 10,000 tokes on that transaction
Step 5: Finalizing deployment
If the confirmations are good and the transaction ID has 10,000 coins in it you’ll be brought to the next screen.
I'll encourage you not to get worried about all his information, you only need to grab a few Data points from it. Were almost done.
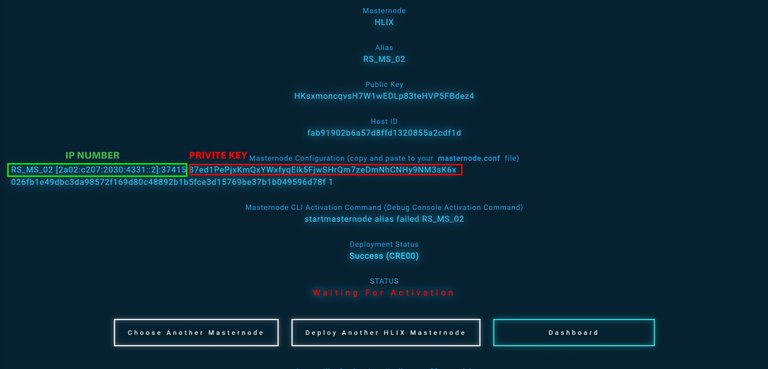
- You want to look for the IP address
- The IP address will look something like
- this : 144.81.78.221:37515
- Or like Ip6 like this : [2a02:c207:2030:4446::7]:37415
- Next to this is your Private Key, both of these numbers you need.
In the above example, the IP this number is listed underneath the master node configuration line. Right after the name of the alias we set up.
- Copy this number down (Ctrl + C )
- Go back on your Desktop HELIX wallet
Here is a handy-dandy illustration showing all the places you click and in what order, on your desktop wallet.
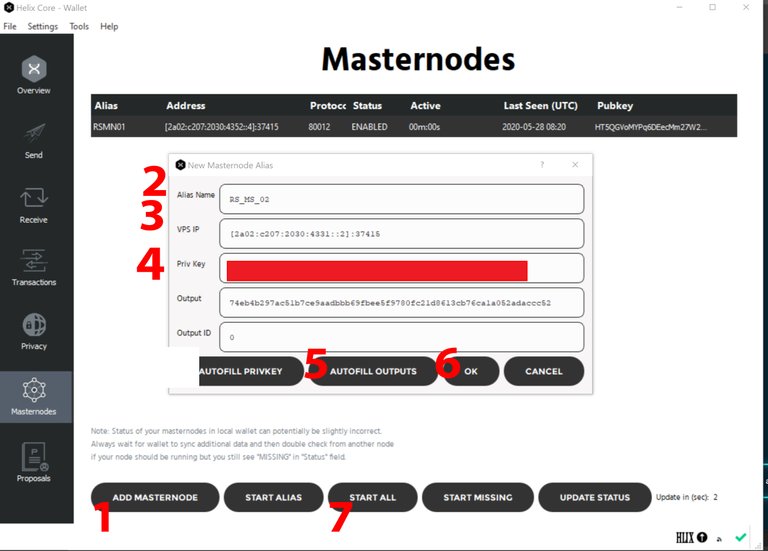
- Go to master notes > And click add “Master node”
- Go add the exact alias name as from though host when you set it up
- The VPS ID is the IP address you copied in the previous step
- Copy your Private key from MMH and post it here
- Click auto-fill output
- Click okay
- Click and say start Alias
- You should see the status turn to enable
Are you done let's check ?
At this point, this should all be Technically working And your master node "should" be online. Congratulations!!!
If you go to your MMH page, and you see the status says missing.
Let's troubleshoot a few things it see if it really is.

For some reason on the dashboard page, Says "missing" quite often.
If you see this click on the name of your master node and you will be brought to another screen.
- If this box is green your good! Relax.
- If it's red, well let's try something else.

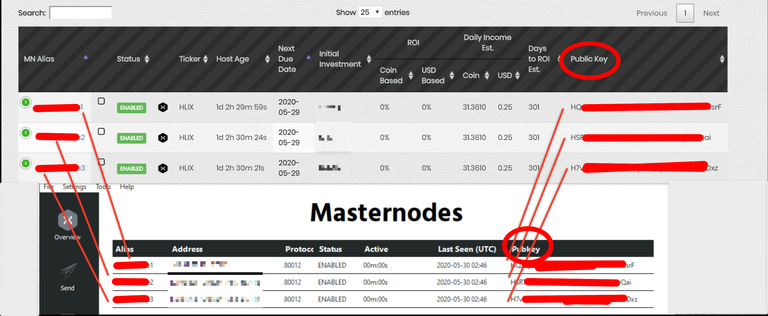
One issue I have encountered was that sometimes the public key on MMH is not the same as the public key in my wallet. Of course, if this key is wrong you will not be enabled or in sync.
You can open your wallet and checked the public key, Check the public key on your MMH site are they the same? if not click edit on MMH and enter the correct public key.
I found this fixed most of the issues I have had.
Summary
I am no expert when it comes to setting up master nodes, however I think this is a fairly painless process and with a little bit of creative finesse, you can make it happen. I have also encountered a few other issues that sorting through however I do have three nodes up and running as of now.
The Daily Earning Estimated to be about: 31.3610 HLIX / $0.26 USD
You also get extra funding if your wallet is online and you have coined staked to the net work, By way of a master node.
The master note hosting is $0.07 a day, So this could be a profitable adventure. The other thing is the value of the coin is steadily rising and I see it on target to hit a $1 by the end of 2021.
Project is sound, the entry point is pretty low and easy to accomplish, so why not dive and make this happen?
If you have any questions post them below.
- Please note however I am not a guru in this.
- I may CAN NOT help with any technical support issues for either project
- All I can do is lend my thoughts.
Lastly, I bear no responsibility for any lost coins or Issues that may arise from the use of this tutorial. The above is just based on my own experience, your experience and success may vary.
Disclaimer
The information presented is for educational purposes only and is not to be considered investment advice. Please do your own research before making any investment decisions. Cryptocurrency investments are volatile and high risk in nature. Don't invest more than what you can afford to lose. I make no representations, warranties, or assurances as to the accuracy, currency or completeness of the content contained in information or any sites linked to or from this document for future material.
Thanks for reading hope you found some of it exciting!!

 |   Instagram : Instagram.com/roamingsparrow/ Smugmug : https://roamingsparrow.smugmug.com/Appcs : @RoamingSparrow |
|---|
Any Support is Welcome!
Bitcoin (BTC) : 18zopjg9Y2VA1ouCqCZapN3UzdpK3UnMdm
Ethereum (ETH) : 0x849C33abCb753540fD0D6cDd25df05BC20a1254E
litecoin (LTC) : LdWUz5haDfkn4D1fxmte8nJePEGjJv6Lqh
Bitcoin Cash (BCH): 1DRRtY3j5xzx6Dn9ofQgoosXdqGVsYYNcU

NEED A LOGO - BUY ONE WITH CRYPTO!


Thank you very much for this valuable information, I will try to do it from my phone!
@reinaldoverdu I have not tried it for my phone so not sure how it works. I would be curious about your feedback and experience from setting this up from your phone!
Thanks Tim for this article. I will try to make it today or in the next couple of days.
Than if it is sucess after my next steem power down again 😁
@gabbynhice I'm excited by it as well. If you need a help setting up to shoot me a message and I'll try to help you out.
With regards to steam power down with the new recent hard fork, power down has been decreased to four weeks as opposed to 13. Perhaps after the next power-down cancel it and start again for a more rapid power-down.
good luck and hope to see you soon!
I am here for this!
I'm glad you found it useful and hope you have your notes up and running successfully 👍
This is a very good easy to follow guide. I will use it when I setup my own Masternodes. I resteemed the post.
@sydesjokes no problem my friend I hope it works for you. I'm excited about the privacy of this coin offers and the direction of the project. I hope to see you join us soon in helping stabilize the network!
I setup my first MN using the guide. Thanks.
Feel free to send any extraHelix to this adress if you wish : HPnubkb9FBtSZKPjRvqD166BX4vPK3GtAz
:D ❤️