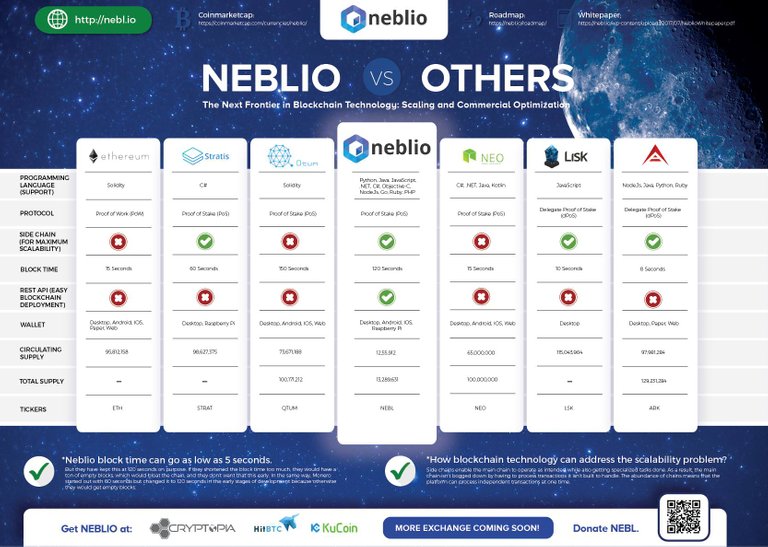
A lot of people talking about Neblio blockchain since this coin entered the Top100 cryptocurrency. I don‘t want to talk so much about it‘s pro and cons but more about it‘s very rare Proof-of-Stake protokol and how to participate with your coins.

PoS and Reward
Proof-of-Stake means that you help to secure the network compareable to miners in PoW blockchains. But unlike PoW you don‘t need all this infrastracture. You only need a wallet and your coins.
In case of Neblio you will get a staking reward of 10 % a year. Check out this calculator. You get your reward every time the chance choosed your wallet with your weight of coins to stake a block. Means: Heavy wallets will stake more blocks than light wallets. But in the end everybody gets ~10 % a year.
If you have just a few coins it can take a while until you stake a block. For example: When you have 1000 coins with the current difficulty you will wait around 10-14 days to get your reward.
To stake a wallet you need to be connected to the network. I personally don‘t want to run my computer 24/7. But the Neblio team came up with a easy to use RaspberryPi staking wallet. In this tutorial I want to show you how to install the Neblio wallet.
1. Run RaspberryPi
Switch on your Pi and connect it to the internet. For this tutorial it doesn't matter if you connect with a graphical interface (HDMI) or via a SSH session from remote terminal. Both will work because we use the non-graphical staking wallet from Neblio.
2. Install Wallet
We install the nebliod wallet (non-graphic-interface). Open a terminal in your RaspberryPi and type:
cd /home/pi
assuming your username is "pi". Next step is download and install. We use this code I have from official Neblio Github. Copy into your terminal:
curl https://raw.githubusercontent.com/NeblioTeam/NEBL-Pi/master/NEBL-Pi-Installer.sh | bash -s -- -d
3. Waiting
Now your Pi is downloading/installing the wallet and then sync the blockchain. This will take around 2 hours (with a Raspberry Pi 3) to finish.
4. Wallet file
If you have an existing encrypted wallet file:
Browse to directory /home/pi/.neblio and check if there is a file named wallet.dat. So send your encrypted wallet.dat file to your Pi and replace it with the file in /home/pi/.neblio
If you don't have an existing wallet file (use the wallet in /home/pi/neblio/wallet.dat):
Encrypt you wallet by:
/home/pi/./nebliod encryptwallet passphrase
Replace "passphrase" with your wanted password. Be careful here and don't use special characters since another user said there might be problems with that.
To show your wallet addresses type:
/home/pi/./nebliod listreceivedbyaddress 1 true
5. Unlock wallet for staking
Type in terminal
/home/pi/./nebliod walletpassphrase password 31000000 true
Repalce password in code with your password. The large number is the time your wallet will be open. In this case ~1 year. True means that wallet open for staking.
6. Is wallet staking?
To check if your wallet is staking type
/home/pi/./nebliod getstakinginfo
7. Autostart
This is optional. If you want to autostart your wallet every time your Pi is restarting, this would be one possible solution:
Make sure your user Pi has a password by
sudo su
Then:
sudo passwd pi
Choose a password. Then type:
exit
Now we autostart the wallet by:
nano /etc/rc.local
And paste 3 lines of code
su pi -c"nohup /home/pi/nebliod >/dev/null 2>&1 &"sleep 600su pi -c "nohup /home/pi/nebliod walletpassphrase password 31000000 true >/dev/null 2>&1 &"
Again replace word password with your wallet password. Close the editor by Ctrl+X and then Y.
Now your wallet will be open for staking every time you connect plug in the pi.
8. Make a transfer
If you want to transfer coins to another address use this command:
/home/pi/./nebliod sendtoaddress target-address amount
If you want to check out the transfer function, why don't you use my account for a donation ;) The address is:
NVG9wcjXKiQShnC2KazXZUu9vDo77ry5dw
Happy staking rewards!
PS: This source helped me a lot
That's a great solution! I'll have to look more into Neblio. Thanks for the information!
I also think so. The energy consumption is just a few bugs a year. !00% silent. The Pi is directly wire connected to the router and I can access it from all over the network via SSH session. Perfect
Congratulations @niloa! You have completed some achievement on Steemit and have been rewarded with new badge(s) :
Click on any badge to view your own Board of Honor on SteemitBoard.
For more information about SteemitBoard, click here
If you no longer want to receive notifications, reply to this comment with the word
STOPHi niloa,
Thank you very much for that detailed description, which is very helpful. I am about to order a Raspberry, and instructions like yours will support my decision.
Your level lowered and you are now a Red Fish!
Do not miss the last post from @steemitboard:
SteemitBoard and the Veterans on Steemit - The First Community Badge.
Congratulations @niloa! You received a personal award!
Click here to view your Board of Honor
Hey,
i am in the process of moving to a raspberry staking node now, thanks for this tutorial.
The only thing i am concerned with is that 'autostart' by putting the walletpassphrase in plaintext on the sd card, this is a huge security risk so it would be nice if we could have a better solution for this, any Ideas anyone?
Cheers
Congratulations @niloa! You received a personal award!
You can view your badges on your Steem Board and compare to others on the Steem Ranking
Vote for @Steemitboard as a witness to get one more award and increased upvotes!