Note: Please read the article carefully before doing it nhé! If you experience any errors, such as link download error, blog load slow, or not access a page on the blog ... then please inform me here. Thanks!
First download and install this software to your computer first, you can go online to search and download the full version, if not find it can leave the email address itself. In this article I will guide on the version of Proshow Producer 6.xx, other versions do the same.
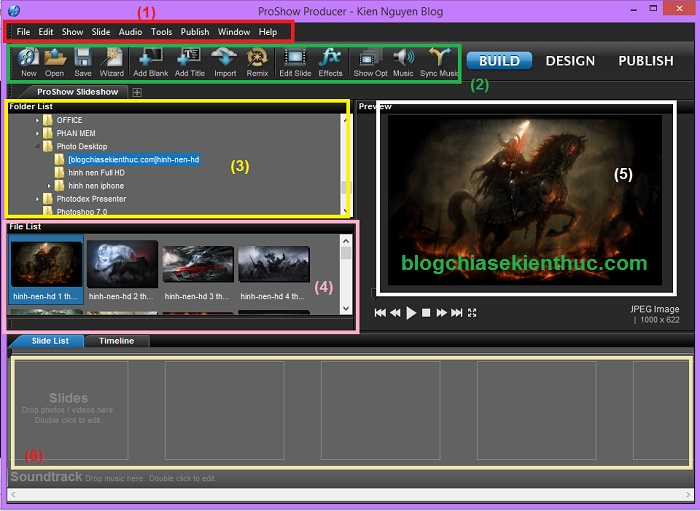
After installation you open this software. Its main interface will look like this, very similar to Proshow Gold right.
Bước 1: Chèn nhạc vào Video Clip
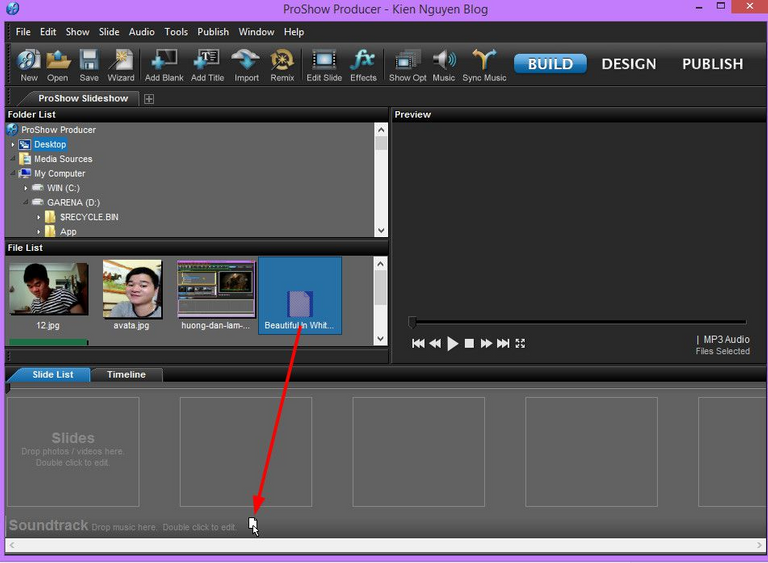
Tại phần Folder List bạn tìm đến thư mục chứa file nhạc và kéo thả nó vào phần Soundtrack như sau:
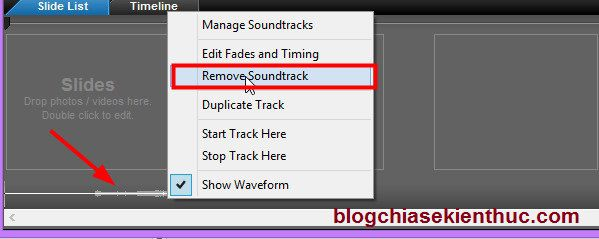
The arrow in the image below is the BackGround of Music, if you do not want to use and delete it, then right click on it and select Remove Soundtrack offline.
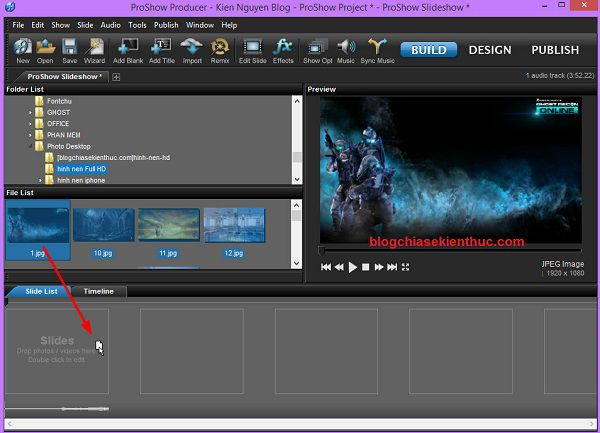
OK! Now we will open the folder containing the image and you do the same as drag the music. You drag and drop the image from the File List area into the Slide.
Step 2: Insert the image into Video Clip
Tips: You can drag one by one or press "Ctrl + A" to select all and drag them at the same time.
In addition, if you want to swap the position of the images for each other can be dragged left, or drag right to change the light.
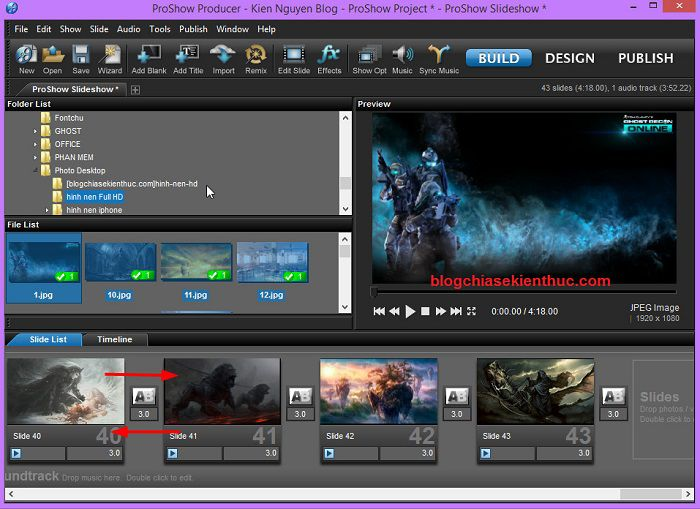
Now we can listen to music and have pictures, but no effect at all. If you want to see if you can click the Play button in the PreView to preview it.
Step 3: Insert effects into the clip
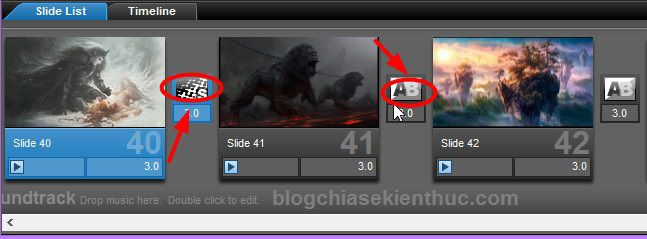
Now we are going to create an effect between two transition slides. Simply click the A / B icon between the two slides and select the effect you like.
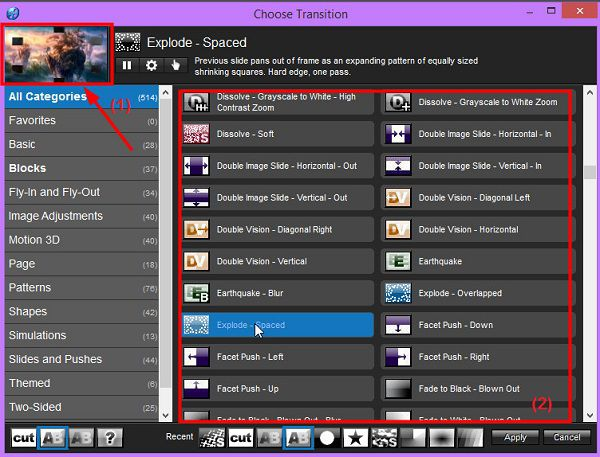
And here is the effect panel, there are many beautiful effects shimmer for you to choose:
- Effects panel listing
- Effect preview mode.
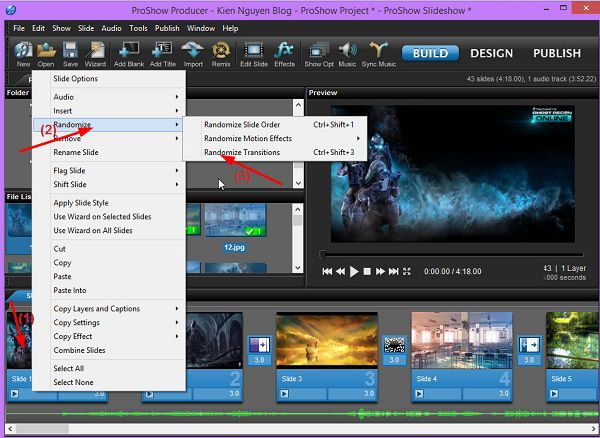
Tips: You can manually make each transition effect or a tip for you to click on any slide and press Ctrl + A to select all slides.
To select random all transition effects, right-click on the slide and select Randommize => Continue Randommize Transition or press Ctrl + Shift + 3.
In the time slice you press Ctrl + A and set the time for any slide and the remaining slide will adjust the rest of the slide like.
You also do the same with transition time, ie the time to run the effect (Transition).
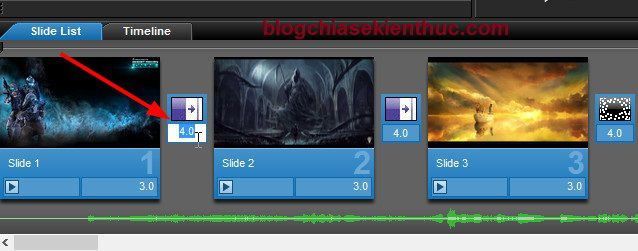
Tips: In order for images and music to fit together, that is, the music runs out of or out of the image, you refer to tips for calculating time between photos and audio as follows:
Display
Let's say your song has a length of 3 minutes 30 seconds or 210 seconds.
While it is time to set the time to run one side of the picture is 5 seconds + effect when the photo transfer is 3 seconds. So the total time to move to the second photo is 8 seconds.
==> 210/8 = 26. So for a 3'30s long song you will need 26 shots, that is to say, the music will run out or the picture is full.
Advanced: Customize audio, create accents
You click on the Timeline, click and drag to Zoom Amplitude, Zome Time.

To create a Timeline on the Soundtrack click on the + sign in the image above, then point at any location on the Soundtrack.
For example, as shown below. The sound at the arrow point has been squeezed, you can use the mouse and drag up and down to customize the sound accordingly.

Step 4: Customize each slide
Read more: How to insert Sub into an existing video or a video made from Proshow Producer
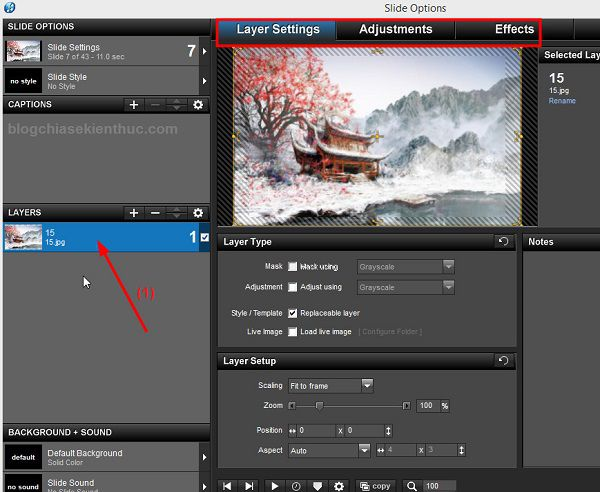
To do this, double click on any slide, which will now appear in a new window and there are many attractive features that allow you to customize your image.
I will skip this part, because it is quite advanced for beginners to get acquainted. Later when you are familiar with the operation then you can learn more about this.
Layout Setting: Layout and edit layer.
Adjustments: Create masks, light effects, shadows ... ..
Create animations, slide shows for pictures.
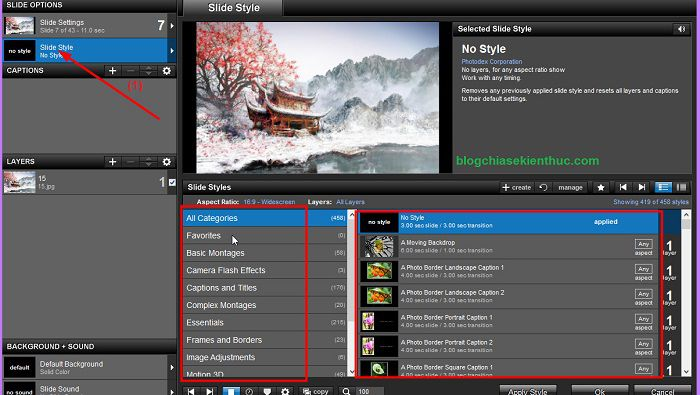
Next we will learn about the Slide Style (this is similar to the Transition section).
In the red frame it is all the effects for the slide that the program has available to us. If you still can not meet the needs of you, you can go to this article to download more than 2000 beautiful effects for Proshow Producer.
However, according to me, the program has provided many beautiful and professional effects then 😀
In the Aspect Tatio section, you can choose from a square (4: 3) or widescreen (16: 9) display. If you upload video to youtube should choose the rate is (16: 9).
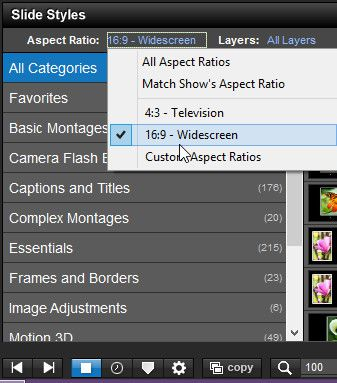
In Layers, click All Layers: Select the number of Layers in a slide. All Categories ie select sort, select effects by theme.
Now try to select a Style for a slide, and you can preview the Style on the Preview window.
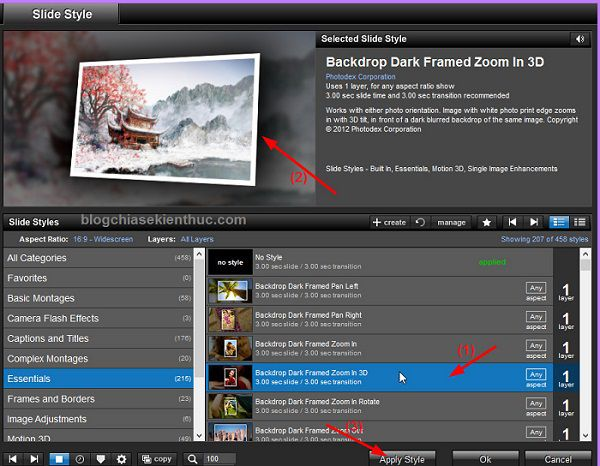
After you have chosen a Style you like click Apply Style to apply that effect to Slide. If a message appears, just click OK.
At this point Layers will appear in many different layers. All these layers combine to create beautiful motion effects for you: D, after that, click ok to complete.
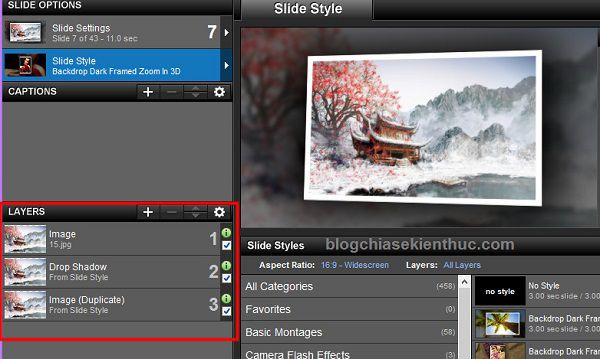
You do the same with the rest of the image offline, the more the picture will take more time to edit the effect.
Step 5: Insert text, sub for video
To insert text into the video, click the Captions option and click the +. Now look at the right side of the Selected Caption Text frame, which is the frame that allows you to type the text. (frame number 2 himself pictured).
Tips: To type Vietnamese accents, you add a VNI font. Or refer back to this article.
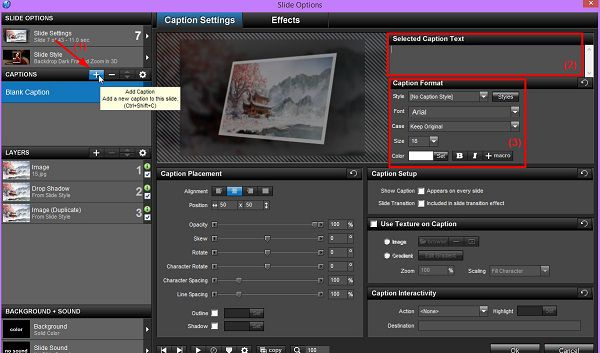
You can select the font, font color, font size in Caption Format. To zoom in, zoom out, or move text you can drag and drop directly in the Preview window.
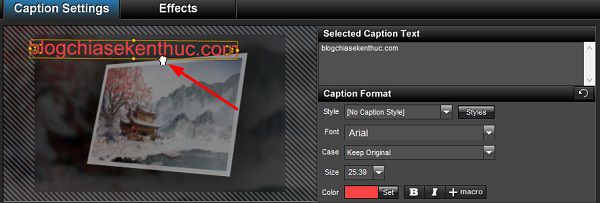
Similar to the above, if you want to add other text click the + sign or delete a line of text, then tick - to adjust your order using the arrow up and down in the Captions frame.
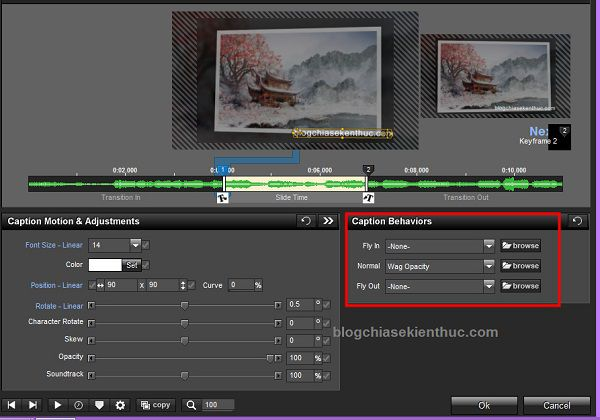
- OK, we will go through the Effects tab. Here we have the following effects (this is the effect for the letter nhé):
Fly in: That is the effect started.
Nornal: Performance demo.
Flyout: End effect.
Click Browse to select the effect that you like.
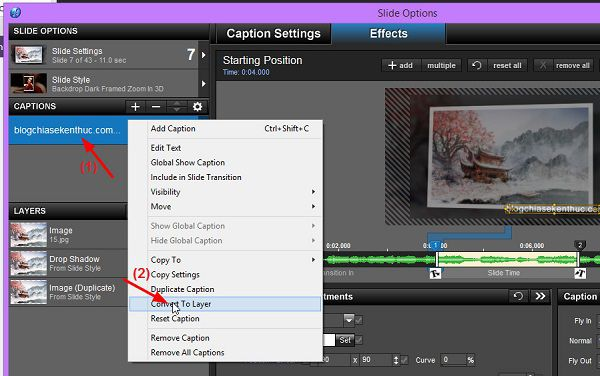
Tips: In Proshow version 6.xx or later, Captions has been added to that feature and can be converted to layer styles. You can apply 3D motion, open caption ... you do the following:
Go back to the Captions section, right-click on the Captions you want to convert and select Convert To Layer
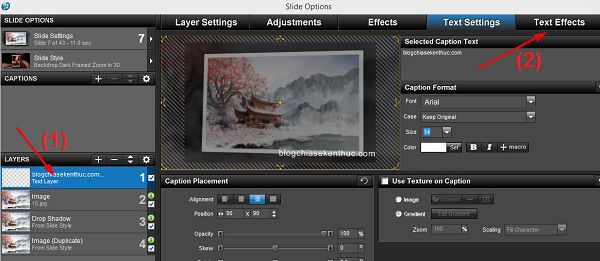
As shown below, Caption has transformed into a layer and it has properties like layers. Next, switch to the Text Effects tab.
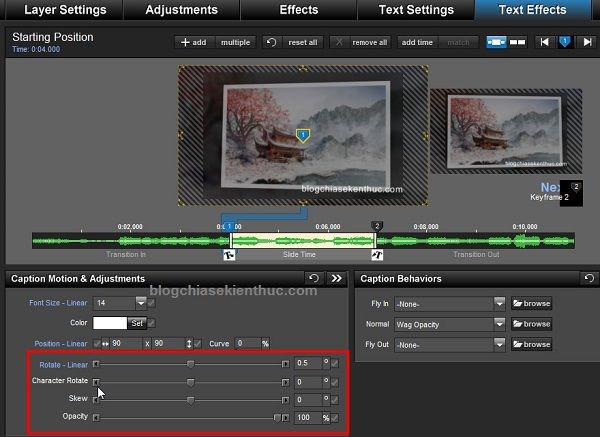
Here you can enjoy the creative effect of your own, in the frame you red circle that you adjust to your liking when you are satisfied then 😀 => then click OK to agree.
Step 6: Export video
The final step is to click on Puclic to export the clip. Here are the options such as printing to disk, up to youtube, upload to facebook ....
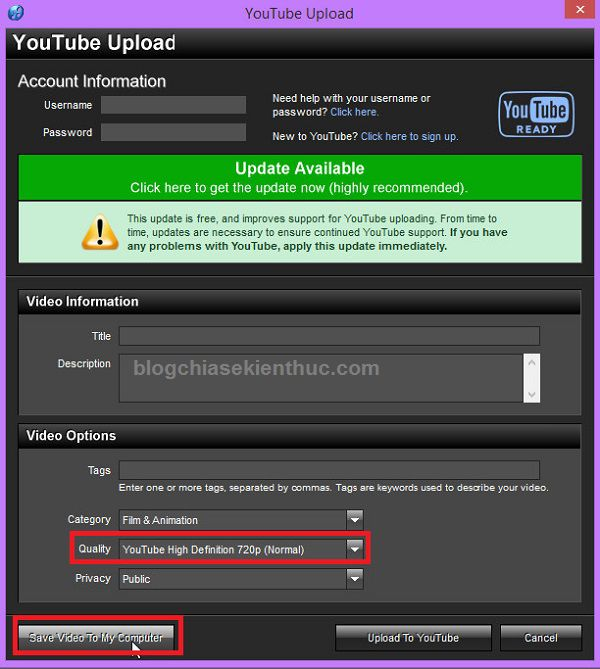
I will save on the computer by clicking on Pulic and click on Youtube.

Next, select the resolution for the video in the Quality box. Select the resolution you want 1080p (Best) or 720p (normal) => finally click Save Video To My Computer to save it.
Done!
Epilogue
Here is a tutorial video how to make a video using Proshow Producer software is very detailed and easy to understand, I guarantee after reading this article you can create your own professional video clips then.
Congratulations @tienthuan96tn! You received a personal award!
You can view your badges on your Steem Board and compare to others on the Steem Ranking
Vote for @Steemitboard as a witness to get one more award and increased upvotes!