Get on the sourdough wagon! Mix up some flour, water, and watch magic happen with homemade sourdough bread. Here's the hows and whys and what you need to make your own beautiful loaf.

Making homemade bread isn't new for a lot of us. It has gone from a novelty to a staple for so many of us. Whether you wanted to control the ingredients, wanted healthier bread, or just wanted to save some money, making yeasted breads at home is on the rise.
With the lockdowns of 2020, many people found it hard to find staples at the grocery store such as bread. Turning to homemade bread seemed to be the answer. If only you could find yeast. That was on the most wanted list for a lot of my friends, as they couldn't find it anywhere. The supply just wasn't keeping up with the demand. They in turn went to homemade sourdough.
What is sourdough?
Wild yeasts exist in the air we breathe every day. Capturing those yeasts will make flour and water rise to create bread. This was the way bread was made every day until the 1800's when Louis Pastuer discovered it in his laboratory in France. By the turn of the century, dry yeast was commercially available and sourdough started taking a backseat to the ease of more quickly rising breads.
A basic sourdough bread recipe will start with flour and water that has been collecting the wild yeasts for a period of time. This is called the sourdough starter. (see how to make yours here). As the yeast is creating the gas in the mixed dough, it imparts a slightly sour flavor, hence the name "sour dough".
Is making sourdough hard?
Not at all. Sourdough may be a bit finicky, but it's still an easy bread to master. This sourdough recipe requires only a few easy to follow steps, and about 12 hours of hands off time for a wonderful loaf of bread.

What kind of flour should I use?
For this recipe, I use what is referred to as "baker's percentages". This is the easiest way to create your own recipes. A baker's percentage is based off the amount of flour used. For that reason, it doesn't matter if you use all purpose flour, fresh milled wheat flour, rye flour, spelt flour, or anything else. I have always gotten consistent results with using baker's percentages.
Here's how baker's percentages will work in a basic recipe. All measurements are by weight, not volume. (Grams instead of cups)
- 500 grams flour
- 75% hydration (the amount of water we use) 325 grams water
- 15% starter 75 grams
- 2% salt 10 grams
If you want to work with more hydration for your loaf that will yield a thinner, more crispy crust, simply adjust the amount of water. A lower hydration will tend to yield a more sour and even vinegary flavor to the finished loaf. Most bakers will work with 70-80% as a "rule".
I recommend that most beginners start with a 75% hydration and work up or down from there. That level tends to make the dough soft and easy to work with, but yields a more mild sour flavor overall.

What equipment do I need to make this bread?
In general, I recommend that you have a few things on hand to get started. However, I will also show you ways around that equipment if you don't want to put a lot of money into this to start with. Here's a basic list for best success:
Kitchen Scale:

This will help you get the best success for your bread making as all measurements will be more accurate. You CAN use just volume, or cups, of flour and water, but you may get different results. Don't be afraid to try and work with the dough and get a "feel" for it if you want. It should be slightly wet, but not so sticky it sticks to your fingers when you pull it. Add more flour or water as needed.
Measuring cups and spoons:
Unless you want to just spoon the flour and water into the bowl, measuring cups and spoons help you get the right amount of ingredients for your bread. Many of us have them already in our kitchens, so let's put them to a new and fun use!
Danish whisk:

This is fun to have on hand to get the flour and water mixed, and getting the dough pulled together. However, you can use a regular wooden spoon, or just get your clean hands in there.
Bench scraper:

This helps you get the dough off the counter when you are doing a rise. However, a plain butter knife or your patient hands will work just as well.
Mixing bowl:
You'll need some kind of bowl to mix your dough in, and to let it rise the first time. I personally prefer my stainless steel bowls, but you can use just about any large mixing bowl you have on hand.
Banneton:

This cloth lined bowl is made of wicker and is awesome for having your bread rise in just before baking. It comes in several sizes as well as shapes. Bannetons are useful for shaping dough and can help leave a pretty pattern as well in the dough before baking. If you don't have one, you can use a cast iron pot or pan, a cake pan, or regular bread pan for rising and baking if you desire.
Lame:
This is a sharp razor blade in a holder that you use to make pretty cuts in your bread. Totally not required in any way, shape, or form, honestly. But, it can make for a more artisan looking loaf. You can also use a sharp knife to do very close to the same thing.
Stainless steel bowl:
This can be the same large mixing bowl if you want. You put it in the oven to heat up as the oven is preheating, and it creates a dome over the bread the first part of baking. This will help keep moisture in, as well as make a more crisp crust. However, the bread will do just as well if you make it in a cast iron dutch oven with a lid. OR, you can not use anything at all and still get a tasty loaf of sourdough bread.
Baking steel or stone:

Both are useful for heating in the oven, and baking your bread directly on. This helps to create a beautiful crispy crust on the bottom. They ARE an investment, but very worth it. They are great for baking the best pizza crusts too. If you don't have one, or don't want to spend the money right away, try these stainless steel pizza pans for similar results. You can also use a regular cookie sheet to bake your bread on and you will get great results.
Baking peel:
Also known as a pizza peel, this is a useful tool for getting your bread on and off the baking steel without burning your fingers. I use it for bread, pizzas, and more. However, a large spatula and some patience can do the same thing in a pinch.
Flour:
You can use whatever flour you like. I personally like a combination of white, whole wheat, spelt, and rye. But a basic white loaf is a great way to transition your family to sourdough if they have never had it before. If you want to get into whole wheat flours, I would suggest buying the grain itself and milling it fresh as you need it. This is the mill I personally use. Grain stores a lot easier and keeps the nutrition longer than already milled flour.
Water:
To keep the yeasts in the sourdough active and alive, I would highly suggest you use filtered water. If you must use tap, leave it out in an open container for 24 hours to allow the chlorine that is in city water supplies to evaporate. I love my berkey filtered water for this, or you can use bottled water from the store if you want.
Salt:
While pink Himalayan is my go to salt for most things, you can use regular table salt. You may find that you need to adjust the amount of salt with different sized grains, so I suggest that you write your recipe down as you make it and keep notes of what levels you like until it turns out perfectly for you.
Your basic steps to sourdough bread making:
Autolysing the flour. This is the first step. You measure the flour and water you are going to need, and mix those together. In my recipe, I used 350 grams of all purpose flour, and 150 grams of whole wheat flour. This was mixed with 350 grams of water.
Then, without adding the starter or salt, you allow the flour and water mixture to rest for 25-30 minutes before going to the next steps. This will give the flour a chance to hydrate and proteins to bond before the dough is handled. This helps the gluten formation, giving you more rise in the loaf. This is where you would use your Danish whisk.

Adding the starter and salt. Add those into the flour and water in the percentages you want. For my percentages, I used 75 grams of starter and 10 grams of salt. Gently mix in the starter and salt until just barely incorporated. You don't need to do more than that, as it will all come together as you pull and allow it to rise in the first stage.

Pull the dough. This is a "no knead" recipe, basically. You aren't kneading the dough like you would a yeasted loaf, but rather, pulling it in each direction, turning it over on itself. You will do this once in each direction, then allow the dough to rest for 30 minutes after.
This process takes 4 times over the course of 2 hours. Your dough will become more soft and pliable as it is pulled and rested. A large mixing bowl will make this much more easier as you have room to pull and move the dough around.


Bench rest. This is the first resting stage, and you can do this in the bowl, or on the counter. You allow the dough to fully rest, and rise undisturbed, and covered with a towel or lid for 3 hours.
After this stage, you will shape it and allow it to rise the final time. If you allow it to rest on the counter, you will want to use your bench scraper to help you get it into the basket.

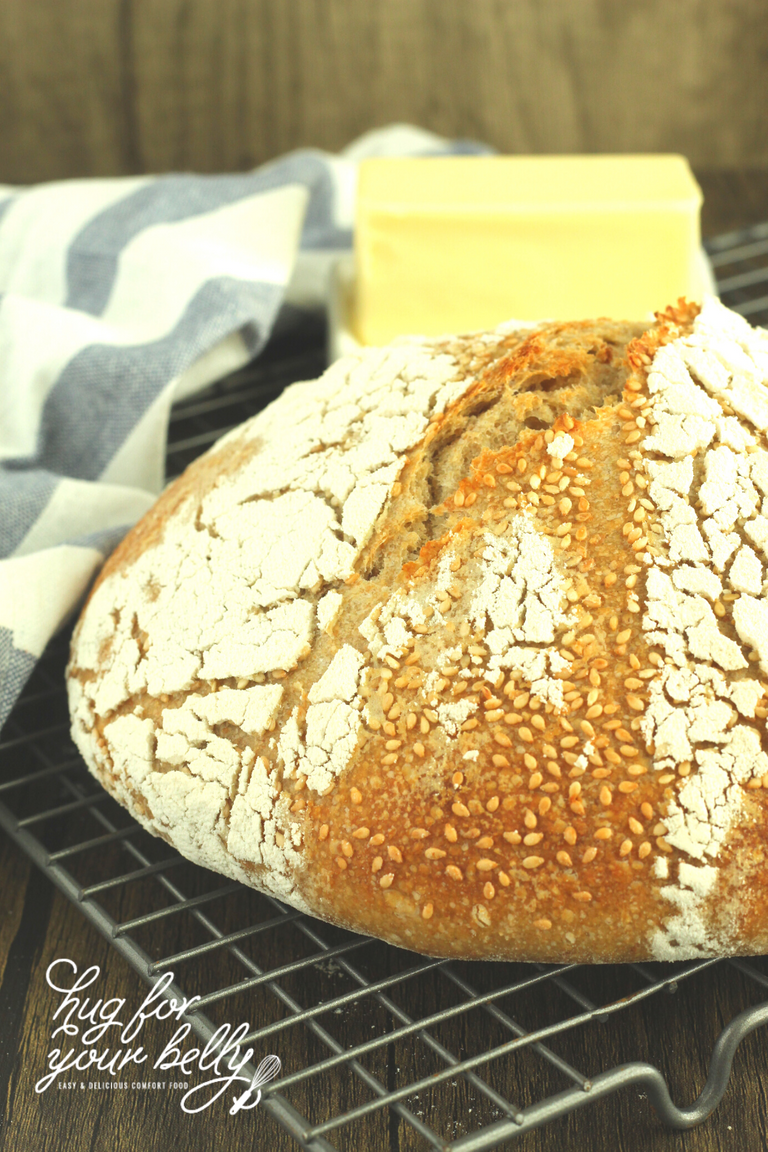
Final rest. This is where you have your sourdough resting and rising in it's final shape. The banetton basket works great at this step. You will shape your loaf and place it in the basket. I also like to "dip" it in some sesame seeds before putting it in the basket for a nice textured crust.
You can put it into your cast iron dutch oven or pan for a final rest. This process can take 3-12 hours on the counter depending on the temperature in your home at the time. You are looking for a nearly doubled in size dough, or to nearly fill the banetton basket.
You can also allow it to do it's final rise in the fridge, covered, overnight and bake your bread in the morning. This can rest in the fridge for up to 3 days if you need it to before baking.

Baking. Your oven, baking steel or stone, and the dome bowl should all be nice and hot. I usually let my oven heat for almost an hour with the steel and bowl inside to get it all hot. When it's hot, you will turn your bread out from the banneton onto the hot steel, and this is where you would use your lame to make any desired cuts into the dough.
You will put your dough on the hot steel with your peel, then cover it with your hot bowl dome to seal in that heat for the oven spring, or final push in that yeast to rise. Adding a few ice cubes to the bottom of the oven after you push the rack into place helps as well. Ice will create steam, which also adds some moisture into the dough and helps with a crispy crust.

Cooling. After baking, remove the bread to a cooling rack. You will want to try and let your bread cool for at least 45 minutes before slicing (if you can!) This will help ensure it's fully baked in the middle as well as keeping the moisture inside the loaf longer. Cutting into a hot loaf of bread can cause "weeping" and lets the moisture all slip out, making for a rock hard loaf within a few hours.

Now that you have all that you need, are you ready to make a great loaf of sourdough bread? Let's get baking!
Other Bread Recipes to Try:
"]Posted from my blog with Exxp : https://www.hugforyourbelly.com/homemade-sourdough-bread-guide-for-beginners/
What amazing bread! Nice recipe with excellent photography. Thanks for sharing with us.