The token swap procedure is simple to execute in just a few steps, and will only take a few minutes. To get started, you will need have MetaMask setup with the wallet that holds your SPRK tokens, and a small amount of ETH. The new tokens will be locked until September 2nd 2019 to allow everyone sufficient time to swap tokens.

Step 1: First calculate the ‘Wei’‘Ether’ field, type in the number of tokens you wish to swap. quantity of the number of tokens you wish to swap. To do this, navigate to https://etherconverter.online. In the
For example, if you wish to swap 100 SPRK tokens, you would type in 100 in the ‘Ether’ field. Copy and paste the ‘Wei’ value that is generated into a document. You will need this quantity in a Step 4.

Step 2: Navigate to the existing contract at https://etherscan.io/address/0x971d048e737619884f2df75e31c7eb6412392328#writeContract
Step 3: Next, click on the ‘Connect to Web 3’ next to the red dot. MetaMask will appear and ask to confirm that you wish to connect your wallet to the contract. Click ‘Connect.’ You will be then be prompted with a notification message, click ‘OK’.
If you are not logged into MetaMask, it will ask you log in, then the red dot will turn green.

Step 4: Now, scroll down to to section 30, ‘increaseApproval’.
In the ‘_spender (address)’ field insert the new contract address: ‘ 0x80a740C8FFa28C8C2c3f1fc8b6c1A0A442212E71’.
In the ‘_addedValue (uint256)’ field insert the Wei quantity of tokens from Step 1. In this example, 100 SPRK tokens, that is 100000000000000000000.
Then click ‘Write’

Step 5: You will now see a transaction window appear in MetaMask. The transaction will be of zero value. Click ‘Confirm’ in the MetaMask window.
In Etherscan, a button will appear called ‘View your transaction.’ Click on this to view the status of your transaction. You will need to wait till your transaction is confirmed, before continuing to the next step.

Step 6: Once your transaction has been confirmed, navigate to the new contract in etherscan by clicking here: https://etherscan.io/address/0x80a740C8FFa28C8C2c3f1fc8b6c1A0A442212E71#writeContract
Step 7: Click on the ‘Connect to Web 3’ next to the red dot, just as you did in step 3, and click the ‘OK’ button again when the notification appears. The red dot will turn green.
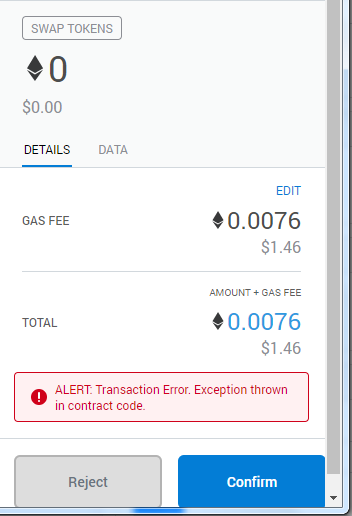
Step 8: Scroll down to section 20 titled ‘swapTokens’ and click the ‘Write’ button. This will bring up another zero value transaction in MetaMask. Click ‘Confirm’ in the MetaMask window, just as you did in step 7.
That’s it! Your tokens have been successfully swapped.
I went to step 8, I need to send a transaction, but failed, I tried many times.

please help me
I have the same problem