I'm working on a Steemit app in Angular and I'd like to take you guys along on my journey! I feel like Steemit doesn't give me enough control over which posts I'd like to see. For example, I'd love to be able to see all posts in my favorite tags, but I can't do that on Steemit.
So I figured I'd just write my own app. With blackjack, and hookers.

While I'm working on that app I try to write a blog post about it on a regular basis, because sharing is caring. Last week I wrote my first tutorial on how to login to Steemit in your Angular app.
Today I'll teach you how to load the latest Steemit posts in your Angular app. Ready?
The goal
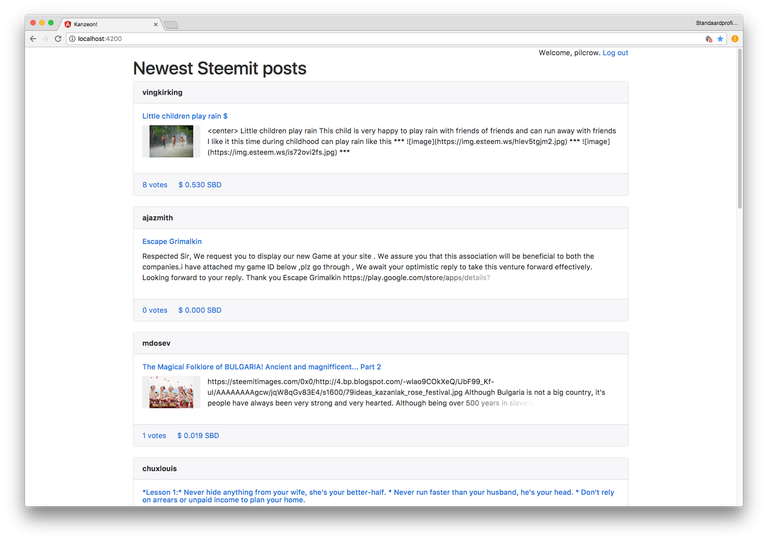
Today's goal is quite simple: load a list of the latest posts on Steemit and show them on the main page of my app.
We'll just cover some basics: a list of posts with the name of the author, the title and a little excerpt of the post, and finally the upvotes and pending rewards.
Showing more detailed information and interacting with the post (upvoting, resteeming) will be part of another tutorial, I wouldn't want to tire you out by cramming way too much in every post. Baby steps!
The tools
To build this app I used Angular 4 and steemconnect to login to Steemit (see part 1). For this post I'll be adding Steem.js to load some posts and Bootstrap 4 to give it a nice look and feel.
To use Steem.js and Bootstrap we need to install it from npm:
npm install --save steem [email protected]
Using steem.js
Steem.js is a nice little JavaScript library that interacts with Steemit. Unfortunately, it's documentation is quite lacking at the moment so I had to figure out some stuff by myself. Hopefully the maintainers will improve this in the future.
Essentially all it does is wrap calls to the Steemit API in JavaScript functions. For example, getting all the latest posts is described in the API as get_discussions_by_created, so Steem.js offers a getDiscussionsByCreated() method to do so.
With that explained, let's dive into the code!

Posts service
The first thing we need is a service to communicate with Steem.js. Let's keep it simple for now, just one getPosts() method that fetches the 10 latest posts.
posts.service.ts
import * as Steem from 'steem';
import {Injectable} from '@angular/core';

@Injectable()
export class PostsService {

    constructor() {
    }

    getPosts() {
        const query = {
            limit: 10
        };

         return Steem.api
            .getDiscussionsByCreated(query)
            .then((result) => result.map(this.transformPost));
    }

    private transformPost(post) {
        post.meta = JSON.parse(post.json_metadata);

        return post;
    }
}
On the first line we import the Steem.js API, and in getPosts() we call Steem.api.getDiscussionsByCreated() on it. It expects an object with information about the requested posts. Documentation about this query object is scarce, but we don't need more for today's example anyway. For now we just want the 10 latest posts, so we pass along the setting limit: 10.
The Steem.js documentation gives examples for each method by using a callback, as such:
steem.api.getDiscussionsByCreated(query, function(err, result) {
  console.log(err, result);
});
But we don't want no stinking callbacks, we need promises! Thankfully that's very easy; we just don't pass the callback function but return the result of the call instead.
The post objects contain loads of information about the author, the content, the votes and the rewards, but some meta information like the tags, images and links in the post are hidden in JSON format in the json_metadata property.
We need that information as an object, so before returning each post let's first add the meta property on it with the metadata parsed as an object. We do that by mapping the returned votes through the transformPost() method.
Post components
Now that we have a service, we can create some components to display the posts. To show a list of posts we're going to create an <app-posts> component that loops through the posts it receives from the service. Each post will be rendered in a <app-post> component. Here's how:
posts.component.ts
import {Component, OnInit} from '@angular/core';
import {PostsService} from '../posts.service';

@Component({
    selector: 'app-posts',
    templateUrl: './posts.component.html',
    styleUrls: ['./posts.component.css']
})
export class PostsComponent implements OnInit {
    posts = [];

    constructor(private postsService: PostsService) {
    }

    ngOnInit() {
        this.postsService.getPosts().then((result) => {
            this.posts = result;
        });
    }
}
When the posts component is initialized it fetches the posts from the service and stores them on a public property, so the HTML can loop through them. Simple, right? The HTML is even simpler:
posts.component.html
<app-post *ngFor="let post of posts" [post]="post"></app-post>
Easy! Now each post is displayed as a <app-post>, which looks as following:
post.component.ts
import {Component, Input} from '@angular/core';

@Component({
    selector: 'app-post',
    templateUrl: './post.component.html',
    styleUrls: ['./post.component.css']
})
export class PostComponent {
    @Input() post;

    constructor() {
    }
}
Nothing to see here, move along! We only need this so we can show the template, though in the future of course we'll add some code here for things like upvoting.
post.component.html
<article class="card">
    <header class="card-header">
        <strong class="post__author">
            {{post.author}}
        </strong>
    </header>

    <section class="card-block">
        <h6 class="card-title">
            <a href="{{post.url}}">{{post.title}}</a>
        </h6>

        <div class="post__img-wrapper pull-left" *ngIf="post.meta.image">
            < img src="{{post.meta.image[0]}}" alt="" class="post__img">
        </div>

        <p class="post__intro fade-out">
            {{post.body}}
        </p>
    </section>

    <footer class="card-footer">
        <a href="#" class="card-link">
            {{post.net_votes}} votes
        </a>

        <a href="#" class="card-link">
            $ {{post.pending_payout_value}}
        </a>
    </footer>
</article>
Note: I added a space between < img in the HTML because Steemit wouldn't allow me to post it otherwise. Remove that space in your template.
As already mentioned before, we just show some basic information in the post. The url to the post actually doesn't even work, the content still contains unparsed HTML and there's no way to upvote or reblog this. But hey, our main mission was completed: we show a list of the latest Steemit posts!

The finished product after following this tutorial. It's not much yet, but we're in no rush. One thing at a time 😀
All done!
And there we are, one step closer to being the world's best Steemit app.
Just like last time I uploaded a snapshot of our current progress at http://kanzeon.litso.com/. Of course that page will change over time as I implement (and blog about) new features, but I can guarantee there will always be a page that shows post on there.
By the way, I didn't add the CSS in this article because the focus of this post is the functionality, not the styles. Of course you can see them for yourself along with the rest of the code at https://github.com/stephanmullerNL/kanzeon/releases/tag/show-new-posts.
Next up: showing more post details, parsing the HTML in the post's content and (hopefully?) upvoting too. As always, feedback is welcome!
Great tutorial bro, This what i looking for since a week. hope can help me
I want to do something like this in my own website. Using python. List my steemit acount posts, and then when clicked on a post show the content of the post on my website. It will be the blogs page. Only blogs are retrieved from steemit. Is it possible with python? or better with javascript?
Congratulations @pilcrow! You have completed some achievement on Steemit and have been rewarded with new badge(s) :
Click on any badge to view your own Board of Honor on SteemitBoard.
For more information about SteemitBoard, click here
If you no longer want to receive notifications, reply to this comment with the word
STOPCongratulations @pilcrow! You have completed some achievement on Steemit and have been rewarded with new badge(s) :
Click on any badge to view your own Board of Honor on SteemitBoard.
For more information about SteemitBoard, click here
If you no longer want to receive notifications, reply to this comment with the word
STOPCongratulations! This post has been upvoted from the communal account, @minnowsupport, by Phtephan from the Minnow Support Project. It's a witness project run by aggroed, ausbitbank, teamsteem, theprophet0, and someguy123. The goal is to help Steemit grow by supporting Minnows and creating a social network. Please find us in the Peace, Abundance, and Liberty Network (PALnet) Discord Channel. It's a completely public and open space to all members of the Steemit community who voluntarily choose to be there.
If you like what we're doing please upvote this comment so we can continue to build the community account that's supporting all members.
Thanks @pilcrow for your contribution. I've made similar tutorial starting with installing Angular CLI to how to show steemit posts. You'll find it here How to install Angular CLI and show Steemit Posts in an Angular Web App