One of the first problems I encountered in steemit after creating my account, was the change of my profile page.
In all social media channels, you click on the photo, upload what you need from the computer, write a few things and that’s it.

Well in steemit the profile section is a bit of ‘nuclear science’ or so it seems for newbies.
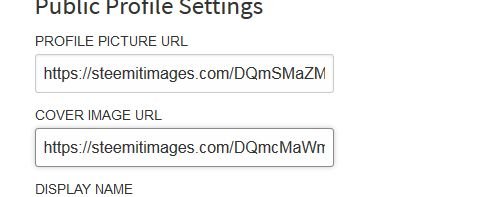
I remember finding the 'settings' after a (looong) while, only to realize that there was no 'upload' photo. I needed to come up with a URL for my profile picture and cover photo...

Luckily I had used photo uploading services in the past, googled a little bit and I found a website that uploads images to use.
Nevertheless, I have now found an easier way and I am sharing it with you!

So in this post we will do 3 things.
- Learn how to edit our profile
- Check a couple of creative profiles as examples
- Change (finally) my profile and see both (before and after)

(replace @yourusername with your username)Please go to your settings page > from profile > settings or click https://steemit.com/@yourusername/settings
1. Edit profile info
UPDATE
As per user @pokerman, it is also possible to change profiles from esteem app.
I downloaded esteem app and it it’s as easy as uploading pics from your phone on the app no url needed
The below is for changing profile information from desktop or laptop.
After you choose your language (we will leave English) you need to change your profile & cover image.
We will upload the pictures in steemit as a more convenient way in order to use the steemit generated links for the profile info.
a. Please find the image(s) you will use. In this example I have used a cover of 1652 x 186 and a square logo.
b. Open the ‘post’ button in a new tab and with the ‘drag and drop’ method, insert the logo and cover post in the story field. (like you would do with any other photo)

c. Copy – paste the logo & cover steemit address in the relevant fields

d. Make any changes you wish in the bio section, country or website fields and at the end you click on ‘update’.
NOTE: You will need to re-enter your key for saving the new information
Remember that: The bio letters will be white, so the cover should allow them to appear well and be easily read.
My cover was 1652 x 186 and I think that the size was almost perfect.
The bio needs to be approximately 155 characters.
You can use a tool like https://www.lettercount.com/ to count the characters.
Regarding the About Section: Remember that other steemians will read this – so it better be interesting and describing yourself in a nice way. It should also give an immediate feel about you and your blog’s topics.
Keep it short, relevant, interesting!
2. A couple of interesting profile examples
You can find below a nice looking cover with bio from @ruth-girl

This post is being written a little bit after New Year’s so you will see the cover of @ruth-girl beautifully decorated :)
Her profile is inviting, with an optimistic touch and very well presented! She uses her stronger characteristics first
a teacher, writer and steemSTEM curator.
She continues with some hobbies and closes with her moto.
Another profile you can look at is by @welcoming (a promising and great initiative for newbies support - please follow and support if you have not already !)

This is a well presented, straight forward profile - to the point! You can tell at once that it is used for welcoming new members : )
You can find more ideas if you look around in steemit!
3. Finally, I've got a new profile! What do you think?


I hope you have found these instructions useful and I will be happy to read your comments or any questions below.
Thank you for stopping by!

I downloaded esteem app and it it’s as easy as uploading pics from your phone on the app no url needed
This is very useful information, thank you! I will edit my post and mention your tip (if you do not mind)
I have also downloaded the app, but not used it yet .. so, thank you for reminding!
Not at all actually I was inspired I make a post of my own just now
This is great! I just dropped by, followed and upvoted :)
I have also written a review about busy.org but still a couple of things missing...
The difference in their wallet is that it calculates the steem and SBD price as is, while steemit takes an average price I think.
Thank you again for stopping by :)
Thank you @katerinaramm, it's very helpful.
Ευχαριστώ!
If you have any suggestions regarding tutorials that you believe would be useful, please let me know :)
Thank you @katerinaramm! That was really helpful for creating my profile.
Hi David, welcome to steem!
I am very happy to see that you found useful info in this post, and you may want to read a helpful collection I gathered here. Let me know if you have questions.
Enjoy and have fun!
Thanks a lot! That other post was very helpful too. I'll make sure to follow those tips before publishing.
really helpful