My first tutorials is all about introduction of steemit and the function of Author and Curation Rewards. You can view my first tutorial here:
Tutorial Number 01 by: @keshawn
as clicked that link you were drop directly to my first tutorial, of course that only a trick on how to improve your post outcome.
> **You can also see there the fact of how hard the steemit was at first.**
Note: don't just click it you should learn from it.
I'm only teaching you the basics and be a part of this platform, and these tutorials are important to all newbies, These are also a compilation of some marksdown styles as they said and a bit of important about everything.
So Let's start!
First thing you should do is the Header or should i say a sub-titles. This is so important to all viewer to express what will going to happen in your post/Blog. It should be Bigger font than your post Body context.
all you have to do is to add hashtag(#) from the said Sub-title.
e.g.:
(# Let me introduce myself to you.)
That's it. You can also use double hashtag(##) or even triple (###) for your next Sub-title.
How to make text bold and italic

Bold
For Bold all you have to do is put two(2) asterisk or underline symbols ( ** or __ ) from first to end.
Italic
for the italic it goes by putting one(1) arterisk or underline symbols ( * or _ )
Strikethrough
for line cross put two(2) similarity symbols ( ~ ) from first to end of the word.
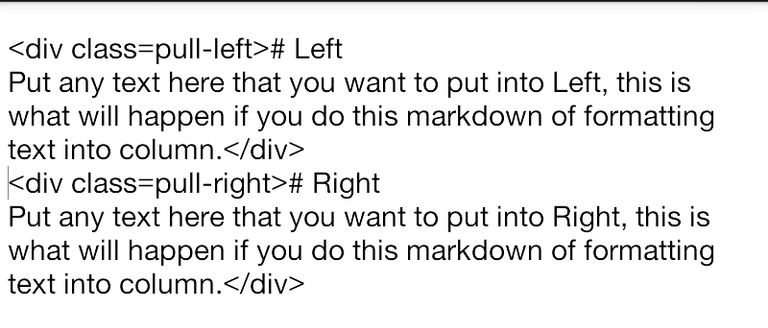
How to align text to Right and Left.

so how it goes;
image

that's how you align image to where ever you want to put it.
"How to format text into column"

How to make a Table in your post.
Tables are not part of the core Markdown spec, but they are part of GFM and Markdown Here supports them. They are easy way of adding tables to your blog/post -- a task that otherwise require copy-pasting from another application.
Markdown | Less | Pretty--- | --- | ---
| *Italic* |Render` | Bold
| Markdown | Less | Pretty |
|---|---|---|
| Italic | Render | Bold |
Blockquotes
`> Blockquotes are very handy in post/blog to emulate reply text.
`> This line is part of the same quotes.
Quote break
This is a very long line that will be quoted properly when it wraps.
Blockquotes are very handy in post/blog to emulate reply text.
This line is part of the same quotes.
Quote break
This is a very long line that will be quoted properly when it wraps.
So this are some awesome Markdown that you need to used in your blog post. If that's what you're looking for and If you want to learn so more don't forget to follow me for more.

Very informative and helpful guide for future posts. Thank you for this!
Yes indeed, you can also view my 1st tutorial to know more about steemit.
Great tutorial learned some new elements to work with and use on markdown. Thank you for sharing!
Thank you for share!
Welcome. :)
Good Luck!This post was resteemed by @resteembot!
in the introduction post.
Some of it is really cool!Learn more about the @resteembot project Check out the other content resteemed by @resteembot.
@keshawn got you a $1.49 @minnowbooster upgoat, nice! (Image: pixabay.com)
Want a boost? Click here to read more!
This is nice tutorial. :)
Hehehe ... salamat @zararina ...
I am integrated the old DHTML tags such as h1
for header
, h2for subheader
, b for bold, i for italic and soon on. Itworks fine and clean.However, this toturial is far far better and easy to understand. Perfect for new steemian who have a less knowledge in scripting. Thanks
This post has received a 4.29 % upvote from @lovejuice thanks to: @claudene. They have officially sprayed their dank amps all over your post rewards. GOOD TIMES! Vote for Aggroed!
Great posts! Very informative. Following for future posts!
U da
mandude,broman?!Good tutorial - thanks!
Well thank you for dropping here in my blog, hope to see you again in my future post.
Thank you.
Pleasure, @keshawn. I thought I'd posted a follow-up question, but I can't see it here so will post it again (apologies if you get it twice!). I wanted to ask you how you highlight those heading cells. I don't know how to do that in Markdown. 😊😊
this is very handy guide and a little complex for me to learn it all but i will practise a new skill each new blog -thanks for sharing
It's a pleasure knowing you're learning from my post. Yeah it's so much important if you learn or practise more new skills for every blog, for our knowledge is infinite.
So looking for this-- Thanks!
Really nice! Good job sir
You're welcome.
yeah.. good post. but it's the cube at the end that is the coolest! :P