00 - Introduction
DEUTSCH | ENGLISH
That's the first chapter of my Steem.js Tutorials.
I like to show you the basics to interact with the Steem-Blockchain via Node.js (Javascript for servers). It's oriented on the Steempy Tutorial (@steempytutorials).
The tutorials are being published in an english and german version. The code for the complete tutorial is accessible on Github. There is a directory for each chapter.
First of all we are taking care about Node.js:
What's that?
Node.js is a javascript runtime environment, that is usable without a browser and can access the filesystem. It is event-based and non-blockable and uses the Google Chrome V8 Engine. (If you do not have a clue what the last sentence was about: it is not that important). Furthermore it has a packetmanager which we are using in just a moment.
What is Javascript?
Javascript is a specification for a programming language, that is developed for the web. That means developer are implementing that specification in different runtime environments. Javascript is running in (almost) every browser, with Node.js on server, but also in Mobile- and Dekstopapps (e.g. Atom). The programming language has developed further in the last years. Please don't get confused: object-oriented Java is not the same as Javascript.
What do i need?
You need an editor (the windows/mac is good enough, Notepad ++ or Atom or Microsoft Visual Studio Code or Sublime Text are possible, too. Choose the one you are the most comfortable with), Node.js and the Steem-Library. Of course you should also have a internet connection and a computer.
That should not be a tutorial for installing node.js for the different operating systems, so check this out: Install Node.js
I'm using a Debian 9 (Stretch), Microsoft Visual Studio Code and Node.js Version 9.4.0. For development i can recommend a linux-based operation system.
Installing the Steem Library
I'm using the word "terminal" for a command line interface (Windows: Powershell, Mac/Linux: Terminal)
Now open a terminal and navigate to a new directory for that tutorial. Type there npm init. You are asked multiple things, but you can simply spam the Enter-key. When you are finished, you have now created a package.json - file, which holds metadata about your new project.
With a npm install steem --save you are downloading the steem library. This will be saved in the node_modules directory. Also in the package.json a reference to the library will be added and in the package.lock.json the exact version number.
If you are looking at the code on Github, there will be no package.json oder node_modules, just the code. You have to initialize the project by yourself beforehand. Just copy the code in your project folder and run it there.
Test the Steem Library
Now we are ready to interact with the blockchain. We want to get the data of a user directly from the blockchain.
For that we are creating a new file user.js. The extension .js shows, that this is a Javascript program.
In this file we are importing the library:
const steem = require('steem');
With const we show, that we want to declare a new (immutable) variable. A variable is a pointer to a storage place in the RAM of the computer. We can store almost everything in a variable and work with that later on.
steem is the name of the variable. You can choose them freely.
= shows that we want to allocate a value to that variable.
require means that we want to import a library. We have to specify which one to load in the round brackets. In our case it's steem. Use the quotation marks, because we do not want to refer to a different variable.
We are closing every statement with the semicolon.
Now we are getting the information about the user "ned":
steem.api.getAccounts(['ned'], console.log);
with steem.api.getAccounts() we are invoking the function getAccounts of the Steem Library. You can imagine a function like in mathematics: you give it information, it does something with it and you get new information.
I'm giving the information: the Number 2 in the function f(x) = 2x, it is being processed (doubled) and the new information is coming out: the number 4.
In this case we give it the information ['ned']. The [] means, we could give it multiple users. That is called "Arrays". So ['ned','lustigo'] would work also.
In Javascript we often have to give the information what should happen with the new information. This must also be a function. This is called "Callbacks". The function will be called with the new information and can also process them. In our case we want to print it to the terminal.
Functions can also be saved in variables. We are using the global (in Node.js defined) function console.log, which does exactly what we want.
By the way: every line that starts with // will be ignored by Node (i´m using that on Github to give you short comments to the code lines).
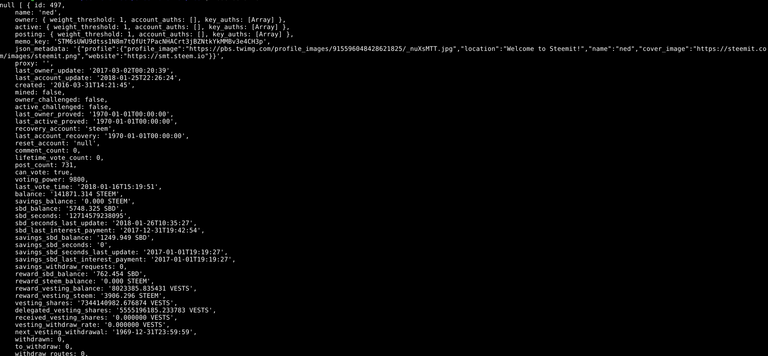
If you now save the file and run it in the terminal with node user you should see something similar to:

Thanks for reading this introduction. It's not fatal if you have not understood everything, you will understand things more cleary later on. I'm looking forward to your responses!
See you next time!