Do you know What Markdown is and How to get started on Steemit? If you are a blogger or developer, so I bet some of you may already familiar with this tool Markdown. If not, then this tutorial is for you to learn everything from scratch.

What is Markdown?
Markdown is a Markup language for Formatting text to write with an easy- to-read format that converts it directly Into valid HTML. If you write for the web so it is a very simple text-to-HTML conversion tool which don't use complex tags or built-in menus for formatting text. Markdown uses characters and punctuation to achieve the same result as we get from any editor or writing HTML code manually.
Markdown let you write web content without having knowledge of HTML.
Markdown let you write web content without having knowledge of HTML, Is it true? Yes, it is true. For example, If you want to bold some text so do not use HTML <b>bold</b> tag for Formatting, Instead use double asterisks to get the job done. For this purpose, you can test your code in a desktop or Web-based editor with live preview.
Desktop editor
- Mou for Mac OSX
- Mou alternative for Windows
Online web based editor
Get started with Markdown
Below is step by step guide To get you started writing in Markdown with an editor of your choice.
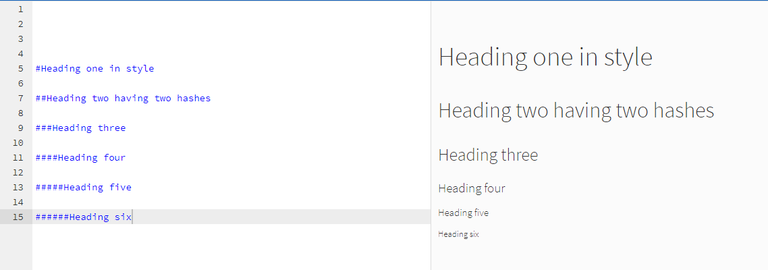
Header
# Is denoting Header and the number of # determine the level of the header, You can close the header at the end if you think it looks better because the closing hashes don't even need to be equal to the number of opening hashes.
Note: I don't recommend for a closing header with the hash at the end. Like #h1 heading#, ##h2 heading## and so on.

Paragraph and line break
When you write a bunch of lines of text in Markdown so It automatically converts that lines of text in HTML <p>Paragraph</p> tag, separated by a blank line.
In HTML, You can easily break the line with <br/> tag, but here in Markdown you only add two spaces at the end of the line to get the same effect.

General Elements
Here, In General Elements we will take a look at some of the useful techniques which are very important to grasp.
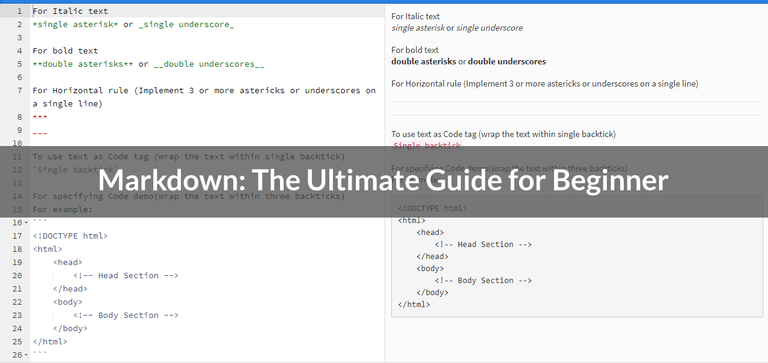
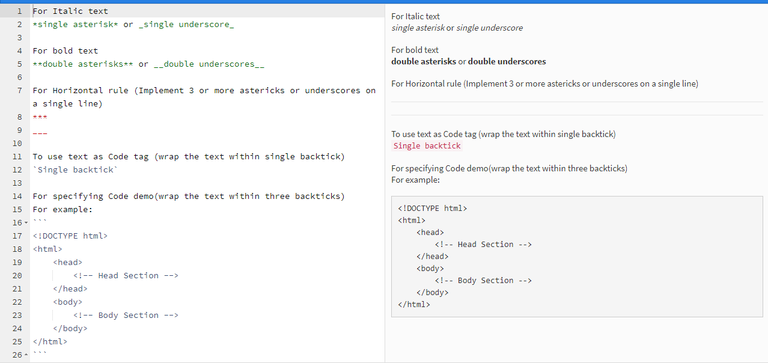
- To Renders as emphasized text (italic text), wrap it in either a
single asteriskorsingle underscore. - To boldly emphasize text (bold text), wrap it in either
double asterisksordouble underscores. - You can create a horizontal rule
<hr/>by implementing 3 or more*or_on a single line. - To use text as
<code></code>tag, wrap the text insingle backtick - For specifying code demo in
<pre><code></code></pre>tags, wrap the HTML, Javascript or PHP codeswithin three backticks - To add a table, do it with raw HTML Itself because Markdown is smart enough to know that what to do.

Ordered and Unordered lists
These are other cool features of Markdown for specifying lists which is pretty straightforward, Simply add number+dot+space for ordered list, Use *, - or + for Unorderlist.

blockquotes and backslash
You can easily add blockquote in Markdown with the help of right angle bracket > which is sometimes also called greater than sign.
Markdown allows you to escape characters with the backslash, which would have a different meaning at some point.
For example, If you will wrap a text within an Asterisk in markdown, it converts the text in italic, But we want something different like wrapping text within asterisk, So you can do it with a backslash to escape character. e.g: \* Backslash \*

Inline links and images
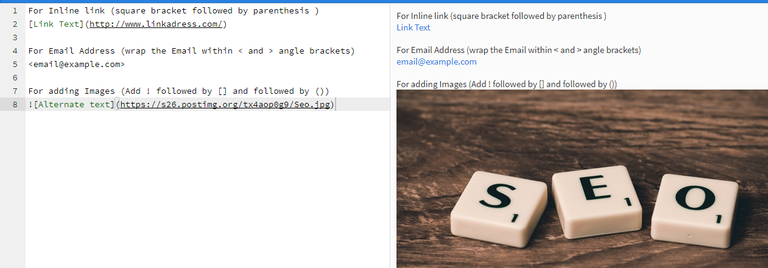
Markdown gives us very simple instructions for adding links and images in the post. There are two kinds of link out there, One is used for an email address and the next one is used for the inline link.
For Implementing inline link Use square bracket [] followed by parenthesis () while for adding an email address, wrap the email within < and > angle brackets.
Image syntax and link syntax are very similar to each other, but the only difference is by adding ! Symbol in front of [].
Note: In the square bracket, You can use alternate text for image optimization.

The Next Step: Use Markdown on Steemit
Now, It's your turn to perform all the commands on the real Steemit Post and comment. If you stuck somewhere, Just let me know so I can help you out.
Conclusion
This tutorial gives you a brief introduction to Markdown and How to get started with it, With easy to follow examples. So finally, I believe, The more you practice, The easier it would be. Now I want to hear from you about Markdown, Maybe I missed something.
Just leave me a comment below to let me know.
Congratulations @mslifesteem! You have completed some achievement on Steemit and have been rewarded with new badge(s) :
Click on any badge to view your own Board of Honor on SteemitBoard.
For more information about SteemitBoard, click here
If you no longer want to receive notifications, reply to this comment with the word
STOPHello, your post was nominated for an upvote by a fellow within the Sndbox incubator. Thanks for sharing this markdown resource @mslifesteem! Steem on :)
Thank you so much @sndbox for this reward. It will help me to write more Quality content.
Nice markdown guide! I've been writing in Ulysses on mac before copying into Steemit. I'd recommend it as another markdown editor! I'll check out Mou too, looks cool!
I use macdown, working well.
Thanks for reading this post.
Thanks for reading @jeffbernst.
I checked Ulysses, It's quite good.
Yeah, Mou Editor is very simple and cool tool.
In future tutorial, I will post about, how to create our own Markdown editor with NodeJS as a back-end and some other framework as a front-end.
Cool! looking forward to reading your tutorial 🙂
Hey, is there a possibility to escape steemit "@", so that steemit doesn't link automatically to profile pages?
Since it's not an official markdown char, the escape character "\" doesn't work.
No, I haven't heard yet because in Steemit, It linked to the profile pages by default when you add @ before any name but there is one way that you can achieve it. It is not a good way, but Might help you a bit.
Simply wrap the profile name within single backticks. e.g:
@dasskelett. It adds the text within <code></code> tag.Hey, thanks for the answer.
Yeah, this is a workaround.
May try it, than let's see.
My pleasure, keep it up!