
Introduction
Following my post on creating the Steemithelp website yesterday I would like to share my recently finished "Quick Start Guide" for new users. The aim is to provide a step by step way for new users to register and make their first post in a simple and easy to follow way.
Please let me know what you think and if you spot any mistakes - once I have corrected any errors I will be posting it up on the Steemithelp website as a permanent resource.
I have already made some new additions to the website by adding my Markdown Guide for Beginners and the latest version of the Steemit Etiquette Guide.
As stated previously please let me know what other kind of resources you would like me to add to Steemithelp and if you want to point new users to the site the link is:
Registering on Steemit

Prerequisites before starting
You will need the following:
- An active email address.
- An active mobile phone number.

The following would also be helpful and are strongly recommended:
- A password manager/generator.
- A notepad or other suitable place to jot down your password, username etc. or alternatively a printer so you can print out a hard copy for safe storage.
- A cup of coffee/tea or another beverage!
OK if you have the above then go to Step 1:
Step 1- Open your browser and go to: https://steemit.com/
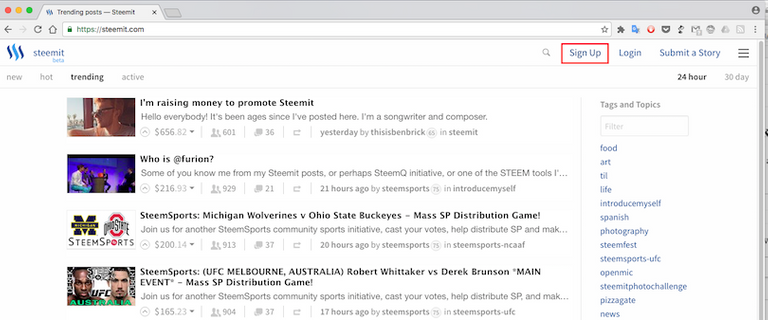
You will see a page similar to this.
Step 2 - Click on the "Signup" Button
This will bring up the email entry page.

Step 3 - Enter your email address and click the check box to confirm you are not a robot.
This will bring up a captcha task like this:
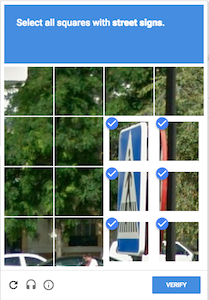
Step 4 - Complete the Captcha Task and click "Verify"
This will bring up the following page asking you to check your email:

Step 5 - Check your email for a message like this and copy/paste the link into your browser:
You could just click the link but it is probably good practice not to click links in your email directly.

The link will open the following page in your browser:
Step 6: Select your country and enter your mobile phone number on the next page and click continue.

Step 7: Check your mobile phone for a text message
I have obscured the details here for security reasons.
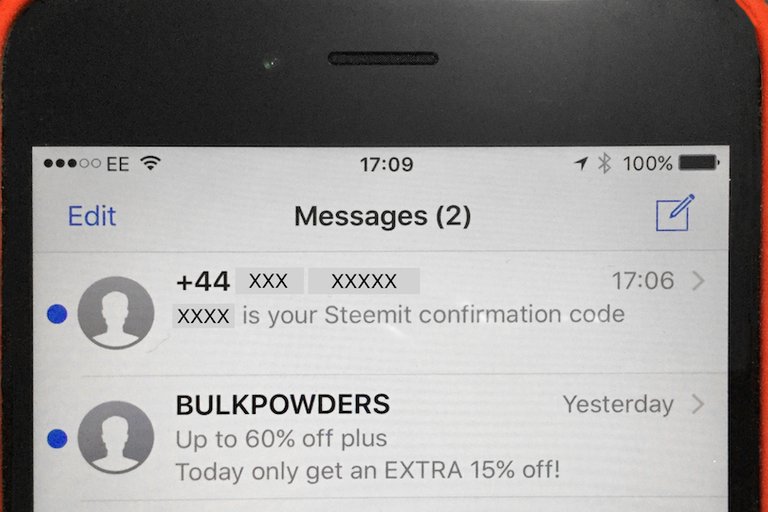
Step 8: Enter the confirmation code into the browser window (which will look like the image below) and click continue.

Step 9: Choose a Username and Password
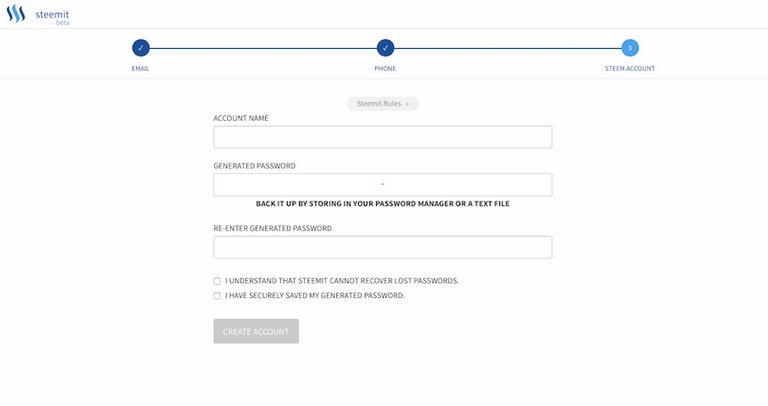
Make sure you do not forget either of these. Your password should be secure and I would recommend using a password manager. It is also good practice to keep a hard copy (in paper form) for all your passwords - keep it in a safe place though.
Step 10: Check the password related boxes and click "Create Account".
If everything has worked your new account will be created. Depending on your browser settings you may need to login again.
Well done! You are now ready to make your first post on Steemit.
Making your first post
When you login to Steemit you will see a page like this or if you are already following some people you will see a different feed composed of the people you are following.

Either way you will need to click on the "Submit a Story" Button (see image above) to take you to the posting page.
The Posting Page - Default View (Markdown Editor)
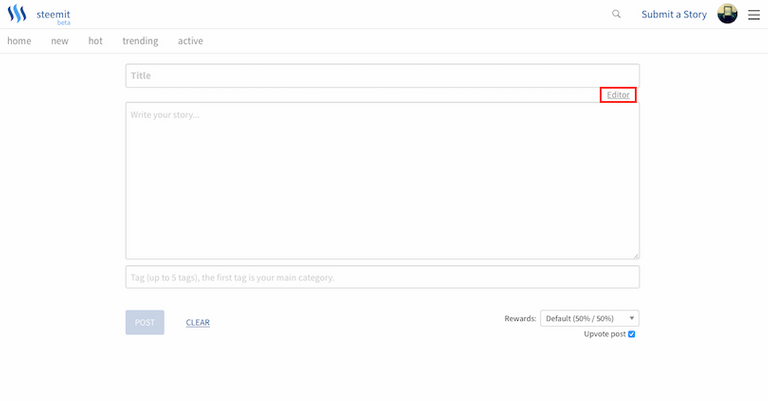
This will bring up the Markdown editor which is the default editor view. Markdown is special way of formatting text using various symbols which is a lot simpler and faster than using .html or word processing tools.
For a basic guide on Markdown have a look here. If you are not familiar with Markdown and want to get posting right away you can switch to the WYSIWYG (What You See Is What You Get) style view by clicking on the button indicated above by the red rectangle.
This will change the view to the following:
The WYSIWYG Editor (Word Processor Style)

This is pretty easy to understand but I have labelled the different sections for you just in case you have any problems. In this view the formatting bar works very much like in a word processor. You will need to select your text and click the appropriate button to format it.
Hovering the cursor over the toolbar will bring up tooltips to show the function of each button.

For your first post you may want to write something about yourself by way of an introduction. Choose a suitable title e.g. "My Introduction". Write some text about yourself in the body - what you write is purely up to you. Often people will use their first post as an opportunity to post a photo of themselves and they may also use it to provide some verification (read about verification here).
Adding Images
You can add images using the "Image" button shown below:

At present you can't upload images directly to Steemit. You need to use an image hosting site which will provide you with a link to insert into the editor.
There are lots of options but the easiest and quickest to use is Imgsafe as you don't even need to register:
Uploading your first image using Imgsafe.org
Go to: https://imgsafe.org
This is what the Imgsafe page looks like. You can register and login but you don't have to.

You can either browse images on your computer to upload or simply drag and drop them as below.
This will bring up a thumbnail of your image and an upload button. Click the upload button.

Once it has uploaded right click on the thumbnail and select "Copy Link" - or "Copy Image Address" - it may vary if you are using a different browser.
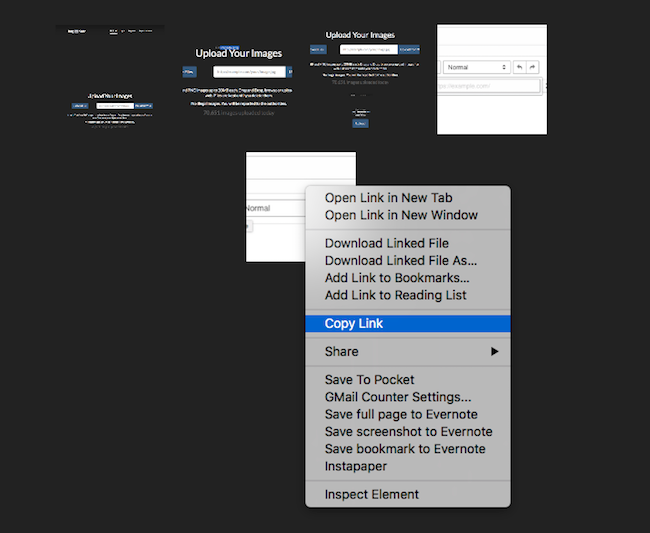
You can now paste that link into your document by clicking the image button and inserting the link text as shown below:

Tag your post
Next choose some suitable tags such as "introduceyourself" (the common tag for introductions) and anything else that applies to the content of your post. The tags need to be plain text separated by spaces.
Choosing your rewards
Unlike other social networks or blogging platforms when people vote for your post on Steemit you get paid a certain amount of money (in Steem/Steem Dollars). You can receive this a number of ways. To learn more details about this I would recommend reading this FAQ.
Clicking on the triangle next to Rewards will bring up 3 different choices.

The default payment method is a 50:50 split between Steem Power and Steem Dollars (or liquid Steem depending on economic factors). You can also choose to get payed fully in Steem Power - the option labelled "Power Up 100%" and you can also decline payouts.
The last step clicking the "Post" button
If you have done everything correctly the "Post" button will no longer be greyed out. It's a good time to double check your text and make sure there are no typos or other types of mistakes. Note if you do make a mistake you can edit your post after posting it for up to 30 days.
If you are sure everything is fine, then you are ready to post:

Click "Post" and you will be taken to the "New Posts" feed on Steemit where your post will be at the top:
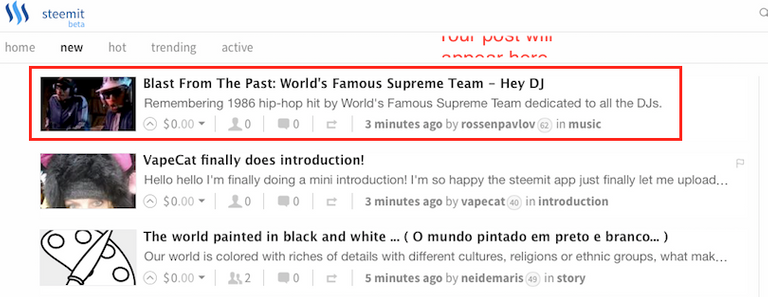
(Note the post shown in the image above is a different post from the previous image as it was merely a mockup for illustrative purposes and I wasn't going to post it!)
Congratulations! You have made your first post on Steemit.
So you made your first post what next?
You will receive notifications on your home page if anyone responds to your post (next to Replies) as shown in the image below:

You can also promote your post in various ways. For example at the bottom of your post (just above the comments section) is a footer bar with a share button.

Clicking on this allows you to share on other social media sites as shown below:

If you need to correct any mistakes in your post the "Edit" button is in the same footer (next to the "Reply" button):

You can also share your post in various other places such as the Steemit Chat. For further information please check out the FAQ and also Steemit itself as new services are being launched all the time.
How you can help
Please let me know if you spot any mistakes in this guide or find anything unclear. I have also deliberately removed personal details to avoid being spammed and cold called. If you spot anywhere that I forgot to do this please also let me know:)
Also don't forget to send new users to the Steemithelp.net website.
I have provisionally added this post to the website here in case you would like to see it how it looks on there.
Your Reward for Reading:)

If you like my work and aren't already, please follow me and check out my blog (I mainly discuss photography but I do other topics too) - @thecryptofiend
Photo Credits: All photos are taken from my personal Thinkstock Photography account. More information can be provided on request.
(Verification for me here: http://www.aapicture.com/about-me)
Some of my other recent posts
- Steemithelp.net a new resource for helping new users (with an updated version of the "Missing FAQ")
- Idea for Steemit - Tiered Voting Power Regeneration According to Vests
- More Polaroid Photos of Rachelle (Part 3) - free photos for you to use in your own posts
- TIL what JAM is and you might be surprised by the answer.
Very helpful for new users thank you so much for sharing this!
You're welcome:)
Extremely helpful. Thank you. Spent over 5 hours trying to figure out the 'image issue".
Perhaps you could comment on the "Resteam" - What it does, and the warning of 'are you sure' & 'this is irreversible' ... as a new user to crypto/steam I'm not trying to "Fubar the System" or piss someone off. Thxs. 💯
Thanks! I never realised the images are a problem for most users until I heard other people mention. I think it is one of those issues people who are used to doing these things are blind to.
Regarding resteeming. I already have a section in my FAQ:
The text may be too small to read in the screenshot but it says this:
I will need to add the bit about it not being reversible. I had not thought about that!
Welcome!! Here's a boost to your reputation. Wish it was more. :)
Thanks mate. You are always very kind:)
This post has been ranked within the top 25 most undervalued posts in the first half of Nov 27. We estimate that this post is undervalued by $10.22 as compared to a scenario in which every voter had an equal say.
See the full rankings and details in The Daily Tribune: Nov 27 - Part I. You can also read about some of our methodology, data analysis and technical details in our initial post.
If you are the author and would prefer not to receive these comments, simply reply "Stop" to this comment.
Thank you:)
This post has been linked to from another place on Steem.
Learn more about and upvote to support linkback bot v0.5. Flag this comment if you don't want the bot to continue posting linkbacks for your posts.
Built by @ontofractal
Thanks:)
Shared on twitter. :)
Thank you so much:)
Another thought. Thinking of demonstrating steps like this in my idea of steemland in a virtual world where it may be more visually seem step by step more at once like on billboards in real life but with an avatar in a virtual world by a user on their computer. Maybe as a different way to visually explain as some people learn and understand better in such a manner.
That could definitely help if it is done in the right way:)
Yes agreed. Also thank you for your donation to @steemprentice. Thinking of making some posts by @steemprentice with links to numerous of your posts sometime. Also let me know if you want to write post(s) for steemprentice and be rewarded half of the post's STEEM or not as a full donation if you might be interested.
Sure. Hopefully it can help please use it however you feel appropriate.
Also I have updated https://www.steemithelp.net with some more of my posts including the Quick Start Guide. Feel free to use it or guide people there.
Sure no problem - I'm not so much interested in getting the rewards from posting on that account but I am happy to help in any way I can.
It might get more attention too if I use my account.
May be it should be available right from the first page of Steemit.com?Excellent useful post @thecryptofiend! I wish to read it when I was a newbie!
That would be great:)
Great post! My only suggestion is to maybe split them into separate guides. People have short attention spans for one, and it would be easier to index/search guides that cover individual topics. Having it all in one guide has it's benefits too though, so if you would prefer to leave it as-is, I don't have any objections :)
That's a good idea. I will see about splitting them. It is quite long.
Well done and clearly illustrated.
Thank you:)
Excellent post! Thanks!
0.1 Steem was sent to you.
Thank you that is very kind but not necessary:)
Nice work! Btw i was wondering if sign up could be "instant" and all those confirmations and account security could only be set up later. For one i think its important to also lower the barrier and get people experiencing steemit asap..
Some people are turned off by the requirement of a phone number. But that makes some sense for steemit as opposed to steem. So look forward to other ways to use steem like steemit with different barriers.
Yes I think it is tricky. If there are no hurdles to jump over then it good be gamed with lots of spam accounts.
I'm not sure - it might be worth exploring - for example the account is initially set up so you can view all the settings and things and pages but you can't actually post or vote until you set everything up. If you don't do so within a certain set period then the account is deleted.
I think the problem with this would be the blockchain basis where you can't really delete things, however there are likely to be ways round it, - provisional accounts could be cached on an external server (like images) until they are fully activated.
Thks for putting out this tutorial. I support and encourage these type of initiative for the community. Congratulation!
Thank you:)
Very helpful post :) Thanks

Thanks so much for this hints..
Thank you so much for posting this step by step guide , I am so excited to get started and this can be overwhelming. I am sure to be back for more tips and information.
You're welcome.
I think the reward section and selecting 50%-50% is most important section of this post. fifty-fifty is fairly
Thanks for sharing this great infos about the start on Steemit @thecryptofiend !
This article maybe old but this is actually the first article I read before signing up for steemit. My account was approved just a few minutes ago after 7 days of waitng. Then first thing comes to my mind is to search this article again to say "Thank You!" Thanks for posting this it really helped me a lot! Starting today I will follow you. :-)
Just sent the link to my old Mum, cheers mate. Love Steemit!
Great stuff mate thanks. I found a broken image on one of your webpages but no longer able to contact you so here's a link to screenshot http://bit.ly/2qSvoUM
I'm trying to start a new profile on steemit but I get foiled at every turn it seems. I finally managed to get a confirmation email through after signing up through my phone (it wouldn't work from PC as had prev signed in on that to this account), then when I had to put in my phone number to send confirmation code, it took about half an hour to arrive, so I thought that something had gone wrong and hit refresh and back and it won't let me enter any phone number or the confirmation code now... Is there anyway out of this predicament?
Thanks for your work and support