[ESP]
👋 ¡Hola, entusiastas de la tecnología y la innovación!
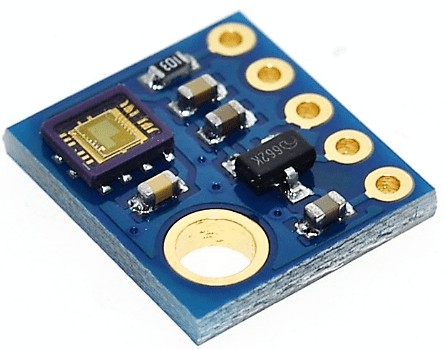
Hoy profundizaremos en el módulo de sensor de luz UV GY-8511, una herramienta que mide la intensidad de la radiación ultravioleta (UV). Este dispositivo es perfecto para proyectos relacionados con el monitoreo solar, estaciones meteorológicas, protección de la salud y más. ¡Vamos a conocerlo mejor!
🧩 ¿Qué es el módulo GY-8511?
El módulo GY-8511 está basado en el sensor ML8511, diseñado específicamente para detectar radiación UV. Proporciona una salida analógica proporcional a la intensidad UV medida, facilitando su integración en sistemas electrónicos.
⚙️ Especificaciones principales:
- Voltaje de operación: 3.3V–5V.
- Rango de detección UV: 280 nm–390 nm (UV-A y UV-B).
- Salida: Voltaje analógico proporcional a la radiación UV.
- Interfaz: Pines VCC, GND y OUT (señal).
- Dimensiones: Compacto y ligero, ideal para proyectos portátiles.
🔧 ¿Cómo usar el módulo GY-8511 en tus proyectos?
1️⃣ Conexión básica:
Conecta los pines del módulo de la siguiente manera:
- VCC: Alimentación (3.3V o 5V).
- GND: Tierra.
- OUT: Salida analógica, conectada a un pin analógico del microcontrolador (por ejemplo, A0 en Arduino).
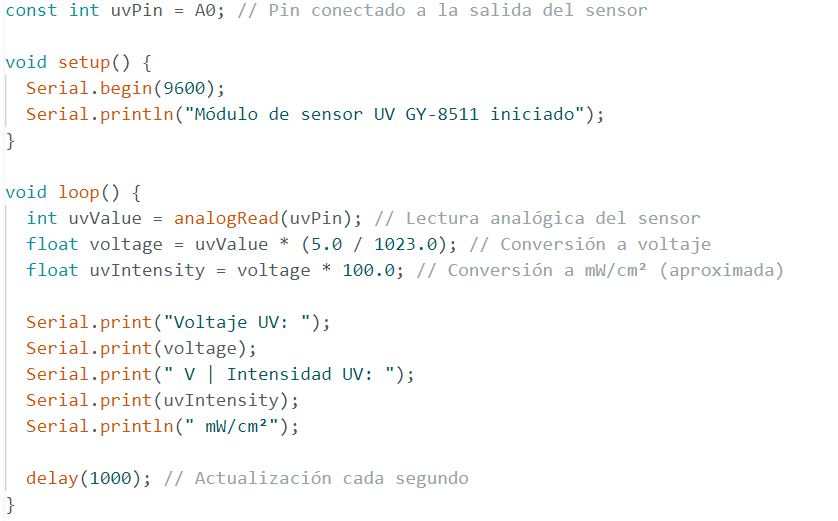
2️⃣ Código de ejemplo en Arduino:
El siguiente código te permitirá medir la radiación UV y convertirla a un valor aproximado en mW/cm².
3️⃣ Calibración:
El sensor proporciona una salida proporcional al nivel de radiación UV, pero es recomendable verificar los valores con un medidor UV estándar para mayor precisión.
🌐 Aplicaciones del módulo GY-8511
- Estaciones meteorológicas: Monitoreo de niveles UV en tiempo real.
- Proyectos de salud: Alertas para evitar la exposición prolongada al sol.
- Agricultura inteligente: Control de la radiación UV para el cultivo.
- Sistemas de protección solar: Integración en dispositivos para medir la exposición.
- Energía solar: Evaluación de la eficiencia en paneles solares.
🤔 Ventajas del módulo GY-8511
- Compacto y versátil: Fácil de integrar en diversos proyectos.
- Medición precisa: Detecta radiación UV-A y UV-B.
- Bajo consumo: Ideal para sistemas alimentados por batería.
- Compatible con microcontroladores: Se adapta perfectamente a plataformas como Arduino.
📢 Conclusión
El módulo de sensor UV GY-8511 es una herramienta valiosa para medir y monitorear la radiación ultravioleta en proyectos tecnológicos. Su facilidad de uso y precisión lo hacen perfecto tanto para principiantes como para expertos.
📢 ¡Gracias por explorar conmigo el módulo GY-8511! 🌞
Si tienes preguntas, ideas o proyectos en mente que incluyan este sensor, ¡no dudes en compartirlos en los comentarios! 📝
🔔 Próximos temas: Sigue descubriendo nuevos módulos y cómo integrarlos en tus proyectos. 🚀
🤝 Únete a nuestra comunidad: Comparte tus experiencias y aprende de otros apasionados por la tecnología. 💬
📷 Comparte tus logros: ¿Ya has usado sensores UV? ¡Muéstranos tus proyectos en acción! 🛠️
🌟 Sigue innovando: La creatividad es el límite en el mundo de la electrónica. ¡Explora y crea! 🌈✨
¡Hasta la próxima, y sigue construyendo proyectos que inspiren! 💡
[ENG]
👋 Hello, technology and innovation enthusiasts!
Today we will delve into the GY-8511 UV light sensor module, a tool that measures the intensity of ultraviolet (UV) radiation. This device is perfect for projects related to solar monitoring, weather stations, health protection, and more. Let's get to know it better!
🧩 What is the GY-8511 module?
The GY-8511 module is based on the ML8511 sensor, designed specifically to detect UV radiation. It provides an analog output proportional to the measured UV intensity, making it easy to integrate into electronic systems.

⚙️ Main specifications:
- Operating voltage: 3.3V–5V.
- UV detection range: 280nm–390nm (UV-A and UV-B).
- Output: Analog voltage proportional to UV radiation.
- Interface: VCC, GND, and OUT (signal) pins.
- Dimensions: Compact and lightweight, ideal for portable projects.
🔧 How to use the GY-8511 module in your projects?
1️⃣ Basic Connection:
Connect the module pins as follows:
- VCC: Power (3.3V or 5V).
- GND: Ground.
- OUT: Analog output, connected to an analog pin on the microcontroller (e.g. A0 on Arduino).
2️⃣ Arduino example code:
The following code will allow you to measure UV radiation and convert it to an approximate value in mW/cm².
3️⃣ Calibration:
The sensor provides an output proportional to the UV radiation level, but it is recommended to verify the values with a standard UV meter for greater accuracy.
🌐 Applications of the GY-8511 module
- Weather stations: Monitoring UV levels in real time.
- Health projects: Alerts to avoid prolonged exposure to the sun.
- Smart agriculture: Control of UV radiation for cultivation.
- Sun protection systems: Integration into devices to measure exposure.
- Solar energy: Evaluation of efficiency in solar panels.
🤔 Advantages of the GY-8511 module
- Compact and versatile: Easy to integrate into various projects.
- Accurate measurement: Detects UV-A and UV-B radiation.
- Low consumption: Ideal for battery-powered systems.
- Compatible with microcontrollers: Perfectly fits platforms such as Arduino.
📢 Conclusion
The GY-8511 UV sensor module is a valuable tool for measuring and monitoring ultraviolet radiation in technological projects. Its ease of use and accuracy make it perfect for both beginners and experts.
📢 Thanks for exploring the GY-8511 module with me! 🌞
If you have questions, ideas, or projects in mind that include this sensor, feel free to share them in the comments! 📝
🔔 Upcoming Topics: Keep discovering new modules and how to integrate them into your projects. 🚀
🤝 Join our community: Share your experiences and learn from other tech enthusiasts. 💬
📷 Share your achievements: Have you already used UV sensors? Show us your projects in action! 🛠️
🌟 Keep innovating: Creativity is the limit in the world of electronics. Explore and create! 🌈✨
Until next time, and keep building projects that inspire! 💡
Excelente información. Que bueno que el código trae comentarios, son muy útiles.
Congratulations @profwhitetower! You have completed the following achievement on the Hive blockchain And have been rewarded with New badge(s)
Your next target is to reach 21000 upvotes.
You can view your badges on your board and compare yourself to others in the Ranking
If you no longer want to receive notifications, reply to this comment with the word
STOPCheck out our last posts: