Getting Started with Electron Pt 3: How the Hell Does This Thing Work?
written on Busy (beta)
This is the third post in a tutorial series on building applications with Electron. In this post, we'll go over some foundational concepts that are vital for creating Electron apps.
I'm Back!

Well, everyone, it's been quite a while (nearly a year) since I was last active on here, but I wanted to keep working on this series. In the time that has passed since I wrote the first two parts of this tutorial, I was happy to see that people were still occasionally finding and reading my posts.
Anyway, let's get right into it. We left off in Part 2 having understood the tooling of our Electron app - i.e. the tools that allow us to build, run, test, and release our app. We learned what the fields in package.json are used for, and learned how to use the command line tool, npm, to accomplish several of those tasks.
Interestingly, it was only 9 days after I published Part 2 that Facebook announced its open-source alternative to npm, yarn. I've since switched to primarily using yarn due to its compatibility with and improvements over npm, and I'll get into the specifics of switching to yarn in the next post.
As for this post, I know I said in Part 2 that we would dive into the code itself, but we actually need to cover a few key concepts first. These concepts are often overlooked by beginners, who later find themselves confused about the separation of concerns within their Electron app. Fortunately, after this post, you won't have to worry about that.
Brief Refresher: What does this App Do Again?

To keep things in context here, let's do a quick review on what our very simple app does. Upon launch, our app:
- Places an icon in the menubar
- Displays a native notification
- When the menubar icon is clicked, it displays a popup that says "Hello Steemit!"
- When the notification is clicked, it also displays the popup.
You can read more about it in Part 1.
You can also get a full copy of the source code for this app in my GitHub repo here: Github: Simple Electron App.
IPC, and the Main and Renderer Processes
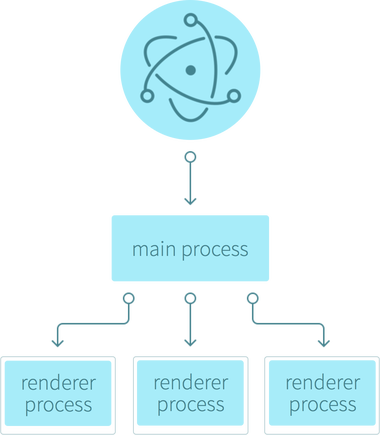
In working with Electron, you'll inevitably run into the concepts of the main and renderer processes, and the task of having them communicate with each other. So what exactly are they?
The Main Process
When our app starts up, once Electron has handled all of its initial setup, it launches the main process. This means that before our user interface code (in index.html and index.js) runs, Electron runs our main process code to setup our app. The main process is responsible for tasks like creating new windows, registering keyboard shortcuts (i.e. the play / pause button for a music player app), creating the menubar in the tray, and much more.
In our example app, main.js is the file where we indicate how Electron should configure the main process of our app. And if you remember from Part 2, it is our package.json file that instructs Electron to use main.js as the entrypoint to our app.
Our main.js file handles the tasks of placing the menubar icon in the operating system's tray, and loading our index.html file into that menubar's popup. It also handles the logic of when to show and hide the menubar's popup to give a native-like experience - i.e. you naturally expect that clicking out of the popup would hide the menu, but if we don't implement this behavior in our app, it will actually stay open.
The Renderer Process
The renderer process, as you might have guessed, is responsible for actually rendering our user interface on the user's screen.
As we covered above, the renderer process gets loaded after our main process loads. This is because the main process is the driving force behind the renderer process - i.e. our main process instructs Electron to create the menubar and its popup, and then load our index.html file into that popup.
And it actually isn't until we load the index.html file into the menu popup that the renderer process runs. This is similar to how a tab in your web browser typically has its own process to run the Javascript on the website you've visited. In our case, the renderer process loads our HTML and runs our Javascript code that displays the notification.
Do they have anything in common?
The main process and the renderer process, for the most part, have their concerns and abilities separated. However, they do share a few key variables / interfaces.
Cameron Nokes wrote a great Medium post on this topic, and the Venn diagram from his post illustrates the situation very well:
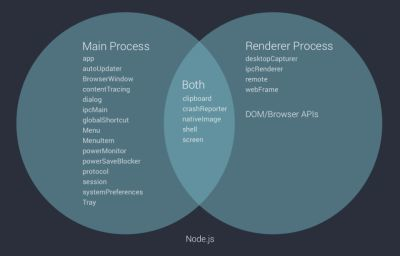
To summarize, they share the following:
- clipboard
- crashReporter
- nativeImage
- shell
- screen
These interfaces are indeed useful in both contexts, such as the case where it's useful for both the main and renderer processes to be able to get information about the user's screen. As we'll cover in the next post, we use the screen module to determine where to place the Steemit popup in relation to the menubar.
Why have a main and renderer process?
Now, why does Electron have multiple processes to begin with? Well, it all comes back to Google.

See, Electron is, for the most part, just a glorified web browser. In fact, it's based on a very popular web browser called Google Chrome, which you have most likely used at one point or another. More specifically, Electron is based on Chromium, which is the browser project underlying Google Chrome. Google open sourced Chromium in 2009 and it's been used for many projects since then.
So to answer our question, Electron has multiple processes because Chromium does. And you might actually be familiar with how Chromium makes use of this very deliberate design to have multiple processes for different concerns.
Have you ever used Google Chrome and noticed that the whole browser doesn't crash if something goes catastrophically wrong in one of your tabs? Typically Chrome will display a picture of a dead folder with a message that says "Something went wrong." Or it will tell you that the tab is unresponsive and ask you if you'd like to wait longer or kill the tab.
Google deliberately designed their browser so that each tab has its own process. Therefore, even if things go haywire on a given website (for example, if a site you visited ran an infinite loop that froze the page), the other tabs will keep churning along as if nothing happened. This is a huge win for user experience, among other things. And at the time this feature was released, it was quite revolutionary. You can read more about Chromium's multiprocess architecture here:
Chromium Multiprocess Architecture.
But what if they need to talk to each other?
While a simple app could get by with little to no communication between the main and renderer processes, it's almost inevitable that most apps will need to eventually transfer data between the two.
For this, we need something called Interprocess Communication, or IPC for short.
IPC is nearly self-explanatory in this case, but just to clarify, it's simply a means of getting two processes to communicate with each other.
And unlike the experience of doing IPC on a lower level, Electron makes it incredibly easy for us to send messages between the processes.
Now, to give you an idea of why our app is concerned with IPC, let's revisit its behavior.
When our app launches, the menubar icon loads in the tray and the notification appears. And as I mentioned above, if you click on the notification, it actually causes the tray menu to open and display the page with the "Hello Steemit!" message.
As we briefly covered above, the main process is responsible for managing things like windows and menubars. Within our app, it's responsible for the task of hiding and showing the popup window that appears under our menubar icon with the "Hello Steemit!" message.
But, if you examine the code, you'll see that we dispatch the notification from the renderer process, in index.js:
const {ipcRenderer} = require('electron');
document.addEventListener('DOMContentLoaded', () => {
   let n = new Notification('You did it!', {body: 'Nice work.'});
   // Tell the notification to show the menubar popup window on click
   n.onclick = () => {ipcRenderer.send('show-window')};
});
In the code above, you can see how we create the notification with its title and body. But it's the next line of code that makes IPC important to our app. We add a function to the notification, onclick, which calls a method named ipcRenderer.send when the notification is clicked.
Electron provides IPC between the main and the renderer processes with two interfaces that you can import from its package:
- ipcRenderer, used in the renderer process to send messages to and receive messages from the main process.
- ipcMain: used in the main process only to receive from the renderer processes
Notice that ipcMain is only used for receiving messages from the renderer processes, not sending to the renderer processes.
Looking at Electron's documentation for ipcMain, we see that the only methods are:
- on
- once
- removeListener
- removeAllListeners
Unlike ipcRenderer, there is no send method. This is despite the fact that ipcRenderer has methods to receive messages, like on and once.
You might be wondering, "What if I find myself in a situation where I want to send something from the main process to a renderer process?".
Well, if you're interested, scroll down to the "Exercise for the Reader" section - it's part of the challenge at the end of this post, and I'll provide the solution in the next post.
In the meantime, a hint: since you can have many different renderer processes (each with different pages), you'd need to specify which one you want to send the message to. So the interface you're looking for is on the popup window we create in main.js.
Now back to our app, as you'd expect, since we're looking to send a message to the main process from the renderer process, we use ipcRenderer.
And if you look at our use of the send function within ipcRenderer, we're sending it a string literal with a value of 'show-window'. This parameter is referred to as the channel that you're sending the message on. It is also often referred to as the event that you're responding to, as evident by the ipcMain.on(event) syntax.
Now here's where it gets a little interesting, because if we go back to our main process in main.js...
ipcMain.on('show-window', () => {
  showWindow();
});
You'll see we have a function in there which receives on that channel and responds to it by invoking our showWindow function.
To be clear, there's nothing special about the name of the channel, 'show-window' - it's not a special value that Electron looks for. We could literally send and receive any channel name that we want. For example, this would be just as valid:
ipcMain.on('open-steemit', () => {
   openSteemit();
});
Make Sense? Good
So hopefully the concepts of the main and renderer process, as well as IPC, are starting to make sense now.
To review, we have our main process, which handles a lot of the setup of our app to create windows and interface with the operating system in other ways. And then we have our renderer process, which displays the UI that the user will interact with.
And any time we need them to interact, it goes as follows:
- If you're in a renderer process and want to send data to the main process, or receive data from it, use ipcRenderer.
- If you're in the main process and want to receive data from your renderer processes, use ipcMain.
- If you're in the main process and want to send data to a renderer process, do the exercise below, or wait until we cover it in the next post.
If you're still a little confused on the differences between the main and renderer processes, Electron's Quick Start documentation describes the topic in a more literal way. To paraphrase: the main process is responsible for creating web pages, and the renderer process is responsible for rendering those web pages.
More information is available in their docs: Quick Start | Electron.
Exercise for the Reader
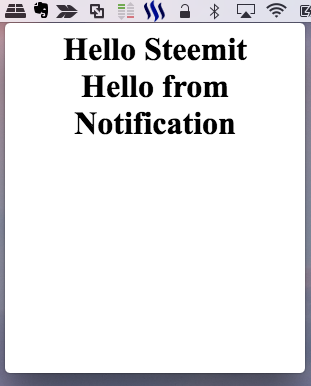
I thought it might be helpful / fun / challenging to provide some relevant exercises with the lesson. Give this one a shot and I'll provide the solution in the next post:
- Using the concepts of IPC from this post, update the main and renderer processes so that clicking the notification appends the message "Hello from Notification" beneath the "Hello Steemit!" text.
That's All For Now
See, that wasn't so bad, was it? Just a little bit of theory to establish a strong base for working with Electron. Now that you understand the roles of the main and renderer processes, we can dig into the code itself - particularly the setup done in the main process to make our tray menu and display the notification.
Until next time!

Hey, I'm Ryan.
I'm a software engineer living in the Bay Area who was introduced to Steemit about a year ago and recently started posting again. You can learn more about me in my intro post.
References
Research
- Chromium Multiprocess Architecture
- Quick Start | Electron
- Deep dive into Electron's main and renderer processes
Images
- Series logo image created by author
- comSysto Blog
- AltPhotos.com
- Wikimedia.org
- browsersaddon.net
- Medium: Cameron Nokes
Thanks for sharing...