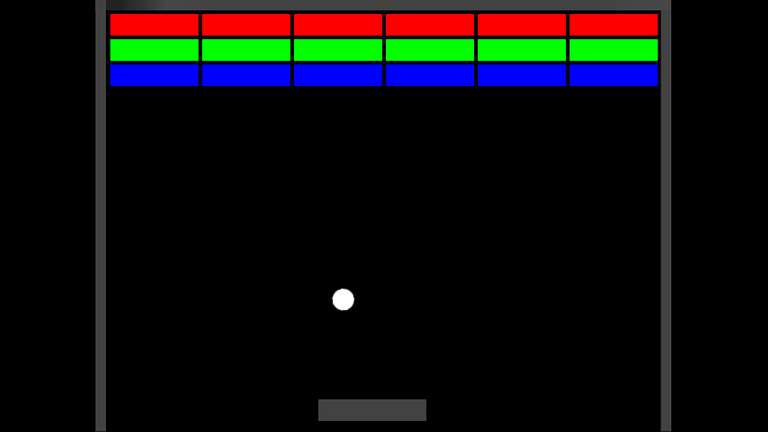
Hello Steemers! In this tutorial I'll show you how to create simple HTML5 game without writing any single line of code. We will create very simple Arkanoid using Scirra's “Construct 2” software (https://www.scirra.com/construct2).
You can try the game here http://casualgames.online/Arkanoid/ So follow the link above, download and install your trial copy and you ready to go!
After installation run Construct and you will see the main window:
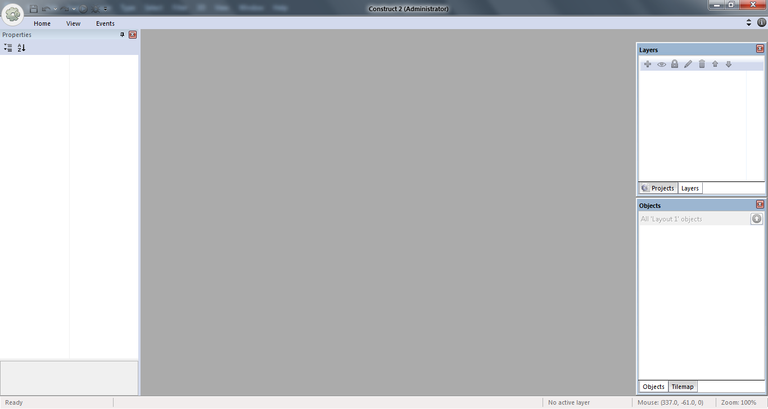
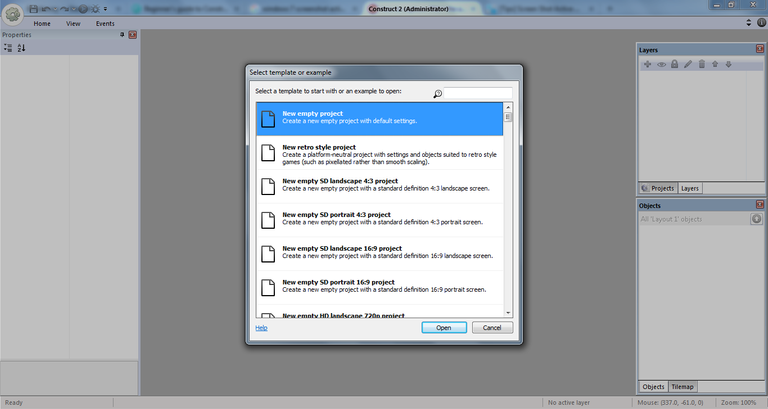
Press CTRL+N on keyboard and you will see dialog window asking you to select template for your project. Click on “New empty project” and press “Open” button.
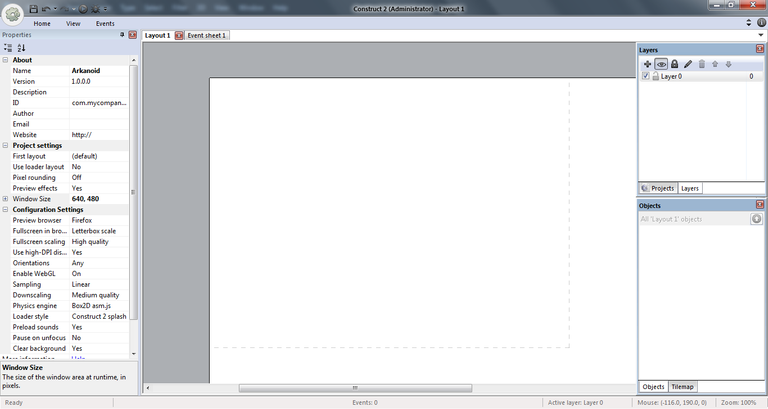
Give a name to your project and set window size at the Properties bar. There are lots of options you can customize but at this point we are interested in these two only. I've used “Arkanoid” for the name and window size of 640x480. Dashed gray border on the Layout 1 defines the area for your game, and its size 640x480 pixels.
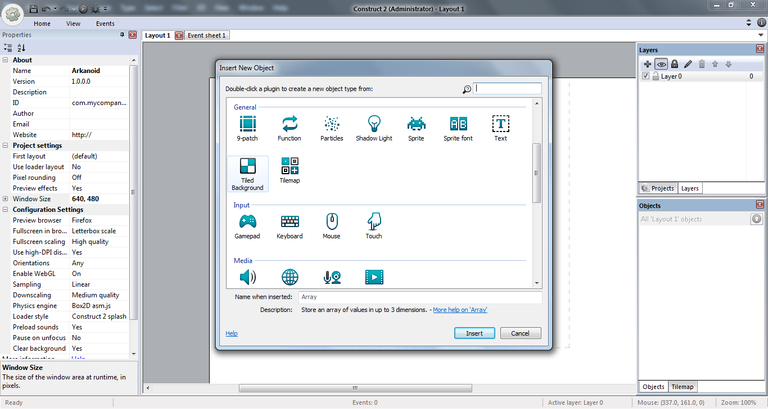
So lets add a solid black background on it. Right click somewhere on the layout and select “Insert new object” from context menu. You will see dialog window with different types of objects - select “Tiled Background” and click “Insert” button. Crosshair will appear to as indicator that you are going to insert new object into your layout. Click somewhere near the middle of the layout.
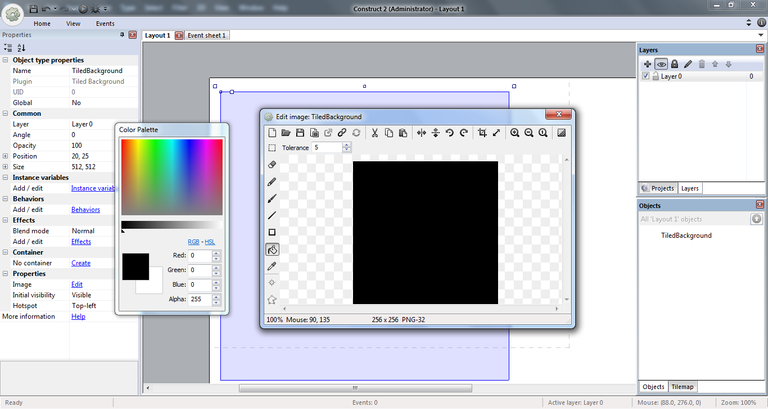
After clicking on the layout another dialog window will pop up. For this tutorial we won't use graphic background. Instead we will simply fill it with black color using “Fill” tool (icon on the left icons bar). Choose black color on the Color Palette and click on on your object to fill it.
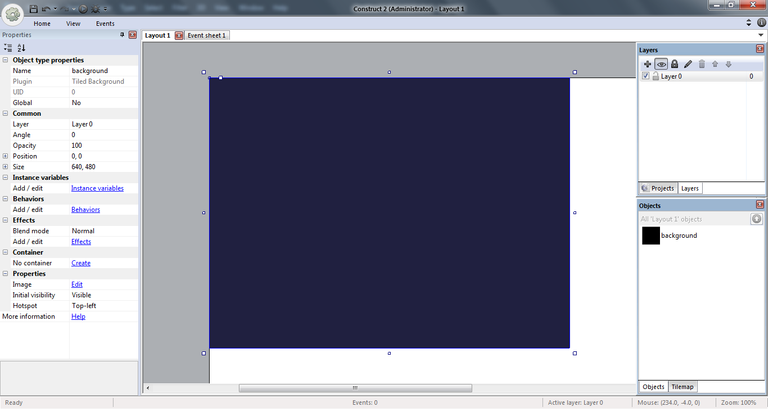
Close this dialog window and you will see your object on the layout. Now you have to set some object properties in the “Properties Bar”. Set name to “background”, position to “0, 0” and size to “640, 480” as shown on this screenshot:
Now we have to “stick” background to the layer so we won't accidentally select it while adding other objects.
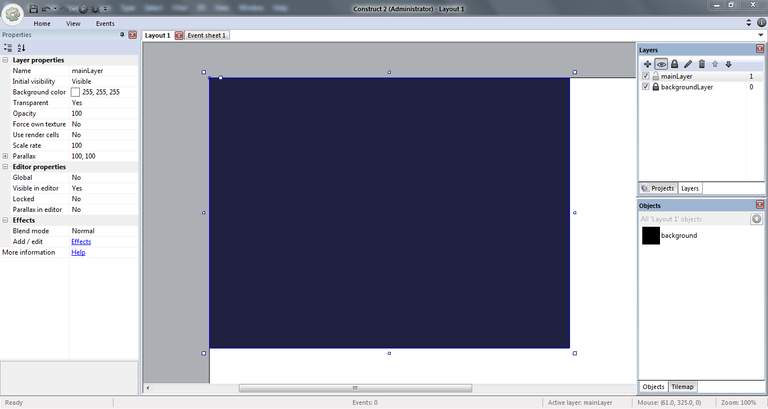
Navigate to the “Layers” tab on the right side of the window. Current layer is called “Layer 0” - let's rename it to “backgroundLayer” and “lock” it by clicking the lock icon right before layer's name.
Now our background is “stuck” to this layer and layer is locked so we can't select it or move it by accident.
Let's create another layer we will be working on. Click “+” icon on the “Layers” tab and second layer will appear right above the one we just locked. Let's rename this layer to “mainLayer”. That's the layer we will use to place all other objects on.
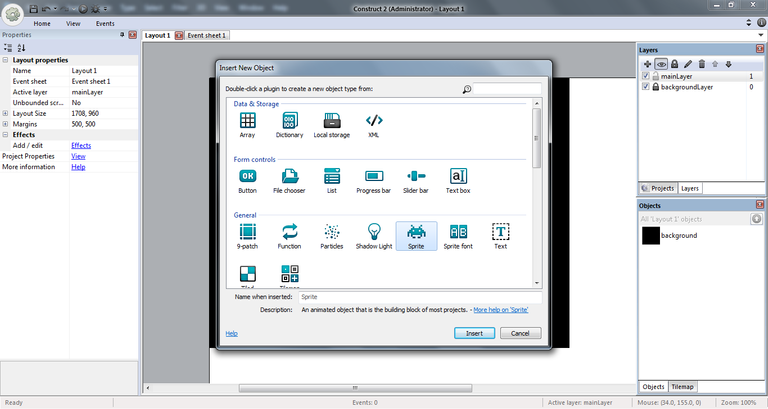
And we will start with adding borders to our game on left, top and right sides. Right-click on layer and select “Insert new object”. Select “Sprite” object, click “Insert” button and place it somewhere in the middle of layer.
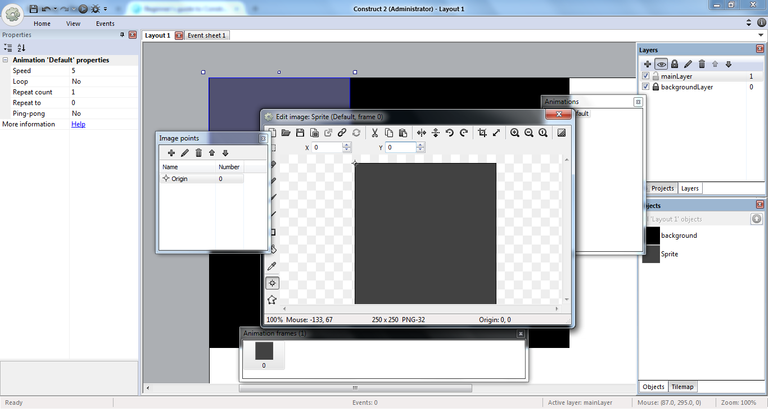
For this object we will change 3 options. First we will fill it with gray color using “Fill” tool. Then we will change it's “origin point” by moving to the left-top corner. Click on “Set origin and image points” icon and set X and Y to 0. You will see that small circle with crosshair moved to the left-top corner. Also we need to change it's size to 12x480. Click on “Resize” icon (double ended arrow) at the top of this dialog window and set width to 12 pixels and height to 480 pixels. Close the window.
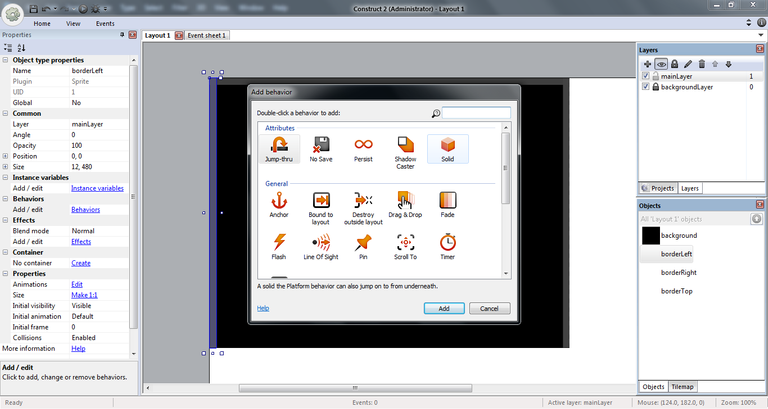
In the “Properties Bar” change object's name to “borderLeft” and set position to “0, 0”. You also have to change the “behavior” for this object. Right under the section called “Behaviors” on the “Properties Bar” you will see the link “Behaviors” - click on it, choose “Solid” and click “Add” button.
Do the same for right and top borders. Right border should be called “borderRight” and position set to “628, 0”. Top border should be called “borderTop” and have size 640x12 (horizontal) and have position set to “0, 0”. Don't forget to change origin and set behaviors for these borders as explained above.
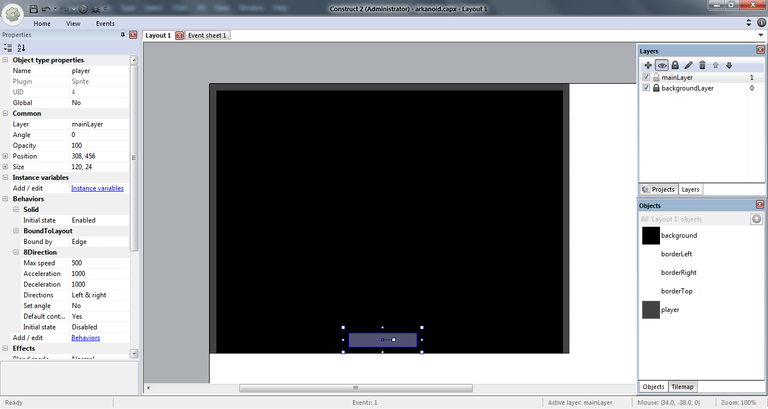
Now it's time to add a rectangle at the bottom which we will move left and right to prevent a ball from falling from the playing field. Add an object, filled with gray color to the layer. Name is “player”, set it's position to “308, 456” and set size to “120, 24” pixels.
You already know how to add “Behaviors” (hint: Properties Bar > Behaviors). For this object we need following: “Solid”, “BoundToLayout” and “8Direction”. The last one has some properties to customize. See the screenshot below and make sure you set them correct.
Next step is adding a ball that will bounce from the rectangle we just added and strike bricks at the top to make them disappear. Download this image http://i.imgur.com/MzXu5oz.png and save it on your local drive.
After that right-click on the layer and choose “Insert new object”. Once dialog window appear choose “Sprite”. In next window click on “Load an image from a file” icon which is second at the top icon bar. Navigate to the directory with ball image and click “Open” button. Close this window and you will see ball object appeared on your main layer. Place this object above the gray rectangle as on the screenshot below:
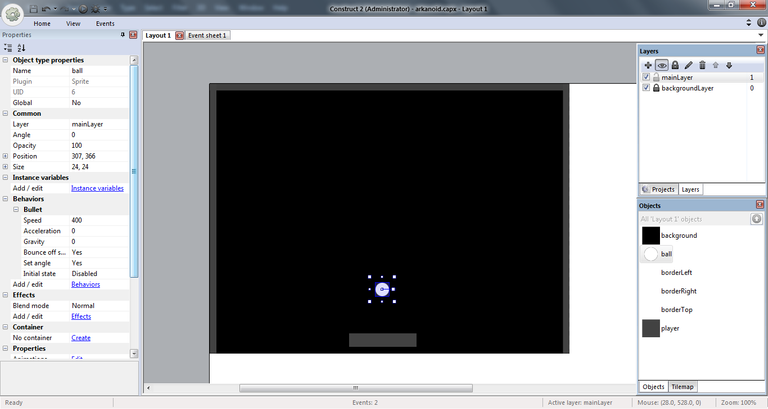
Give it a name of “ball”, set position to “307, 366” and add behavior of “Bullet”. This behavior has some options – just copy values from the screenshot above.
And now the most exciting part begins. We will add some logic to our objects through events and actions using “Event sheet”. So switch to “Event sheet 1” and you will see something like this:
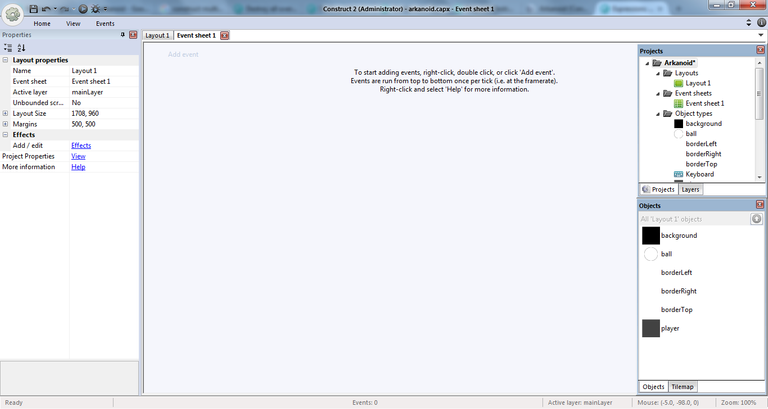
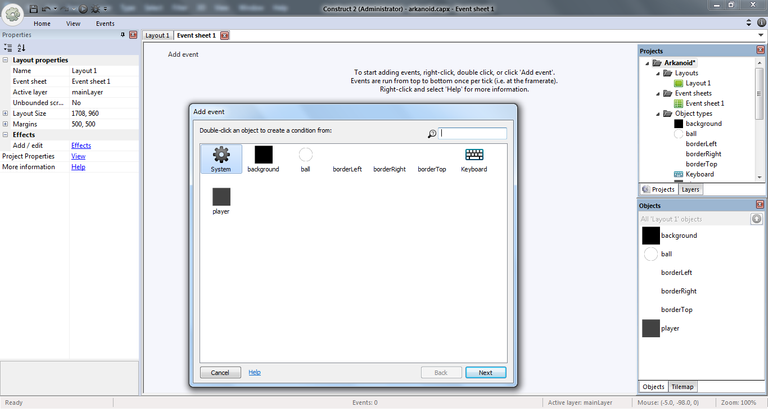
Click on the “Add event” link. In the “Add event” dialog window double-click on “System” icon, then scroll page down and find “On start of layout” event and double-click on it.
The event should be added to your events list under the number 1.
Now we have to enable both – “player” object and “ball” object (as we set them both disabled in their properties).
Click “Add action” link right after the event you've just added. In this dialog window select “player” object and click “Next” button.
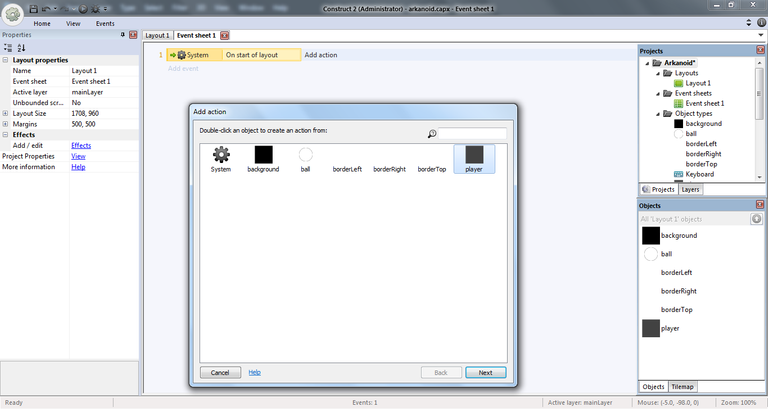
Now select “Set enabled” option for this object and once again click “Next” button.
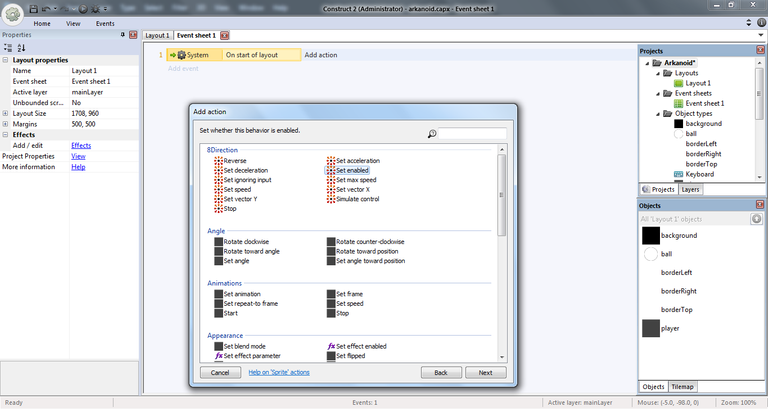
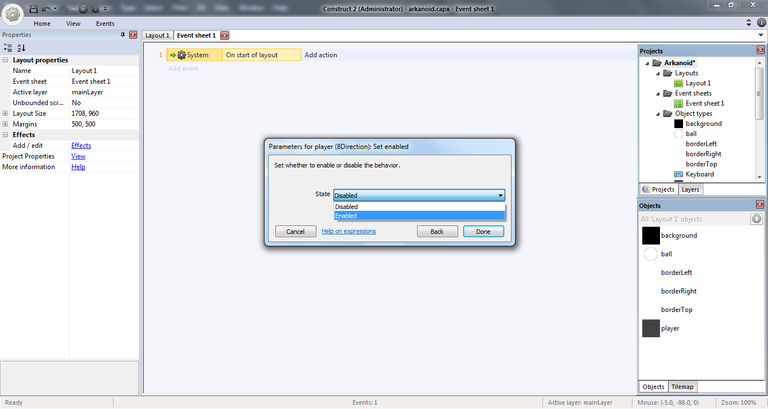
In the appeared window set state to “Enabled” and click “Done”.
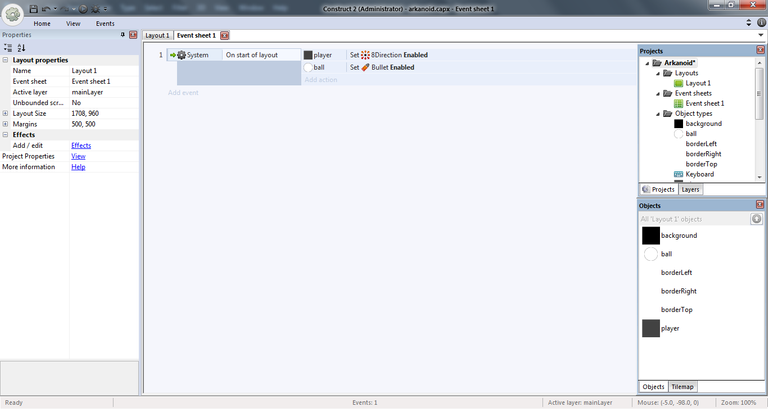
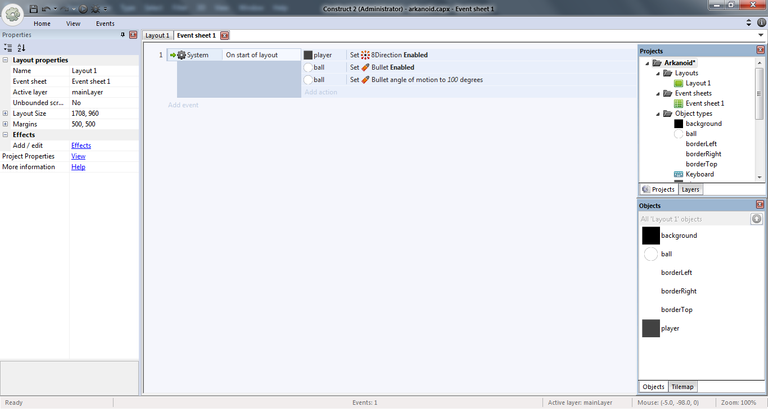
Do the same for “ball” object. The result should be same as shown on this screenshot:
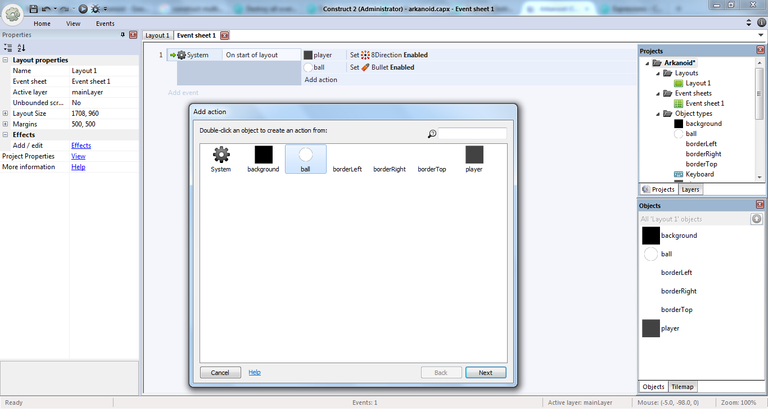
And you should add one more action for the “ball” object. Click “Add action” and select “ball” object from dialog window.
Once ball selected click “Next” and select “Set angle of motion” option and click “Next” again.
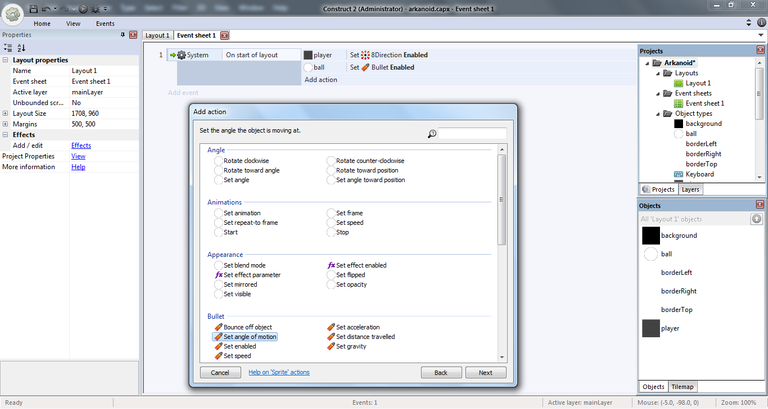
In the next window set angle of motion to 100 and click “Done”.
And add an event for ball once it falls from the playing field. Just click “Add event”, select “ball” object and hit “Next” button. On the next window find the event “Is outside layout” and double-click on it.
Now add action to this condition. Click “Add action” link, select “System” and click “Next”. On the next window find action “Restart layout” and double-click it. That's it, your game will restart once you miss the ball.
At this point you can finally test your “game” to see if ball is moving across the playing field, bouncing from left, top and right borders as well as from our rectangle which should move to the left and right when press “Left” and “Right” keys on your keyboard. So find the “Run layout” button at the top of Construct window (looks like “play button”) and hit it. Your “game” will open in your default browser (hint: refresh browser window if ball has fallen out of screen).
Now it's time to start adding bricks. There are will be 3 lines with 6 bricks in each. We will start from top.
So go black to your “Layout 1” tab and right-click on layer to add new object. Fill it with red color and place somewhere at the top. In the “Properties Bar” set name to “brick1”, position “65, 28”, size “98, 24” and behavior of “Solid”.
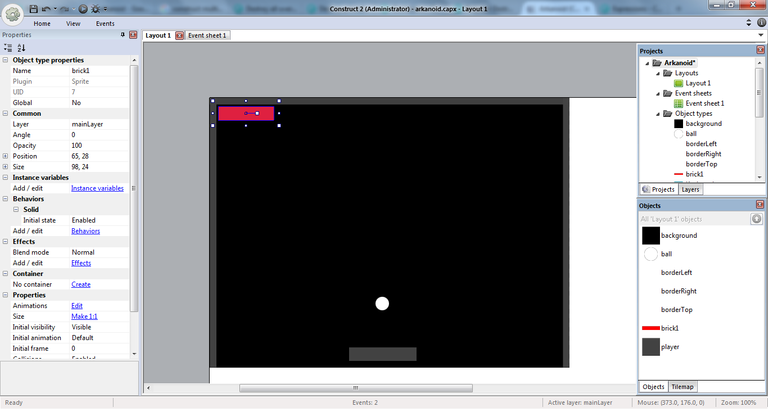
To add 5 more to this line simply right click on this brick and select “Clone object type”. This will create another brick with same properties and name “brick2” (important!). Place this brick in-line right after first. Now clone second brick and you will get third with same properties and name “brick3”. Do same until you get all 6 red bricks in one line as on this screenshot:
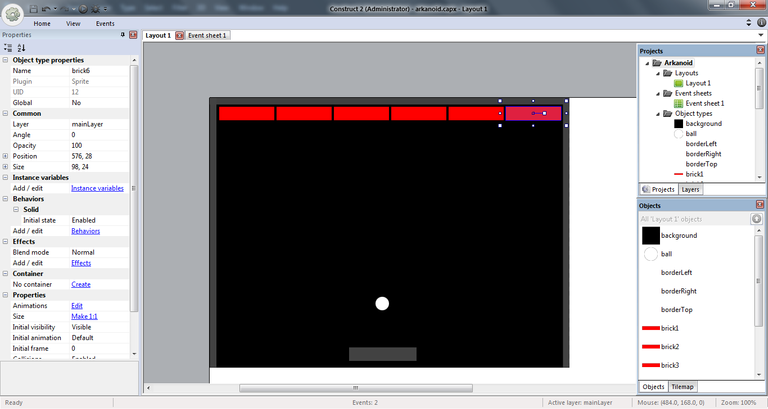
Now start with second line of green bricks. You can't clone red bricks to create green bricks so right click on layer and insert new object filled with green color. Name it “brick7”, set same size “98, 24” and add behavior of “Solid”. Place it right below the first red brick and start cloning them until you get 6 green bricks with names from “brick7” to “brick12”.
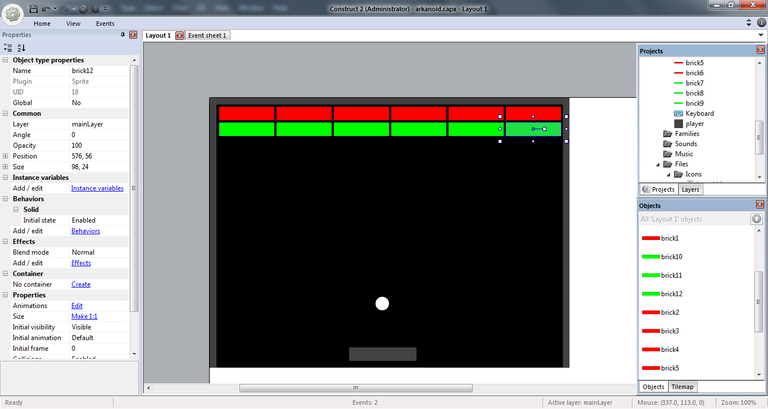
Last line of blue bricks created exactly as line with green bricks. First blue brick should have name of “brick13” and same size and behavior as previous. Once first blue brick added – clone it until you got 6 of them. So the first blue brick should have name “brick13” and last - “brick18”.
That's it, you have all 18 bricks.
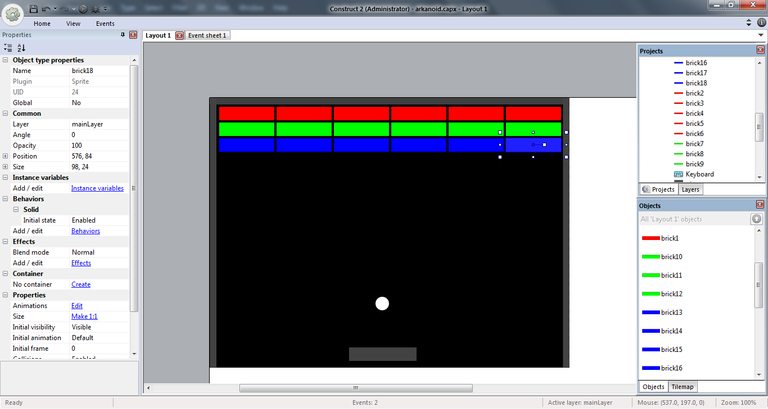
We are almost done. All we have to do is to add some logic to destroy bricks when ball hits them. So switch back to the “Event sheet”.
What you going to do now is adding destroy action to each brick when it collides with ball. I know, there is a more elegant way to do this but now we will stick to adding this action to each brick just to keep this tutorial as simple as possible. So let's start:
Click “Add event” link, choose “ball object” and click “Next button”.
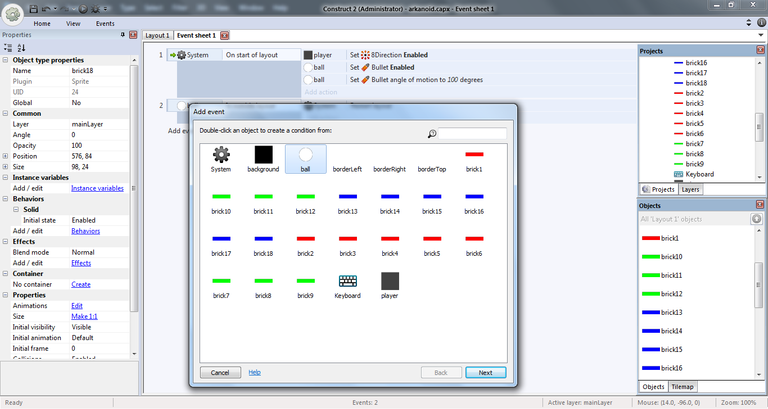
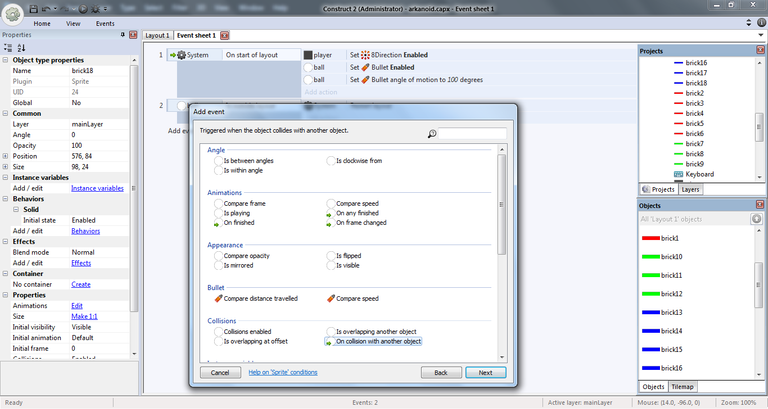
Select event “On collision with another object” and hit “Next” button. In next window select “brick1” object and click “Done” button.
You will see this condition added under number of 3.
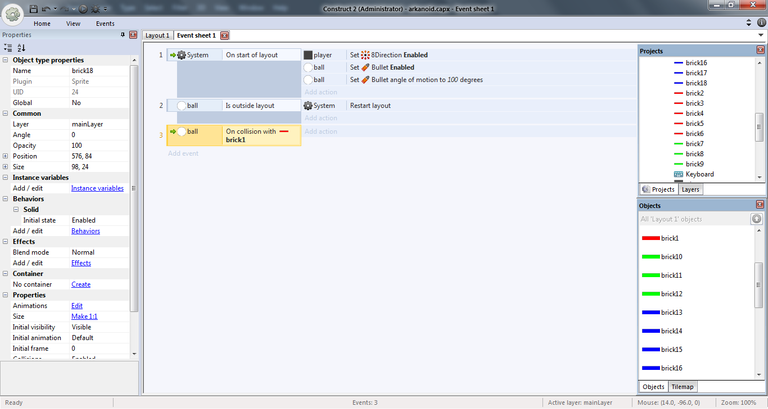
Add action to this condition by clicking “Add action” link.
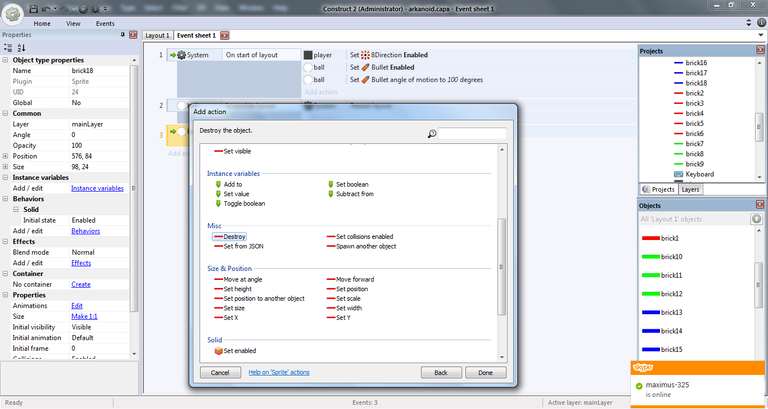
In the dialog window select “brick1” object and hit “Next” button. In the next window find “Destroy” action, select it and click “Done” button.
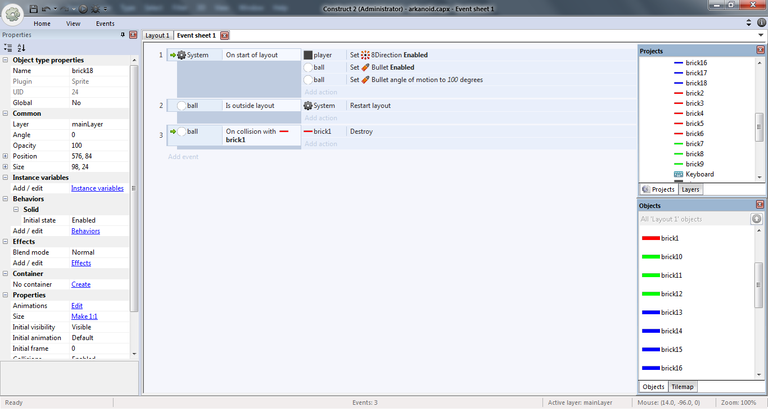
After that your event should look like this:
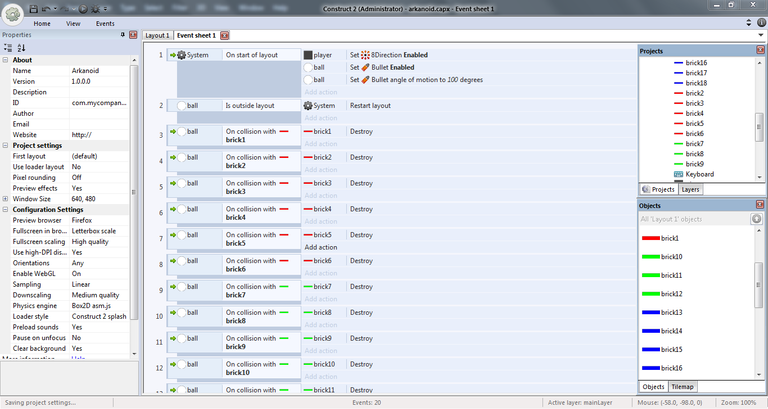
Do exact same for the next 17 bricks, just replacing the brick object. Once you finish with all 18 bricks yous “Events sheet” should look like this.
At this point you can launch your game by hitting “Run layout” button and everything should work – ball will bounce and destroy bricks. But there is a small issue: once all bricks will be destroyed – the game won't end or restart. So we need a counter that knows how many bricks left and once you destroy them all – restart the game.
Lets create this counter.
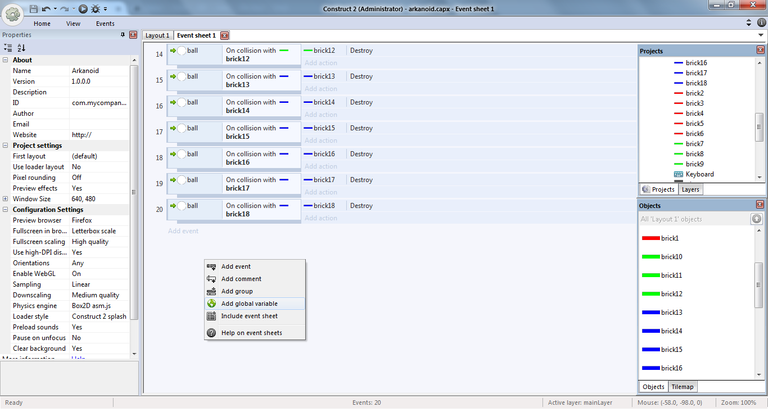
Scroll “Events sheet” to the bottom and right-click on empty space. In context menu select “Add global variable”.
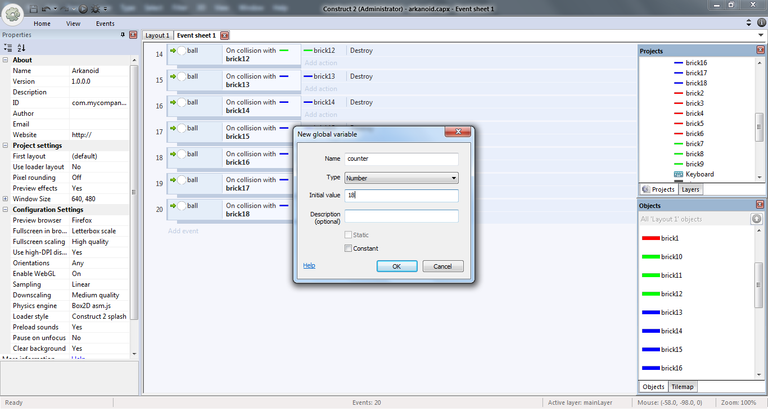
Name it “counter”, set initial value to 18 (we have 18 bricks) and click “OK” button.
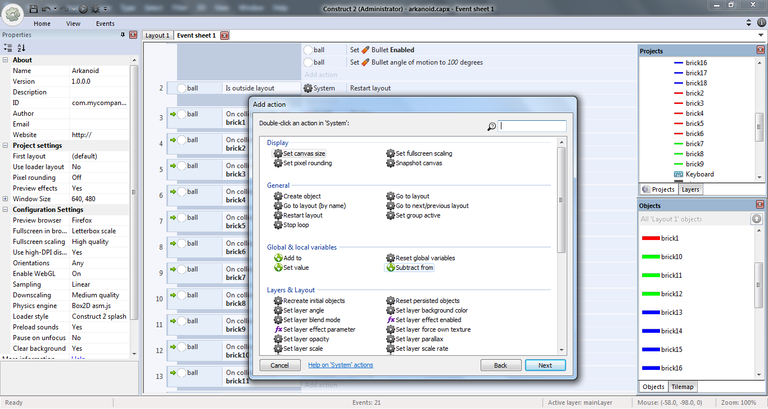
Now on each collision of ball with brick we have to subtract 1 from this variable. So for each collision event you should add subtract action after destroy action.
Lets start from first collision of ball with brick1 object. Right after destroy action you will find link “Add action” - click on it, in dialog window find “Subtract from” action and double-click on it.
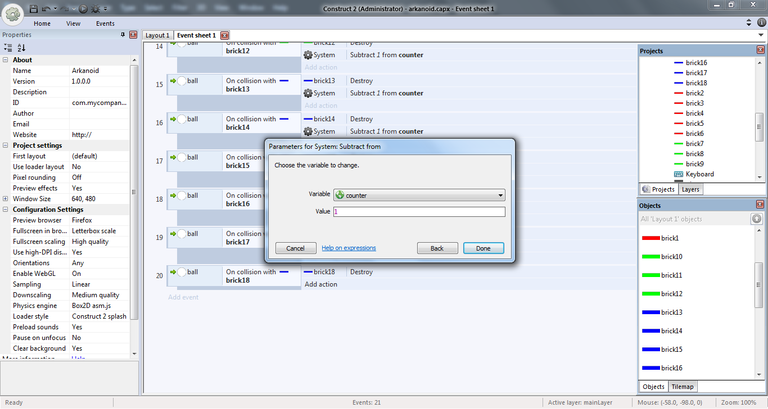
In the next window select “counter” variable and set value to 1. This action will subtract 1 from counter once brick is destroyed.
So now we have to add an event that fires when counter equals 0. Click “Add event” link, select “System” and hit “Next” button. In the next window find “Compare variable” condition and double-click on it.
Select “counter” variable, set comparison to “= Equal to” and value to “0”. Click “Done” button.
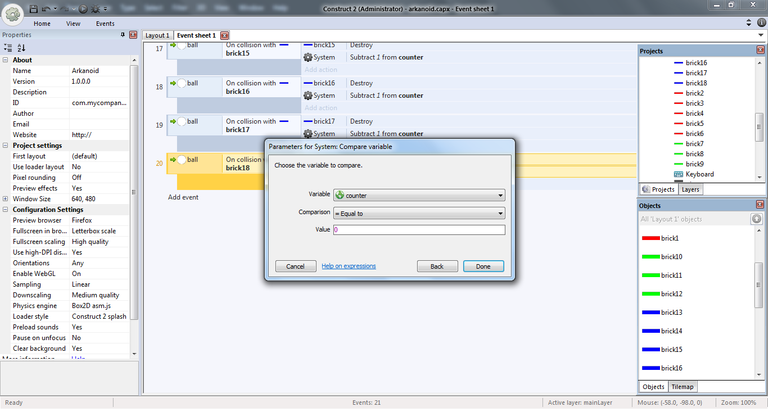
Click “Add action” link for this condition, select “System” and click “Next” button. On the next window double-click on “Restart layout” action.
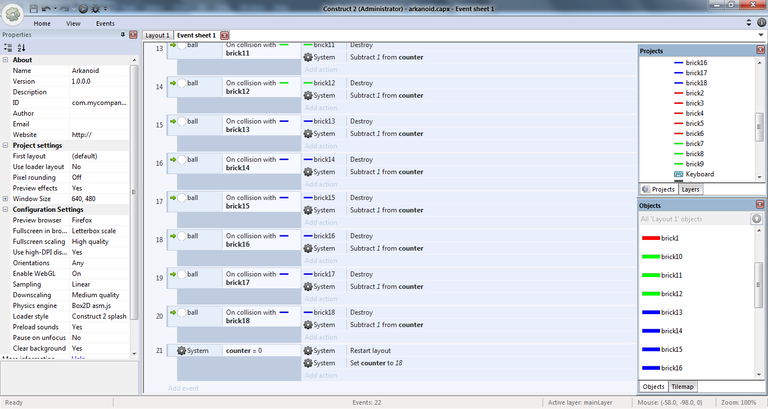
Also, add one more action to this condition. Click “Add action”, select “System” and hit “Next” button. On next window double-click on “Set value” action and set value of counter to 18. So you will get this (event #21):
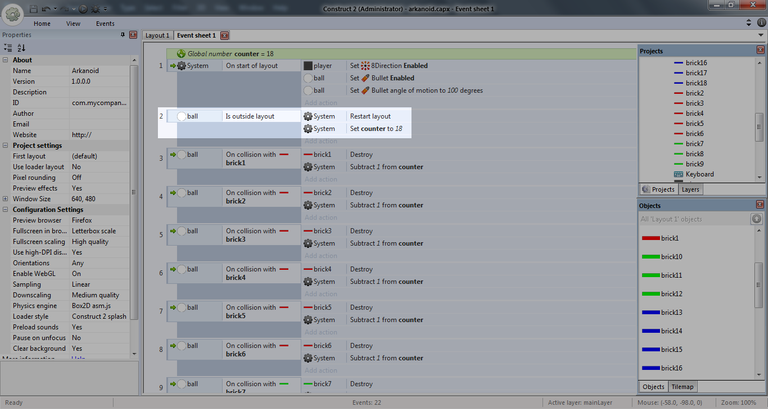
And we need to set counter to 18 on event #2 as well. So scroll your “Event sheet” to the top and add it as shown on this screenshot:
And that's it. Finally! Now your Arkanoid game is ready!
Hit “Run layout” and enjoy your very first HTML5 game made without any single line of code.
If you have any questions - ask here.
I'm looking forward to write part 2 where I can show you how to add sounds, "Start game" screen, "Game over" screen and so on...
This is a really good tutorial. Very helpful; thanks for sharing!